The patient chart — Patient Information
One screen for everything administrative about a patient: open it from the header strip, then work through its tabs — demographics, insurance and eligibility, appointments, questionnaires, prescriptions, forms and letters, prior auth, billing and adjustments, and the outbound communications log.
The patient chart — Patient Information
One screen for everything administrative about a patient: open it from the header strip, then work through its tabs — demographics, insurance and eligibility, appointments, questionnaires, prescriptions, forms and letters, prior auth, billing and adjustments, and the outbound communications log.
One screen for everything administrative about a patient
Coverage, appointments, paperwork, prescriptions, letters, prior authorizations, money, and outbound messages all live on a single screen called Patient Information. It opens from the patient’s name in the chart header strip, and for a physician or an admin it is a full page in its own workspace tab — not a dialog you have to close before you can do anything else.
-
Hover before you click.
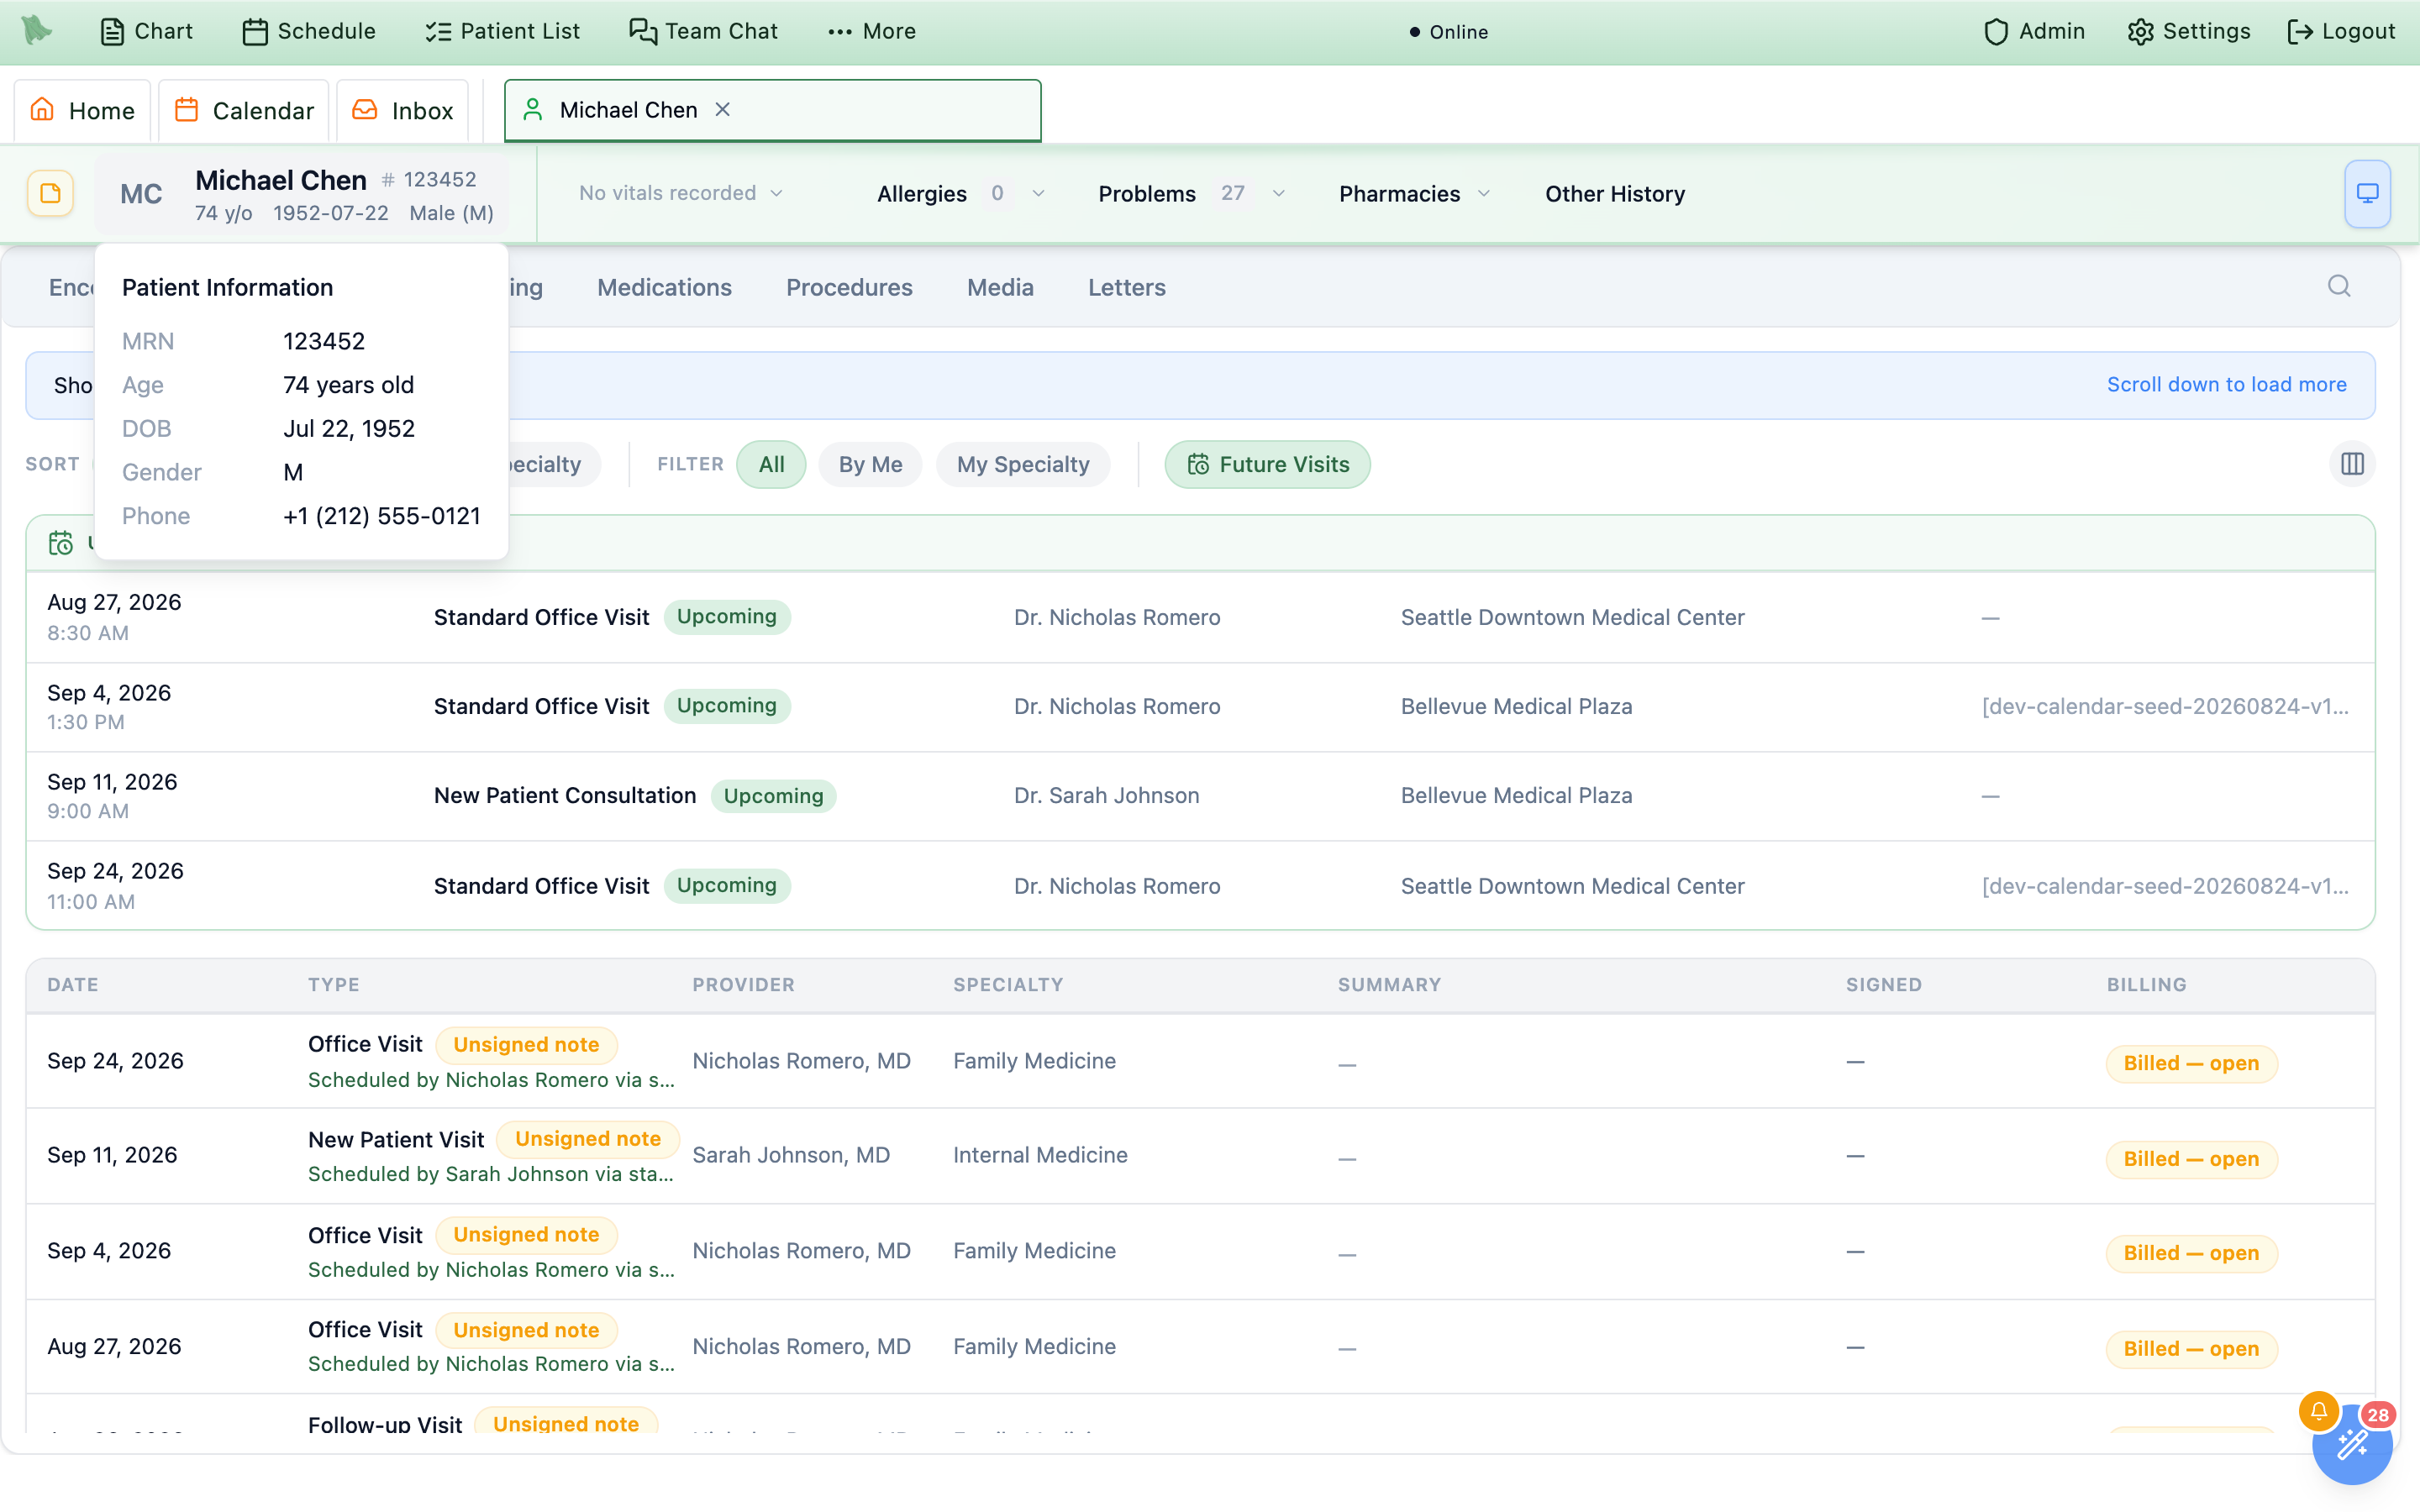
The avatar-and-name block is one button,
Open patient information workspace. Hovering it pops aPatient Informationtooltip withMRN,Age,DOB,Gender,Phone,Secondary, andAddress— rows with nothing on file are left out, so a short tooltip means a thin record. For a quick phone number or date of birth that is usually enough. -
Click to open the workspace.
Physicians and admins land on the page
/dashboard/patient/{id}/info, which registers its own workspace tab titledInfo: Michael Chen. The patient’s chart tab stays open beside it, so you can move between the two without losing either. Staff need a patient-chart permission (patient.vieworpatient.manage) to load that page; without one the same click opens an overlay dialog carrying identical content. There is no keyboard shortcut for it. -
Read the header.
The kicker
PATIENT INFORMATION, the avatar initials, the name, and four chips —MRN,DOB,Age,Sex. A chip is dropped when its field is empty. Save a demographics change and the chips update on the spot, with no reload. -
Navigate with the sidebar.
The page uses a fixed left sidebar under four uppercase headings, in this order:
PATIENT,CARE WORKFLOW,FINANCIAL,ADMINISTRATION. A group is hidden when none of its tabs are available to you; the financial and administration tabs depend on your access. -
Deep-link to a tab with
?section=. The active section is mirrored into the URL, so a link can land on the tab you mean:demographics,more-demographics,implantable-devices,goals-concerns,appointments,chart-sharing,forms-letters,media,prescriptions,prior-auth,questionnaires,custom-billing-rules,insurance,billing-adjustments,health-export,outbound-comms. Anything else falls back toDemographics, which is also where the screen opens the first time with no?section=, and older links written as?section=billingrewrite themselves tocustom-billing-ruleson arrival. Switching sections replaces the URL rather than pushing it, so Back does not walk you through tabs, and a round trip out to a note or the billing workspace returns you to the section you left. Coming back to a patient’sInfotab later in the same browser tab reopens the section you were last on (for exampleCustom Billing Rules), not Demographics — including a section a link opened, such asCustom Billing Rulesopened from Billing. -
In the overlay dialog it is one tab row.
The dialog shows the same items in the same order, flattened into a single row across the top with no group headings, scrolling sideways when it overflows. Close it with Esc, a backdrop click, or
Close. With unsavedCustom Billing Rulesedits it asks before closing; other open edit forms are not checked, so finish or cancel them before you dismiss it.
Seventeen tabs exist in total. Which you see depends on your role, your permissions, and which optional features your practice has turned on in Admin → Additional Features (four tabs are off until then):
| Tab | Group | ?section= | Who sees it |
|---|---|---|---|
Demographics | Patient | demographics | Everyone. The default tab. Edit shows only for users whose save can succeed. |
Goals & health concerns | Patient | goals-concerns | Only when the practice turns on Goals, health concerns and health status; then physicians, admins, and staff with patient.view. See Goals, health concerns & health status. |
Implantable devices | Patient | implantable-devices | Only when the practice turns on Implantable devices; then physicians, admins, and staff with patient.view. See Implantable devices. |
More demographics | Patient | more-demographics | Only when the practice turns on More demographics; editing needs patient.manage. See More demographics. |
Appointments | Care workflow | appointments | Admins, physicians, or staff with scheduling.view. |
Chart Sharing | Care workflow | chart-sharing | Admins, physicians, or staff with records.share — see Chart Sharing. |
Forms & Letters | Care workflow | forms-letters | Anyone with an active provider record — not a permission, so an admin who is not a provider does not get it. |
Media | Care workflow | media | Physicians and admins; staff with document-viewing, triage, or import permission. |
Prescriptions | Care workflow | prescriptions | Admins, physicians, or staff with prescription.view. |
Prior Auth | Care workflow | prior-auth | Admins, physicians, or staff with billing.prior_auth.manage. |
Homework | Care workflow | — | Everyone. |
Questionnaires | Care workflow | questionnaires | Everyone; sending and rule editing need patient.manage. |
Custom Billing Rules | Financial | custom-billing-rules | Financial access plus admin, or staff with billing.settings.manage. |
Insurance | Financial | insurance | Everyone; the money controls and eligibility tools need financial access. |
Invoices & Charges | Financial | billing-adjustments | Financial access plus admin, or staff with billing.charges.manage, billing.ar.manage, or billing.sensitive. |
Export Health Information | Administration | health-export | Only when the practice turns on Export health information; then physicians, admins, and staff with records.export. See Exporting one patient’s record. |
Outbound Comms | Administration | outbound-comms | Admins, or staff with admin.outbound_comms.view. Never a plain physician. |
A plain physician — not an admin, not a staff profile — therefore works with ten tabs: Demographics, Appointments, Chart Sharing, Forms & Letters, Media, Prescriptions, Prior Auth, Homework, Questionnaires, and Insurance — plus Goals & health concerns, Implantable devices, More demographics and Export Health Information for each of those features the practice has turned on. Within each group the tabs keep the order shown above. Which permission grants what is set per staff member under Staff & assistants. Other places open this same surface as an overlay: the primary insurance cell in a Patient List (it reads the payer name, or Add insurance, and opens onto Insurance), and every patient name in the Billing workspace, which opens it as the Patient billing dialog — billing tabs only (Demographics, Prior Auth, Custom Billing Rules, Insurance, Invoices & Charges, as permissions allow), with an Open chart button for users who can open charts (see the billing workspace). A claim’s Edit demographics quick-fix opens Demographics already in edit mode.
Demographics is the exception — it renders from the record the page already has). Each tab also runs inside its own boundary: if one fails, the sidebar, header, and every other tab keep working, and the failed panel shows {Tab} could not be displayed. with a Retry button — Custom billing rules could not be displayed., Invoices & charges could not be displayed., and so on. While the page itself loads you get a grey skeleton; a patient record that cannot be read at all gives Patient information could not be loaded.Open the patient’s documents without leaving Patient Information
Media under Care workflow opens the same document and image workspace as the chart’s Media tab. Staff need document-viewing, triage, or import access to see it; upload, removal, and insurance-card scanning follow their own permissions. It is not included in the billing-only Patient billing dialog. Eligible payment staff also have Take payment entry points from the patient header and billing information; see Payments & card readers.
Demographics: read the cards, edit the record
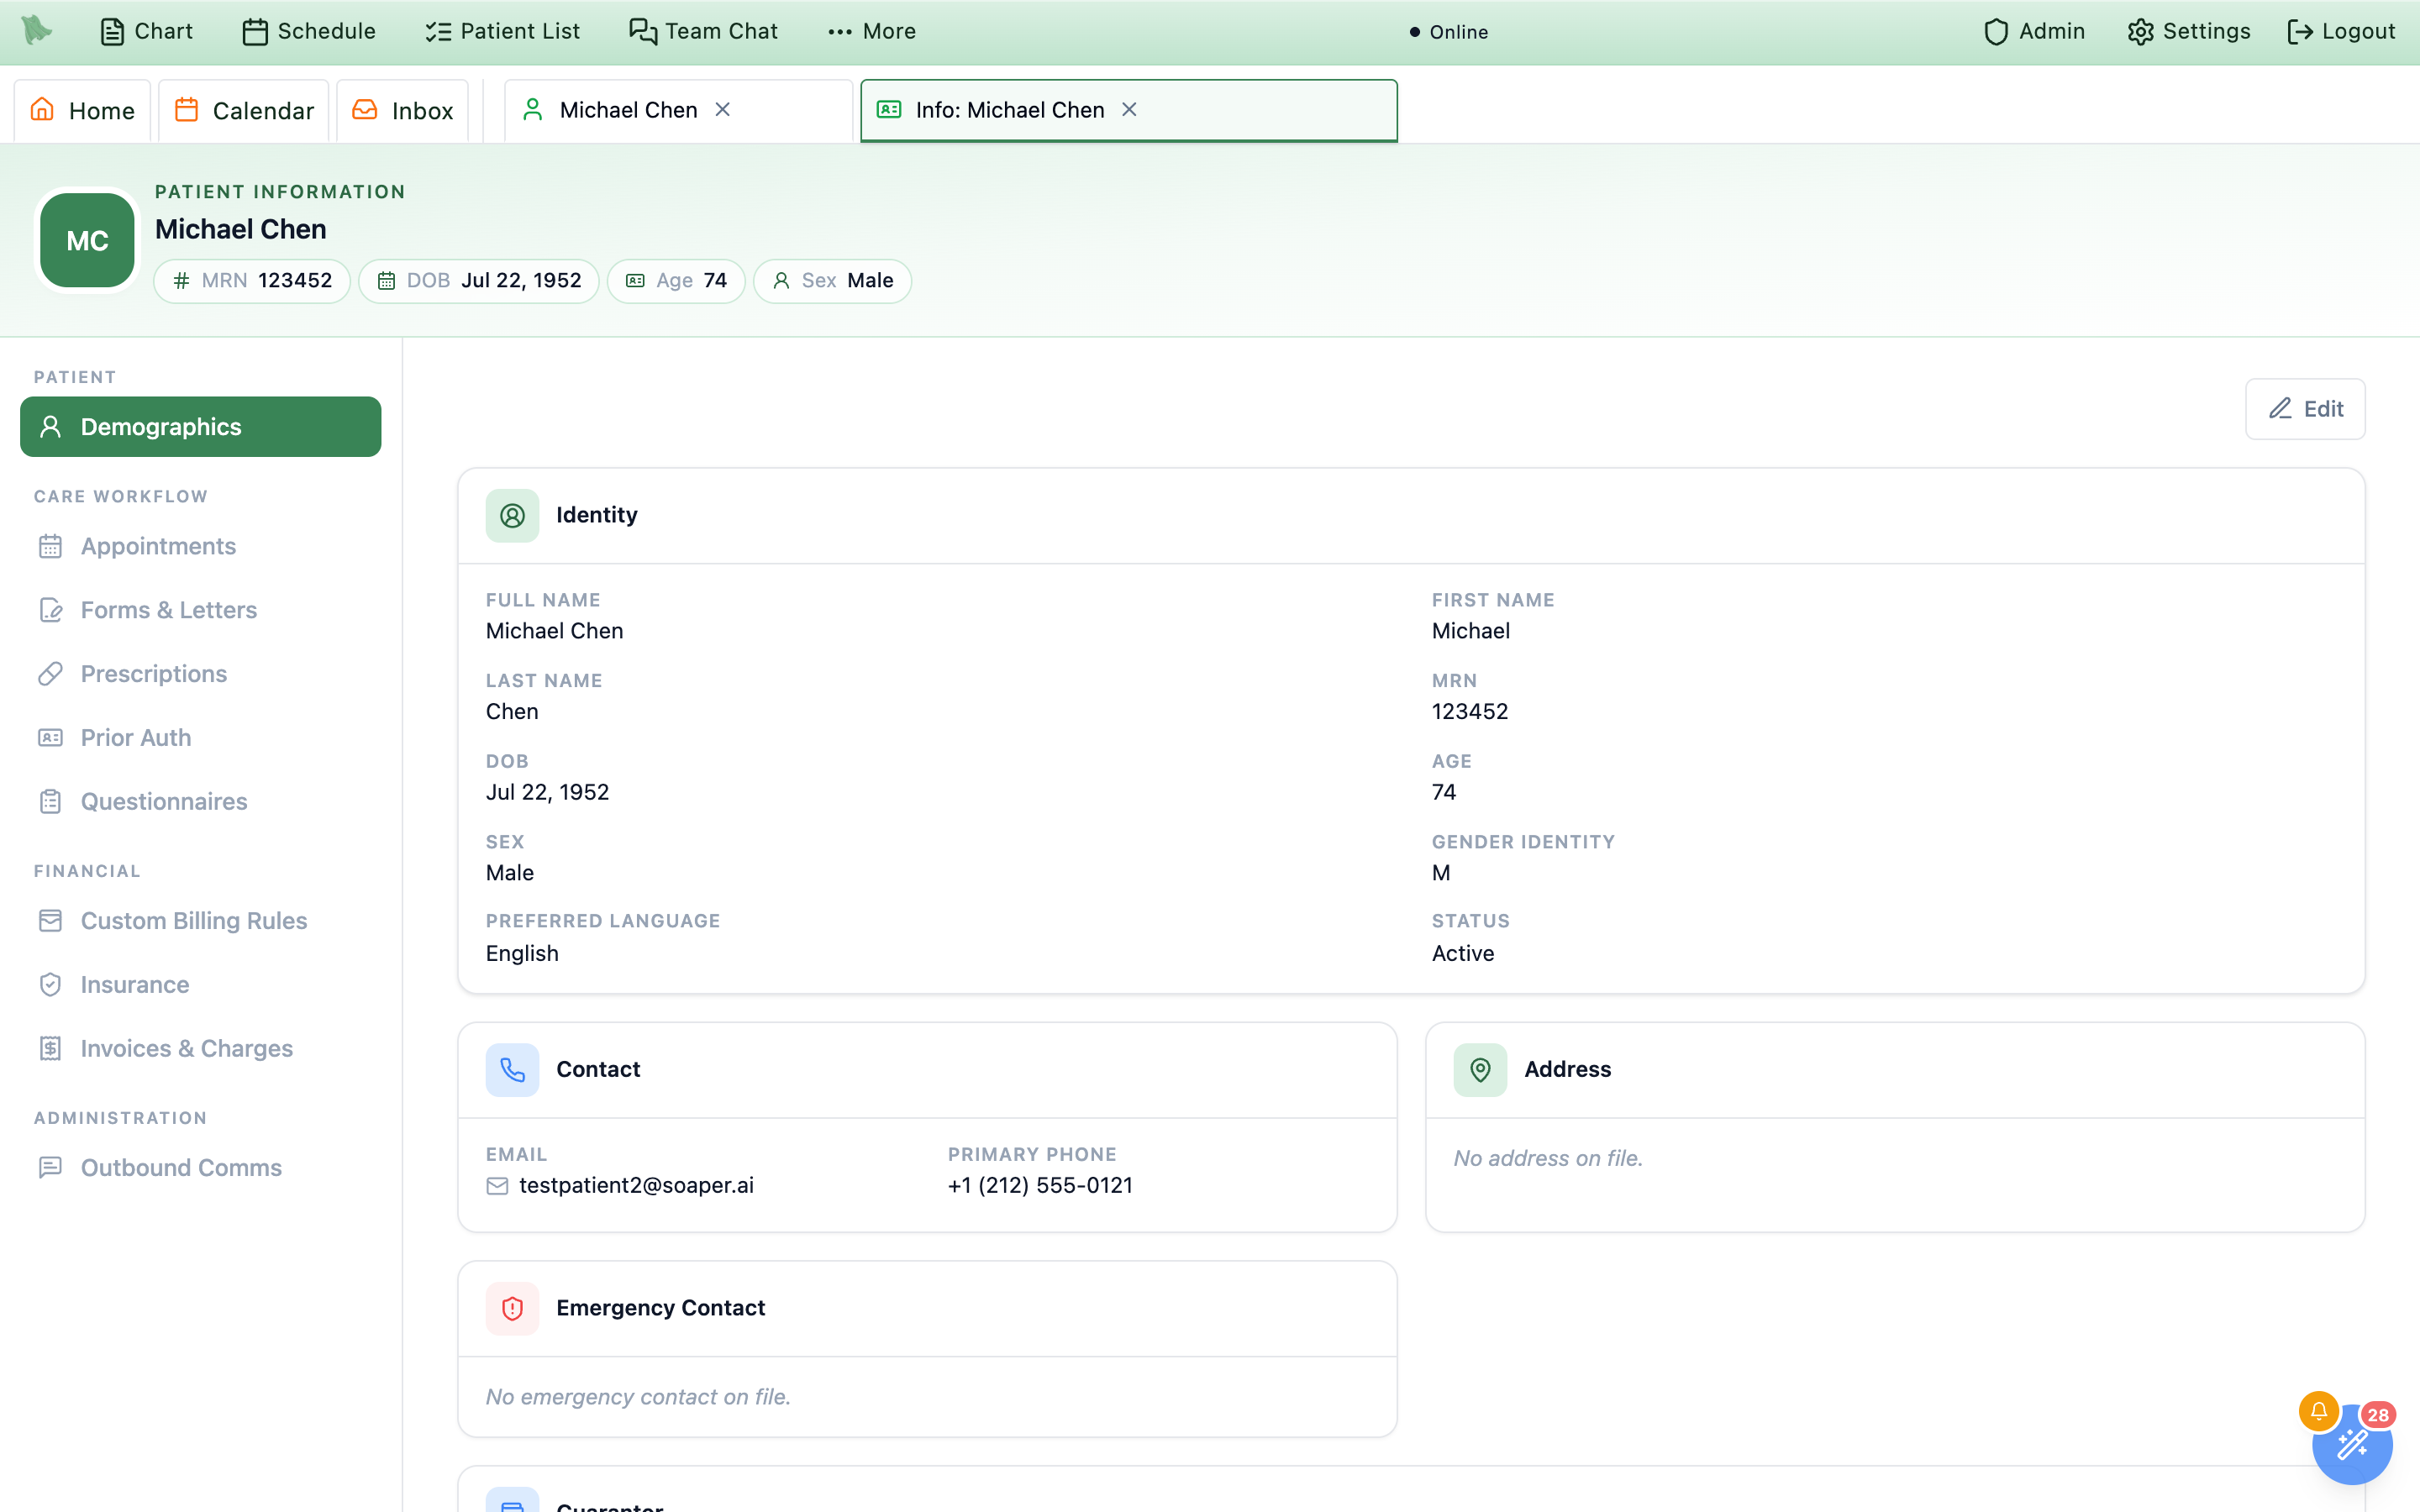
Demographics is where Patient Information opens: six read-only cards with a single right-aligned Edit button above them. The edit form replaces those cards in place — it is not a dialog.
-
Read the six cards.
Identity(Full name,First name,Preferred name,Pronounswhen the practice uses them,Middle name,Last name,MRN,DOB,Age,Sex,Gender identity,Marital status,Preferred language,Status, and theSSNrow described below),Contact(Email, both phones, andLast portal login),Address,Emergency Contact,Parent / Guardian, andGuarantor. A field with no value is dropped rather than shown blank, and phone numbers are reformatted for reading as(502) 555-0134. -
Read the empty states carefully.
AddressandEmergency Contactkeep their headings when empty and say so —No address on file.andNo emergency contact on file.Parent / GuardianandGuarantorhave no such hint, so an entirely empty one disappears from the page. A missing card means nothing has been recorded, not that something failed to load. -
Know two vocabularies.
Statusis one ofActive,Inactive,Prospective,Discharged,Transferred out, orDeceased.Marital statusis one ofSingle,Married,Divorced,Widowed,Separated,Annulled,Domestic partner,Unmarried, orUnknown. -
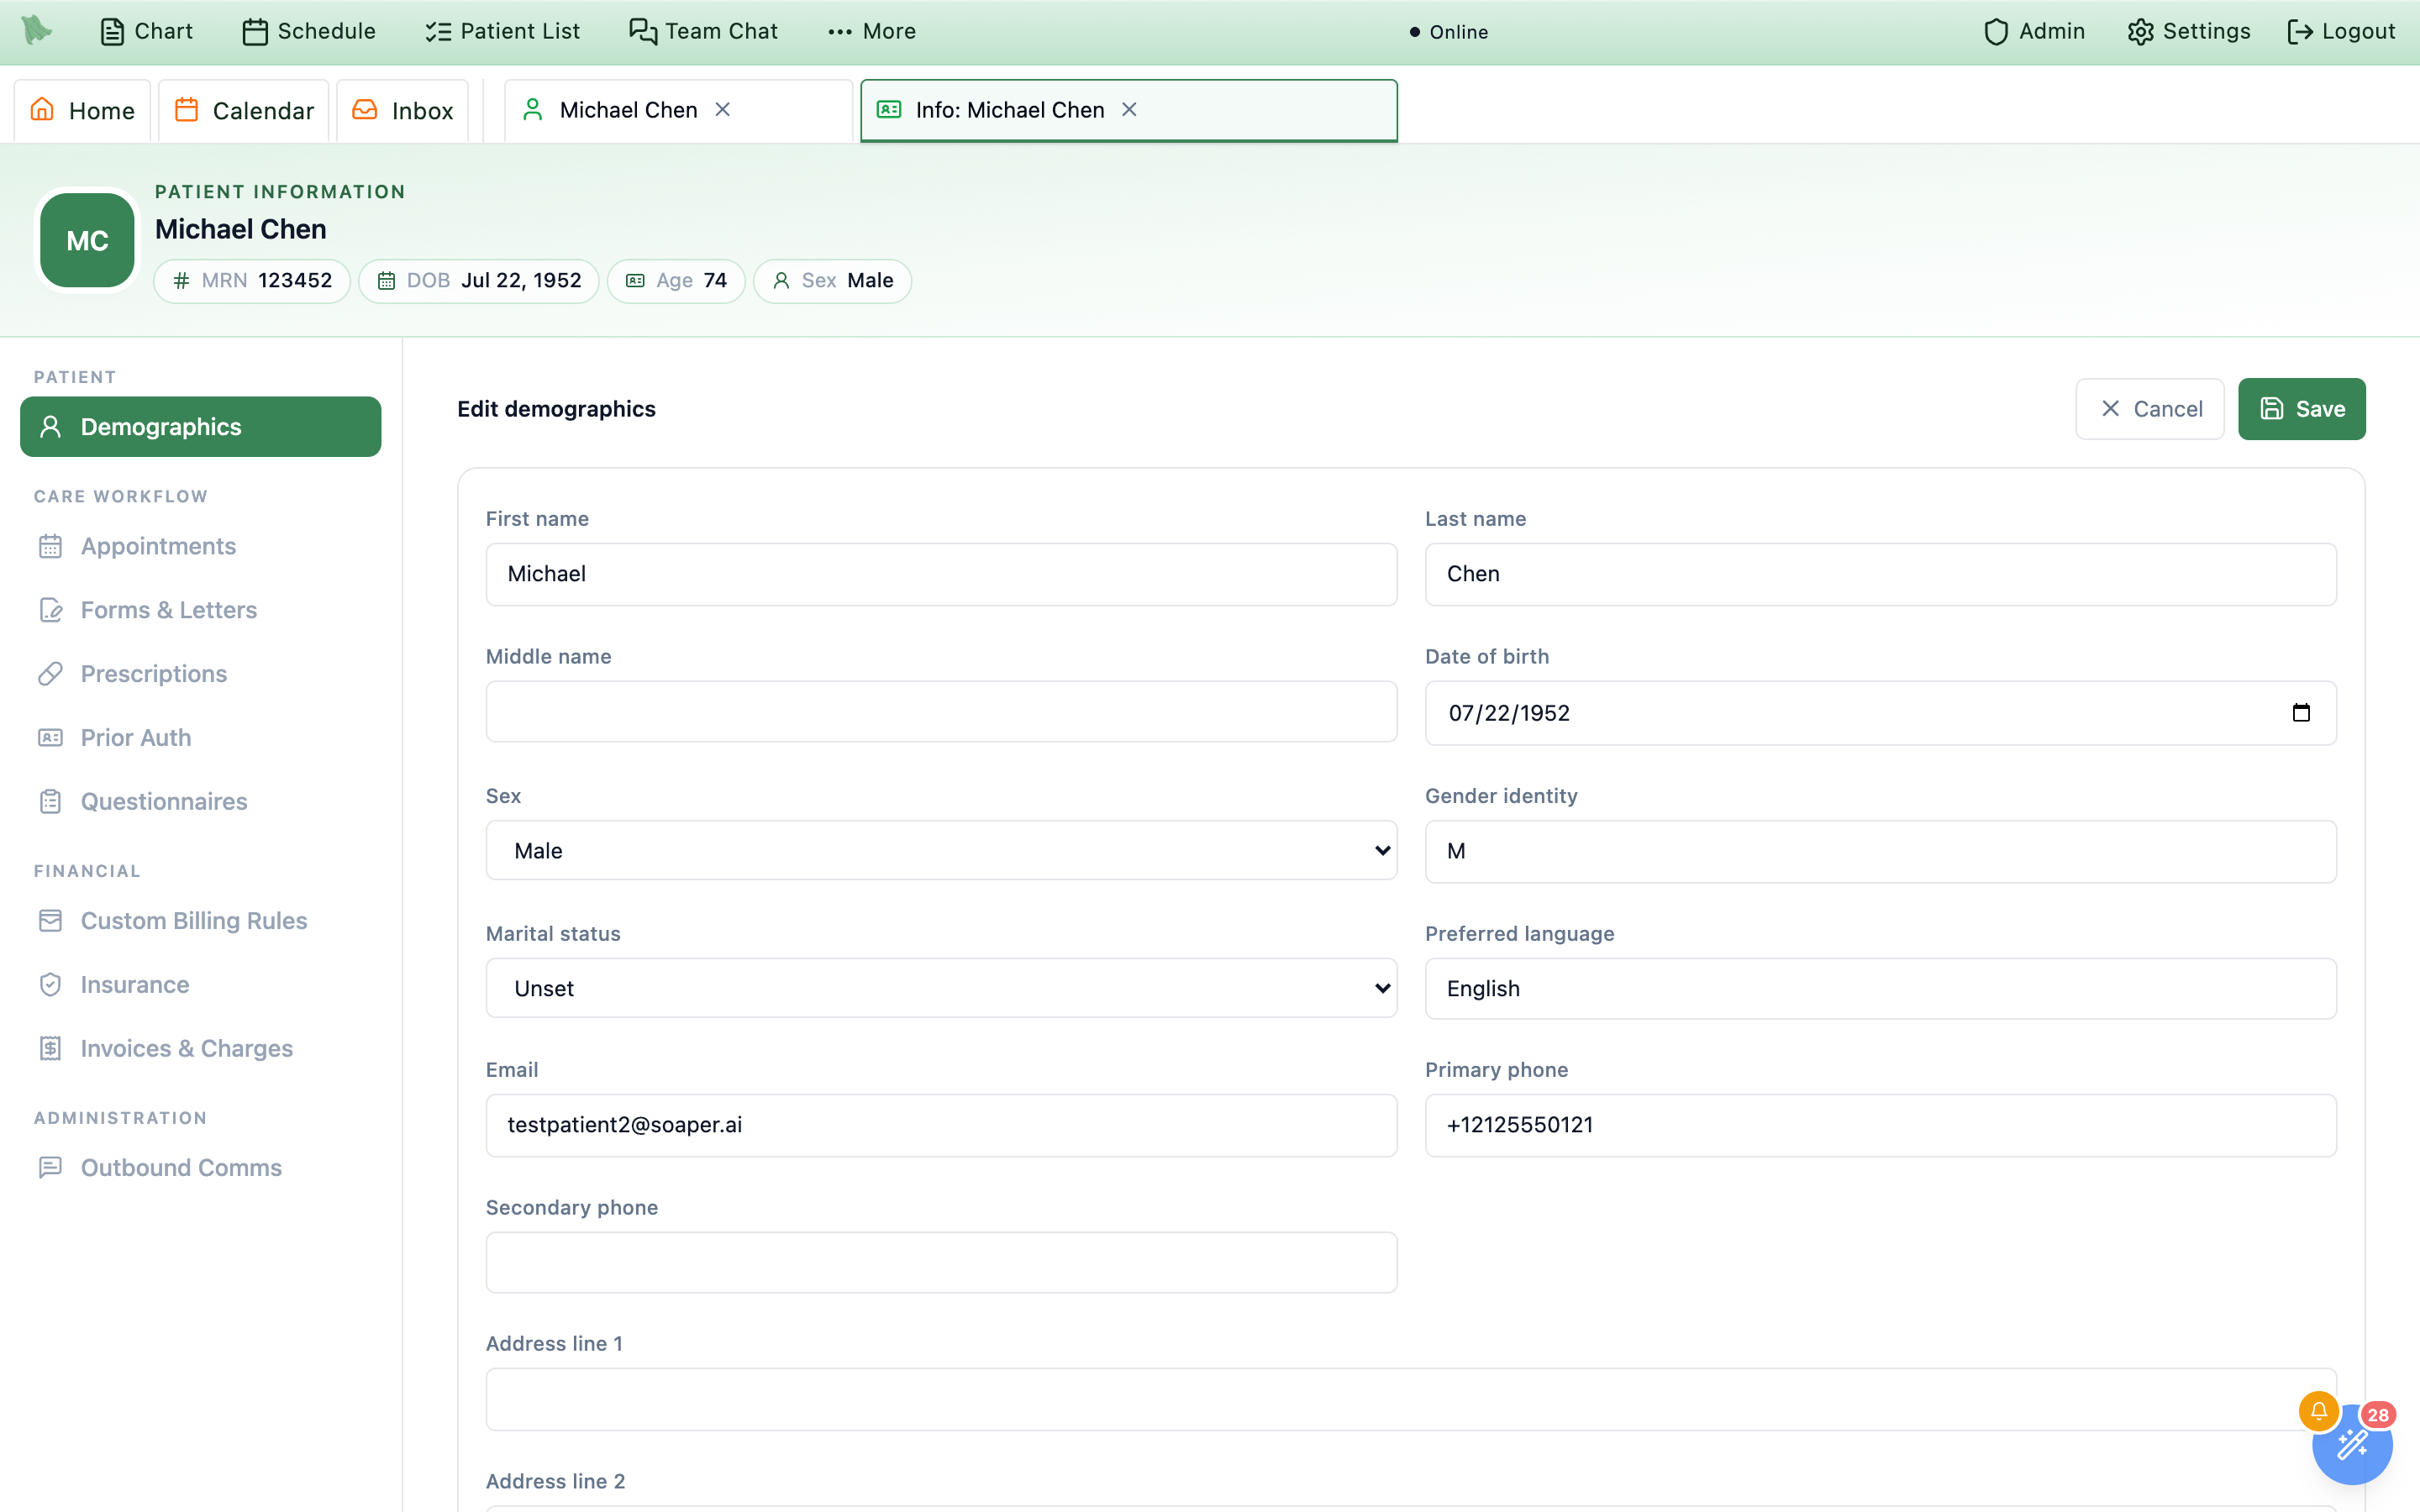
Click
Editto open the form. The button briefly readsOpening…while Hero fetches the latest copy of the record, so you never edit (or save over) an out-of-date one. The heading changes toEdit demographicswithCancelandSaveat the top right. Fields run in order:First name,Preferred name,Pronouns(only with thePatient pronounsfeature on),Last name,Middle name,Date of birth,Sex,Gender identity,Marital status,Preferred language,Email,Primary phone,Secondary phone,Address line 1,Address line 2,City,State,ZIP,Emergency contact,Emergency relationship,Emergency phone, then aParent / Guardianblock (“For a patient under 18 this is where clinic email, texts and portal access go.”) withParent first name,Parent last name,Parent email,Parent phone,Parent date of birthandParent sex. When a minor has no parent or guardian email, an amber note warns that the patient will not receive appointment reminders, forms or portal invitations until one is added. Nothing is required, and the phone fields show the raw stored number rather than the formatted one. The Social Security number is not edited here; it has its own row (below). -
Two fields are validated.
Statemust be a two-letter US state, territory, or military code; case does not matter (orsaves asOR), and anything else is flagged withUse a valid 2-letter US state or territory code.ZIPmust total 5 or 9 digits, elseZIP code must be 5 digits (12345) or 9 digits (12345-6789).— a valid nine-digit entry is tidied on save, so410561234is stored as41056-1234. Both may be left empty. Nothing else is checked: email, phone, and date formats are accepted as typed. -
Save, or back out.
Savebriefly readsSaving...with both buttons disabled, then closes back to the cards. There is no success toast — the confirmation is that the cards and the header chips now show the new values. A rejected change keeps you in the form with the server’s message in a red banner.Cancelrestores the stored values immediately, with no confirmation prompt and no recovery.
State and ZIP are validated before it saves.Who can edit
Editshows only for users whose save can succeed: physicians, admins, and staff withpatient.manageorbilling.claims.manage. Other staff (a referral coordinator, for example) read the cards without anEditbutton.- Physicians and organization admins in the selected practice can change anything.
- Staff need
patient.managefor a full edit. - Staff with only
billing.claims.managemay change the address and guarantor blocks; editing anything else is refused with a message naming the field they touched.
What changes downstream
- The header chips on this screen refresh immediately.
- The mailing address is the address on the claim — an incomplete one blocks submission (see the claims pipeline).
- It is also reused as the policyholder address on a dependent policy whose
Same address as patientbox is checked (next section). - Name and date of birth flow into scheduling, the patient portal, and every eligibility check — which match the payer’s records exactly.
Edit demographics quick-fix on a claim’s readiness issues, and on Correct & refile, opens this tab already in edit mode, and any patient name in Billing opens it in the Patient billing dialog (see the claims pipeline). A staff member whose only relevant grant is the claims permission sees a grey note — Billing role: you can update the patient’s address here. Other demographics need patient-management permission. — and just five fields: Address line 1, Address line 2, City, State, ZIP. Whatever they save lands here in the chart.Save. A mistyped date of birth will start failing eligibility checks at the payer. Read the form back before you save it.The Social Security number row
The Identity card has an SSN row. Some states (Kentucky, for example) need the number for the prescription-monitoring check on controlled-substance prescriptions, and some insurers ask for it to verify coverage. The number is never shown in full by default and never appears in the edit form.
- What it shows.
•••-••-1234(the last four digits) when a number is on file, orNot on file. Show/Hide.Showdisplays the whole number. It hides itself again after 30 seconds, when you switch to another browser tab, or when you leave the tab or patient. EveryShowis recorded in the audit log. Viewing many numbers in a short time is paused for a few minutes: “Too many full numbers viewed recently. Try again in a few minutes.”Add/Replace. Opens aSocial Security number(orNew Social Security number) box that formats as you type (###-##-####).Saveneeds all nine digits (“Enter all nine digits of the Social Security number.”). There is no way to remove a number once saved, only to replace it.
| Who | Sees the last four | Show the whole number | Add / Replace |
|---|---|---|---|
| Practice administrators and owners | Yes | Yes | Yes |
| Physicians | Yes | No, unless also given the sensitive-identifiers permission | Yes |
Staff with patient.sensitive (“Merge, archive, manage portal linkage, and update sensitive patient identifiers.”; the Office Manager preset has it) | Yes | Yes | Yes |
Staff with patient.view or patient.manage only | Yes | No | No |
| Other staff, and anyone in the billing-only Patient billing dialog | The row is not shown. | ||
Patients can also type their own number in the portal, during profile setup, when the practice turns on the Social Security Number card in Admin → Patient Portal Configuration → Features (under Orientation intake; off by default). They can skip the step, and once a number is on file a patient cannot change it from the portal; staff replace it here. The staff row above works whether or not that portal card is on.
Coverage, eligibility checks, and how this patient is billed
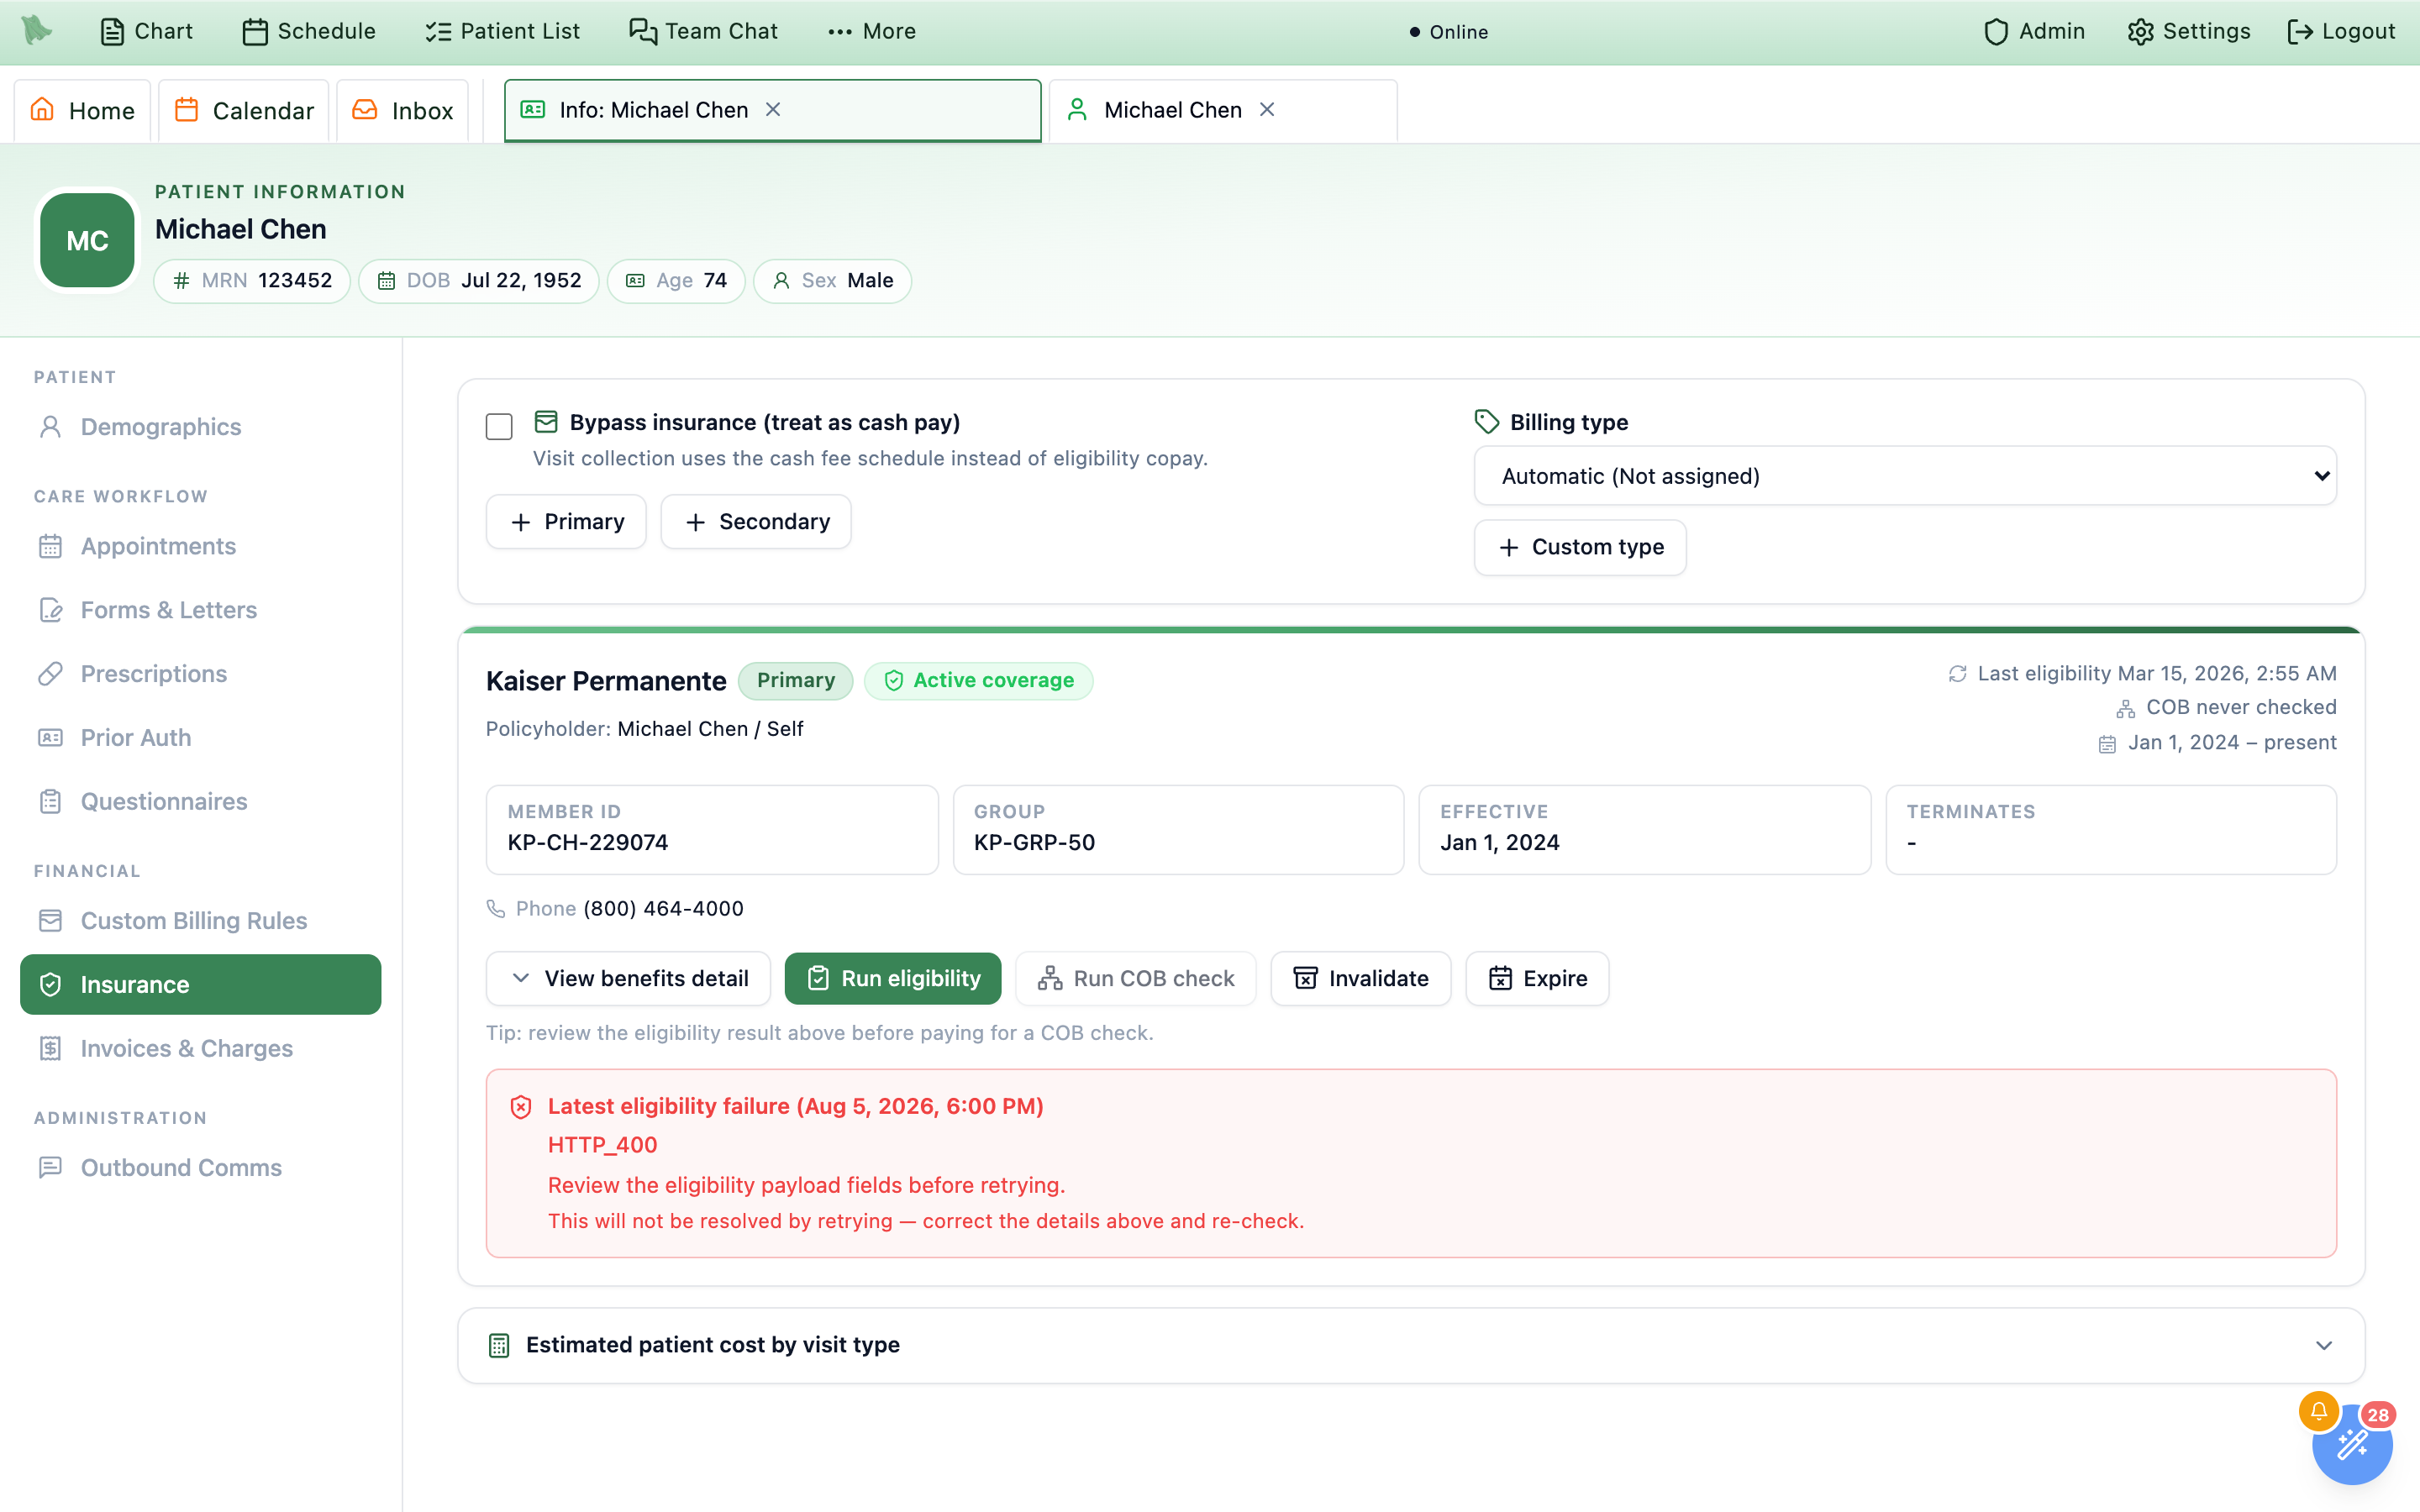
The Insurance tab holds the patient’s policies, the electronic checks you run against them, and the two settings that decide how their visits are billed. It reads top to bottom: the controls card, a card per policy, then a collapsed Estimated patient cost by visit type panel at the very bottom.
-
Start at the controls card.
Bypass insurance (treat as cash pay)is a checkbox, captionedOverride the billing classification and use cash pricing for this patient.(when the patient’s billing type is already Cash Pay, the caption says insurance is bypassed by that classification instead). Beside it,Billing typealways offersAutomatic (based on current coverage)first, then your practice’s own types, and+ Custom typecreates and assigns a new one in a single step. A failed change showsUnable to update billing type. -
Add a policy.
+ Primaryand+ Secondaryopen an inline form headedAdd primary insuranceorAdd additional insurance; once the patient has two active policies the second button reads+ Tertiary / additional coverage.Set coverage order, next to them, lets you put the active policies in the order you verified (Up/Down, then a requiredReason and verification sourceandSave coverage order); it changes which payer future claims go to, and claims already sent keep their payer.Payeris a typeahead (Payer name or Payer ID from the card) that searches the clearinghouse directory after two characters. Abbreviations and card spellings work (BCBS,BCBSTX,UHC,BlueCross BlueShield of Texas, words in any order), and thePayer IDprinted on the card gives an exact match. Each result shows its payer ID, analso known asline when it matched through an alternate name, andEligibility,Claims, andERAchips for what that payer supports; a result markedNot available for electronic eligibility or claimscomes from an older payer list and will fail every check, so pick the clearinghouse entry instead (Medicare Advantage plans usually file under a separateMedicare Advantagepayer). You must pick a result; typing the name and moving on fails withSelect a payer.Member IDis required,Groupoptional (don’t repeat the member ID there; a claim whose member ID is its group number is held), andRelationshipdefaults toSelf. Anything else reveals the policyholder’s name and date of birth plus aSame address as patientcheckbox, ticked by default — leave it to put the demographics address on claims. To have the patient photograph their card instead, the Insurance card requests panel’sRequest insurance cardmakes a short-lived link and QR code the patient opens on their phone; cards read from uploaded documents appear in the same panel. Review the scanned details before saving a policy. -
Read the policy card.
The payer name heads the card with a
Primarybadge and a status chip. Under it,Files to: {payer}withID {payer ID}andEligibility/Claims/ERAchips names the clearinghouse payer the policy actually uses; an amber line instead means the policy cannot be used electronically — either{payer} isn’t set up for electronic eligibility or claimsorNo claims payer selected— and tells you to openEdit policy(a policy linked only to an Office Ally payer is fine at a practice whose claims go through Office Ally SFTP, as long as Hero can match it to one Office Ally claims payer: the line then readsFiles to:with that claims payer ID, which can differ from the eligibility ID), whoseClaims payersection shows the current payer and aChange payersearch; picking a replacement and saving swaps the payer in place and re-checks eligibility (a policy that already has claims or a successful check refuses the swap and asks for a new policy instead). The right column carriesLast eligibility {date}orEligibility never checked,Last COB {date}orCOB never checked, and the coverage date range (a missing end date readspresent). Below sit theMEMBER ID,GROUP,EFFECTIVE, andTERMINATEStiles. -
Use the action row.
View benefits detailexpands the coverage and benefits panel;Policyholder details, on a dependent policy, fills in missing subscriber identity only, since stored fields lock once billing activity exists.Make primarypromotes a secondary policy;Invalidateis for one entered in error andExpirefor coverage that has ended, both confirmed, withExpirerequiring aCoverage end date;Reactivatereturns a historical policy to service with no confirmation. There is no delete — retired policies collapse intoInactive and expired insurance (N)so eligibility, claims, and billing history keep their references. -
Run eligibility — free, and the one to run first.
Run eligibilityis enabled only on an active policy. The result either lands at once or queues, and the notice under the buttons says which:Eligibility check complete.,Eligibility check failed: {reason}, orEligibility check queued. Results may take a little longer; keep this detail open or retry shortly.A stored failure about the patient’s coverage stays on the card underLatest eligibility failurewith the reason in plain words, the recommended action, and a line telling you whether retrying can help. When the insurer only refused the check’s date, there is no red box: a blue notice,The insurer didn't check that date, says it isn’t a problem with the member ID and that Hero re-checks with today’s date (see Eligibility history & payers, which also covers the full list of every check run on a policy). A failure caused by your practice’s setup shows instead as an amber notice — “Eligibility checks aren’t set up · No eligibility clearinghouse is connected for this payer.” (or, for a failure left over from Office Ally, “Office Ally no longer checks eligibility”) — withOpen External Providersfor admins, or “Ask your practice administrator to set this up in External Providers.” for everyone else; retrying won’t fix it. -
Run a COB check when you suspect a second plan.
Run COB checkasks the clearinghouse which plans the patient really has and which one pays first. It costs money — read the callout below before you click. It also needs the COB permission: without it the button is disabled and readsAsk a billing manager or office manager to run a COB check.When the check can’t run, the disabled button says why: “Other-coverage checks aren’t set up for your practice yet. A practice administrator can connect them in Admin → External Providers.”, “Other-coverage checks can’t run while your practice’s clearinghouse connection is in test mode. They work once the connection is live.”, “Other-coverage checks are turned off for your practice. A practice administrator can turn them on in Admin → External Providers.”, “This payer doesn’t accept other-coverage checks.”, or “Other-coverage checks don’t work for traditional Medicare.” After you run one, the card says COB check complete., COB check failed: {reason}, or, after about 30 seconds, “COB check is still running. The result appears here when the clearinghouse answers.”; it keeps refreshing on its own, and one the clearinghouse never answers ends with “The clearinghouse hasn’t answered this COB check. Run it again later.” Once a result lands,View benefits detailshows what came back — eitherNo additional coverage found.or a notice naming the other payers over a card each, carrying the payer ID, the sequence the payer itself reported (Primary Payer,Secondary Payer,Tertiary Payer), and the coordination effective date. -
Apply the coverage order the check proposes.
This is the point of paying for the check. When other coverage turns up,
Review coverage orderopens a dialog headedOther coverage found. It states the finding in one sentence ({payer} pays second.), lists everything the payer reported underReported by the payer— each one marked eitherOn fileagainst a policy you already hold orNot on this patient’s chart— and proposes aNew coverage order: one row per active policy, rankedPrimary,Secondary,Tertiary, each showing where it moved from (↑ was Secondary,↓ was Primary, orUnchanged) and the reason it landed there. Drag a row, nudge it with the arrows, or take the suggestion back withReset to COB suggestion.Apply coverage orderwrites the whole order in one step;Keep current orderchanges nothing. A reported payer that is not on the chart gets its own amber callout with anAdd policyshortcut that opens the add form with the payer name already filled in. -
Expand the cost estimate last.
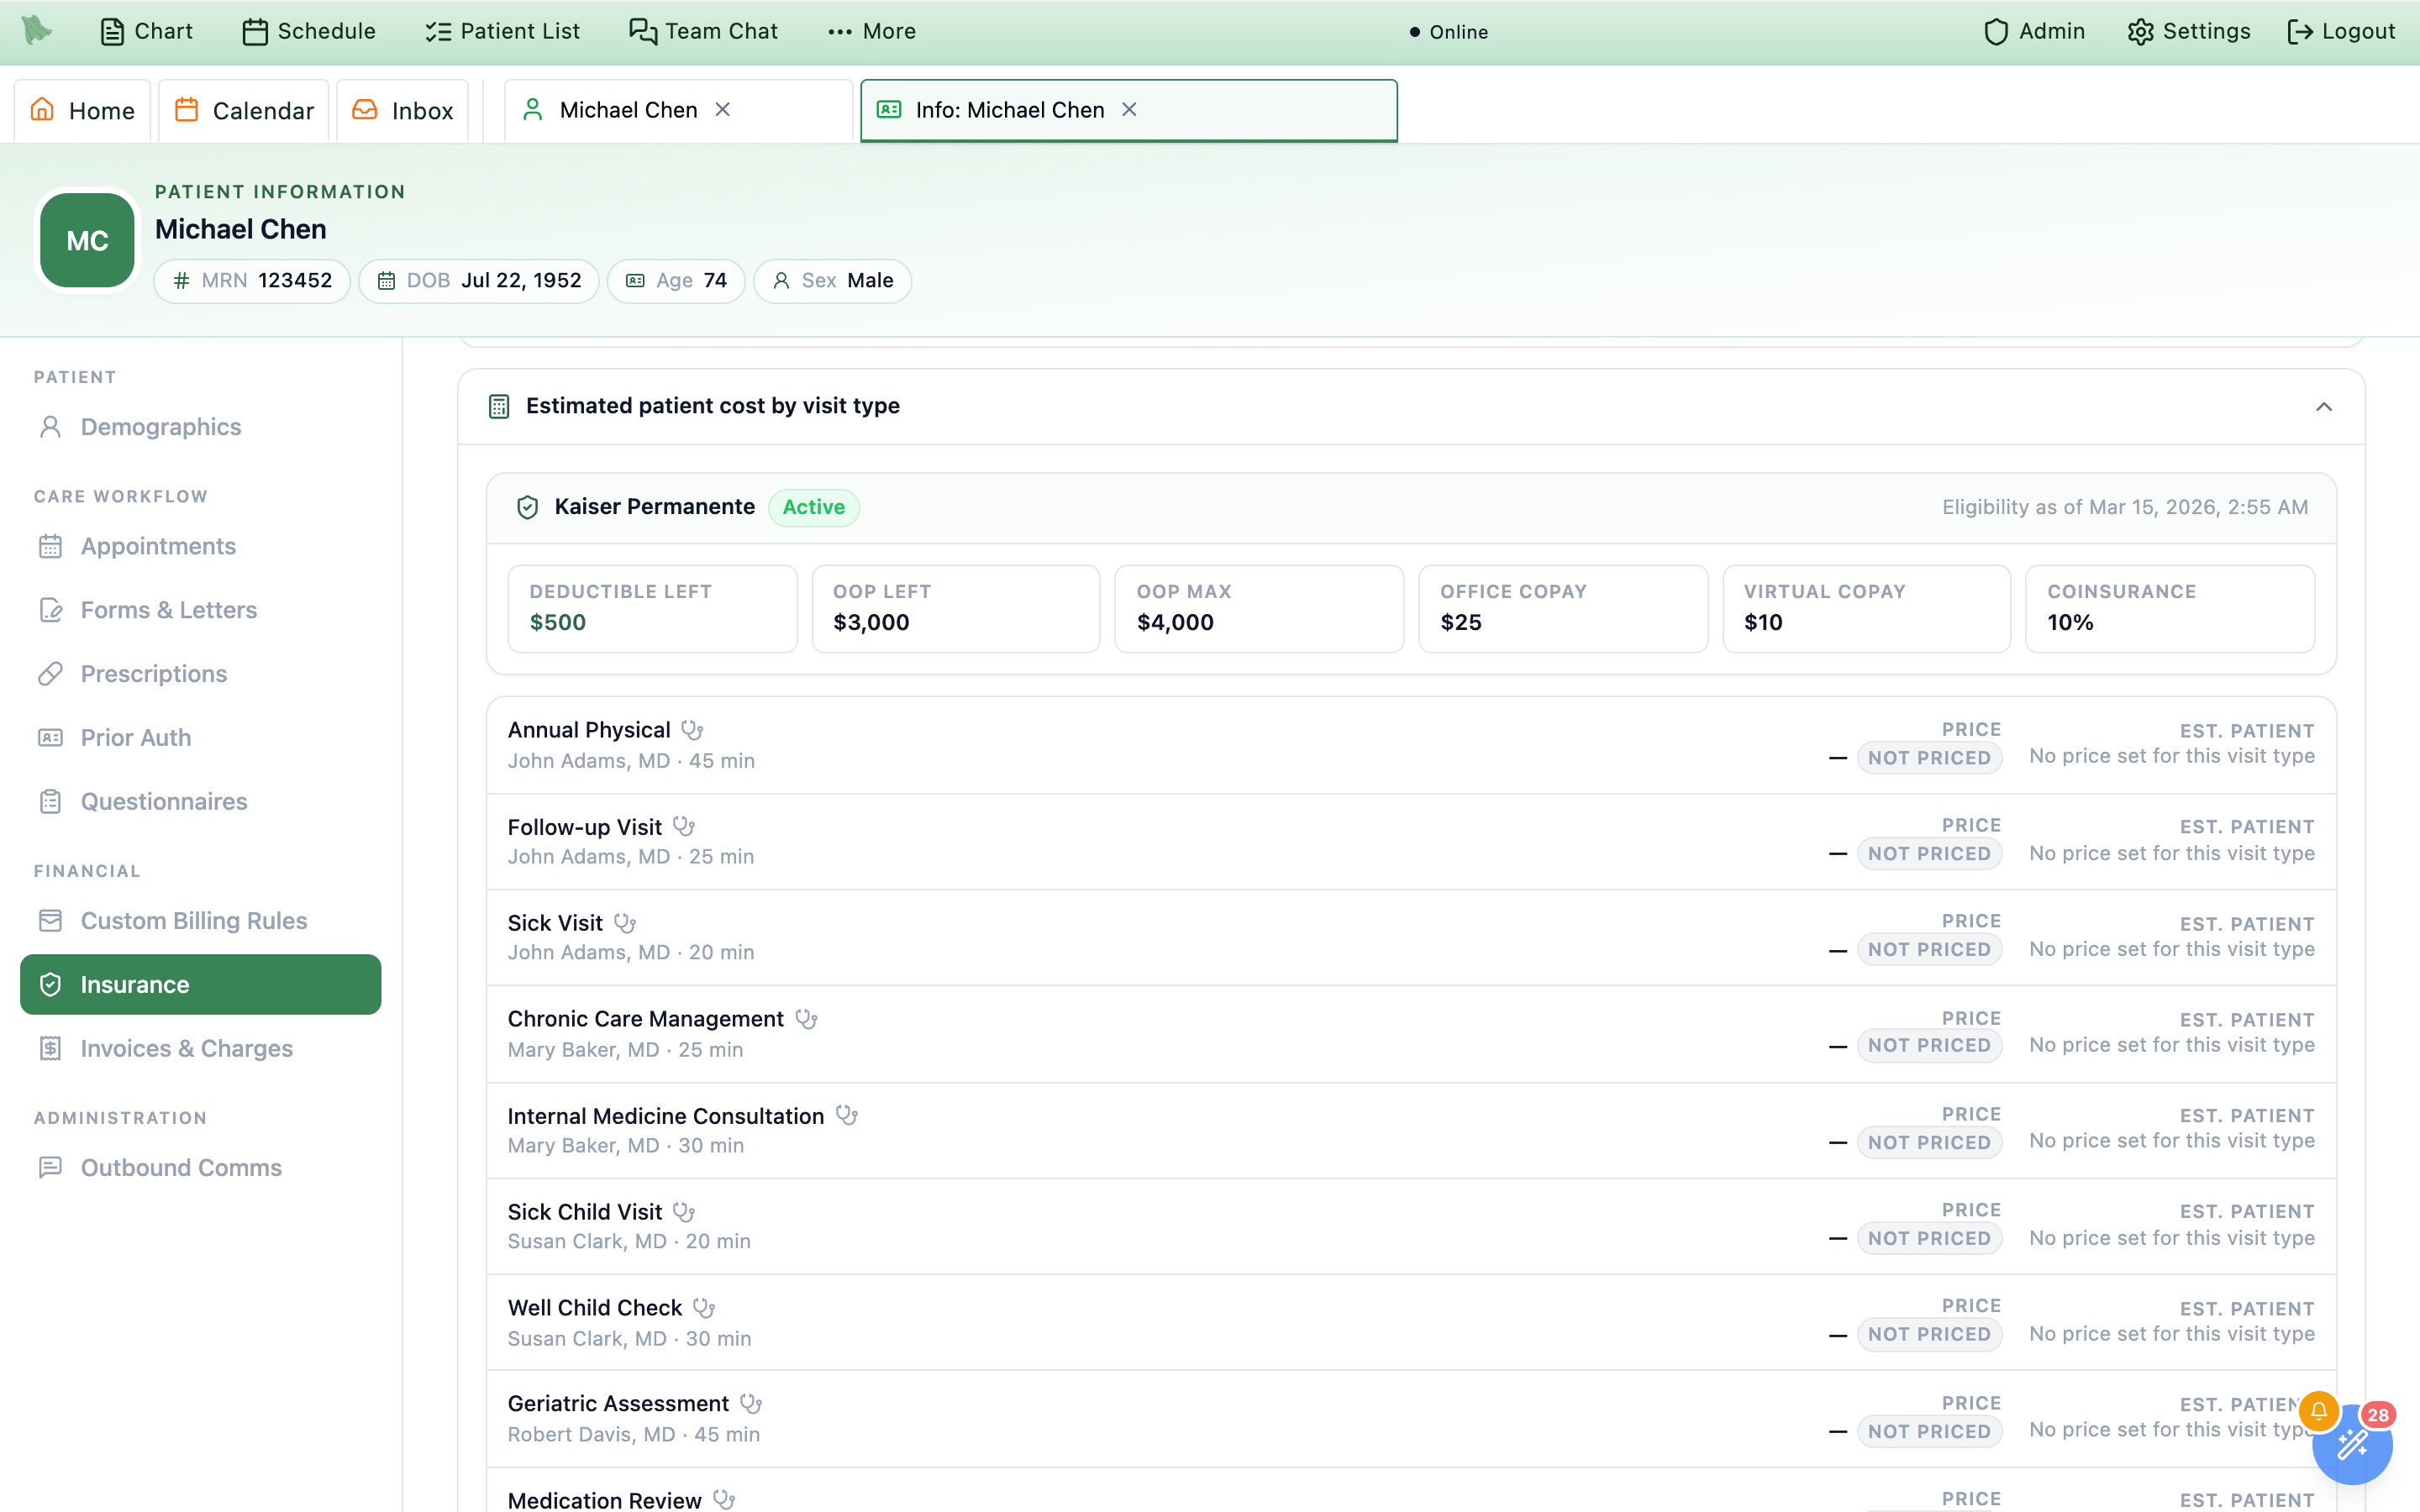
Estimated patient cost by visit typesits at the bottom and starts collapsed. Clicking it is what fetches the estimate, so the tab itself opens fast; once loaded it stays loaded, and collapsing it again does not throw the numbers away. Inside, a coverage summary names the payer with anActive,Inactive, orUnverifiedchip and eitherEligibility as of {date}orEligibility not yet verified, over six tiles —Deductible left,OOP left,OOP max,Office copay,Virtual copay,Coinsurance. Beneath them one row per active visit type shows aPricetaggedNegotiated,Learned rate,Cash rate, orNot priced, and anEst. patientfigure — or the reason there isn’t one, such asRun an eligibility check to estimate. Estimates use the payer’s contract rate, else a rate learned from that payer’s payments (even where claims bill your own list price), else the cash price (see CPT prices & payer rates); a learned-rate estimate is labelled as based on what the payer allowed before, not a contract rate.
| Status chip | What it means |
|---|---|
Active coverage | The policy is active and the last eligibility check confirmed coverage. |
Inactive coverage | The policy is active on your side, but the payer said coverage is not. |
Active | The policy is active and eligibility has never been determined. |
Inactive | Someone invalidated it. |
Expired | Someone expired it with a coverage end date. |
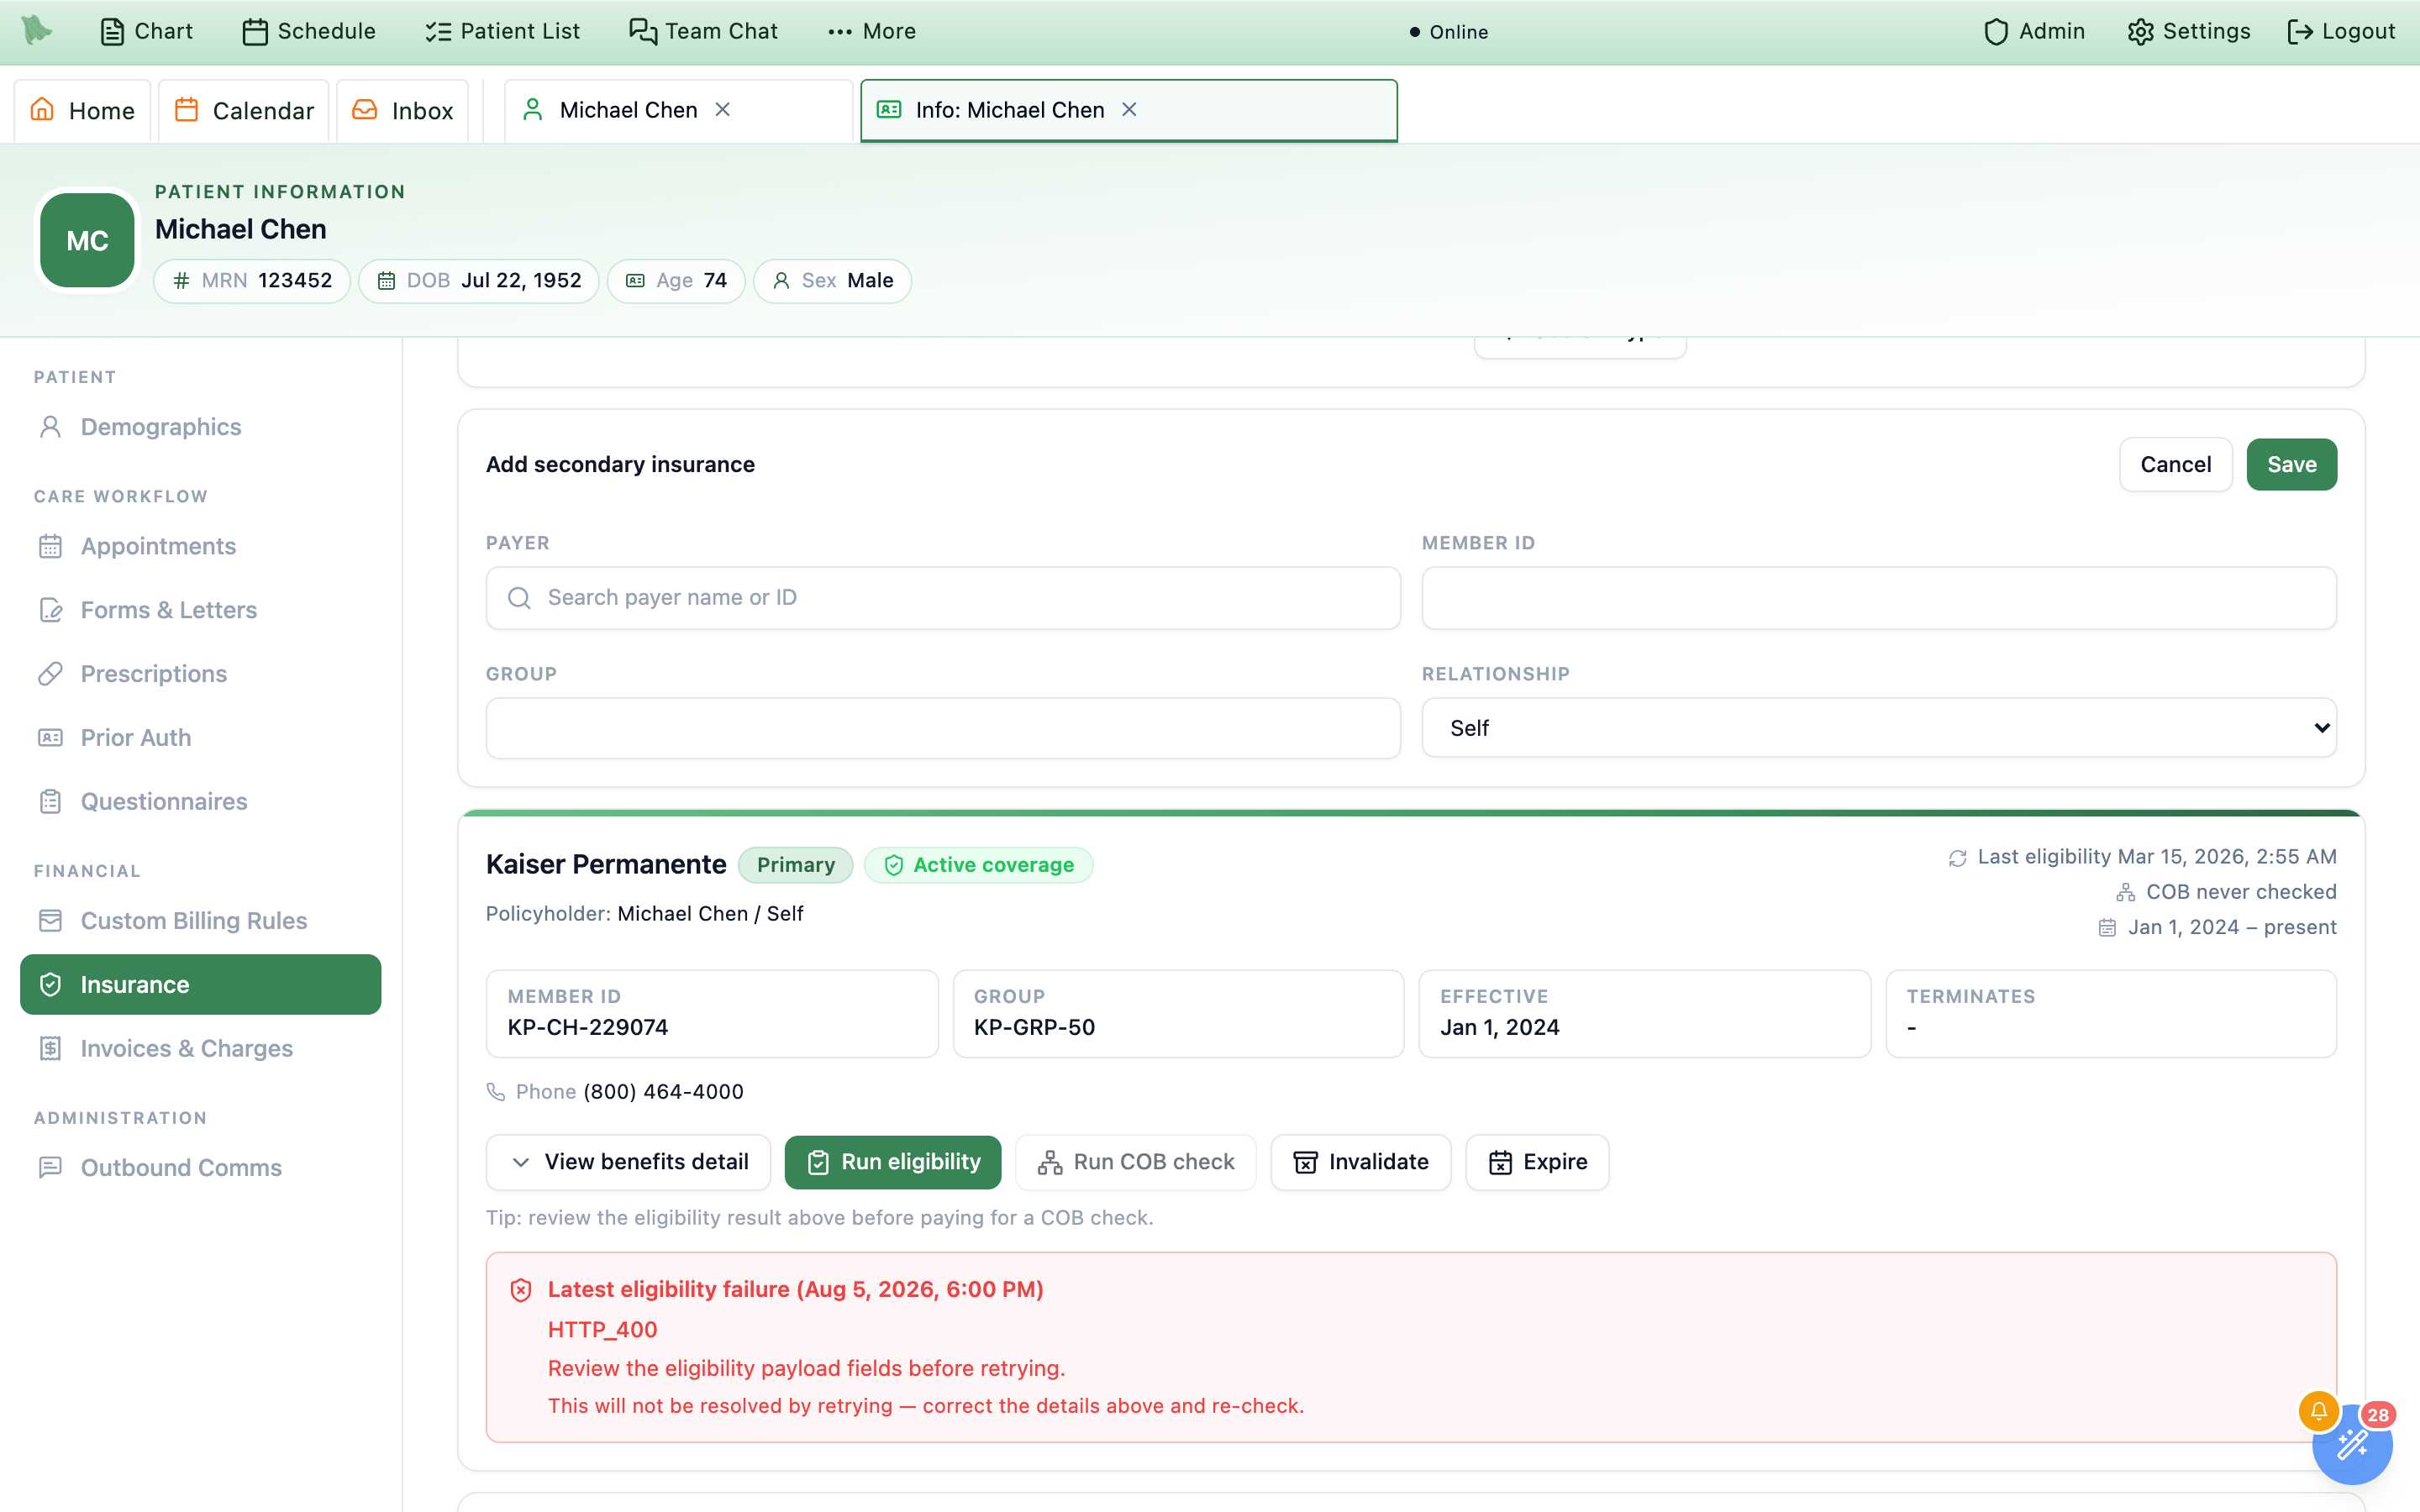
+ Secondary opens the same form as + Primary, now headed Add additional insurance.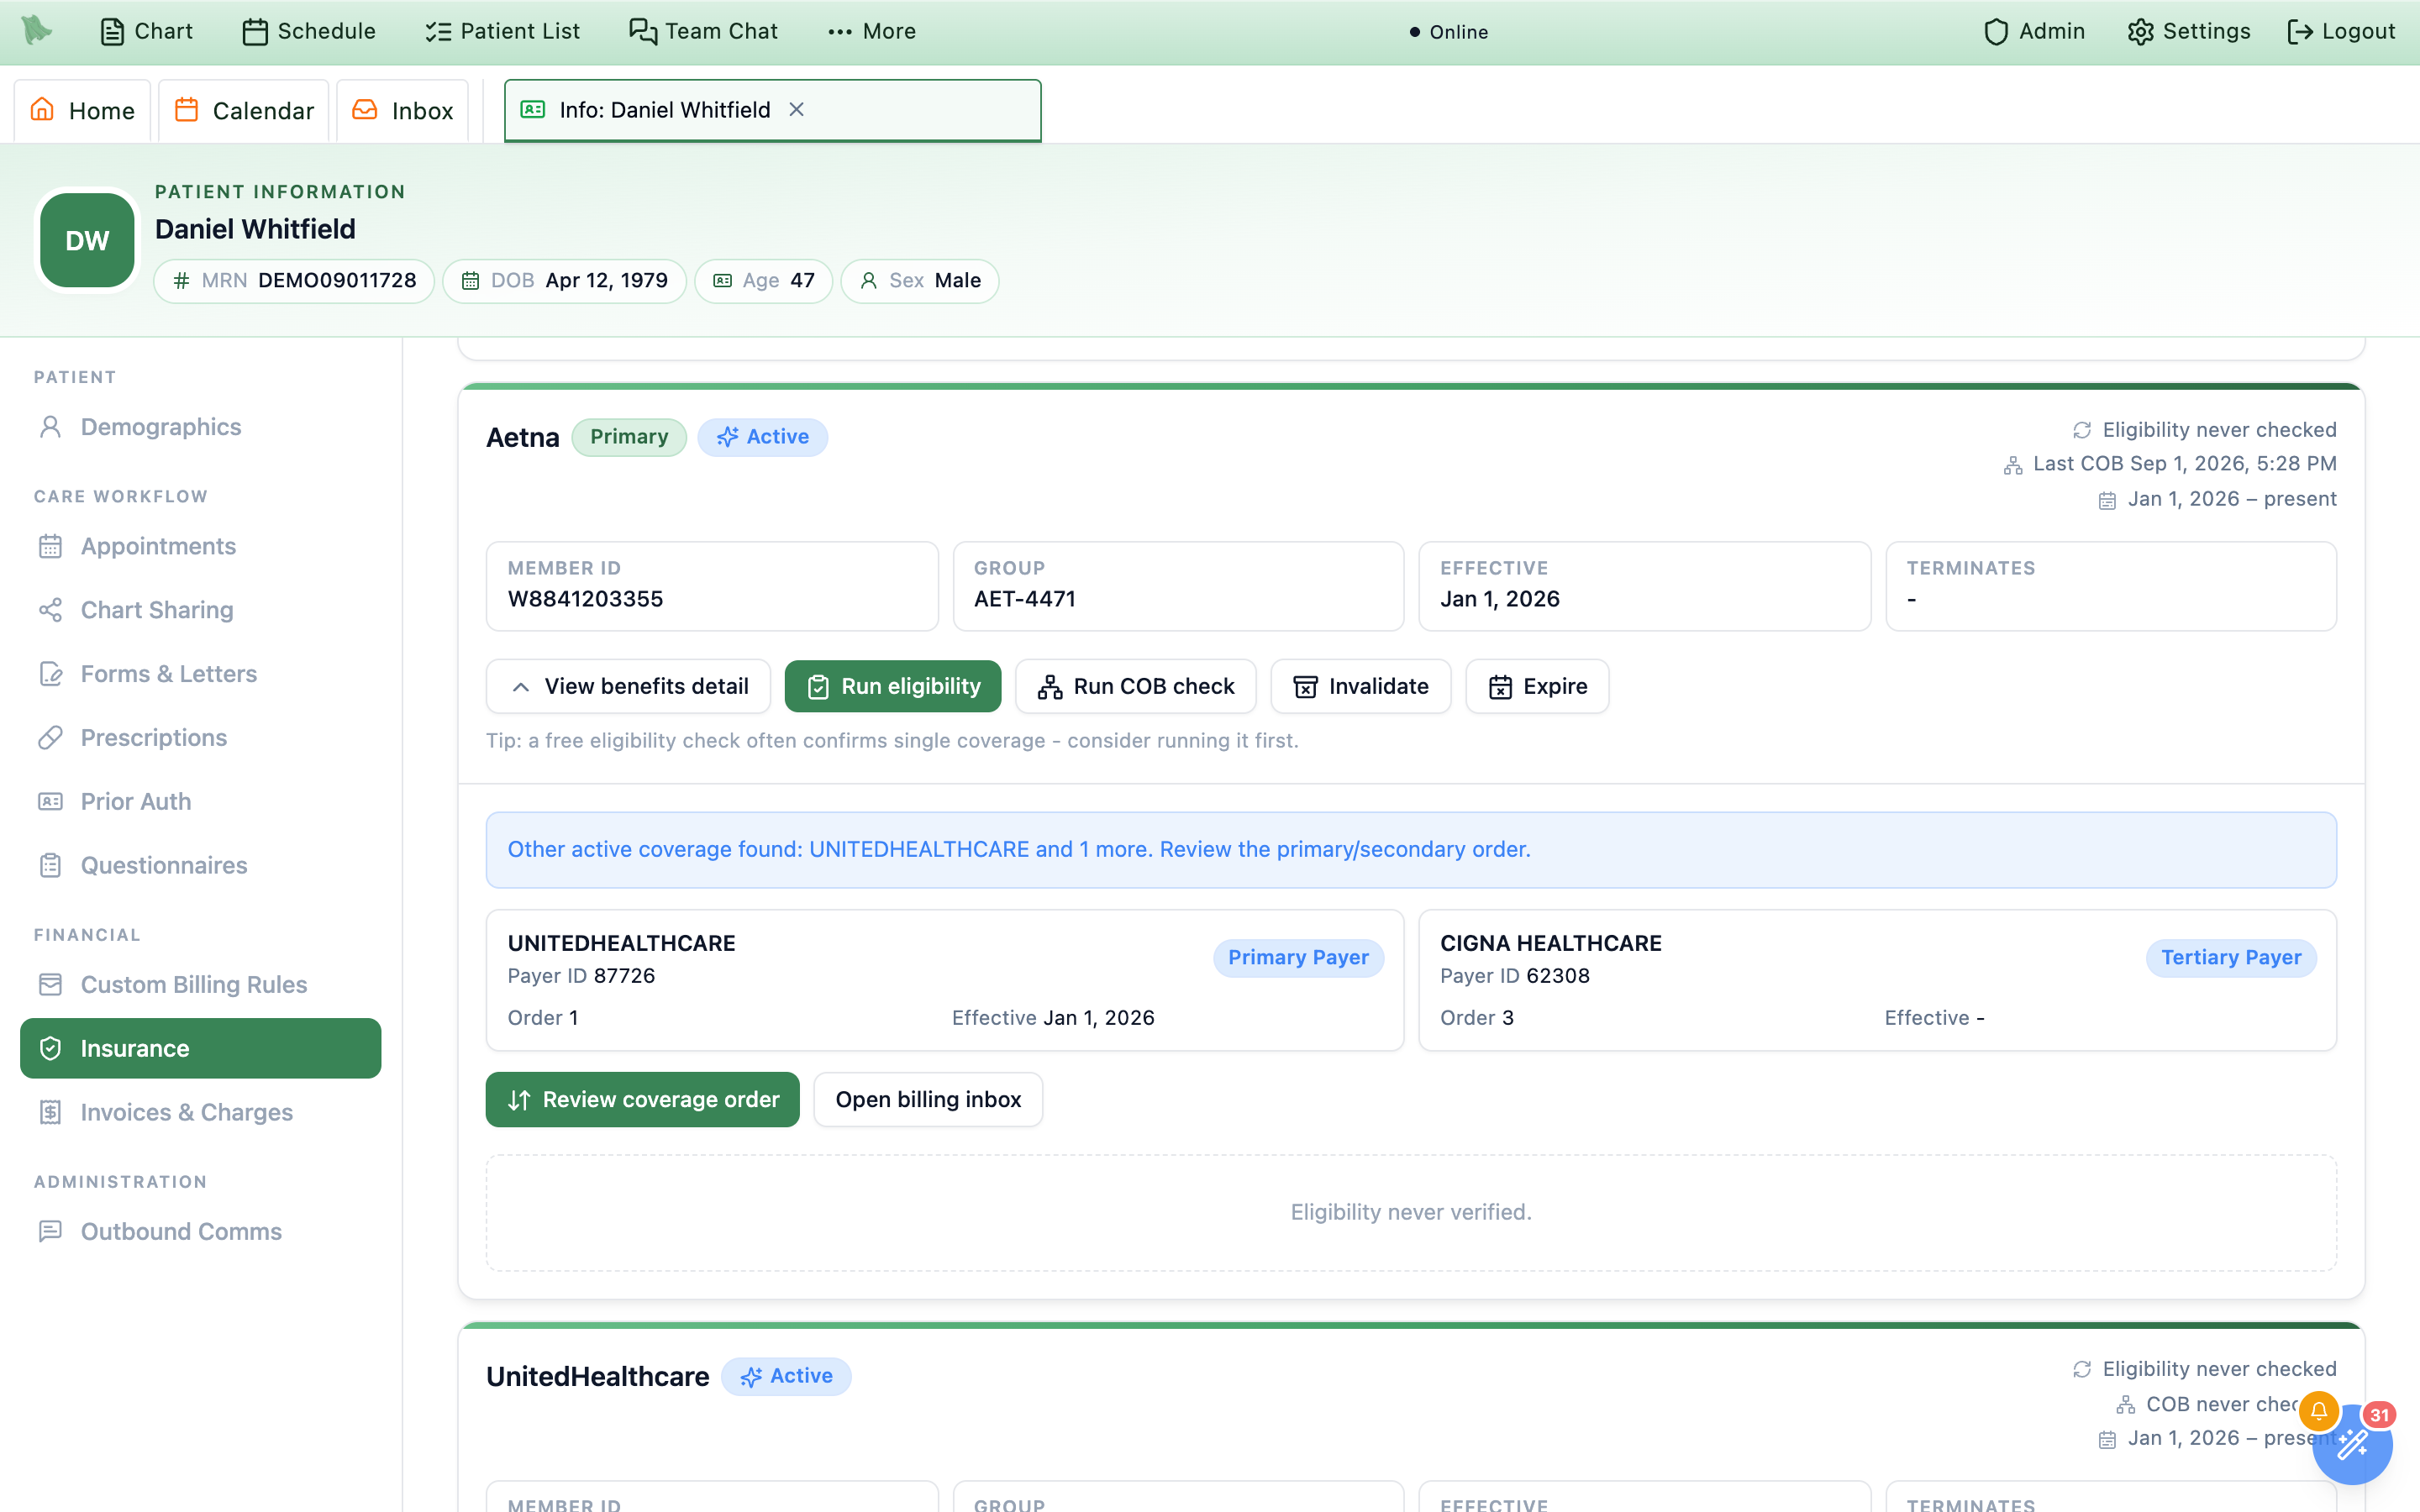
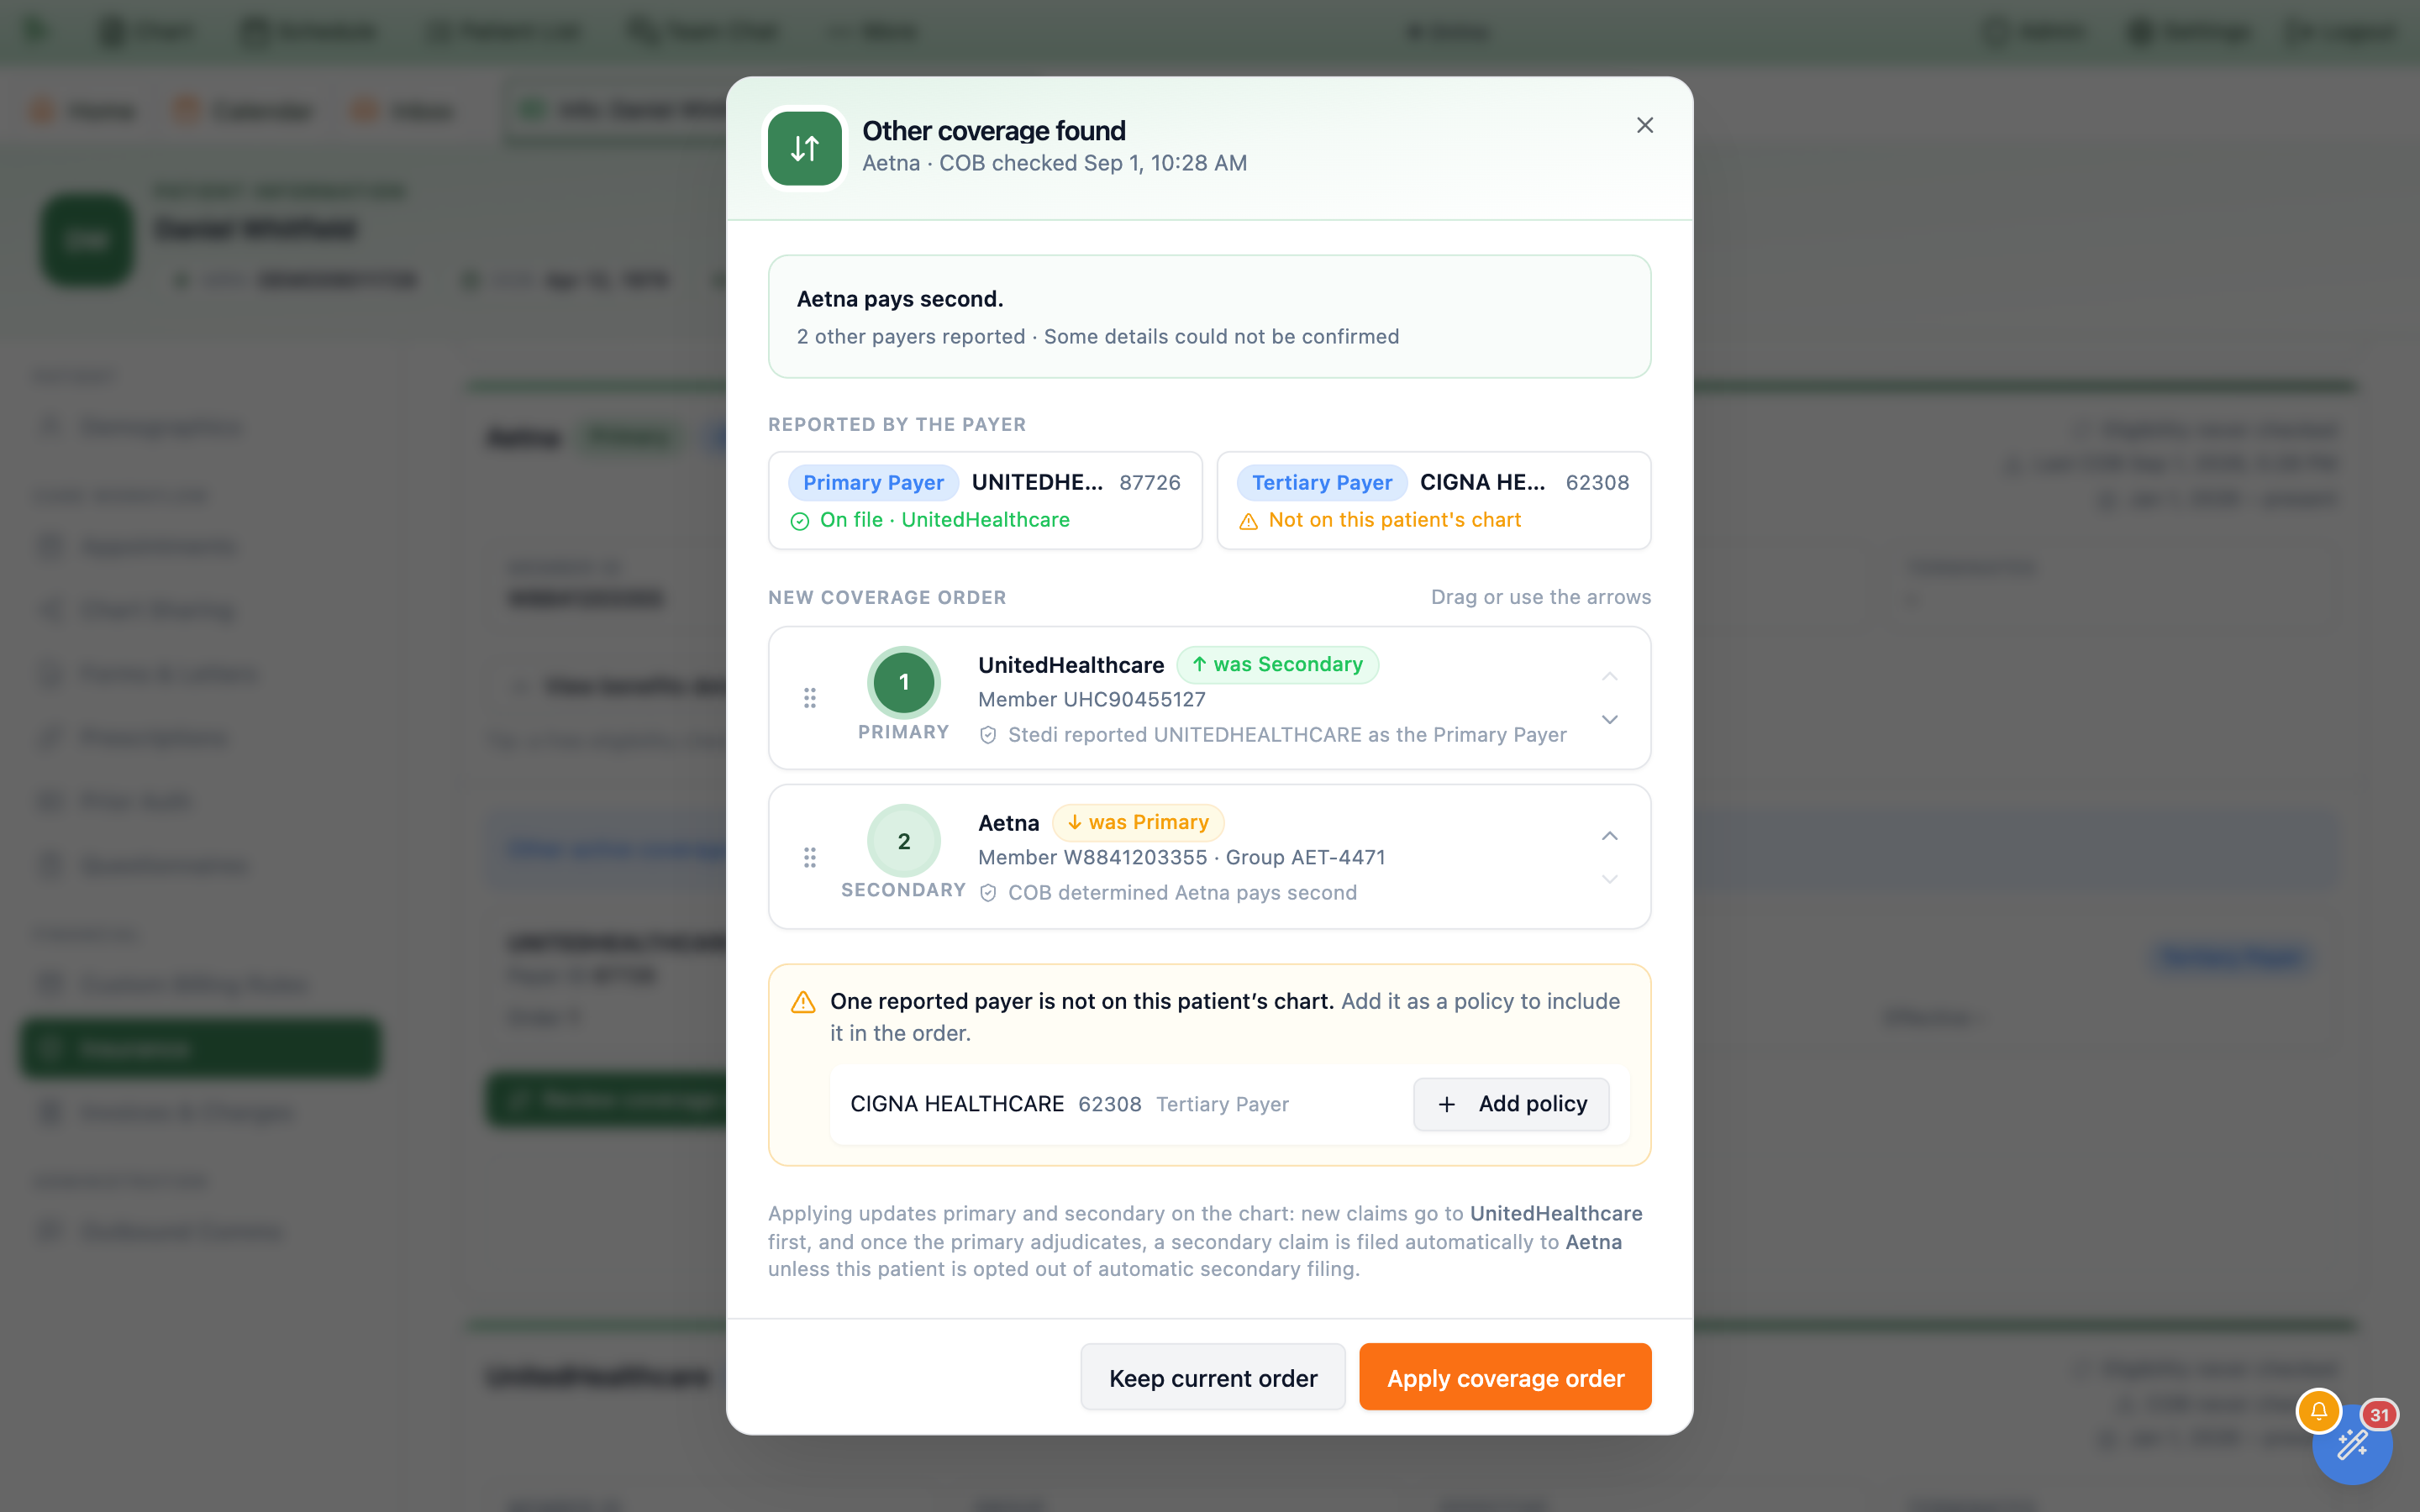
Run COB check costs money. A coordination-of-benefits check asks the clearinghouse for other active coverage and which plan pays first, at about $1 per check — billed whether or not any other coverage is found, roughly three times an eligibility check. Clicking it opens a confirmation headed Run a coordination-of-benefits check? subtitled $1 per check, and the confirm button reads Run COB check ($1). Run the free eligibility check first — the card’s own tip says Tip: a free eligibility check often confirms single coverage - consider running it first. Reserve COB for new patients or a real suspicion of a second plan; it is not supported for traditional Medicare, and the patient’s name and date of birth must match the payer exactly. Not every payer supports the transaction — when one does not, the check comes back refused and you are not billed for it.Primary is who new claims are sent to first, and the dialog spells out the consequence before you confirm. If the practice files secondary claims automatically, the policy you rank second is the one a secondary claim goes to once the primary adjudicates — so an order applied here can put a claim in front of a payer without anyone opening the claim itself. Correcting it later is an ordinary policy edit, but the claims already sent are not recalled. Applying also clears the coordination-of-benefits review item the check raised, provided every payer the check reported is now on the chart.Billing type overrides the classification the system worked out itself. The per-patient exceptions and cash rates live on Custom Billing Rules.billing.claims.manage), so billers can add, edit, and expire policies — staff with neither get Insurance policy changes and clearinghouse checks require patient management or claims permission. The cost estimate, benefits detail, eligibility and COB buttons, and the billing controls need financial access on top; without it that half of the tab is simply absent.When your practice sets a Default Medicare payer in Admin → External Providers → Stedi, a scanned Original Medicare card starts with that Part B payer. Review it before saving; Medicare Advantage still uses its own plan. See Stedi setup.
In Estimate a service by CPT or HCPCS code, select Clinician (optional) when the payer has different clinician rates. The estimate uses the matching contract rate sheet; leaving the clinician blank cannot match a clinician-specific sheet. Payer-rate visibility follows the practice’s rate-access settings.
Every visit for this patient, with paperwork, reminders & outcome
The Appointments tab is the patient-level view of the schedule — as its own sub-line puts it, upcoming visits with paperwork and reminder status, follow-up outreach, and every past visit with its note, billing, and reschedule history. Booking and rescheduling still happen in the scheduler; this tab shows one patient’s whole picture and sends you to the right place. Beside the heading sit Request follow-up, Schedule appointment, and a Refresh appointments icon.
At the top, Prevent this patient from self-scheduling makes the patient contact the practice to book or reschedule while allowing staff to schedule. Physicians, administrators, and staff with scheduling-management permission can change it; the checkbox saves immediately. This is separate from an unpaid-balance scheduling rule and does not cancel existing visits.
-
Scan the six summary chips.
Next visit(a date, orNone scheduled),Upcoming,Paperwork pending,Reminders queued,Active follow-ups, andPast visits (N)— whose value is a breakdown such as0 completed · 12 cancelled · 1 no-show · 29 unresolved, turning amber the moment anything is unresolved. -
Work the upcoming cards.
Each card leads with the weekday, date, start time and duration — in your practice’s time zone, never the browser’s — then the visit type, a status chip, a
Telehealthpill, aRescheduled 4×chip when the visit has moved, aFrom follow-up requestchip when it came out of outreach, the provider and location (orProvider not set), and a booking line such asScheduled by Nicholas Romero (staff EMR) · Aug 26, 2026 at 12:28 PM. Actions on the right:Details,Open note(only with an encounter),Reschedule,Cancel. -
Read the two readiness badges.
Between them they answer “is this visit actually ready?” without opening anything. Paperwork reads
No paperwork required,Paperwork complete (2/2),2 of 2 items outstanding, or — in red —2 of 2 items outstanding · 2 overdue, with a caption naming what is still open (Waiting on Consent to Treat Copy, Previsit agreement). Reminders readsNo reminders,No reminders sent or scheduled, or a count such as1 sent · 4 scheduled, gaining· patient confirmedin green when the patient replied yes and· delivery problemin red when a message failed or bounced; when another is queued,Next: Aug 27, 2026 at 8:00 AMsits underneath. InsideDetails, theQuestionnaires & paperworksection lists what the visit type assigned — orNothing was assigned for this visit.— and, for anyone who can send paperwork (front desk with patient-management permission, physicians, administrators), aSend a formbutton that opens the same dialog as the Questionnaires tab. The form goes to the patient’s Forms to sign, linked to the visit’s encounter when it has one. -
Clear the unresolved ones.
A visit whose date has passed but which nobody ever marked completed, cancelled, or a no-show is Unresolved: an amber
Unresolvedchip in place of its status, with the hover note Still “Scheduled” after the visit date — mark it completed, no-show, or cancelled. The history filter has anUnresolvedoption, and each such row gains aResolvebutton. It opens the same dialog asCancel: pickInitiated by—Provider / clinicorPatient, deliberately unselected until you choose, because provider-initiated waives the fee — then aReason, optionally aNote for the chart, and confirm withCancel AppointmentorMark No-Show. -
Follow the outreach trail.
Follow-up requestsshows a{n} activepill and aShow {n} closedtoggle — a request the patient has already booked counts as closed and hides by default.Request follow-upasks which visit it belongs to, aVisit type(Office visit,Telehealth,Phone call),When(2 weeksthrough6 months, or your own number and unit), an optionalPreferred time of day, an internalReason, andInstructions for the patient. The patient is contacted after the practice’s review delay, not instantly. Each row then keeps the whole trail — status (Pending outreach→Patient notified→Awaiting response→Reminder sent, ending atScheduled,Expired, orDeclined), the booking window, attempt counts, whether the patient replied or booked, and every message sent — plusResendandCancel, which fires immediately with no confirmation. -
Mine the history.
Appointment historylists past visits underWhen,Visit,Outcome & billing, andActions, filtered byShow(All visits,Completed,Cancelled / rescheduled,No-shows,Unresolved).Outcome & billingcarries a clickable note chip —Signed note,Note completed, orUnsigned note— plus a billing chip in the same words as the invoices (Paid,Balance due,Partially paidonly when the patient paid part,Past due,With insurance,Insurance review,Awaiting secondarywhile the visit’s secondary claim is pending,Not billed,No charge,Billing cancelled), the payer name, a balance such as$25.00 due, and any no-show or late-cancel fee; rows with neither readNo encounter. Cancellations spell themselves out:Late cancellation · by patient — Sick. The filter only searches pages you have loaded, which is why the button readsLoad more (17 more visits to search).
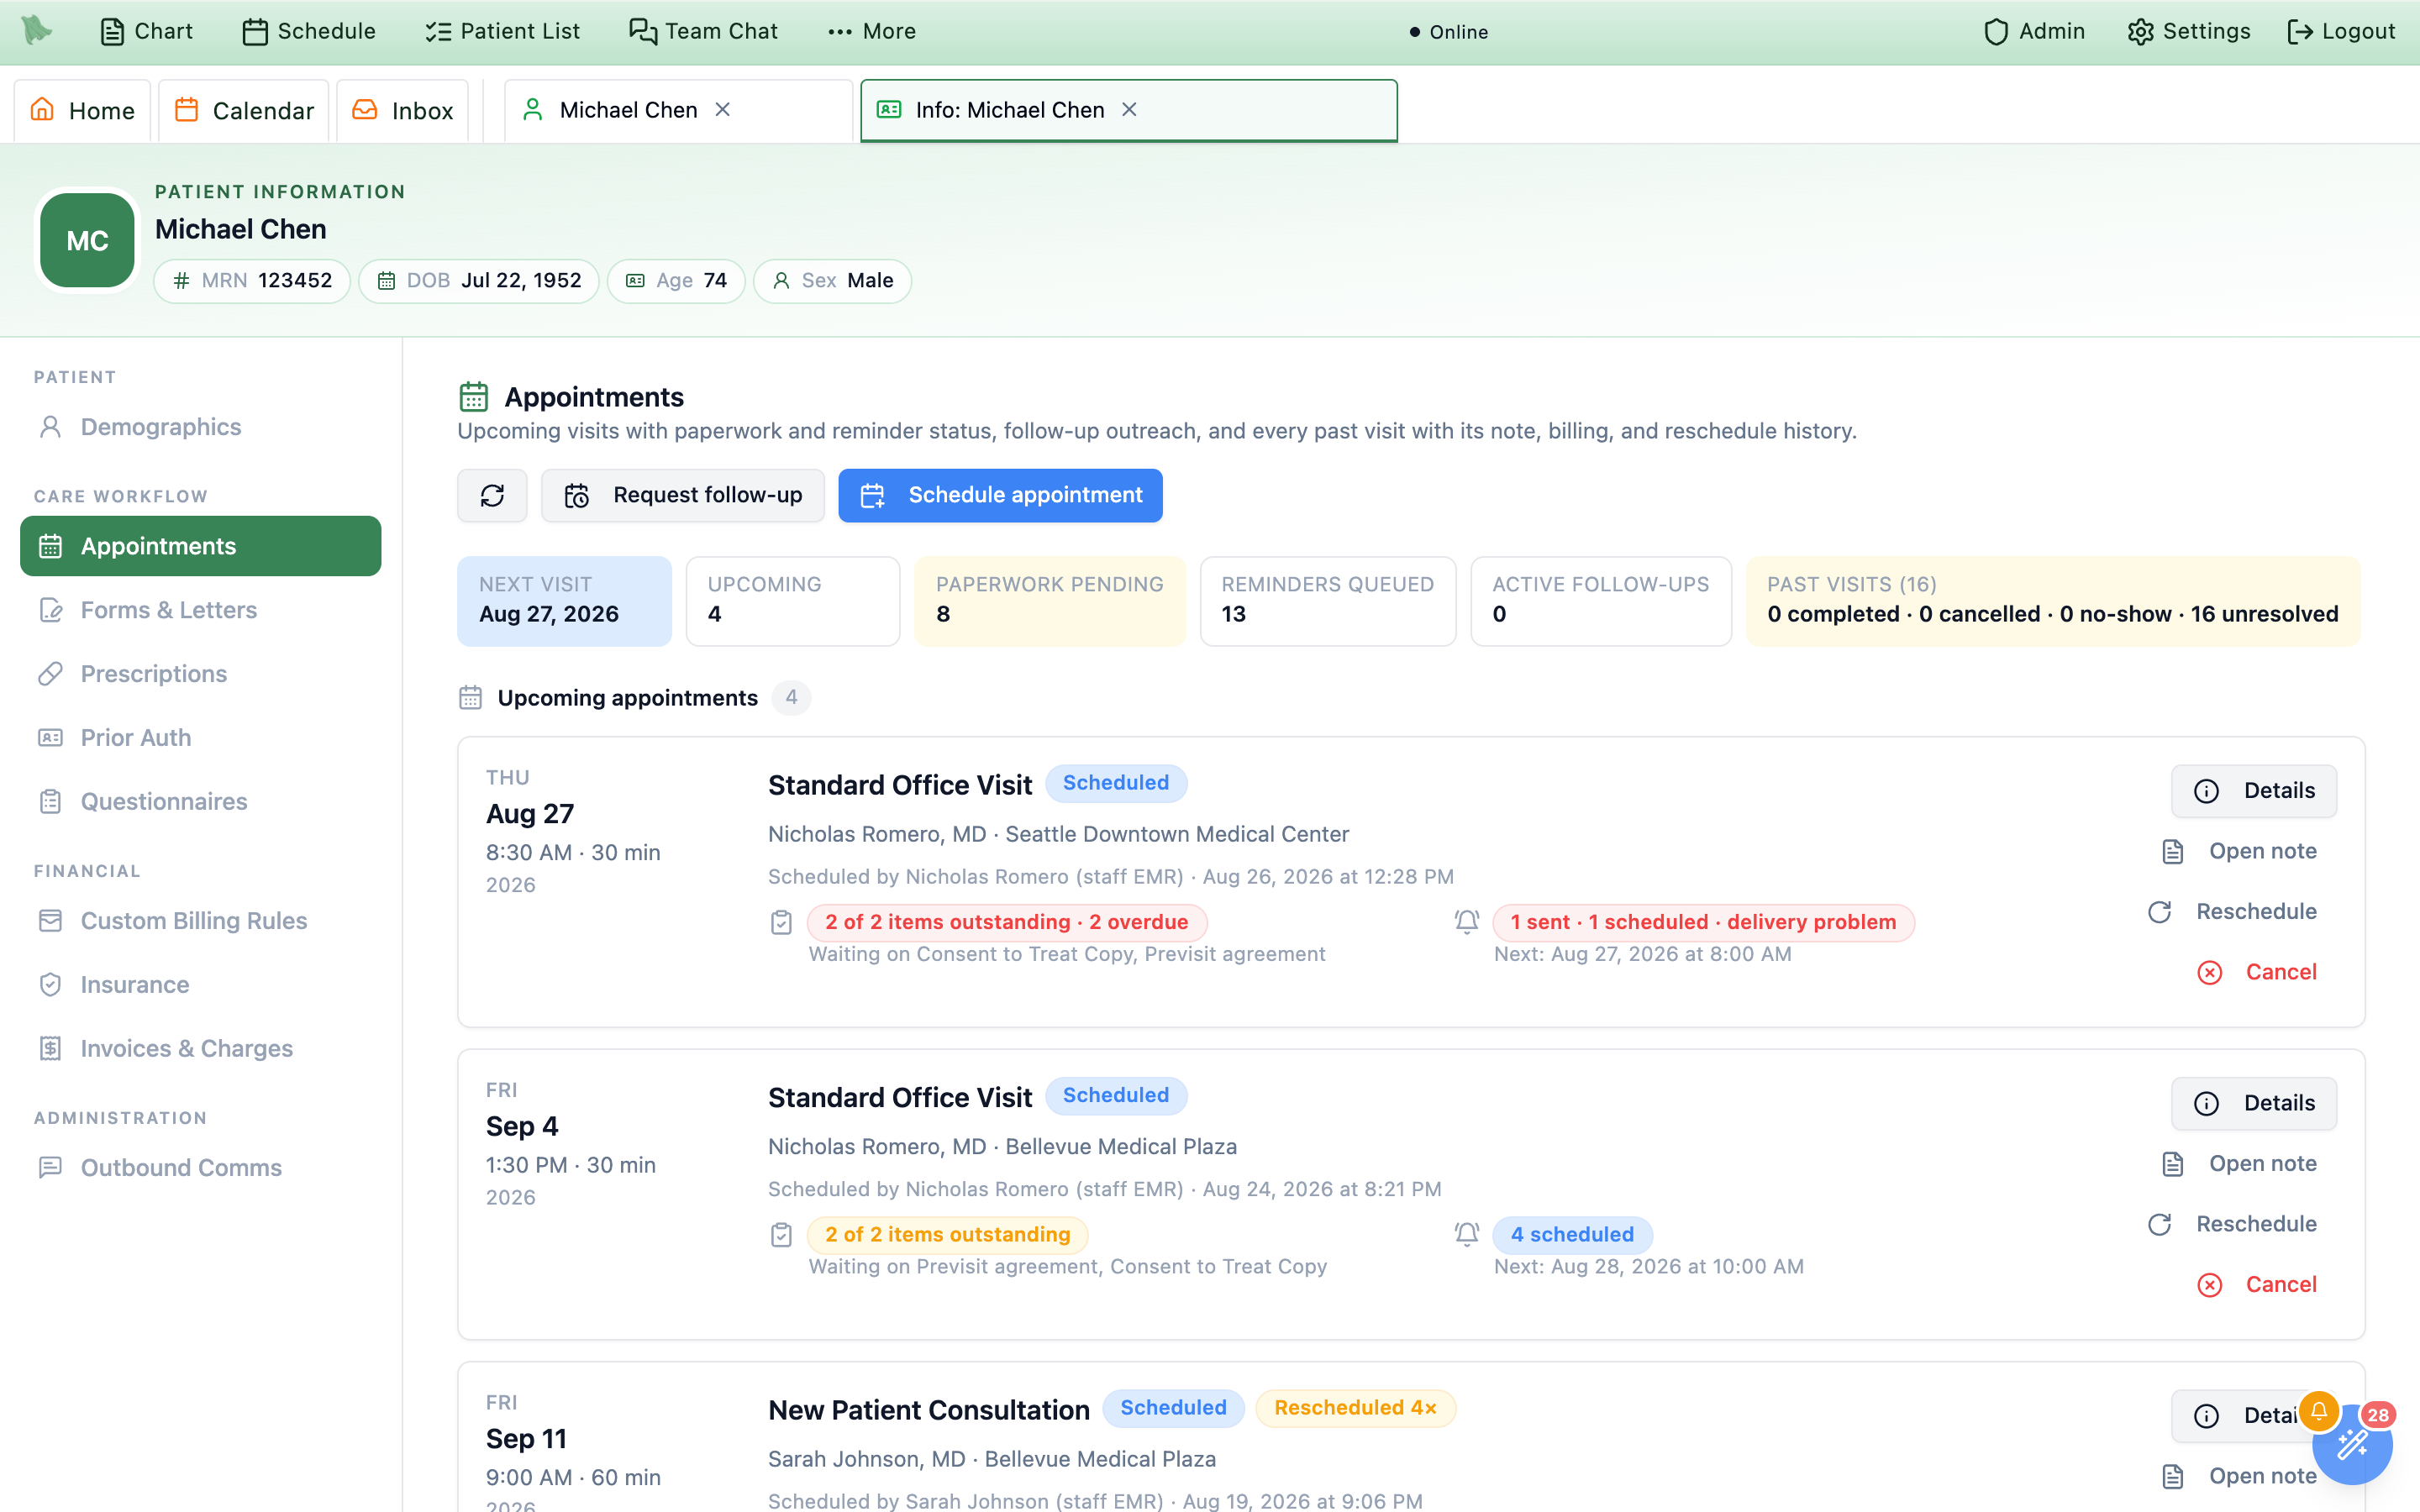
The reschedule chain is durable. Reschedule opens no dialog here — it hands you to the scheduler in reschedule mode with the visit preloaded, reusing one Scheduling tab however many times you click it. What this tab keeps is the record: a Rescheduled 4× chip on the card, Rebooked as a new appointment. on a visit that was replaced, and inside Details a Lifecycle section reading Rescheduled 4 times. above a timeline of every move — Booked, Rescheduled, Cancelled, Marked no-show, Checked in — each with its actor, its timestamp, and for a reschedule the old slot and the new one. Open the rebooked appointment and Open the appointment this replaced walk the chain.
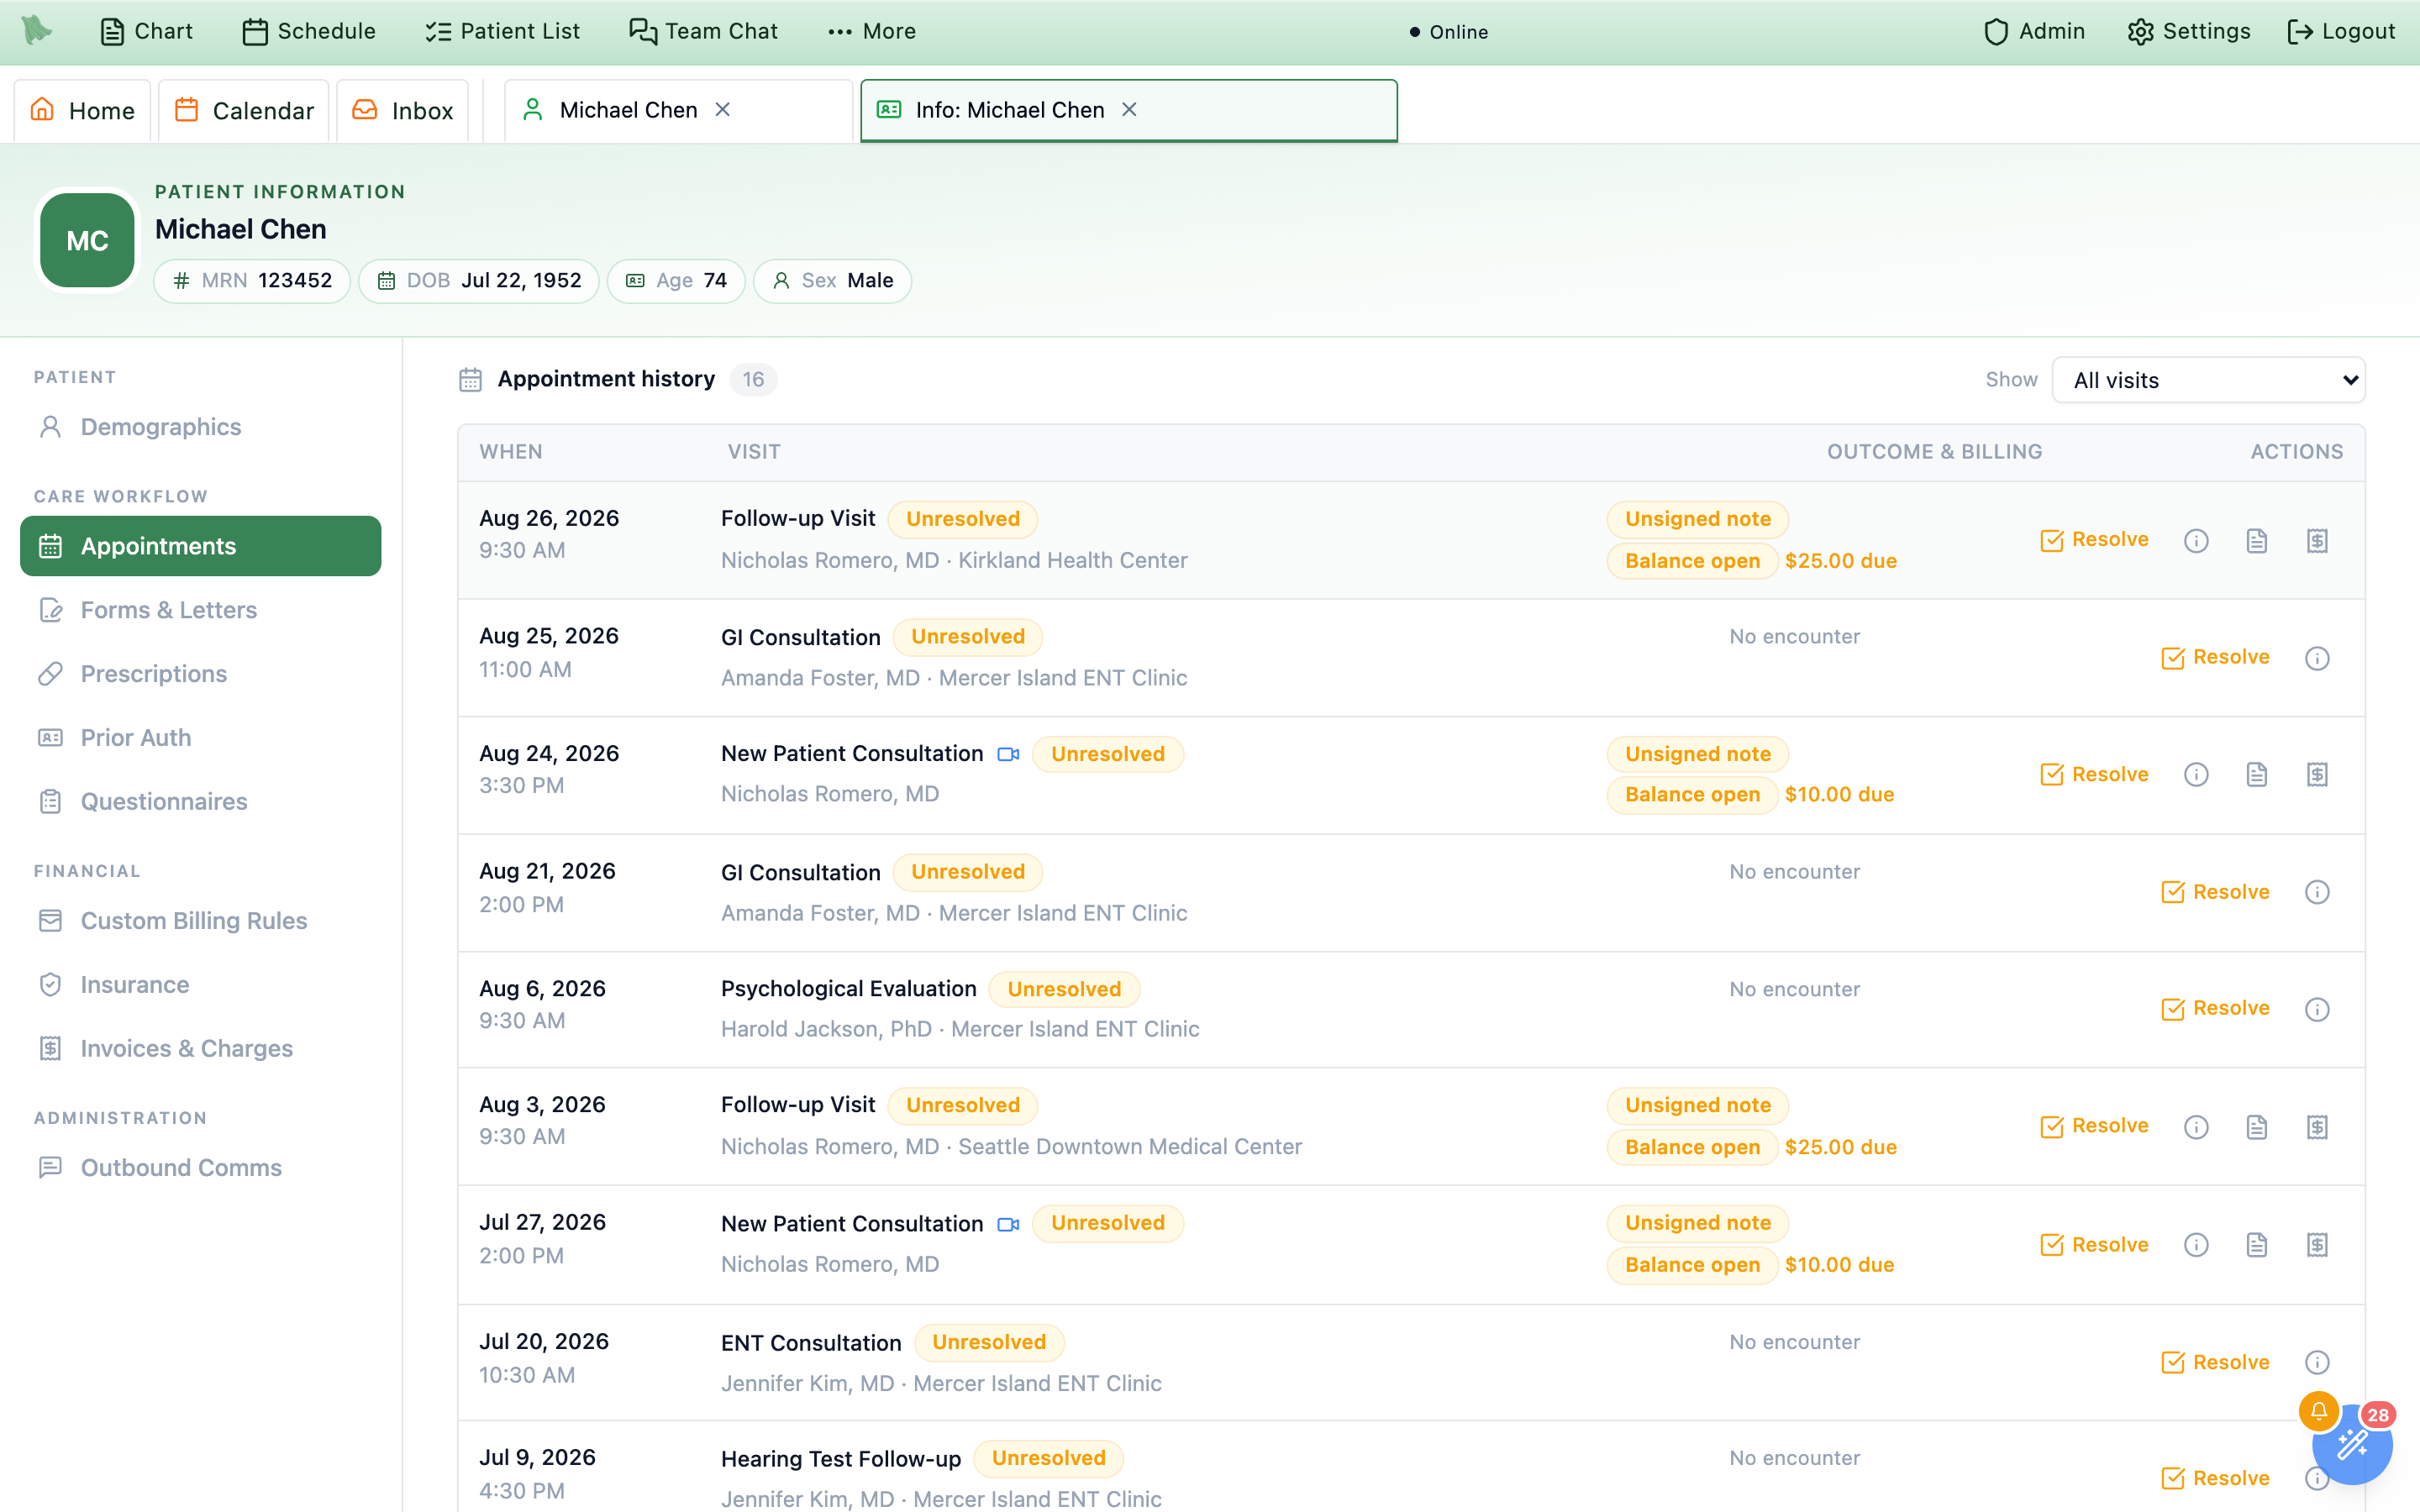
Resolve appears on every stale visit.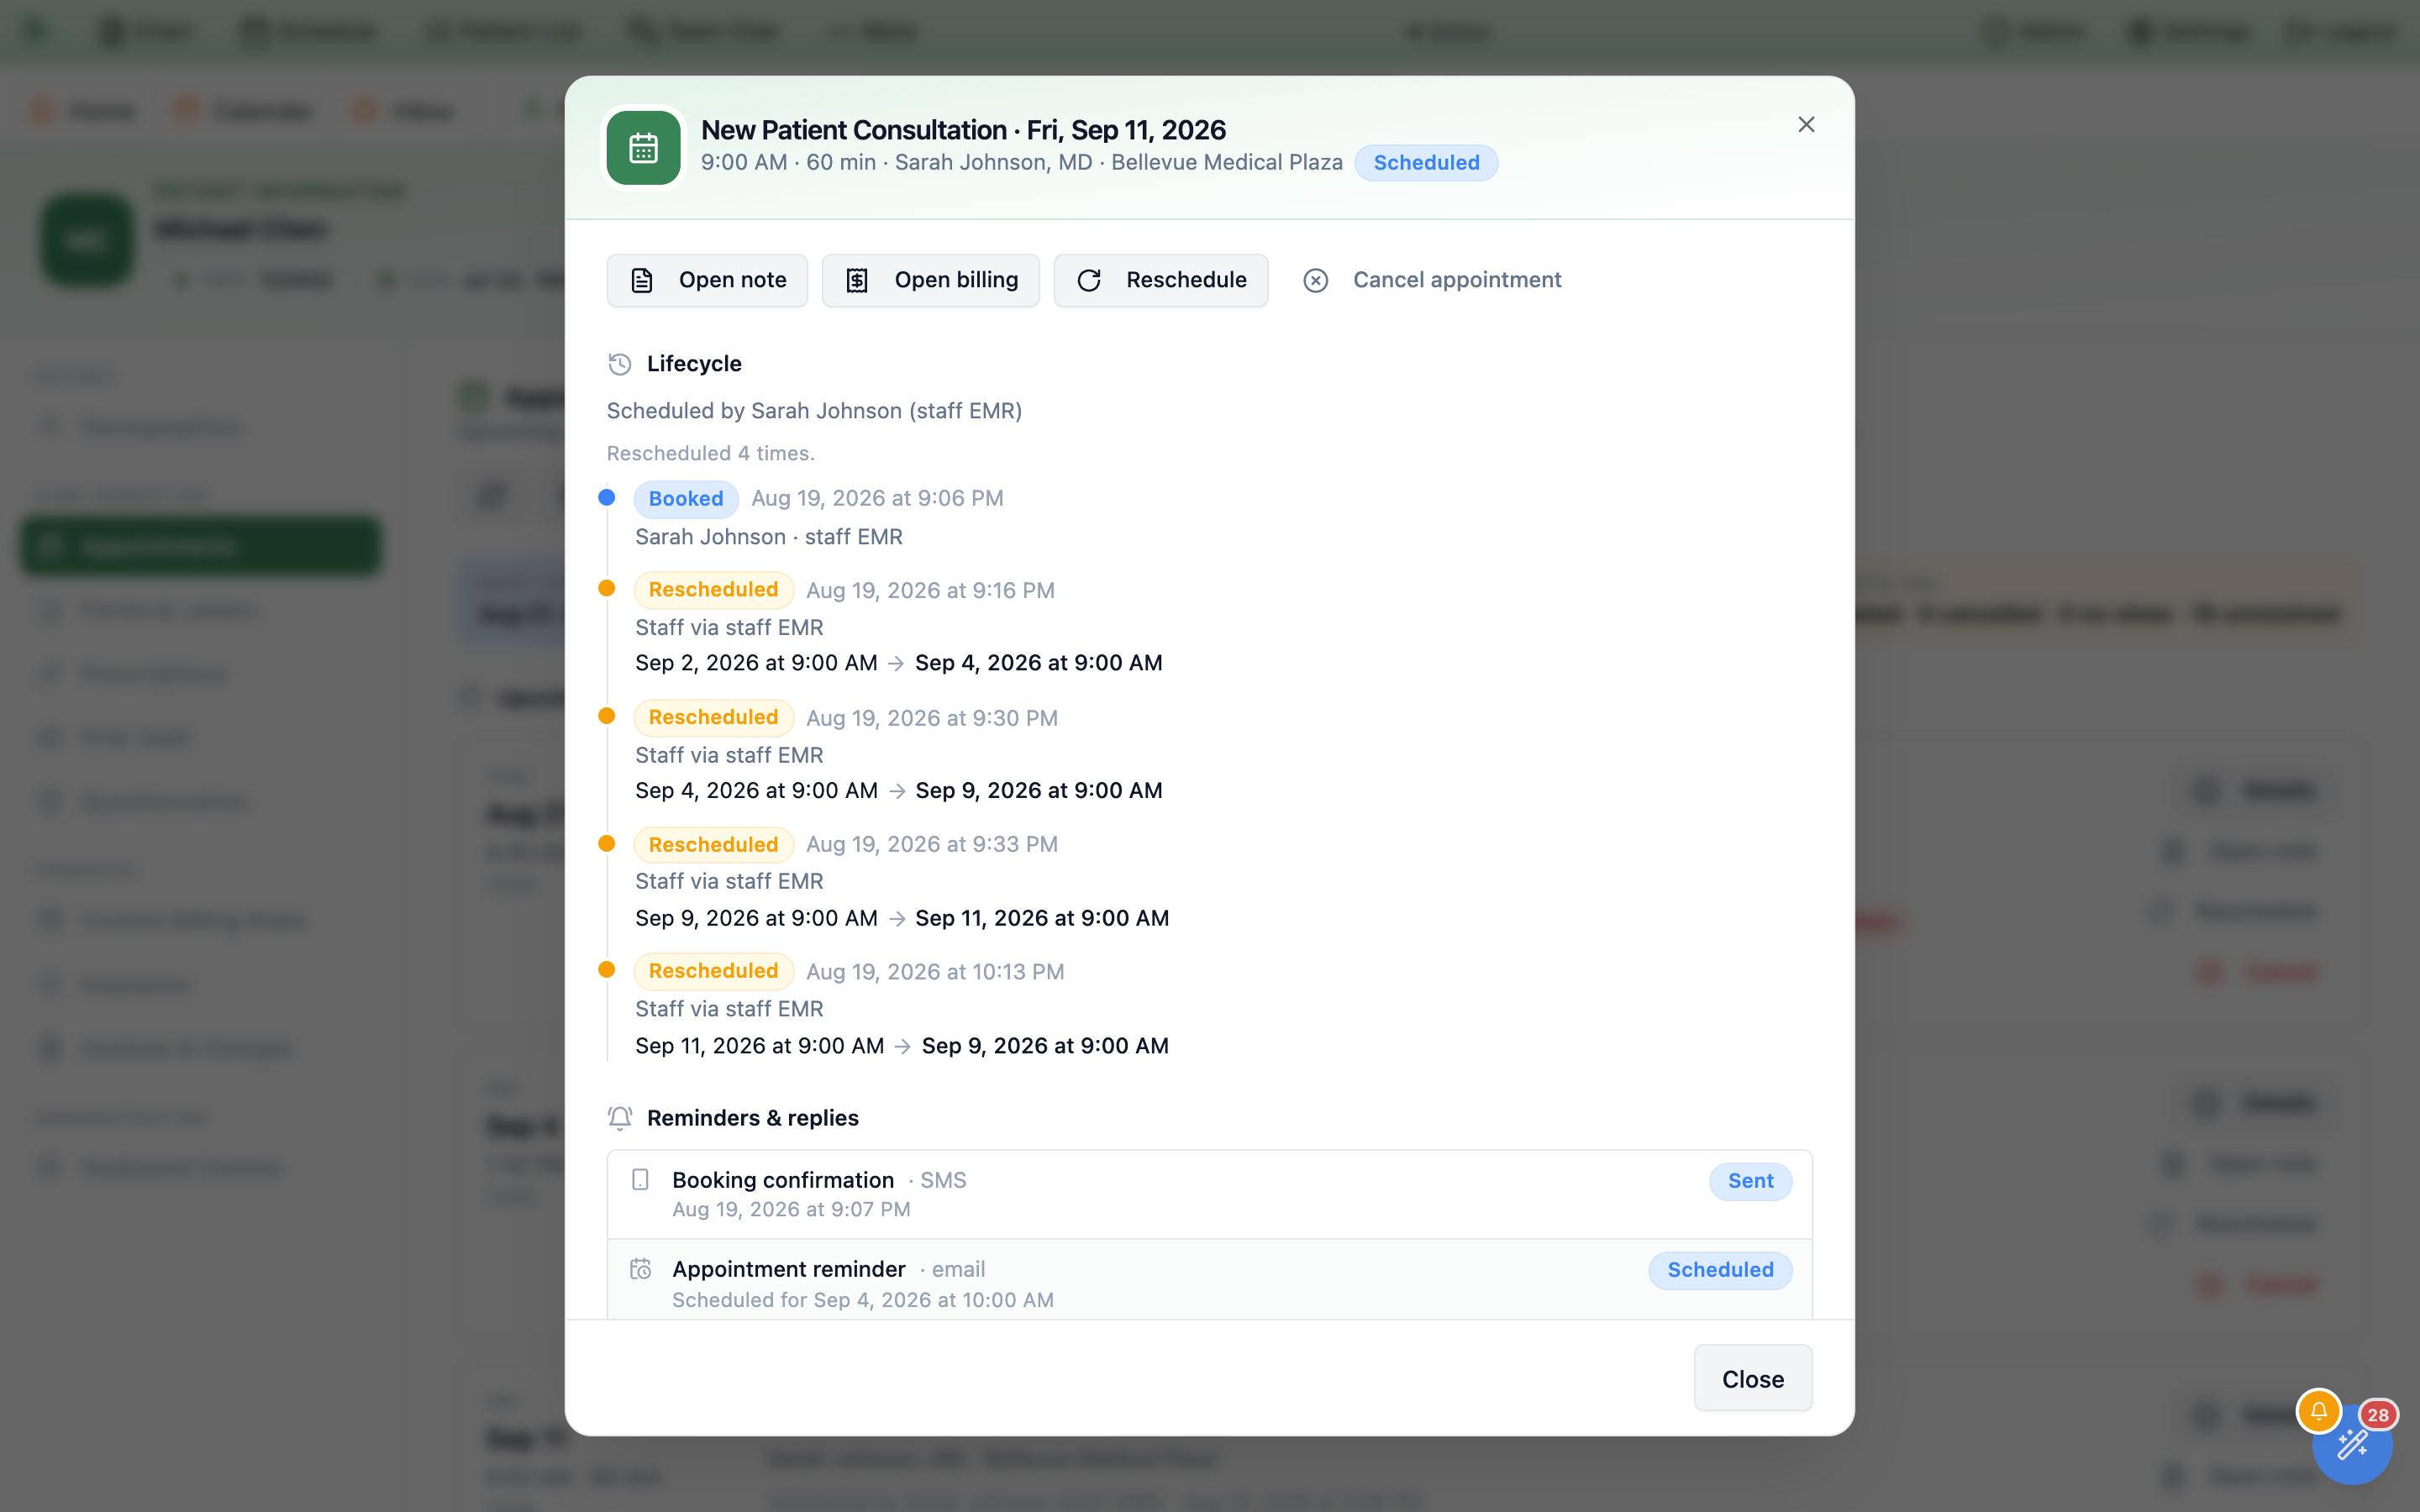
scheduling.view puts it in the sidebar and lets it load — without it the panel reads Appointment history is restricted / Your role does not include scheduling access for this practice. scheduling.manage makes it writable: Schedule appointment, Request follow-up, Reschedule, Cancel, and Resolve all disappear without it, while Details stays. Admins and physicians pass both by role. Without a billing permission the amounts are not merely greyed out — balances, claim figures, and Open encounter billing are absent from what the screen is given, so nothing here leaks a number your role cannot see. Balances themselves are worked in patient balances.Send questionnaires, automate them, read the answers
The Questionnaires tab is the per-patient counterpart to the practice-wide questionnaire rules: send one now, put this patient on their own recurring schedule (or stop a practice rule reaching them), read every result, and find out why a rule did or did not fire. A banner at the top states the precedence plainly — rules on this tab apply only to this patient and always override practice-wide questionnaire rules for the questionnaires they cover. For a patient under 18 a second banner names who actually receives the questionnaire, and warns when no guardian contact is on file to deliver it to.
-
Start with the trends.
Score trendsis the first section, shown once any instrument has at least two completed, scored results (PHQ-9, GAD-7, AUDIT-C, a youth screener or one of your own all qualify the same way). Each instrument showsLatest {score}/{max} · {interpretation}and the change since the previous result, for example▼ 4 since Sep 2, with dates on your practice’s calendar. Open one for its chart: the instrument’s severity bands (for example Minimal to Severe on a PHQ-9) are shaded behind the line in neutral tones and named in the right margin, with the scale marks at the cutoffs, then aDate/Score/Interpretationtable. Click a point or a row to read exactly how that submission was answered. Results from versions with different score ranges are not compared. With nothing to plot the section is absent rather than empty. -
Send one now.
Send a questionnairehas one button,Send Questionnaire, which expands an inline picker rather than a dialog. Type inSearch questionnairesto narrow it; your practice’s own questionnaires sort to the top, then the standard library alphabetically. Clicking a row sends it immediately — no confirmation step, no due-date field, no channel picker. Delivery follows the patient’s notification preferences, and for a minor it routes to the guardian. A greenPHQ-9 sent.confirms it; a red banner carries the reason it failed, most oftenActive assignment already existswhen one is still open. -
Send a consent, intake or other form.
The
Send a formcard sits underSend a questionnaire. ItsSend a formbutton opens a short dialog with this patient already filled in: choose the form inForm— any form your practice has published in Previsit Paperwork, including on-request-only ones such as a controlled substance agreement — and clickSend form. The patient signs it in the portal under Forms to sign; no appointment is needed. A green line confirmsSent “Consent to Treat” to {name}, andSend another formkeeps the patient selected. This is the front desk’s way to send paperwork: it needs the same patient-management permission as sending a questionnaire, not access toAdmin > Previsit Paperwork. If the list is empty, nobody has published a form yet — an administrator does that in the paperwork manager. -
Put the patient on their own schedule.
Automatic questionnaires for {first name}lists this patient’s rules;+ Add ruleopensNew patient rule. Pick a mode —Send automaticallyorStop automatic sending(practice-wide rules will never auto-send these to this patient) — choose the questionnaires, and for a sending rule chooseWhen:On a schedule,When a visit is booked, orWhen a visit starts. A scheduled rule takes a cadence:Monthly,Every 3 months,Every 6 months,Yearly, or your ownEvery N daysup to 1,095. Each saved rule becomes a card with anActiveorPausedpill, a plain-English subtitle (Blocked from org-wide sending, Every 3 months), andPause/Resume, edit, and delete controls. -
Check what the practice is already doing.
Practice-wide rules for this patientis a collapsed panel counting the org rules that reach this patient, plus how many are partly or fully overridden by patient rules. Expand it and each rule shows its triggers and its questionnaires, with any questionnaire a patient-level rule has taken over struck through and labelledOverridden by patient rule. -
Read the timeline.
Previous & upcominglists everything sent plus what is scheduled next. Filter withAll,Upcoming,Completed,Missed; search by name; sort byNewest first,Oldest first,Questionnaire, orScore. Each row carries a badge —Scheduledfor a projected future send (drawn with a dashed border, because it does not exist yet),Sent — awaiting completionfor a real assignment, thenCompleted,Skipped, orExpired— a score chip where one exists, the date (Next around…,Due…, or the completion date), and where it came from:Sent manually,Patient rule · PHQ-9 every 3 months,Practice rule · Follow-up Visit questionnaires, orPhone agent. Click a completed row and its answers open inline underneath, question by question, with any safety flag and the item it fired on marked. When the questionnaire scores domains separately, aSubscalesbreakdown shows each domain’s score and cutoff result — see Score, timing, and every answer. A questionnaire that ended without answers says why:Skipped,Declined,Expired,Withdrawn (visit changed),Withdrawn (visit cancelled), orReplaced (updated version). -
Cancel one that was sent by mistake.
A sent questionnaire the patient has not started has a
Cancellink on its row.Cancel questionnaireexplains “The patient will no longer see this questionnaire. It stays in the chart marked Skipped.”; confirm withCancel questionnaireor back out withKeep it. If the patient has just started it, Hero refuses: “Could not cancel this questionnaire. The patient may have just started it. Refresh and try again.” -
Record a refusal, or fill it in with the patient (optional feature).
With
Social needs screeningturned on inAdmin → Additional Features(off by default), an open questionnaire’s row also offersPatient declined(sent or started) andFill in with patient(not started yet).Patient declinedopens Patient declined to answer (“The patient will no longer see this questionnaire. The chart shows it as Declined, and shared records report that the patient declined to answer.”), with an optionalNote (optional, stays in the chart); clickRecord as declined. A declined questionnaire is never scored.Fill in with patientopens the questionnaire so you can enter the answers in the office, thenSave answers; every required question must be answered (“… or close and use ‘Patient declined’ if they would rather not answer.”). The same feature adds the social needs and behavior screeners (Hunger Vital Sign, the CMS social needs screening tool, financial strain, education, stress, physical activity, social connection and intimate partner violence) to your questionnaire library. -
Act on a positive social needs screen.
Under a completed social needs screener with a positive answer,
Suggested next stepslists each need (for example Food insecurity) with Concern: … · Goal: … and a referral idea (“Refer to a food assistance program (SNAP, WIC, food bank)”).Add to chartadds that concern and goal to Goals, health concerns & health status and then readsAdded. It needsGoals, health concerns and health statusturned on and permission to edit the problem list; otherwise the button is greyed out and says which is missing. -
Debug a rule that did not fire.
Rule checksanswers “why did this patient not get it?” Each rule shows anApplies,Does not apply,Suppresses, orOverriddenpill, aPatient rule/Practice rulescope pill, its triggers, and how many upcoming visits matched.Patient criterialays each condition out in three columns — the criterion, thePatient / visitvalue, and what theRule expects— andUpcoming visit checksrepeats that per visit for the next few appointments. A row reading visit typeStandard Office Visitagainst an expectedFollow-up Visitis the whole answer. -
See what the rules actually did.
Rule checksanswers “what would happen now”; the collapsedWhy questionnaires were or weren't sentat the bottom answers “what happened, and why”. Its summary reads, for example, 12 times the rules ran · 3 not sent. Each entry is one run —Visit booked,Visit changed (type, provider or time),Visit note opened,Portal registration,Date of birth corrected, orQuestionnaires withdrawn— with its time, the visit, and one line per rule markedSent,Already there,Skipped,Not sentorWithdrawn, the deciding reason first, in your practice’s words: “Not sent: patient is 16, rule is for 18+”, “Not sent: pre-visit forms are off for ‘Follow-up’ visits”, “Not sent: visit type ‘Follow-up’ is not one of the rule’s visit types”, “Not sent: the visit was booked more than 7 days ahead”.Show all Nlists older runs; with none it readsNo questionnaire rule has run for this patient yet.
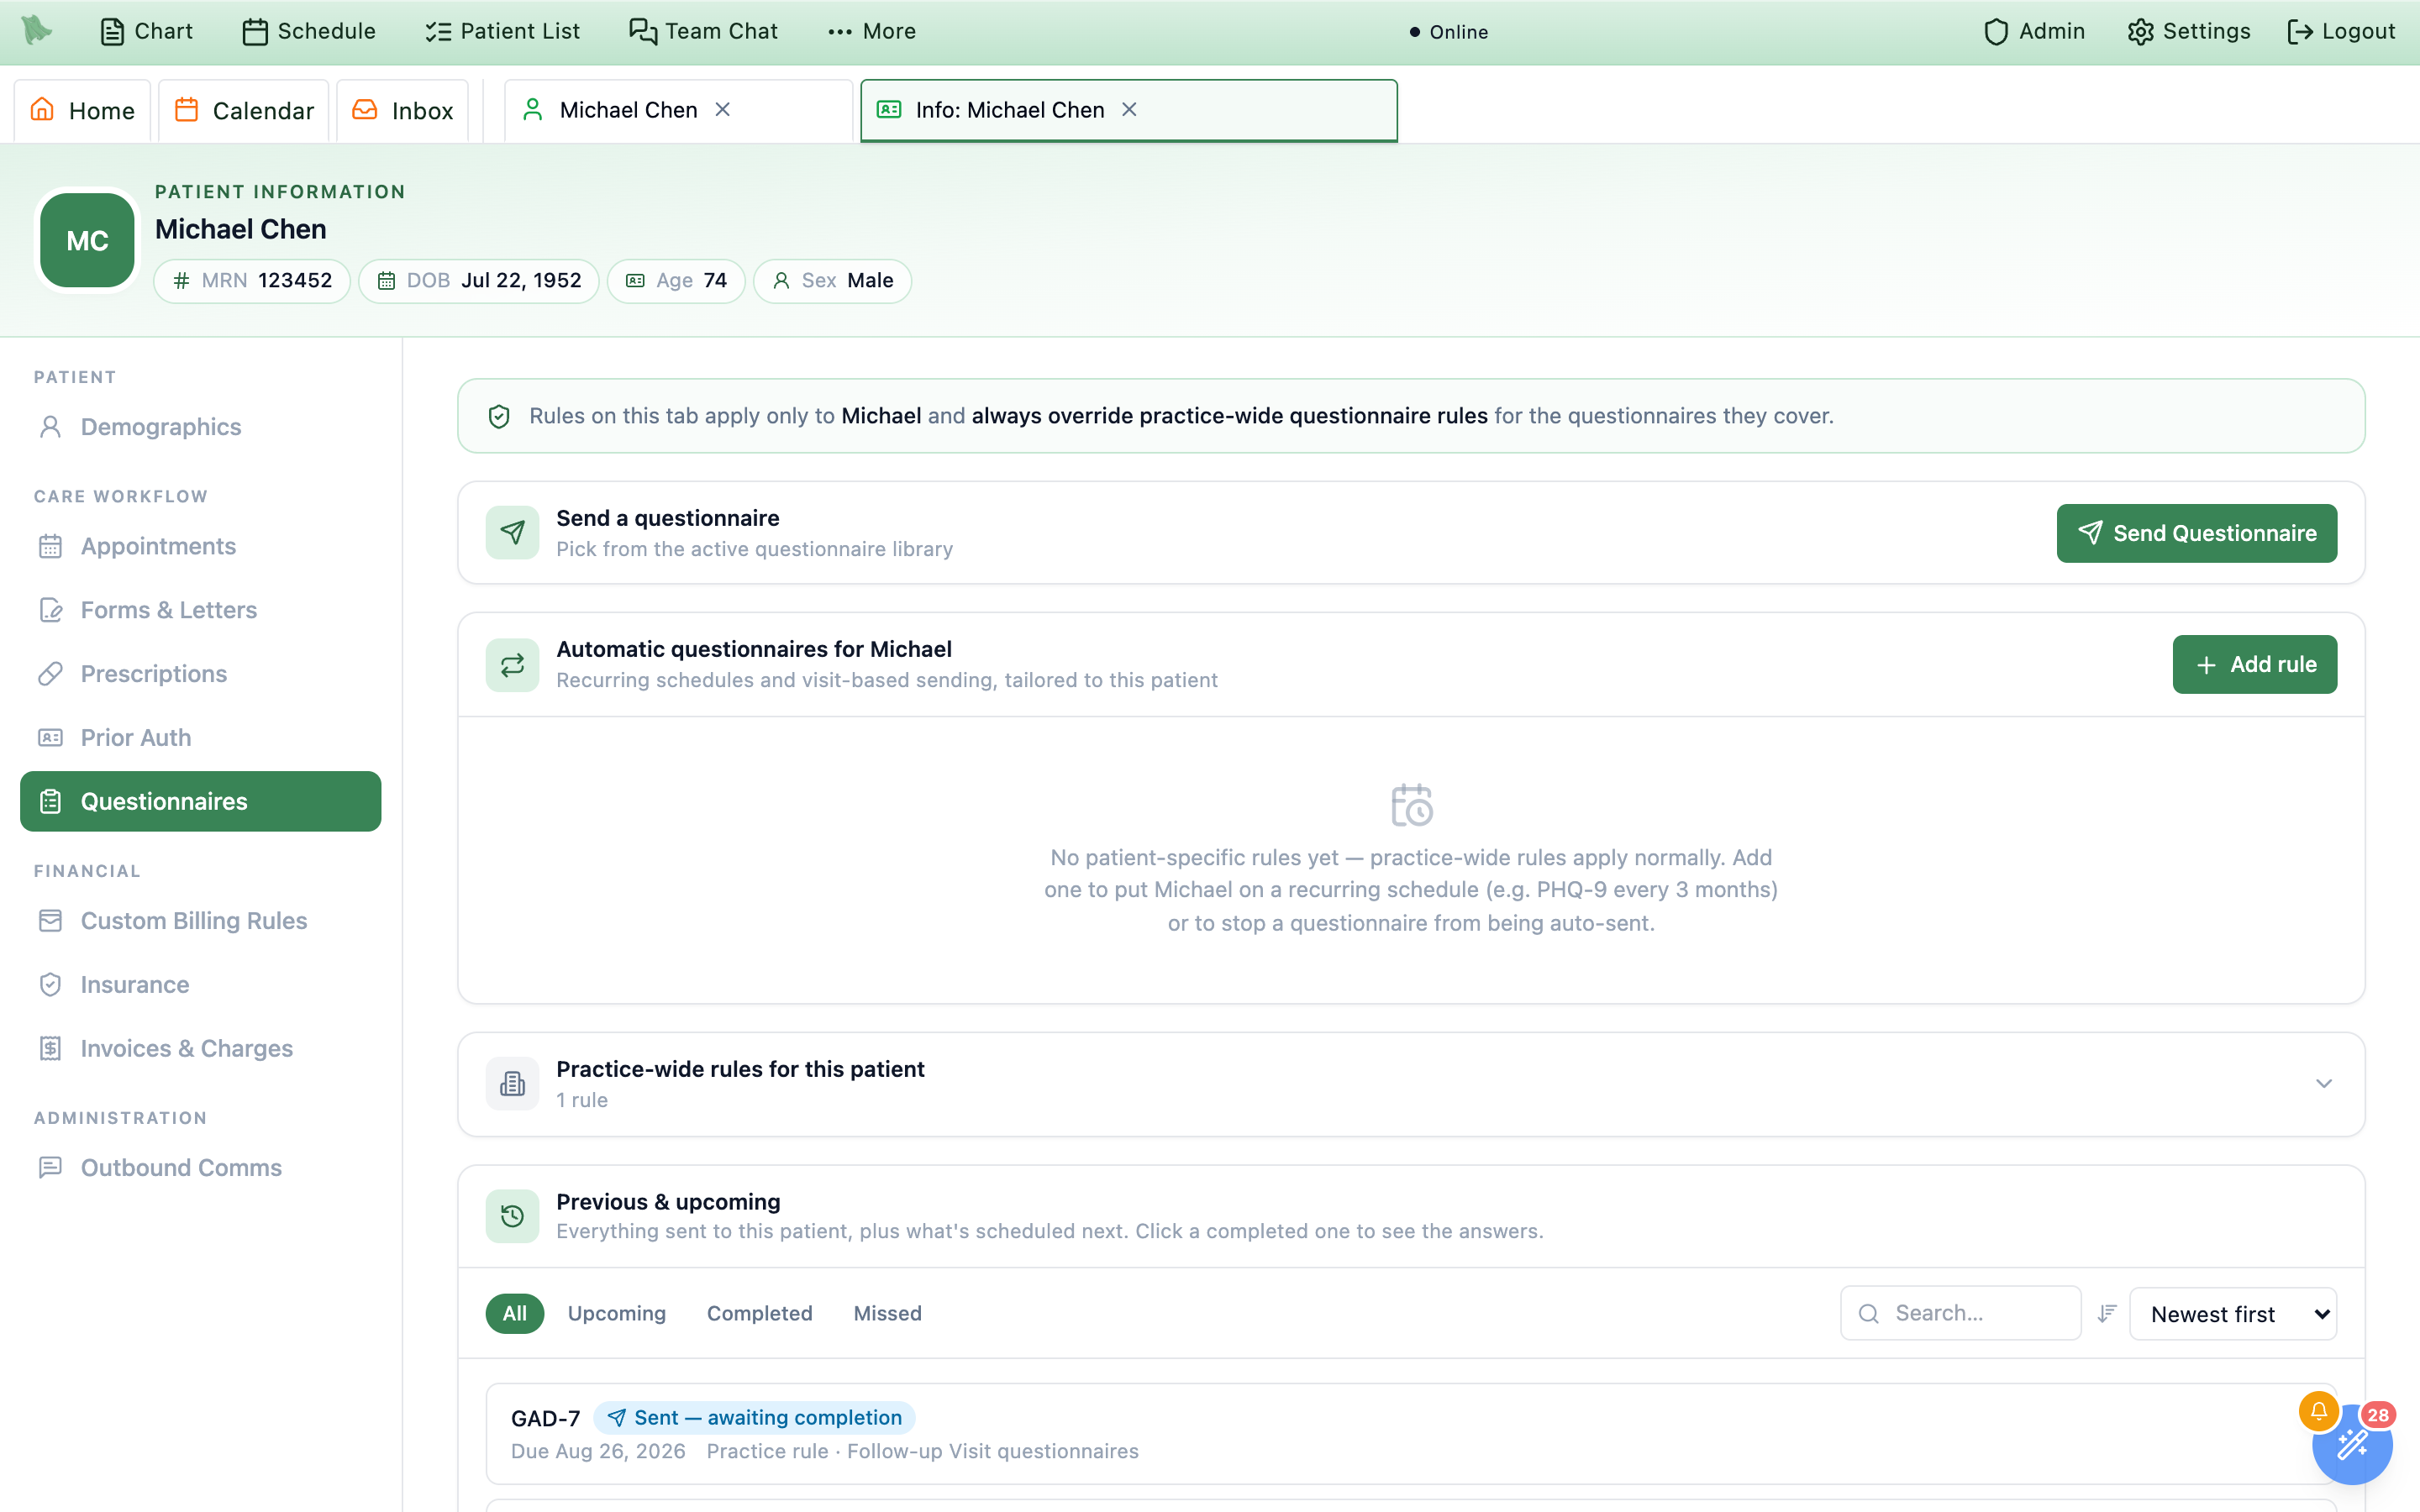
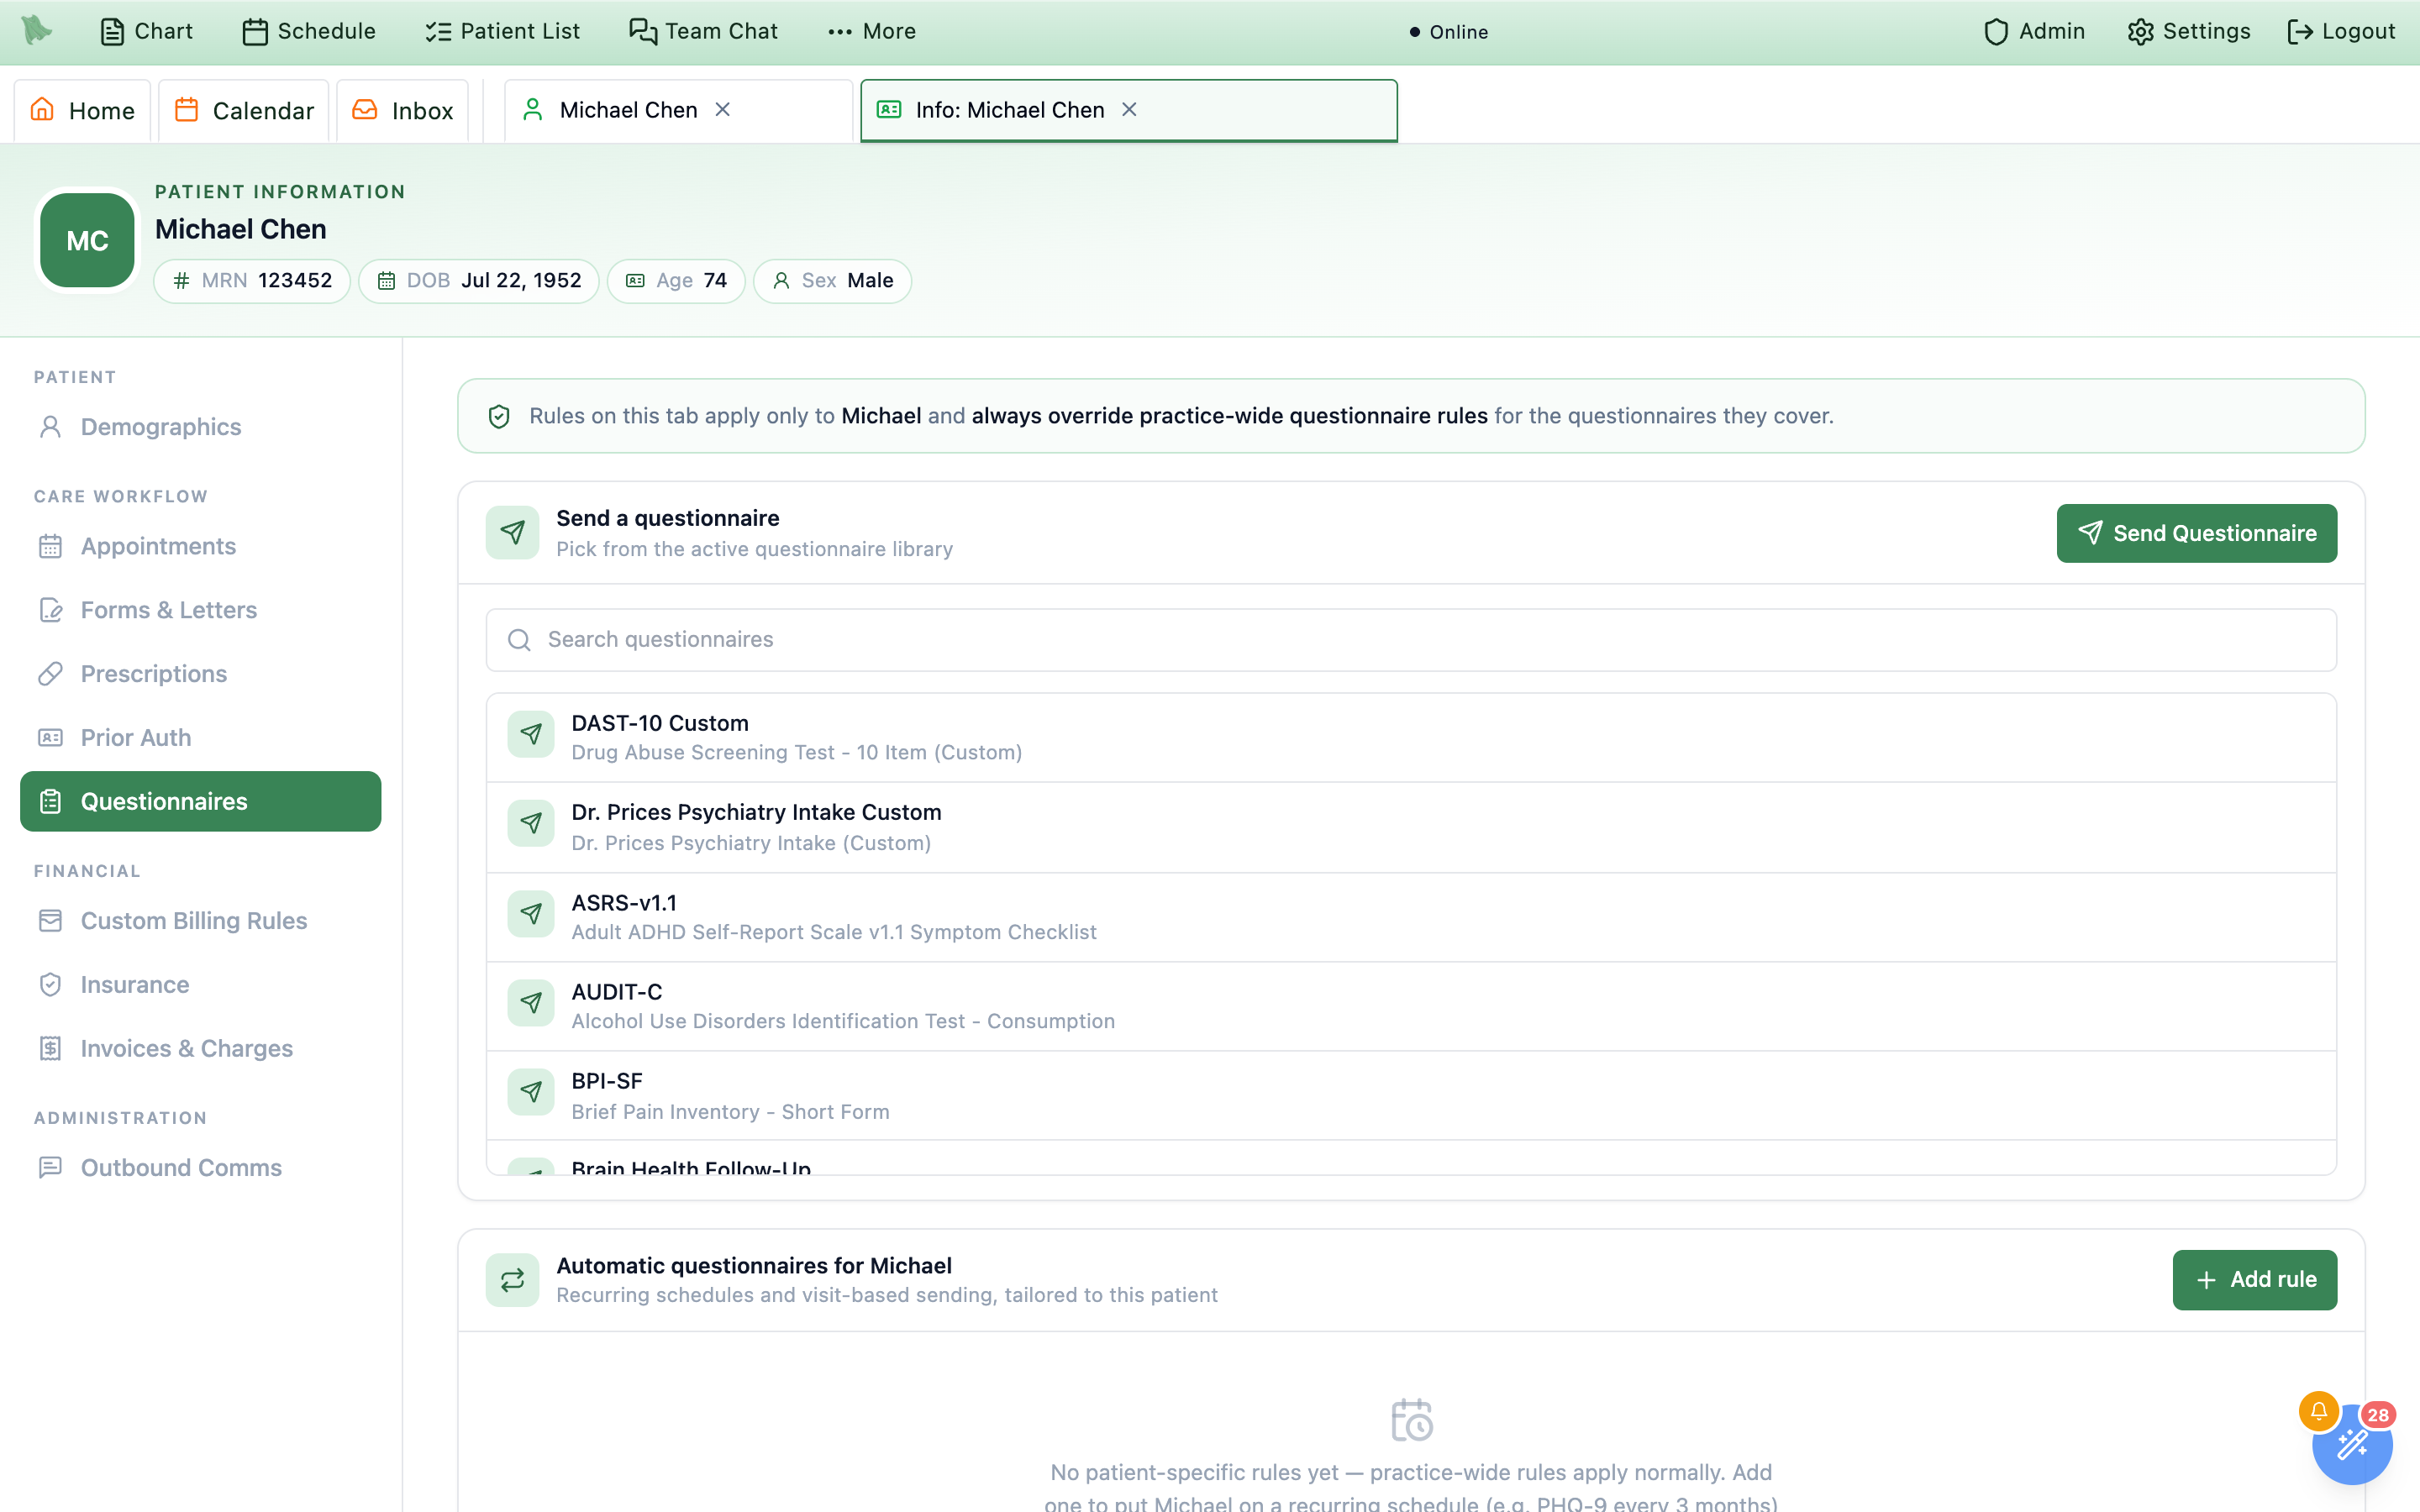
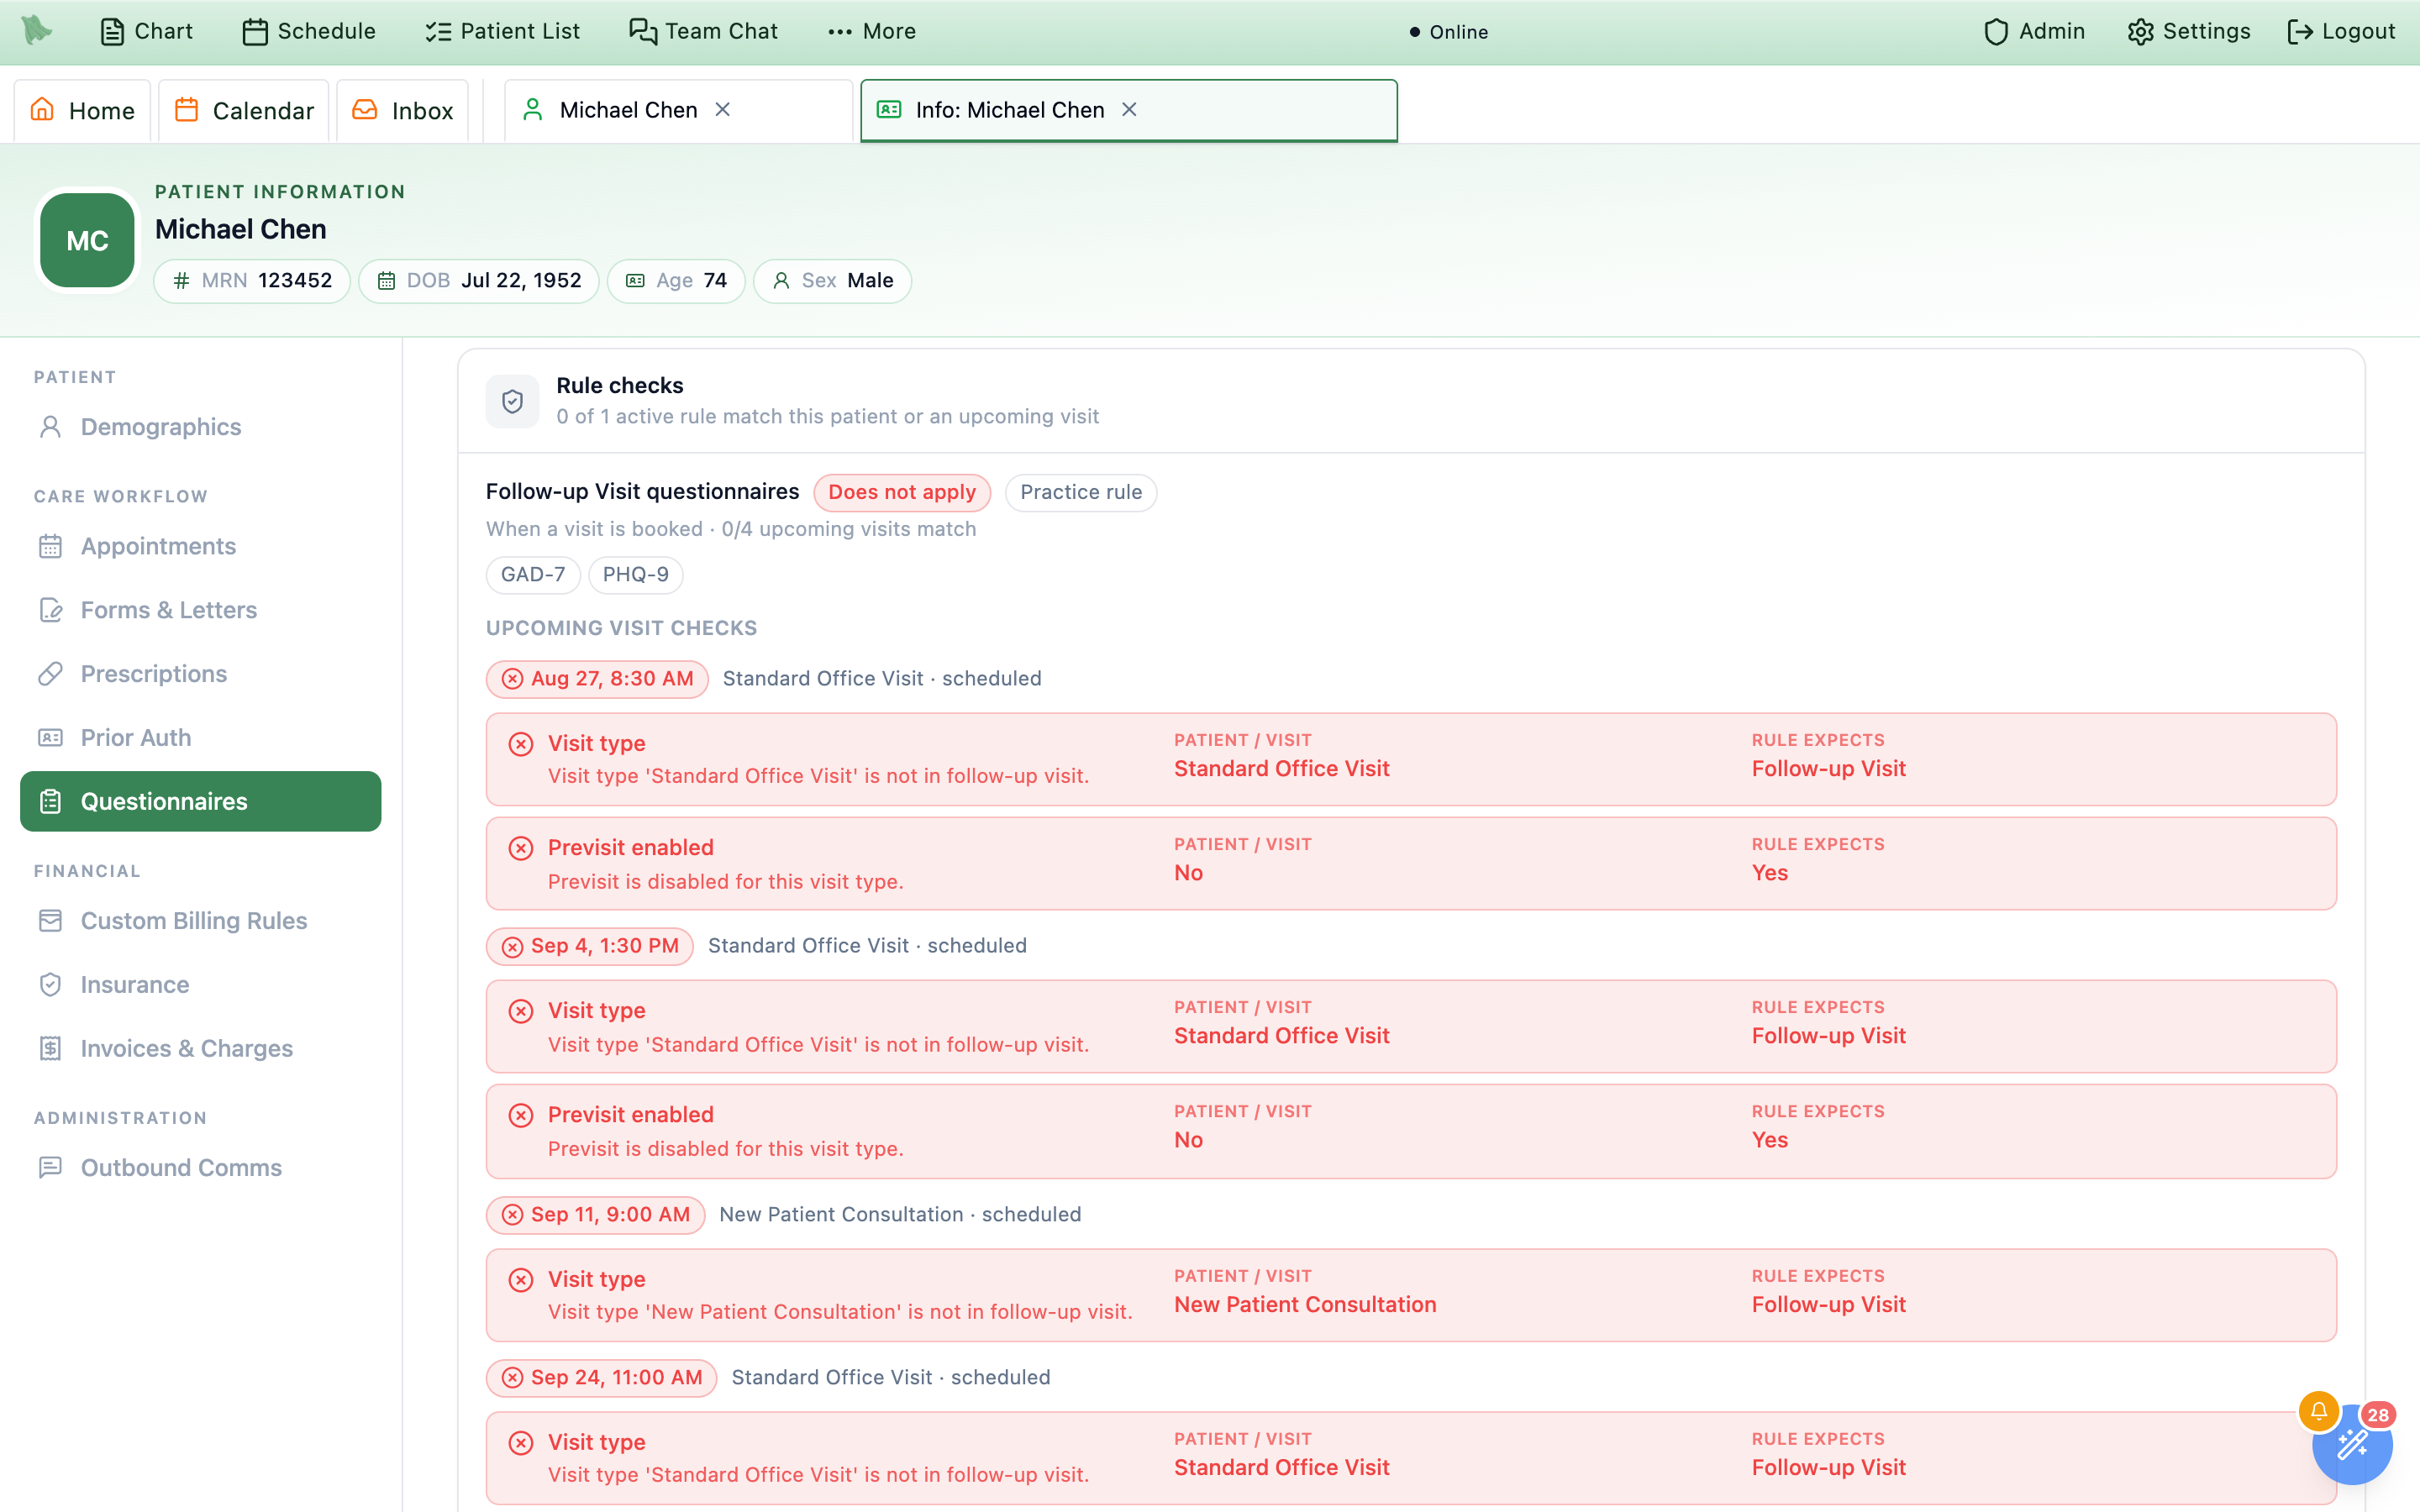
Rule checks shows the comparison that failed, per rule and per upcoming visit.Send a questionnaire, Send a form, Cancel and the whole rule editor need patient-management permission — physicians and admins have it by role, staff need it granted; without it the patient’s rules are read-only. Answers, scores, interpretations and safety flags need intake review or visit-note access (physicians, administrators, and staff who review intake or read visit notes); other staff, such as the front desk, still see which questionnaires were sent or completed and when, but opening the answers says “Your role can't see questionnaire answers or scores. Staff who review intake or read visit notes can.” Building the questionnaires themselves is covered in the questionnaire library.Stop automatic sending rule silently re-exposes the patient to every practice-wide rule it was blocking, so pause it instead if you only want a break.The whole prescribing trail for one patient
Prescriptions sits under Care workflow in the sidebar and answers the question the chart’s medication list can’t: did the pharmacy actually get it? The header reads Prescription history over “Everything prescribed for {first name}, newest first. Open a row for the pharmacy trail, the raw Surescripts XML that was sent, and the EPCS signature on controlled substances.” Admins, physicians, and staff holding prescription.view can read it; placing an order from here — New prescription or Reorder — is physician and admin only, and those buttons are simply absent for view-only staff rather than greyed out. Every row you open is recorded as a chart access. For the read-only medication list itself, see the Medications tab.
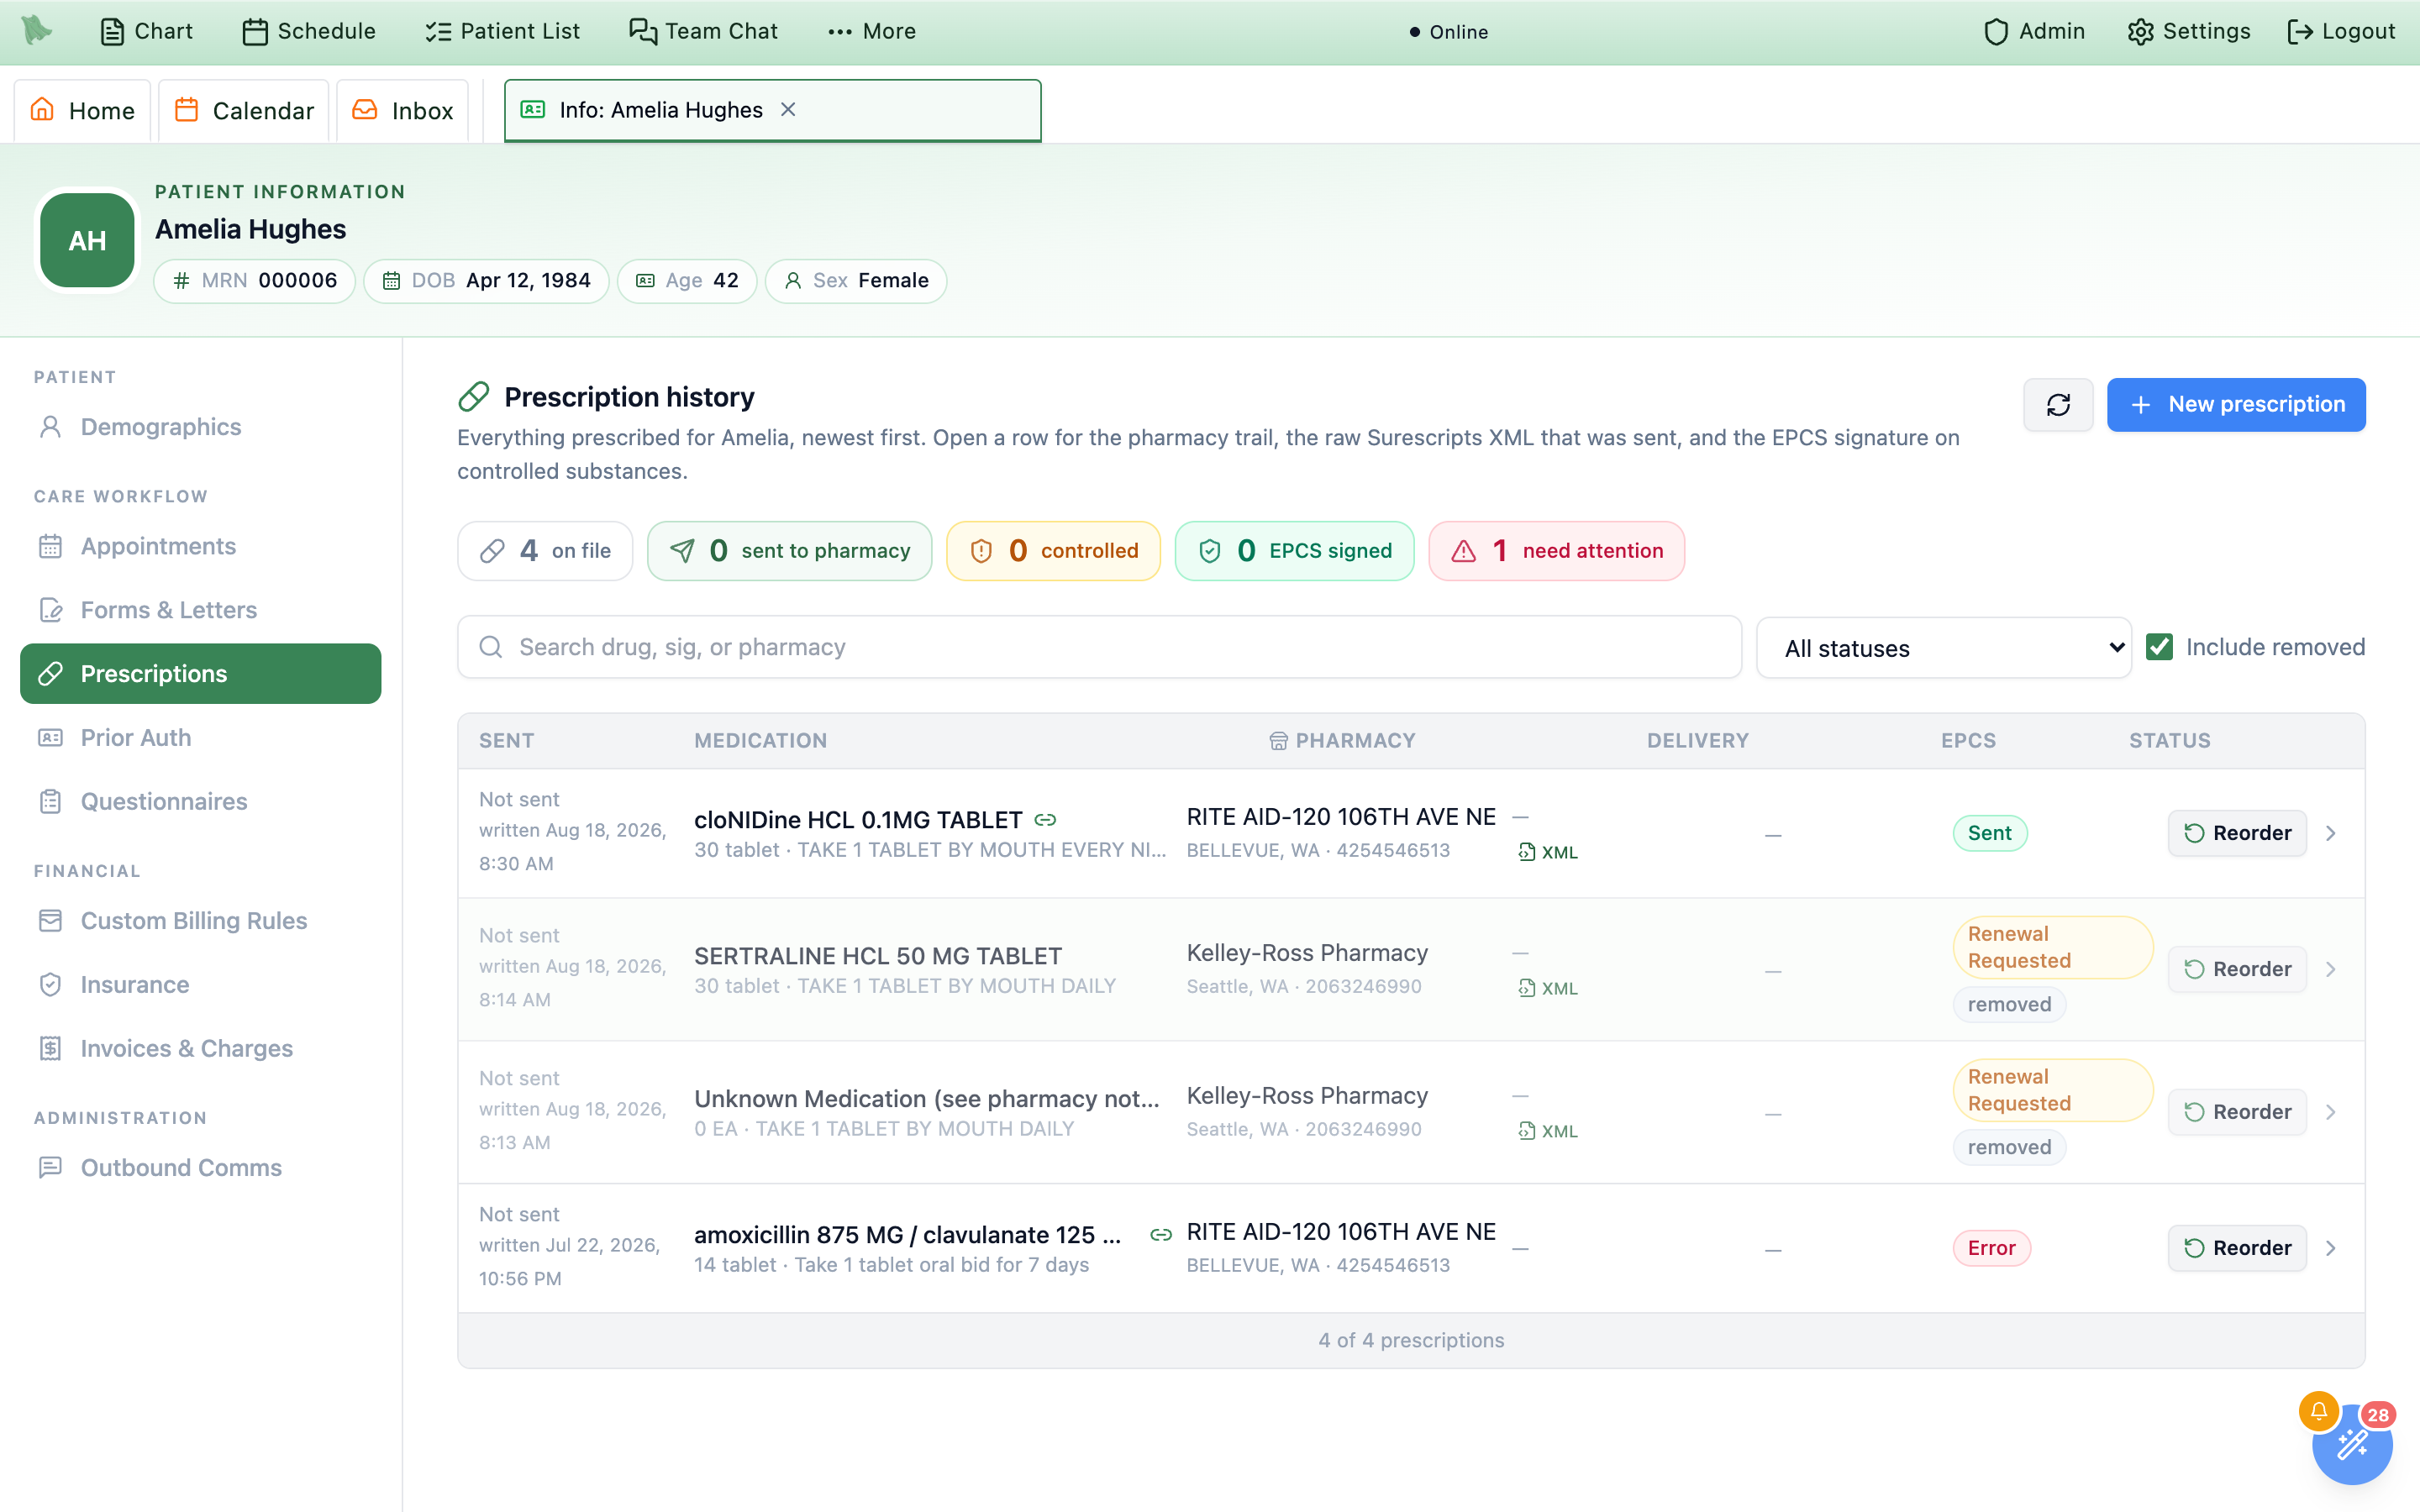
-
Read the counters first.
Five chips:
on file,sent to pharmacy,controlled,EPCS signed, andneed attention, the last shown only when it is above zero.need attentioncounts prescriptions inError,Denied, orPending signature, plus anything whose Surescripts reply came back as an error, failure, or denial. Thecontrolledchip is also a button: click it to filter the list to controlled substances, click again to release it. -
Narrow the list.
Search drug, sig, or pharmacymatches the drug description, the sig, and the pharmacy name;Filter by statusholds one status at a time, starting atAll statuses.Include removedis on by default, which is why cancelled and replaced prescriptions appear, faded, with a greyremovedchip. There is no sort control — the list is always newest-sent first, and long histories load 50 rows at a time as you scroll. -
Read a row.
Sentis the transmission time.Medicationis the drug — with an amberCII-style pill on controlled substances — over a line of quantity · refills · sig.Pharmacy,Delivery(the Surescripts status, a reply count, and anXMLlink),EPCS, andStatusfollow. -
When the
Sentcell saysNot sent. The prescription has no send time and no transmission date on record — it was printed, faxed, never transmitted, or is still waiting on a signature. A smallerwritten {date, time}line underneath tells you when it was created, the Overview fieldSent to pharmacyreadsNot transmitted, and the Surescripts tab says “No Surescripts messages recorded for this prescription (it may have been printed, faxed, or never transmitted).”
| Status | What it means |
|---|---|
Draft / Pending Signature | Written but not signed. Nothing has left the practice. |
Signed | Signed but not sent — the filter spells this out as Signed, not sent. |
Sent | Transmitted to the pharmacy. |
Active | The pharmacy confirmed it. |
Renewal Requested / Change Requested | The pharmacy asked for a renewal or a change; the prescriber has yet to answer. |
Cancellation Pending | You asked the pharmacy to cancel it and no answer has come back yet. Filter by status lists it as Cancellation pending. |
Error / Denied | Transmission failed or the request was refused — these drive need attention. |
Completed / Discontinued / Canceled | Finished, stopped, or withdrawn. |
removed | A grey companion chip, not a status: the row was cancelled or replaced, and shows only because Include removed is ticked. |
Clicking a row opens the detail dialog; clicking its XML link opens the same dialog straight onto the Surescripts trail. The dialog is titled with the drug and subtitled Prescribed by {name} · written {date}, over a strip of pills — the status, Surescripts: {status}, Controlled, the EPCS state, and In medication list or Not in medication list. Four sections sit below it, the last three carrying a count badge:
Overview & Timeline
Overview is three field grids: the product (Drug, Quantity, Days supply, Sig, Refills, RxCUI, NDC), the parties (Pharmacy with its NCPDP and address, Prescriber with NPI, and the Encounter it belongs to — or Standalone — not tied to an encounter), and the transmission facts (Sent to pharmacy, Written, Signed, Message ID, and Lineage when this prescription replaces or was replaced by another). Timeline is the lifecycle audit — each event, its before → after status, the time, and who did it.
Surescripts & XML and EPCS signing
Surescripts & XML is the ground truth for delivery: one card per message with a Sent or Received direction pill, the message type, an ok or error pill, the message IDs, and View raw XML to read exactly what went over the wire. EPCS signing shows the signature on a controlled prescription — signed at, device, signer, signature hash, and each two-factor session. On anything else it reads “Not a controlled substance — no EPCS two-factor signature is required.” See EPCS for the signing ceremony itself.
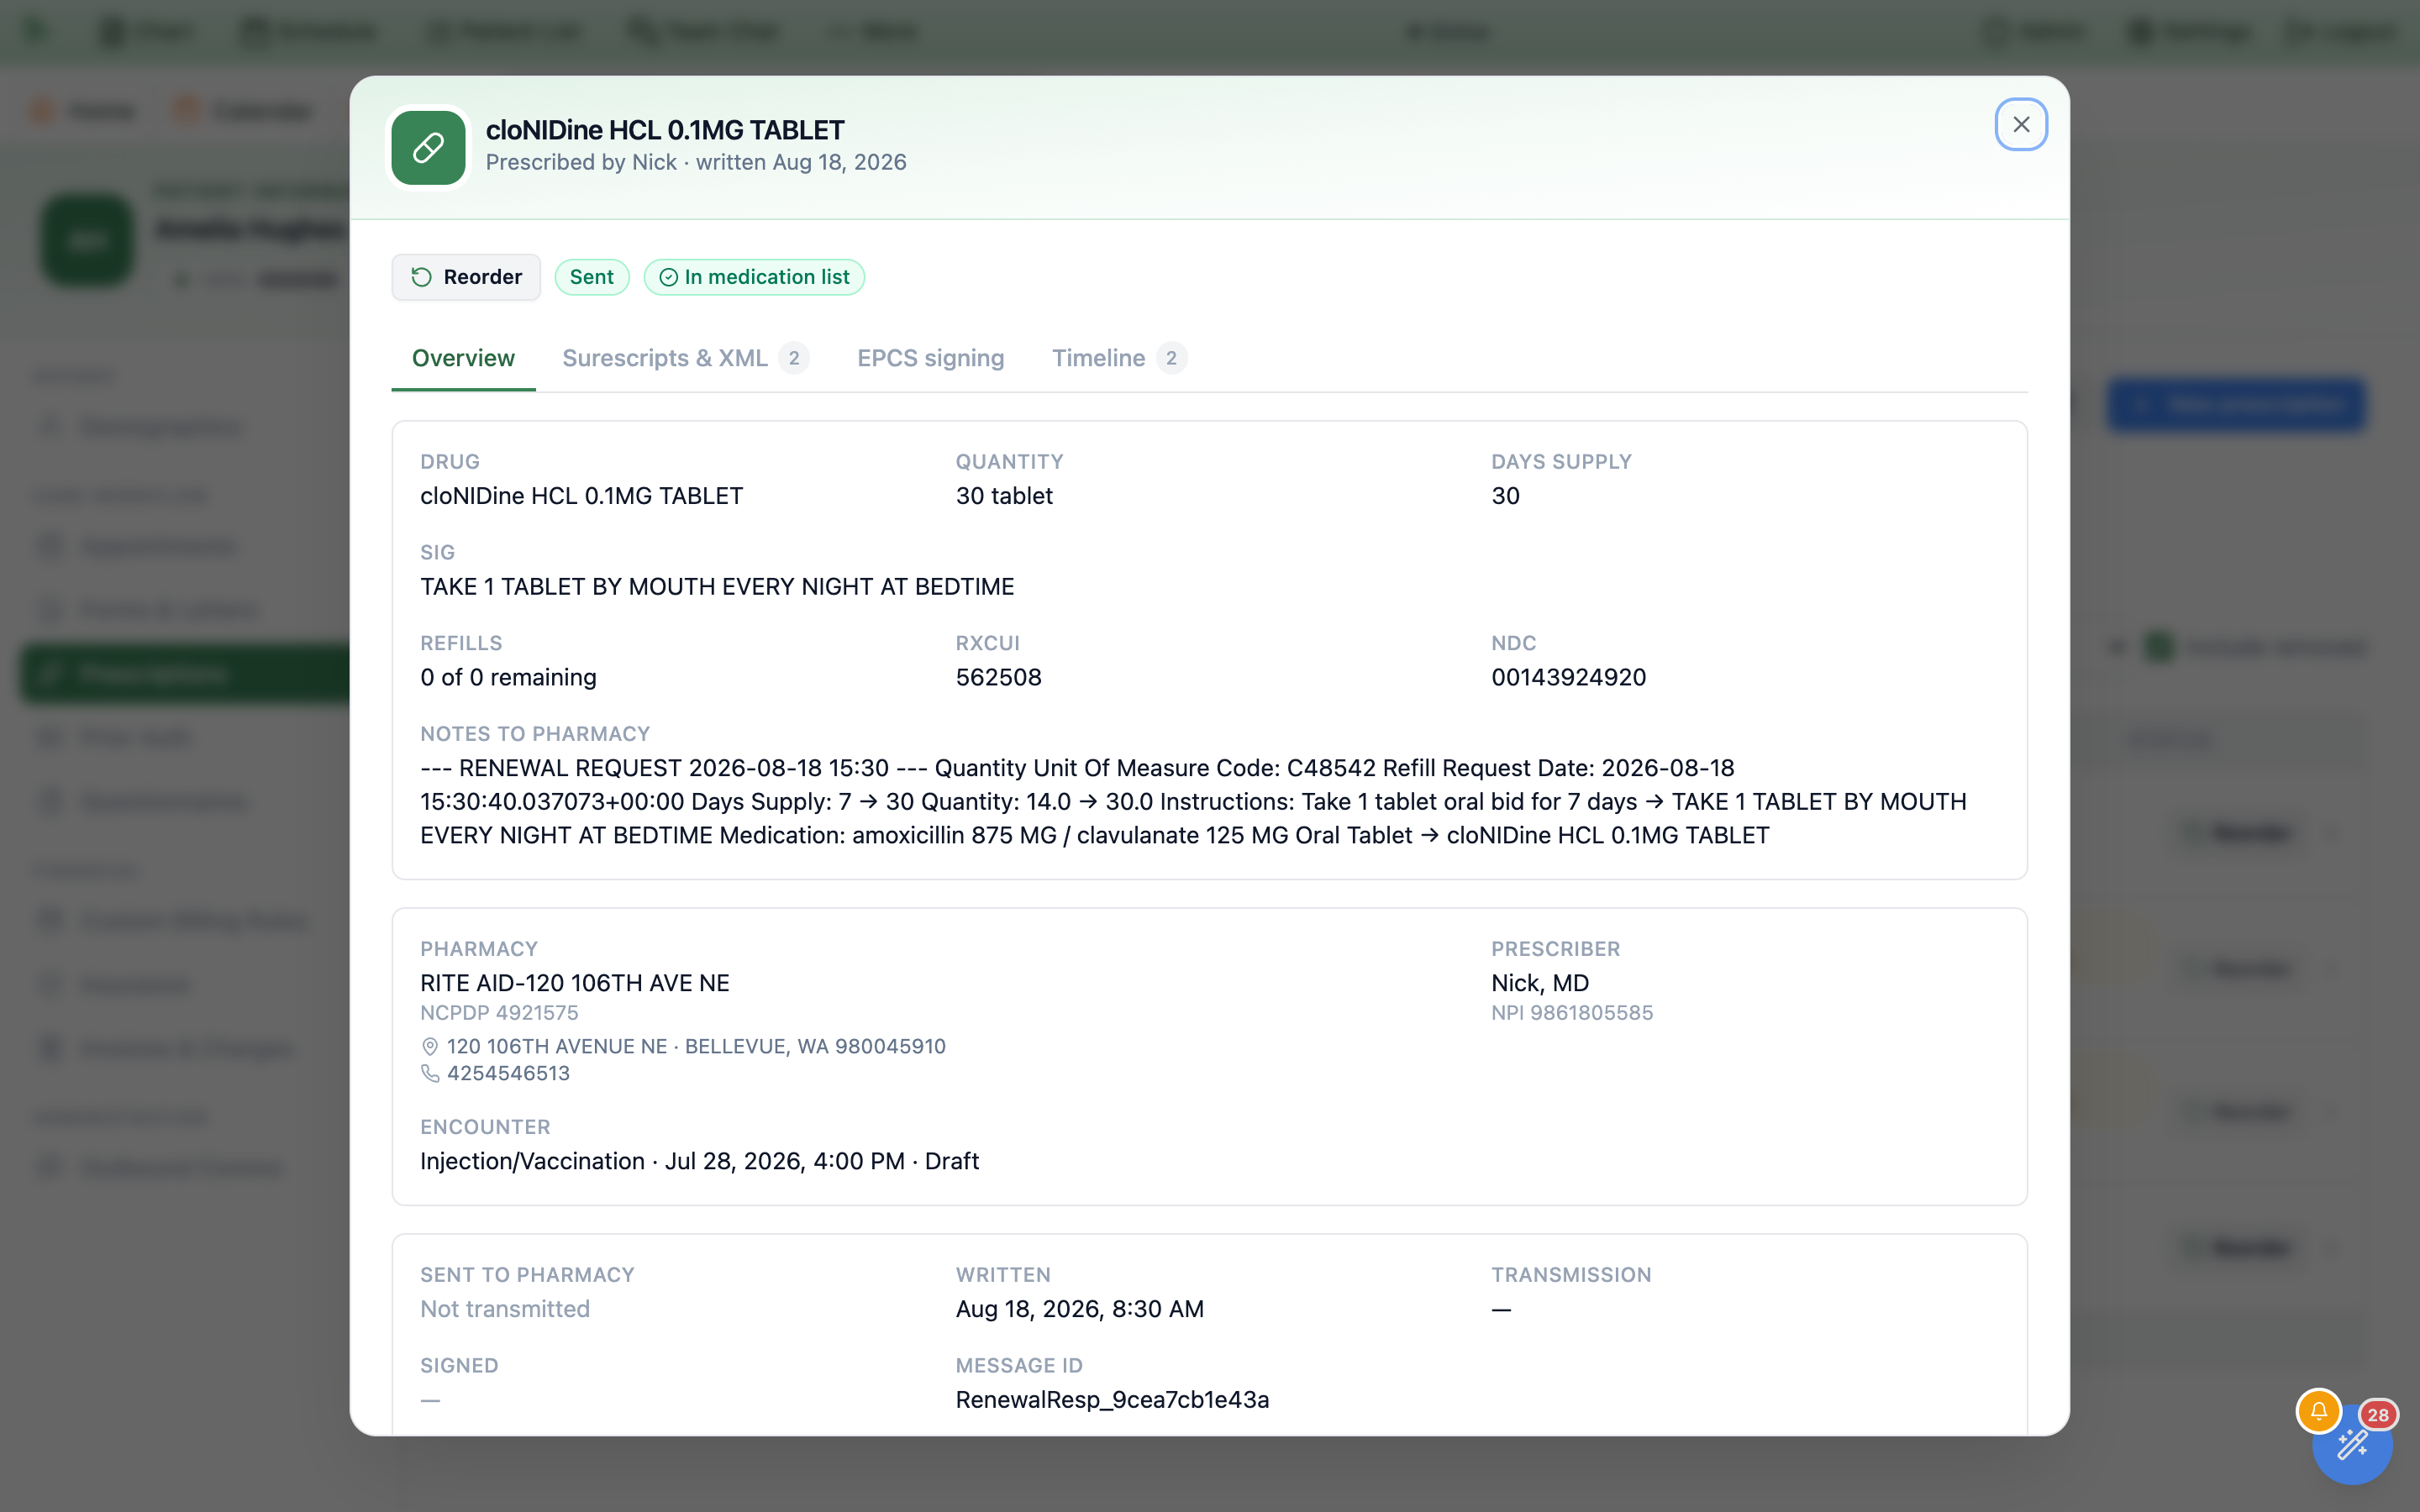
Overview. Reorder is the first control in the status strip.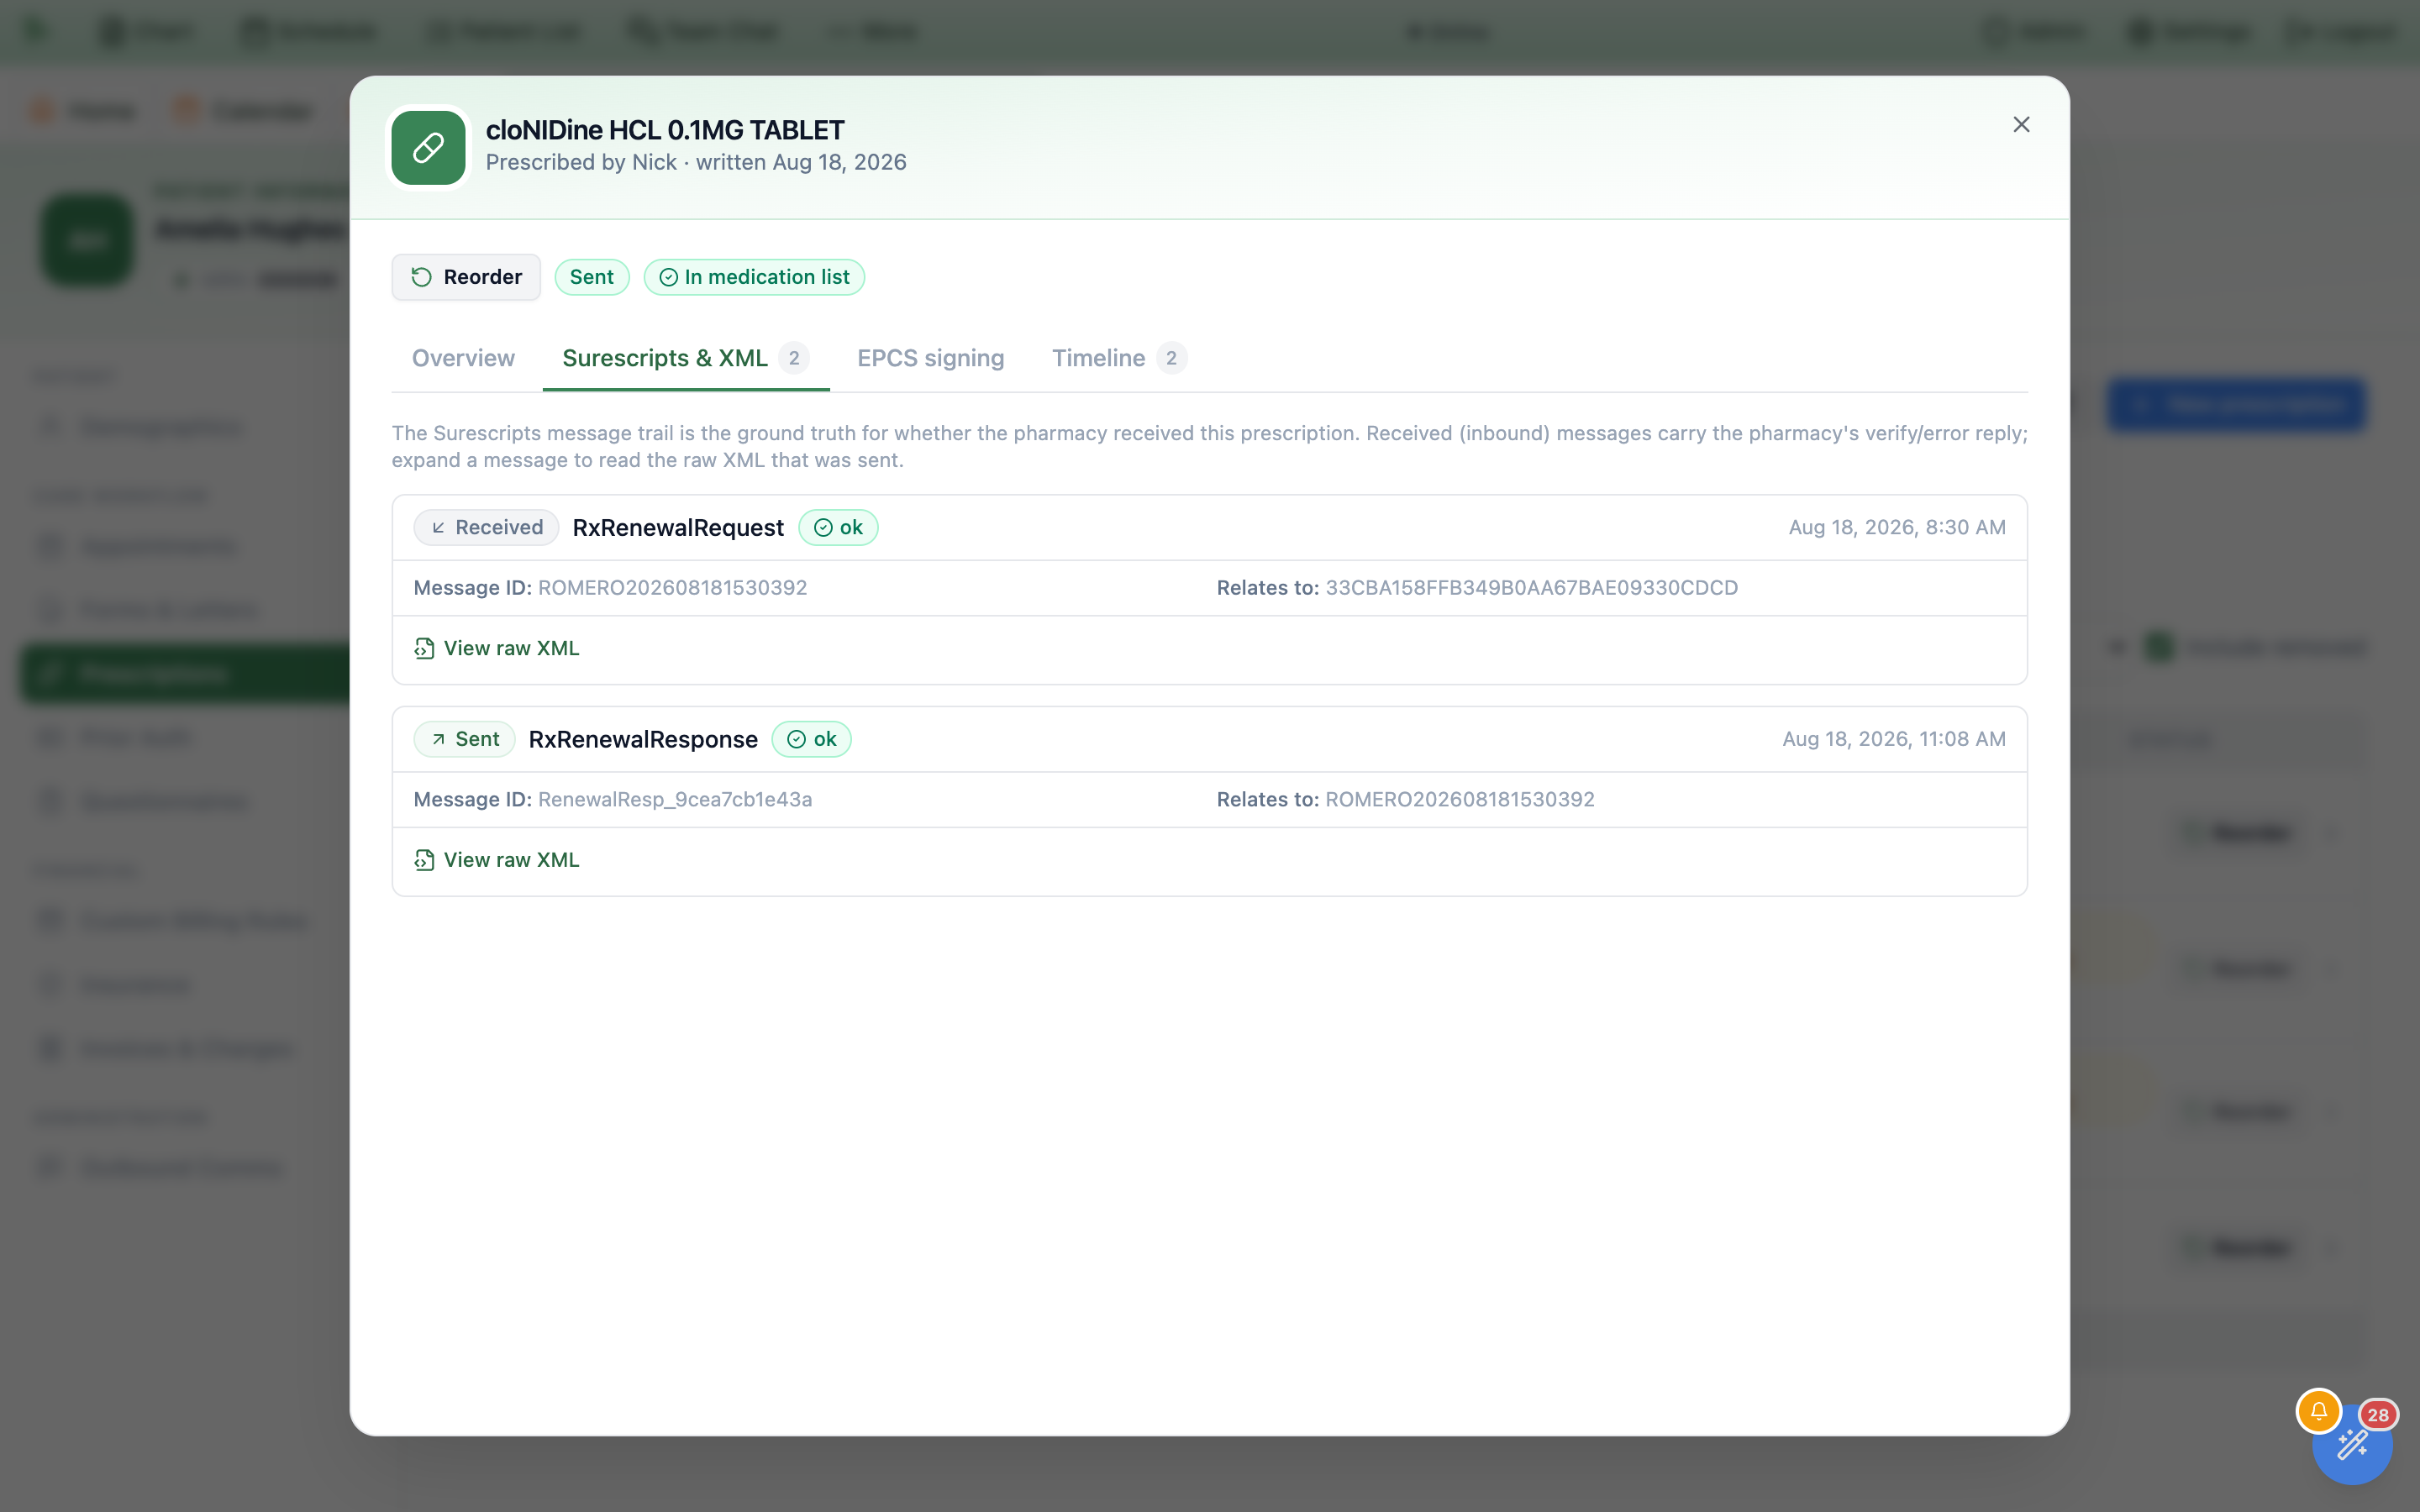
Received rows carry the pharmacy’s reply; View raw XML shows what was actually sent.Reorder appears on every row and again at the top of the detail dialog. It opens the ordinary prescription editor with the medication dialog already showing a new draft titled Reorder · {drug}. Carried over: the drug identity (NDC, RxCUI, DEA schedule), quantity, units, refills, days supply, notes to pharmacy, the sig — rebuilt as structured fields where dose, route, and frequency can be represented, otherwise kept verbatim as free text — and the diagnoses from the original, so the send gate is already satisfied unless you change them. Controlled substances whose schedule forbids free text always open structured, and a route the form can’t represent lands as unknown for you to correct rather than degrading silently. Review the sig, quantity, and refills, confirm the diagnosis, then finish through the normal prescribing flow. If the seed can’t be fetched you get a Could not start the reorder toast and the button is usable again straight away.
Reorder does not resend the old prescription. It always issues a brand-new one with a fresh identity, so the previous Sent status can never carry over — and nothing reaches the pharmacy until you sign and send in the order editor, controlled substances through EPCS. To chase a prescription that failed rather than repeat one that worked, start from Prescription status & errors.Include removed to see the live picture. Because it starts ticked, superseded renewals and cancelled prescriptions are listed by default — useful for an audit, misleading if you are counting what the patient is actually taking.Cancel a prescription
A prescription that has already gone to the pharmacy can be recalled from here: Cancel sits beside Reorder on the row, and again in the status strip at the top of the detail dialog. It is offered to exactly the accounts that may place an order — physicians, and admins who hold a prescriber profile — and only where a cancellation can actually reach somewhere. A prescription that was printed, faxed, or never transmitted has nothing at a pharmacy to recall, so its row carries no Cancel at all; nor does one that is already cancelled, one whose cancellation is already on its way, or one that has been replaced by a newer prescription — there it is the replacement that must be cancelled.
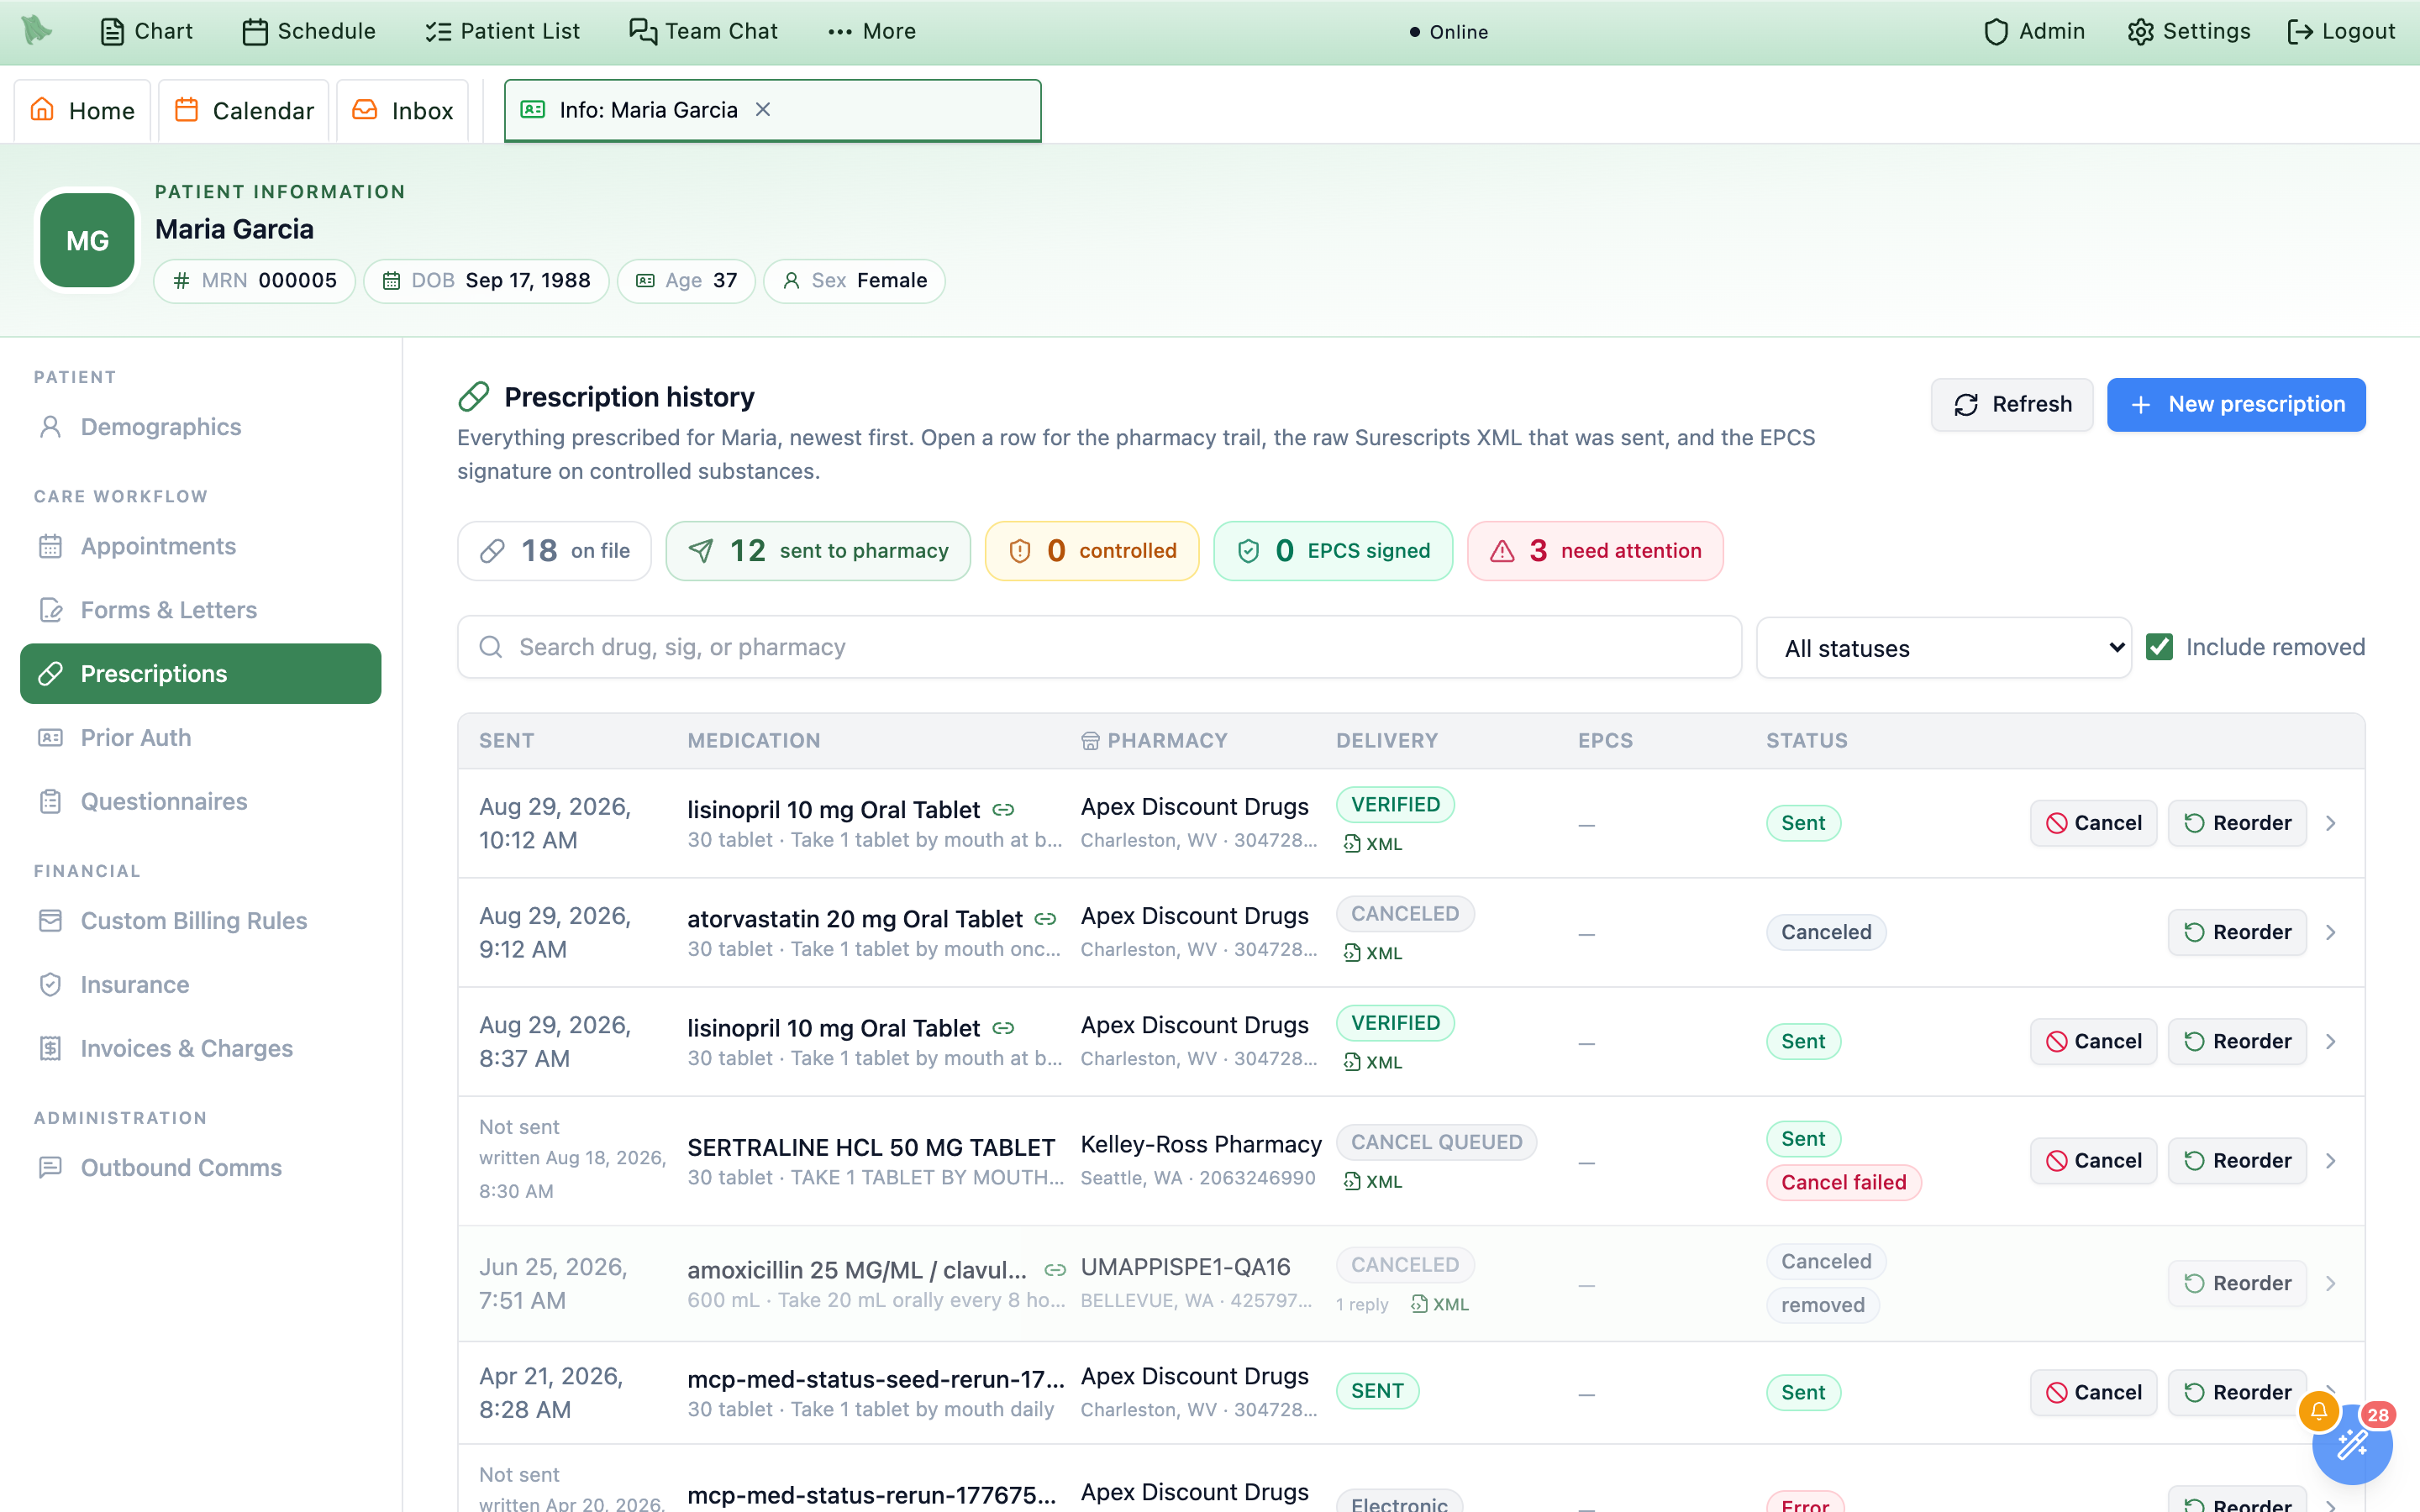
Cancel appears only on rows the pharmacy can still act on. Everything else keeps just Reorder.-
Say why.
CancelopensCancel this prescription— “The pharmacy is asked to cancel it. You will see their answer here.” — over a card naming the drug, the pharmacy, and when it was sent.Reasonis one ofEntered in error,Therapy changed,Patient no longer needs it,Duplicate prescription, orOther;Detail for the pharmacy (optional)takes up to 280 characters of free text, and both travel with the cancellation. -
Check what is actually being cancelled.
If the prescription you clicked was superseded by a renewal or a change response, an amber line says
This cancels the replacement prescription sent {date}— the recall follows the chain to the version the pharmacy is holding. On a controlled substance a second amber line reminds you that the pharmacy must acknowledge the cancellation. -
Send it, or back out.
Keep prescriptioncloses without doing anything.Send cancellationqueues it and confirms withCancellation sent to the pharmacy— “The prescription shows ‘Cancel pending’ until the pharmacy answers.” Nothing needs reloading; the row updates itself when the answer arrives. -
Read the outcome on the row.
While it is in flight the status reads
Cancellation Pendingwith an amberCancel pendingpill in place of the button, andDeliveryshowsCANCEL QUEUED. When the pharmacy answers, the pill becomesCanceled,Cancel denied, orCancel failed; the detail dialog spells the pending one out asCancel pending · requested {date, time}.
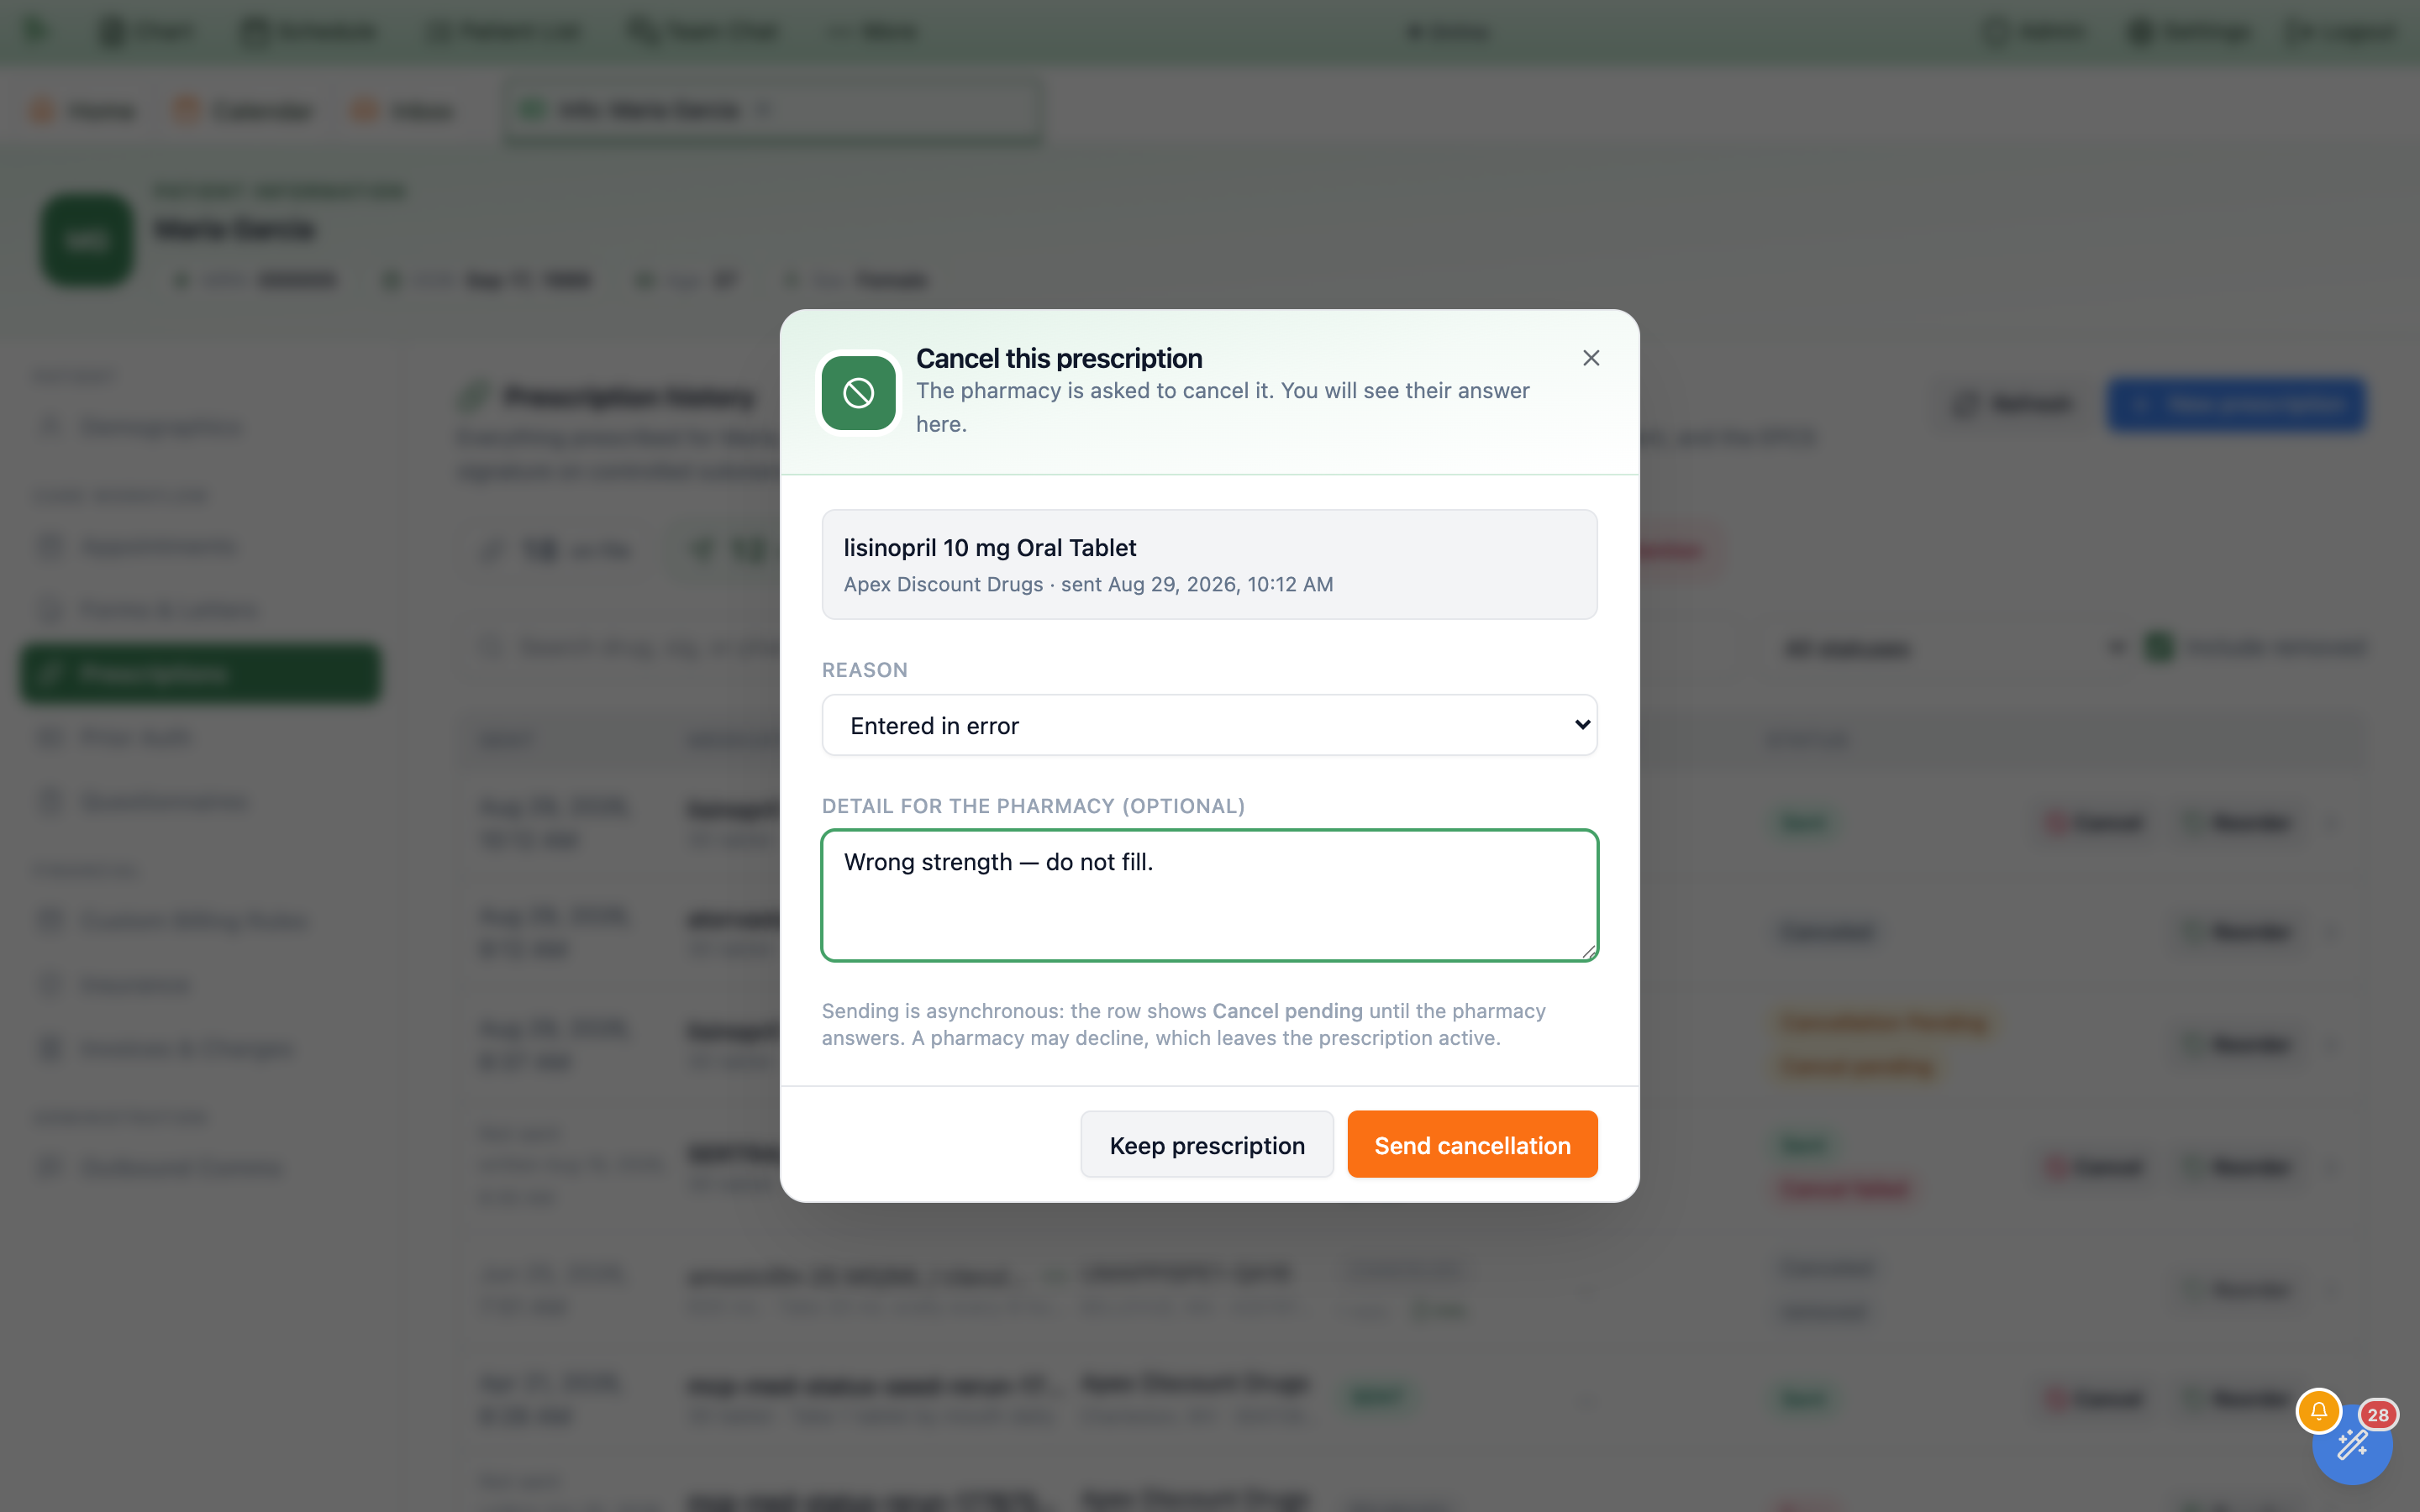
Keep prescription is the safe way out.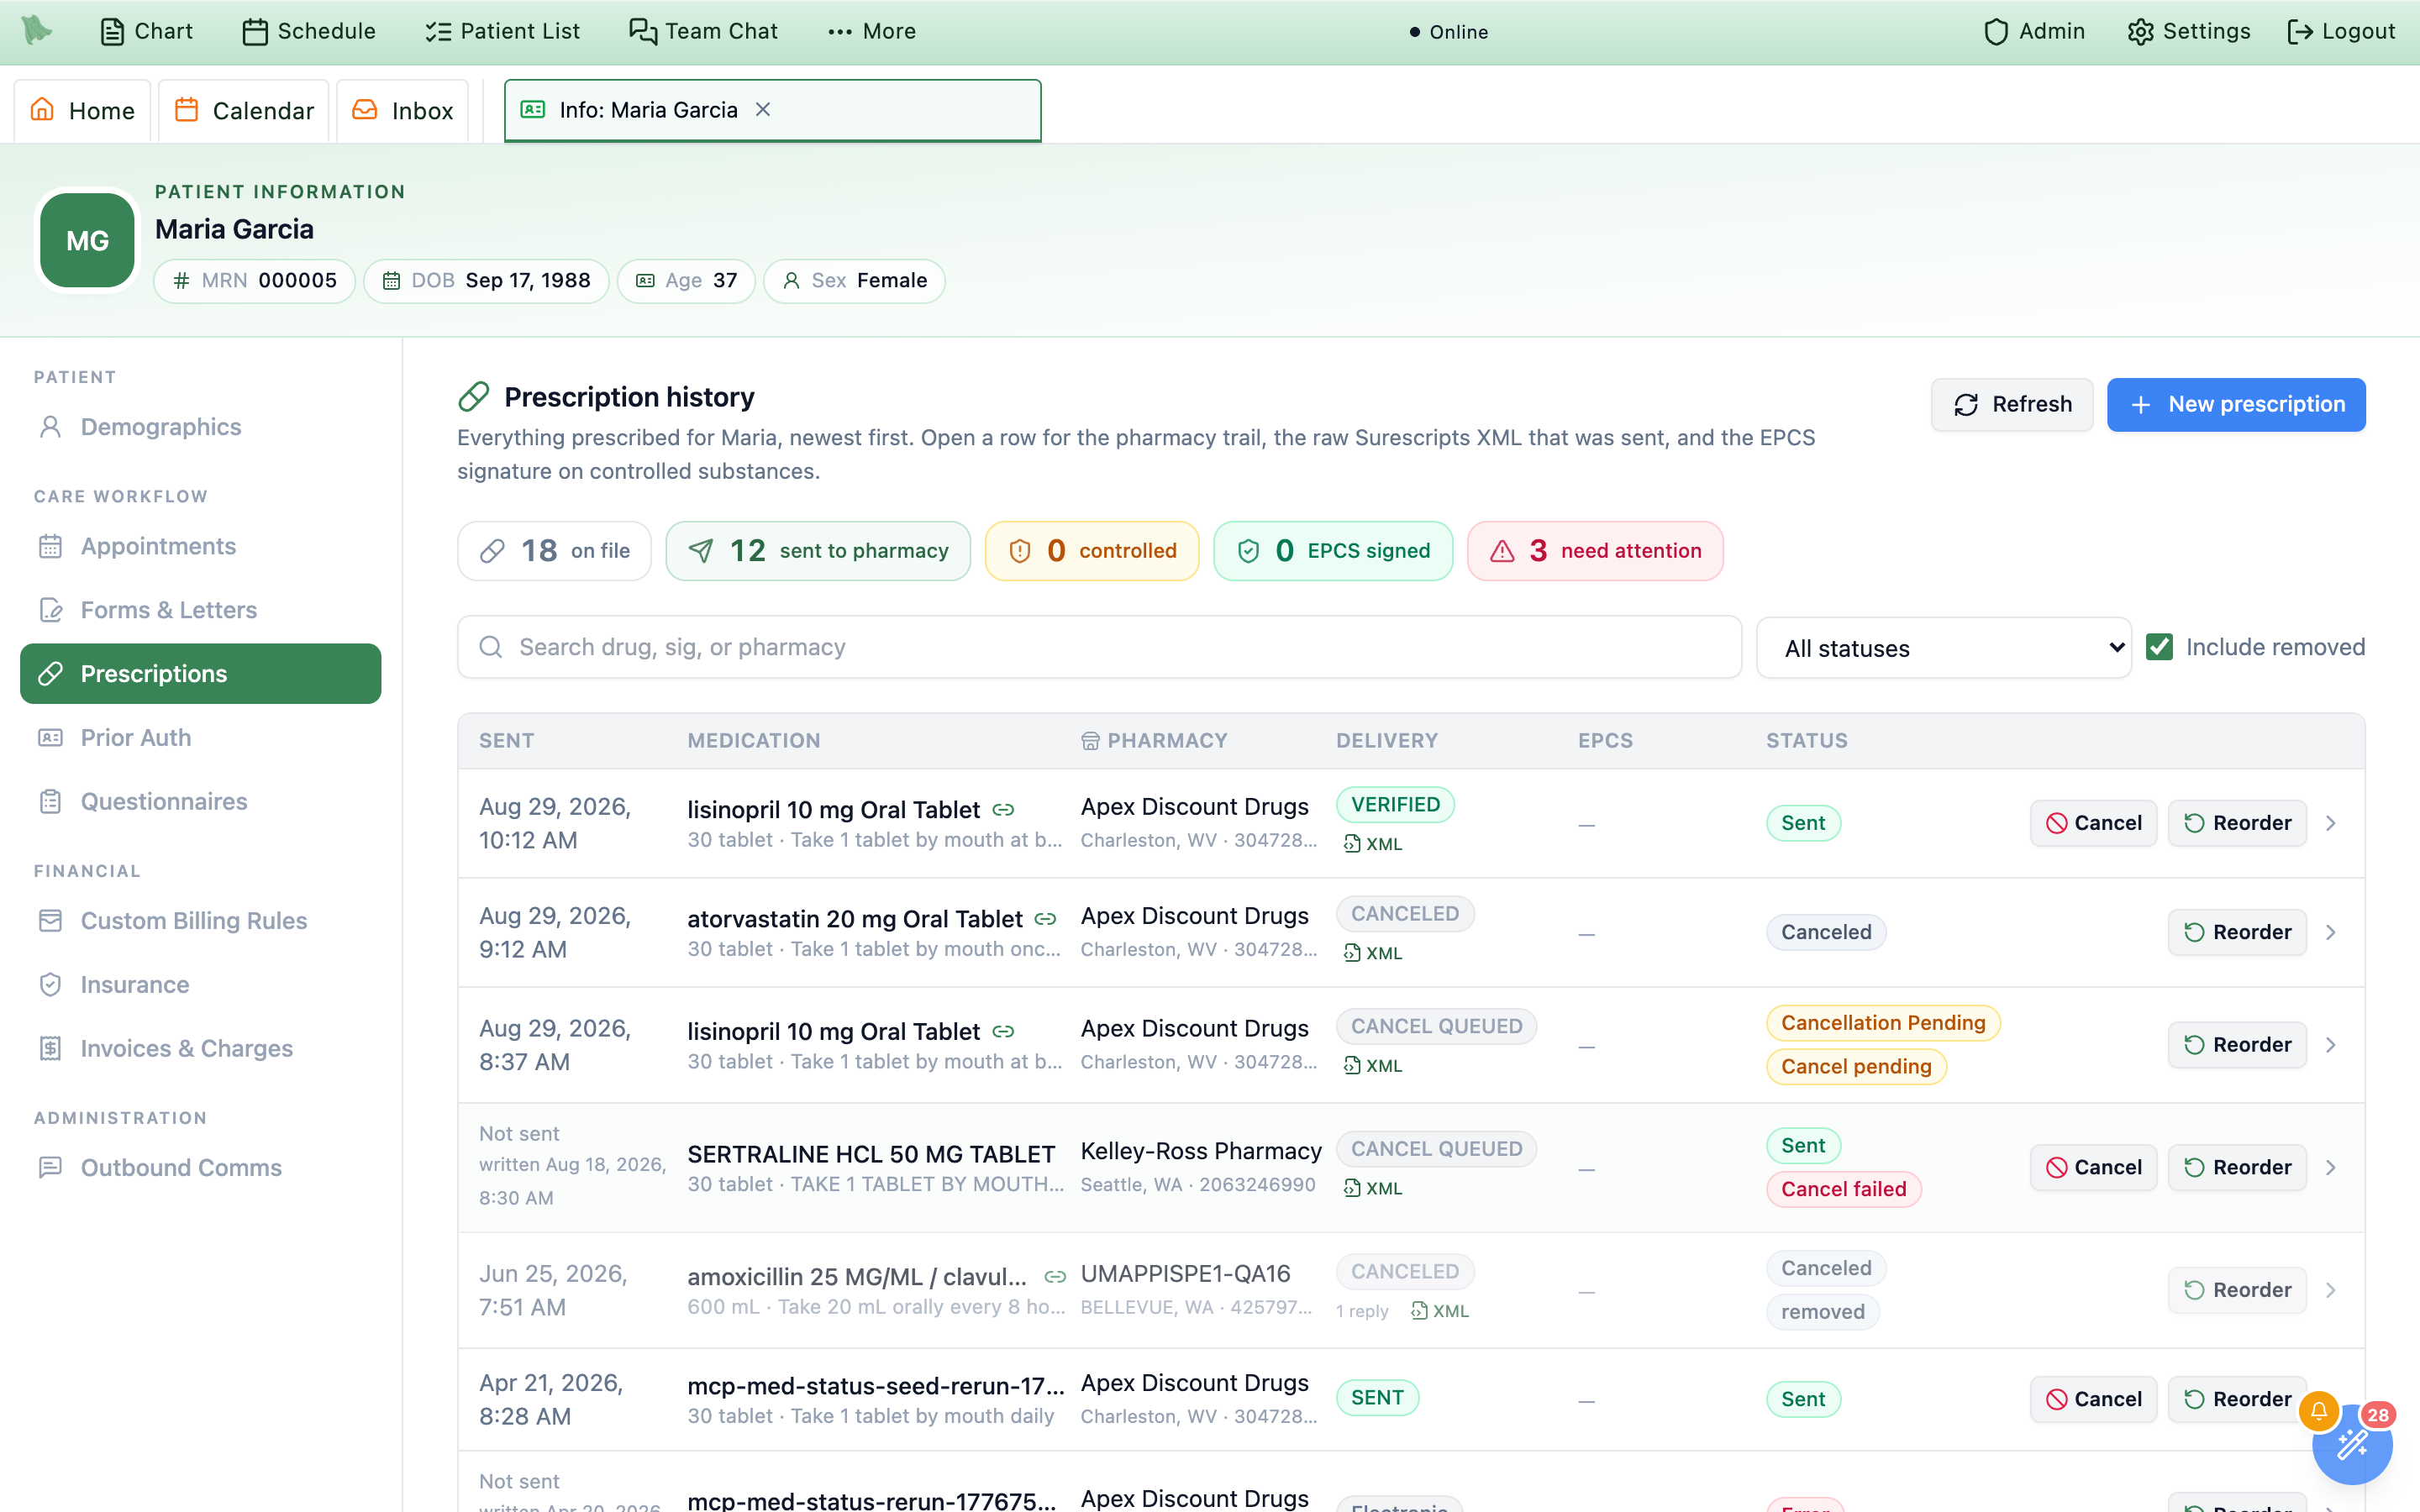
Status column: still waiting, cancelled, or refused.Cancel denied means the request was refused and the prescription is still active — it stays in the list, unfaded, and the patient can still have it filled. Cancel failed means the recall never reached the pharmacy at all. In both cases the prescription is live until you deal with it another way, so treat neither pill as “done”.Prescribe with a clinical note
Prescribing from this tab no longer means leaving the reasoning out of the chart. New prescription and Reorder both open the order workspace with a Clinical note box: once in the prescription dialog, directly under Diagnosis, and once as a Clinical note panel in the body of the modal with an Add a note button. They are two views of the same note — type in either one, and while the prescription dialog is open the panel shows a preview and reads “Editing in the prescription dialog — your changes appear here when you close it.” Dot phrases work exactly as they do in the note editor: type . followed by a few letters (the placeholder suggests .adhdfu) and pick from the list.
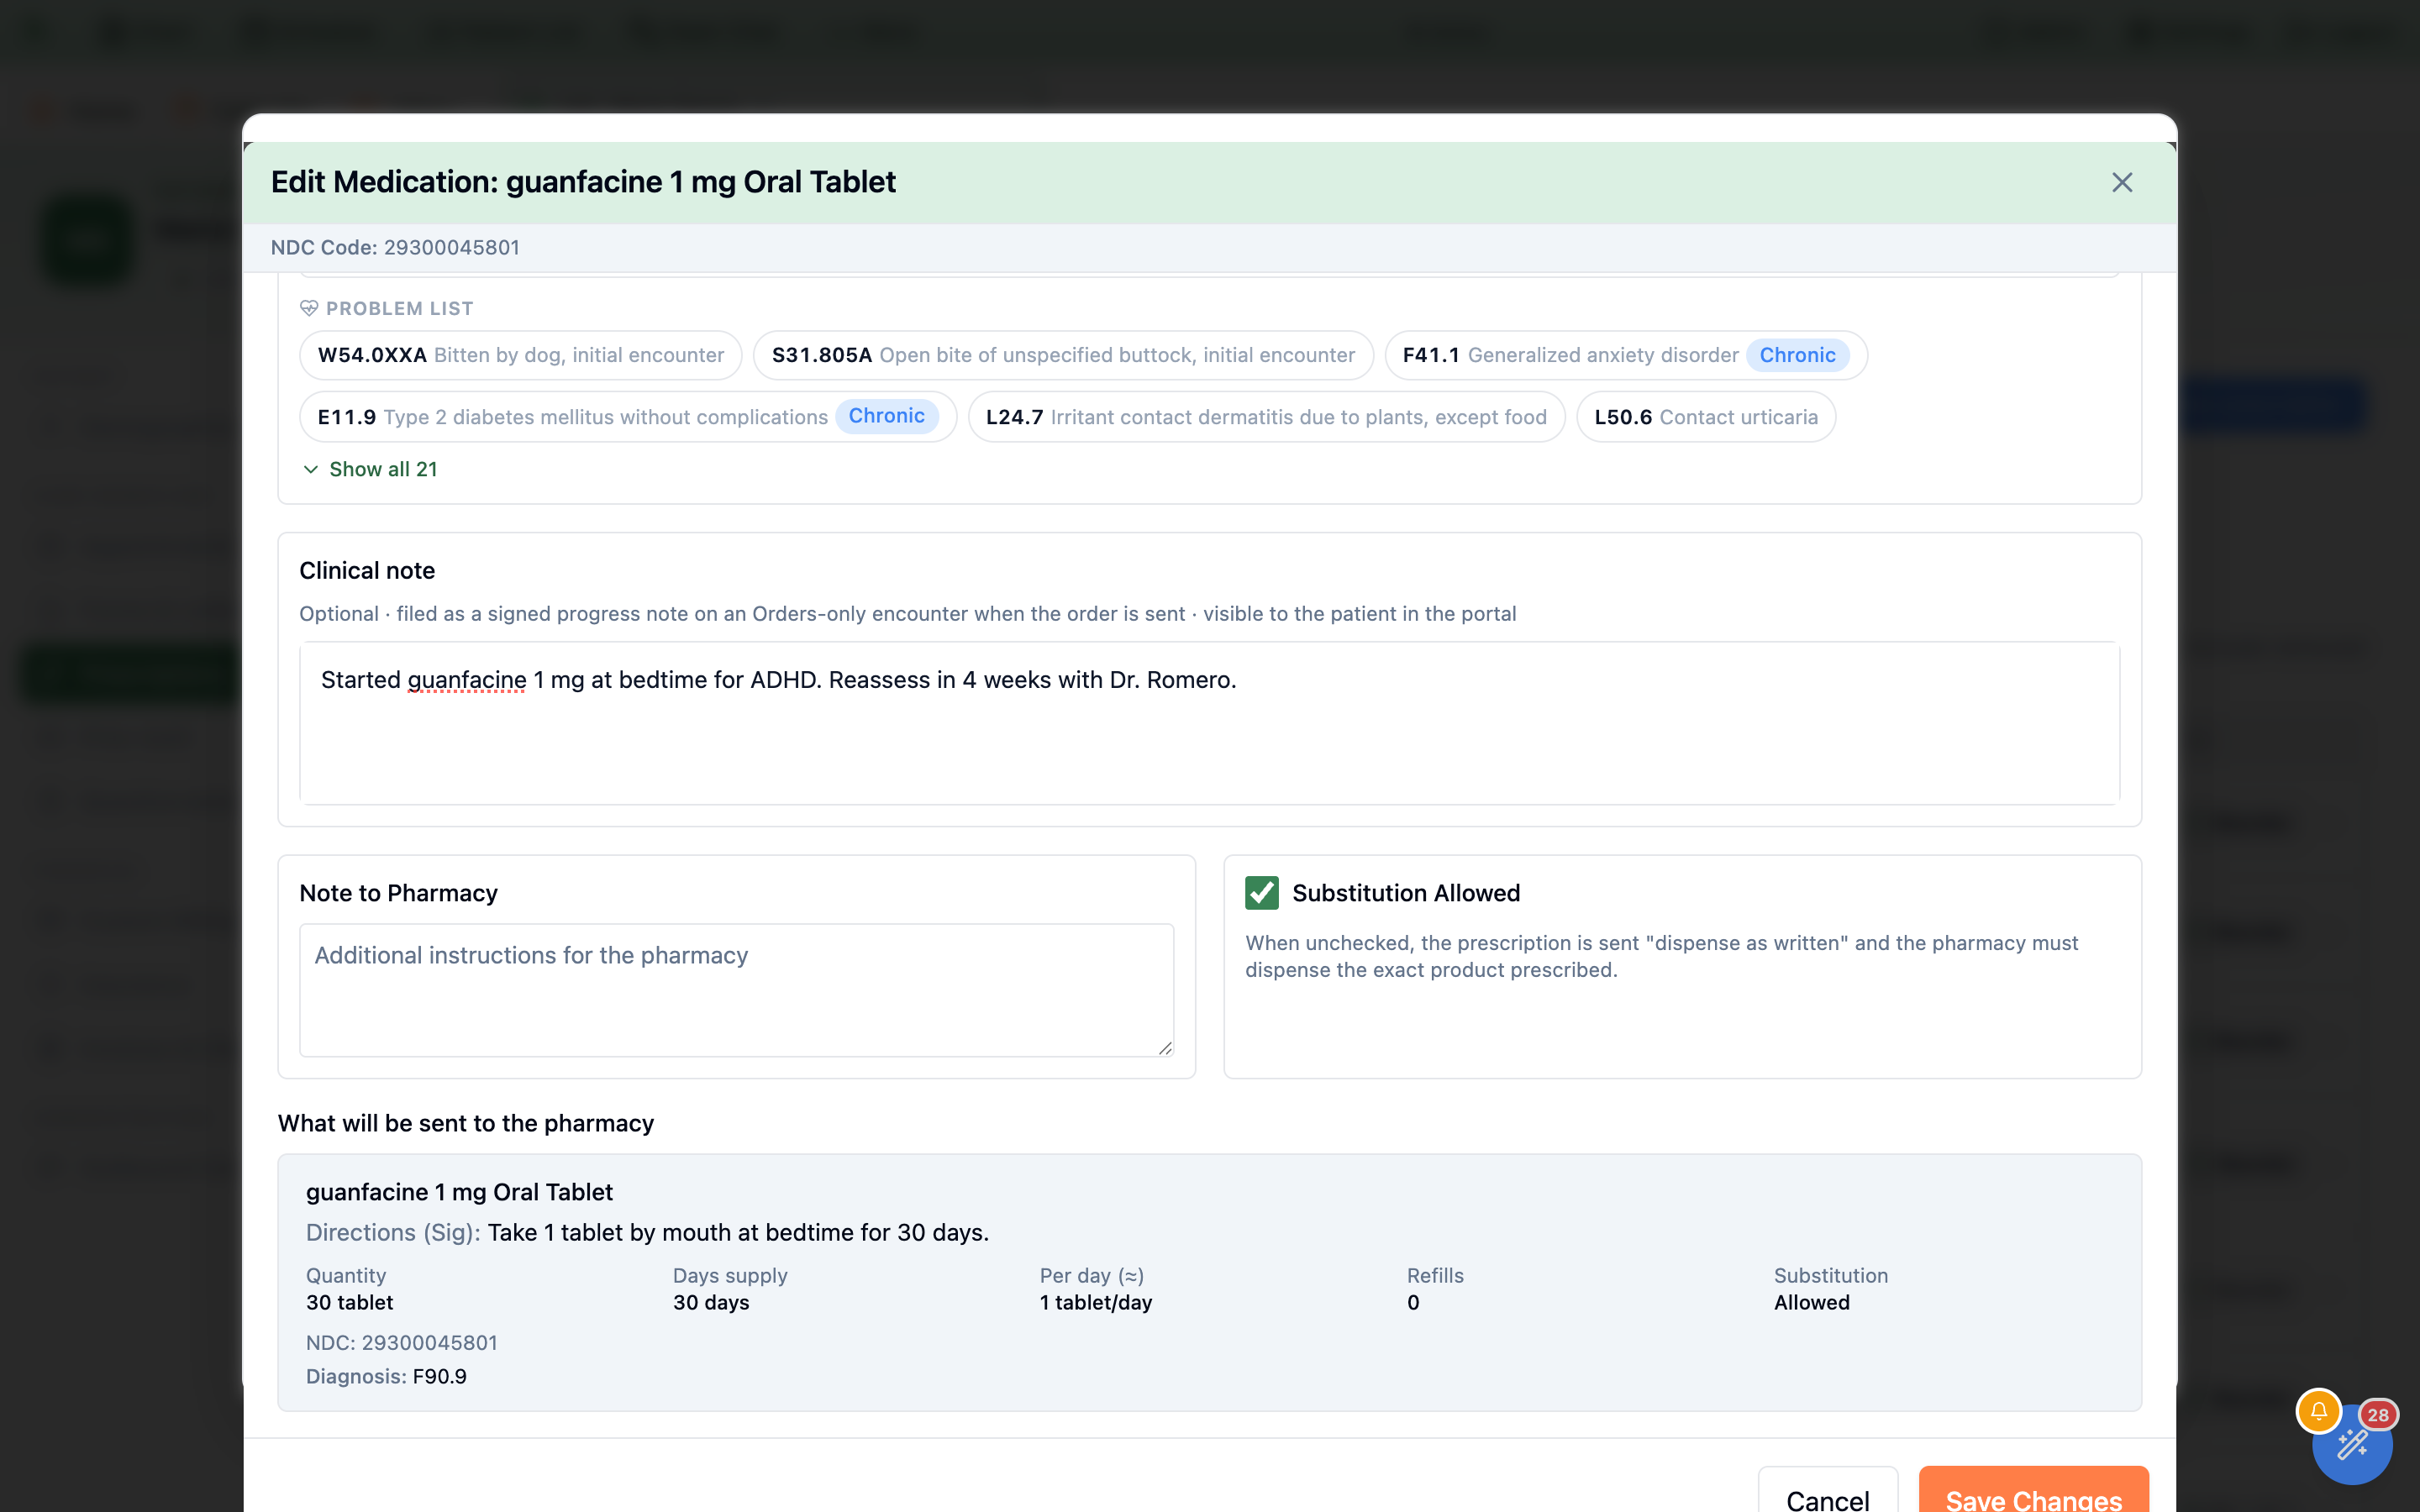
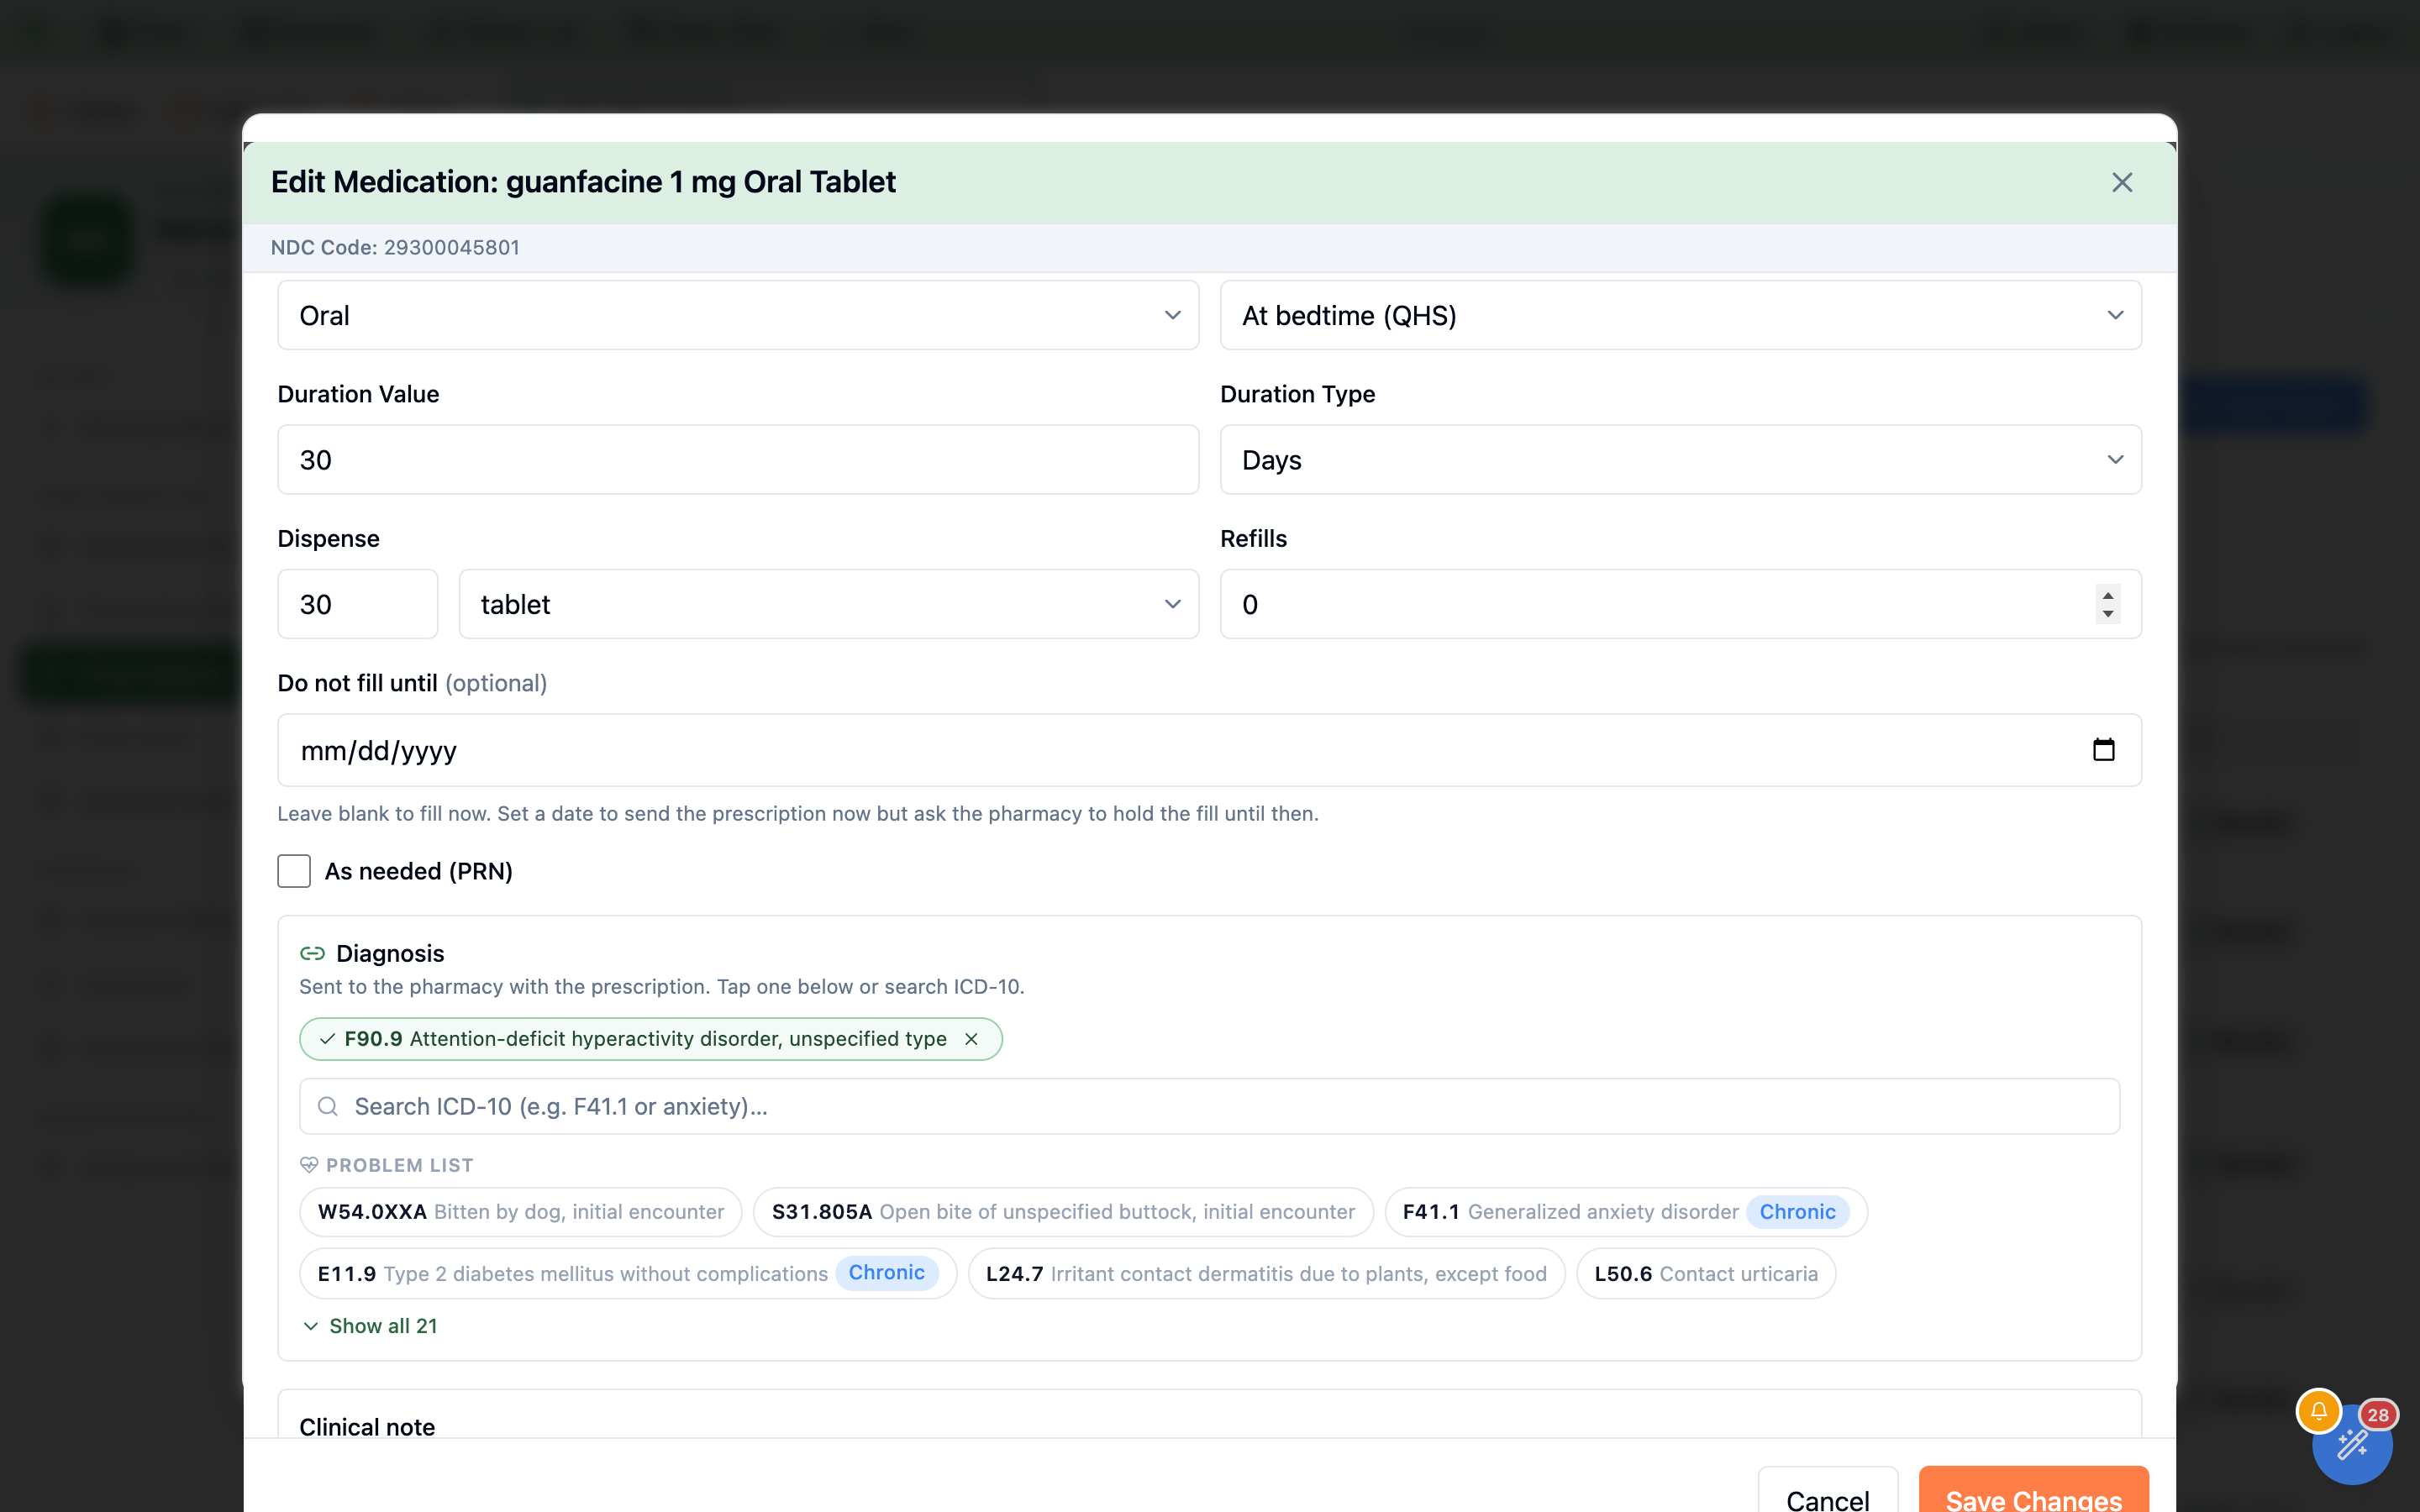
At bedtime (QHS) and the other timing options now survive the send and come back on a Reorder.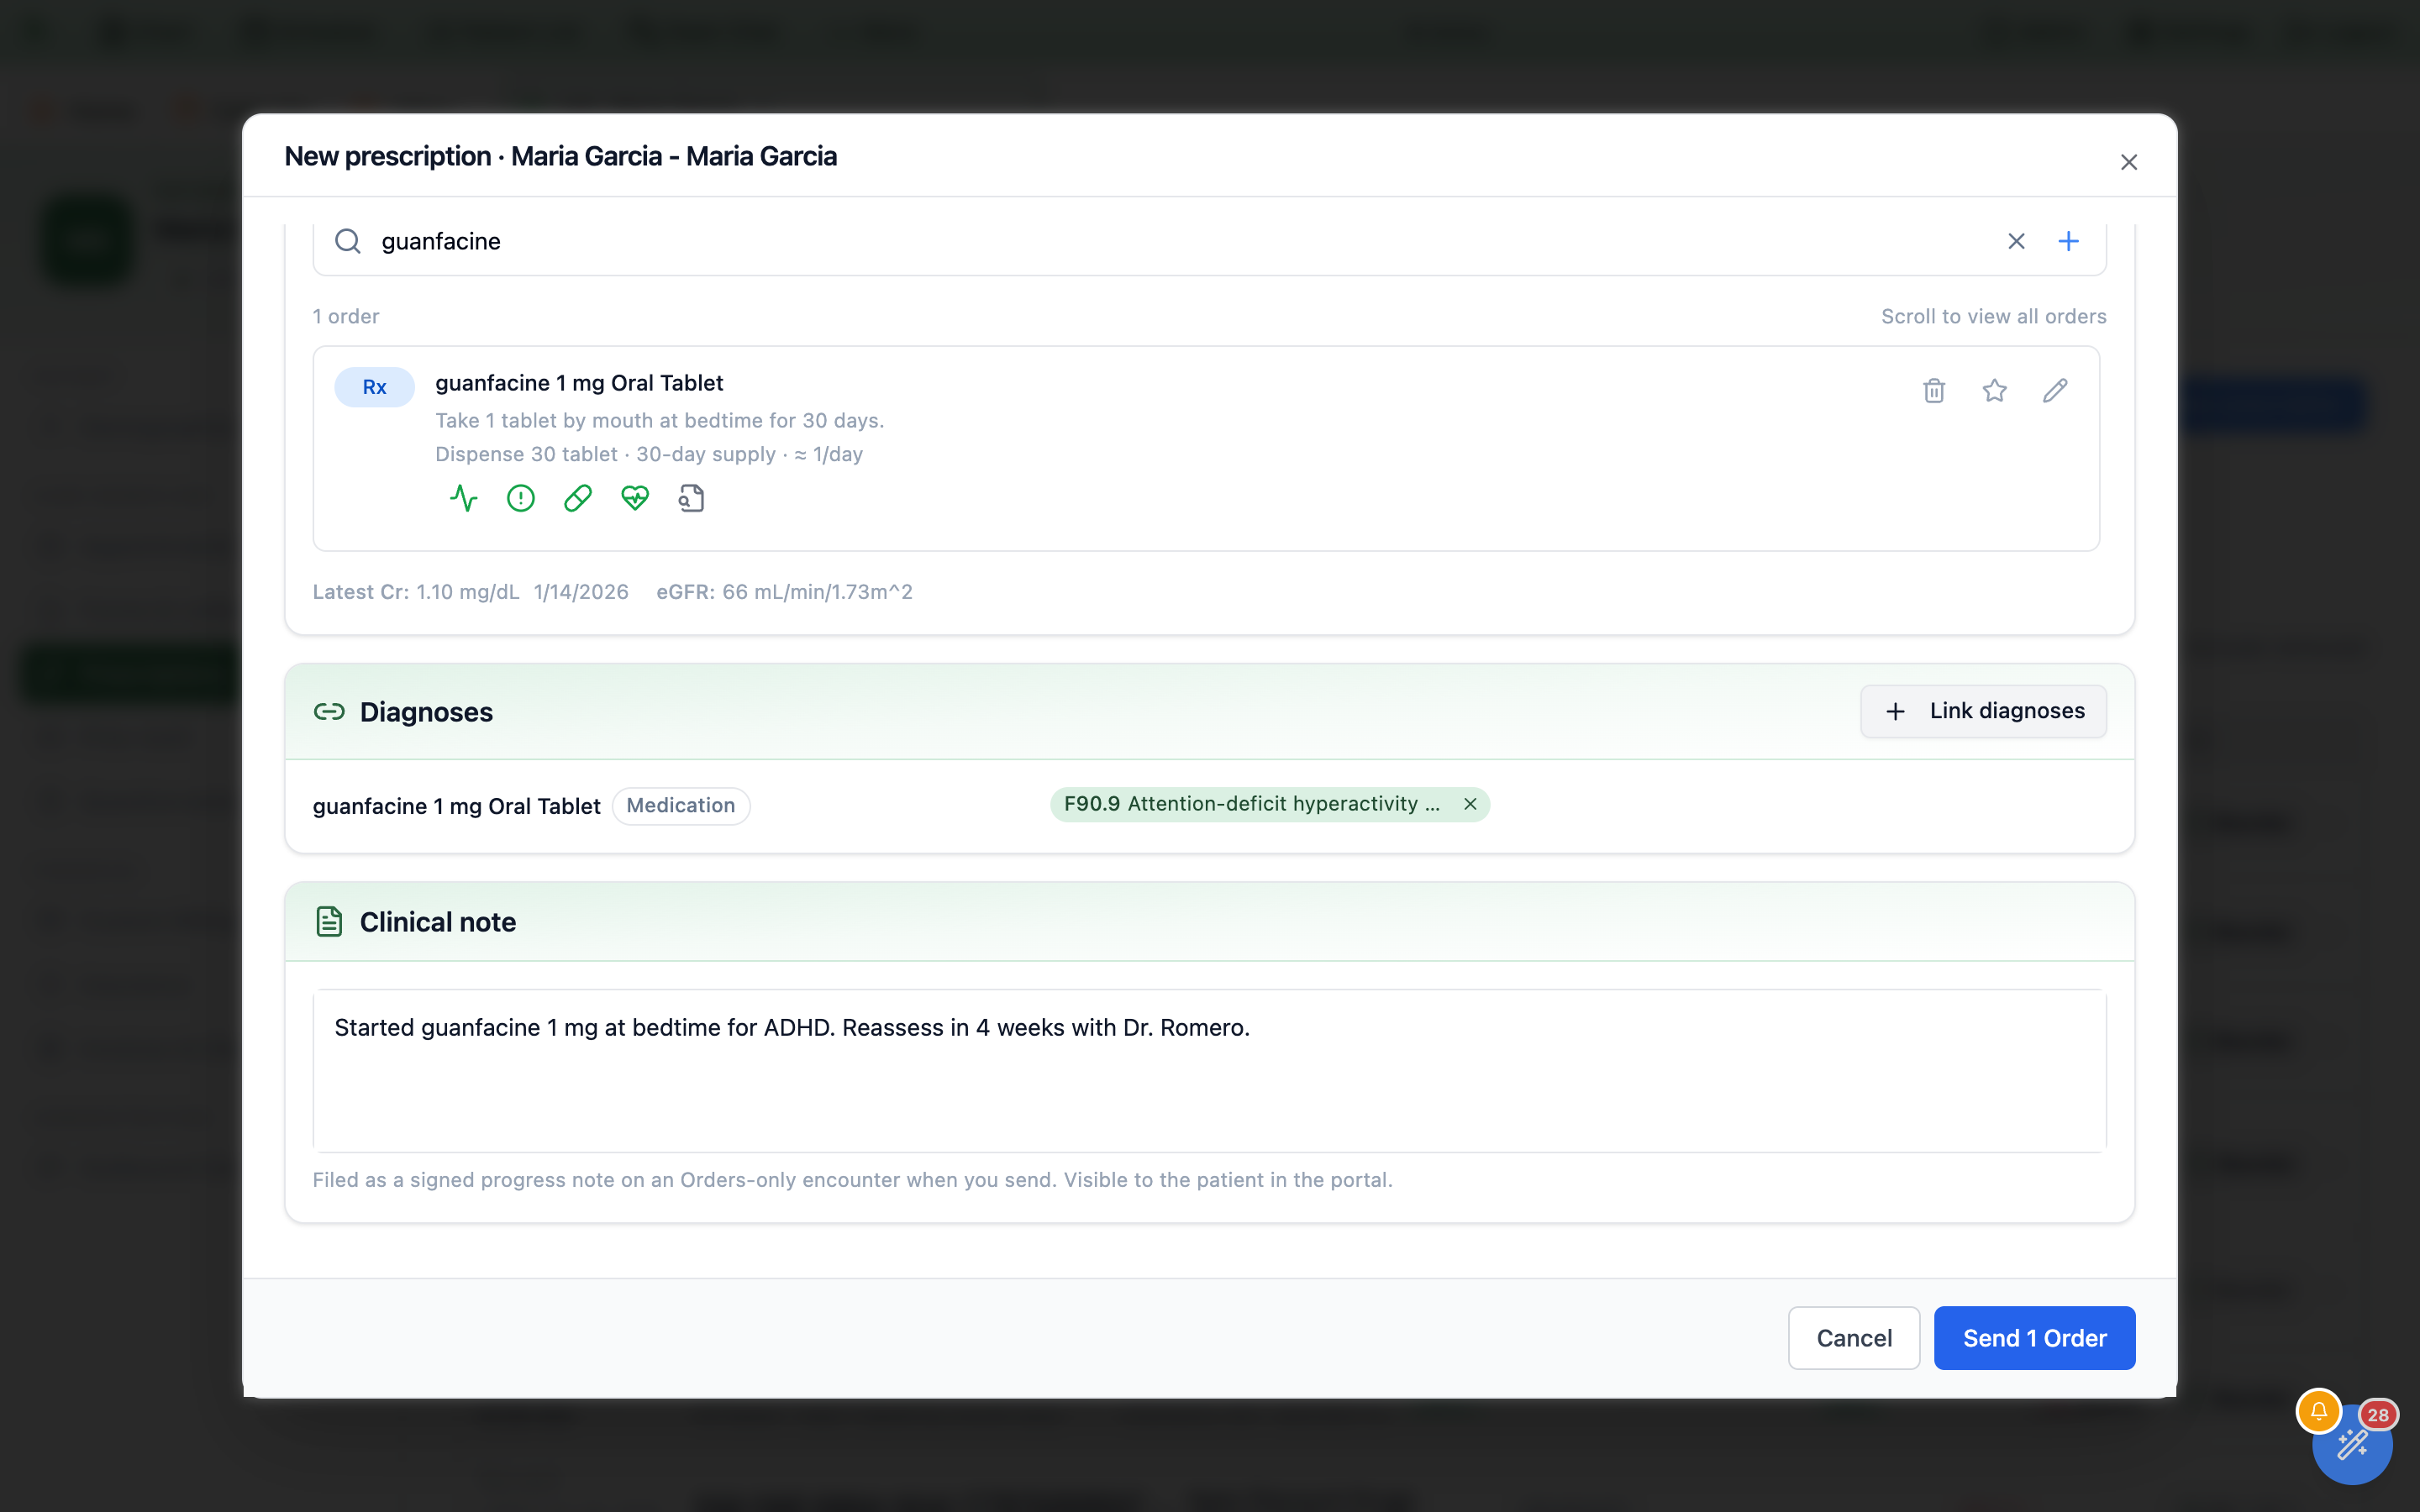
Send.Sending a prescription from here with no visit open creates one Orders only encounter for that send, and the note is filed on it as a signed progress note — but only after at least one order has actually gone out. Cancel the modal, or have every order fail, and nothing is filed and no visit is created. When it works the panel gains a green Filed badge; if the orders go but the note does not, the panel says Not filed — your orders were sent, the note was not. with a Retry button beside it. Afterwards the note is an ordinary chart note: it shows on the Notes tab of the visit, it reaches the patient in the portal like any other signed note, and the prescription’s detail dialog records where it went — the Encounter field reads Orders only · {date, time} with a Clinical note filed chip beside it.
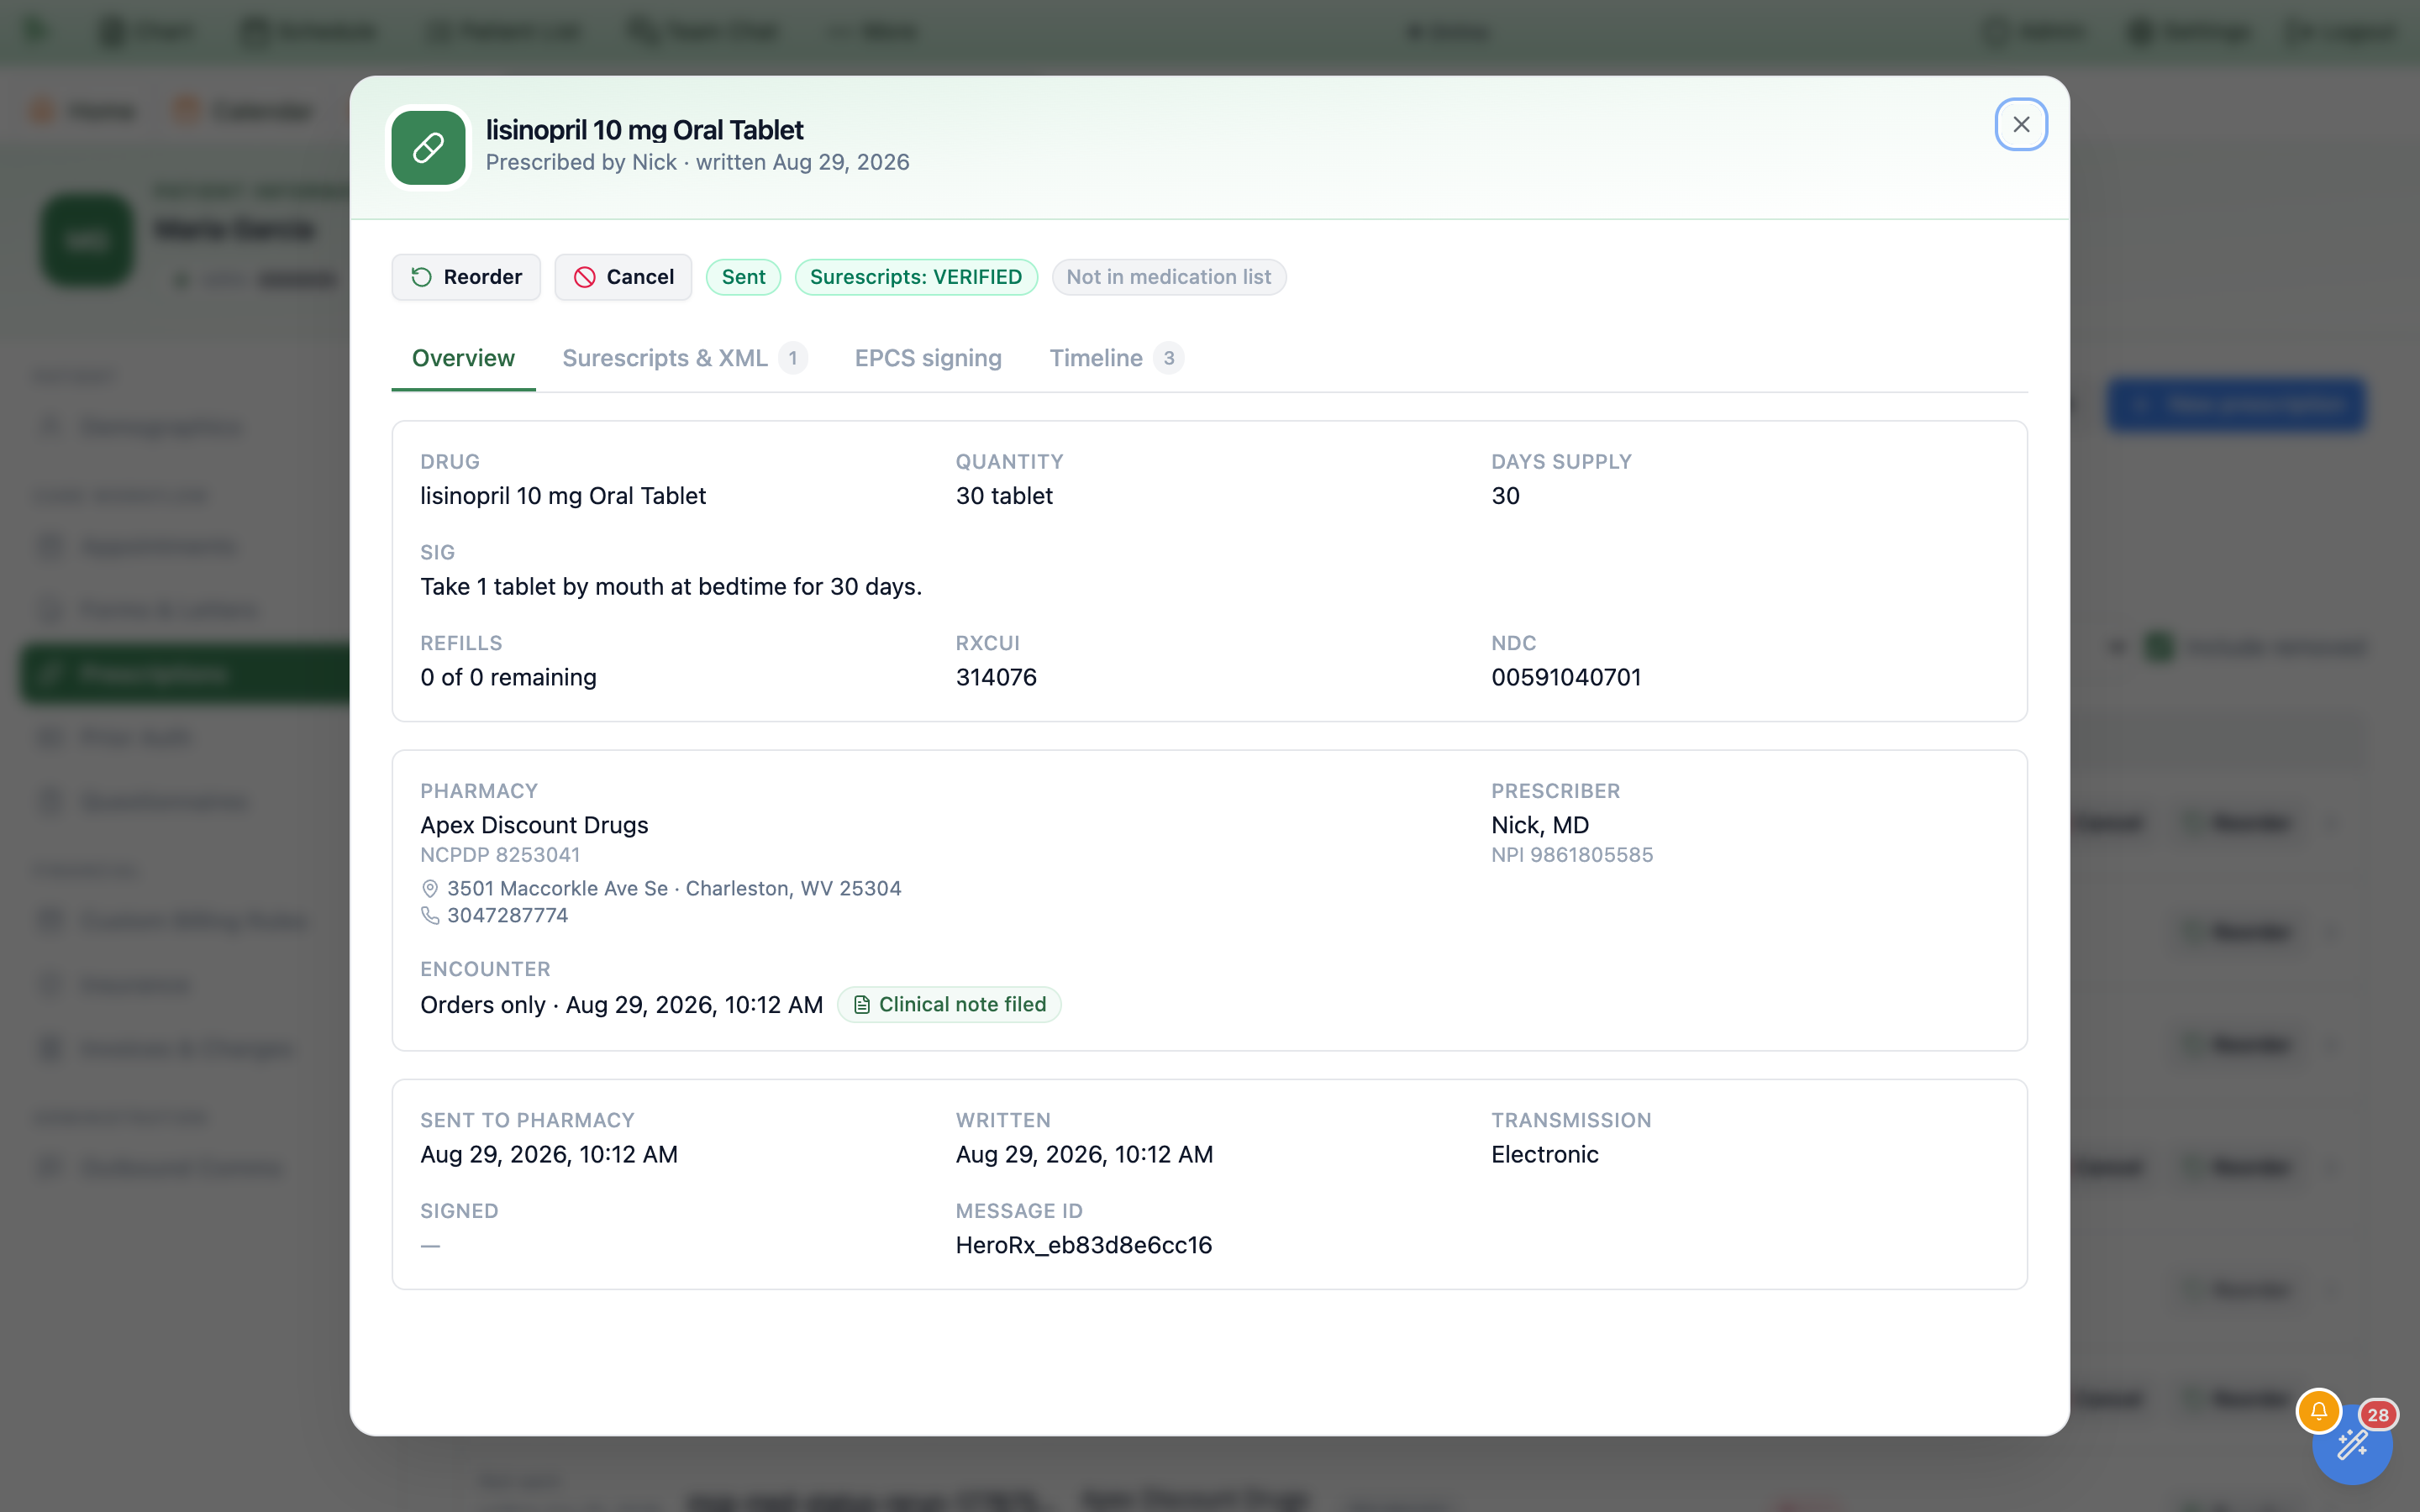
Encounter field is the receipt: which visit the order landed on, and whether a note went with it.Write a letter for a patient without opening the visit
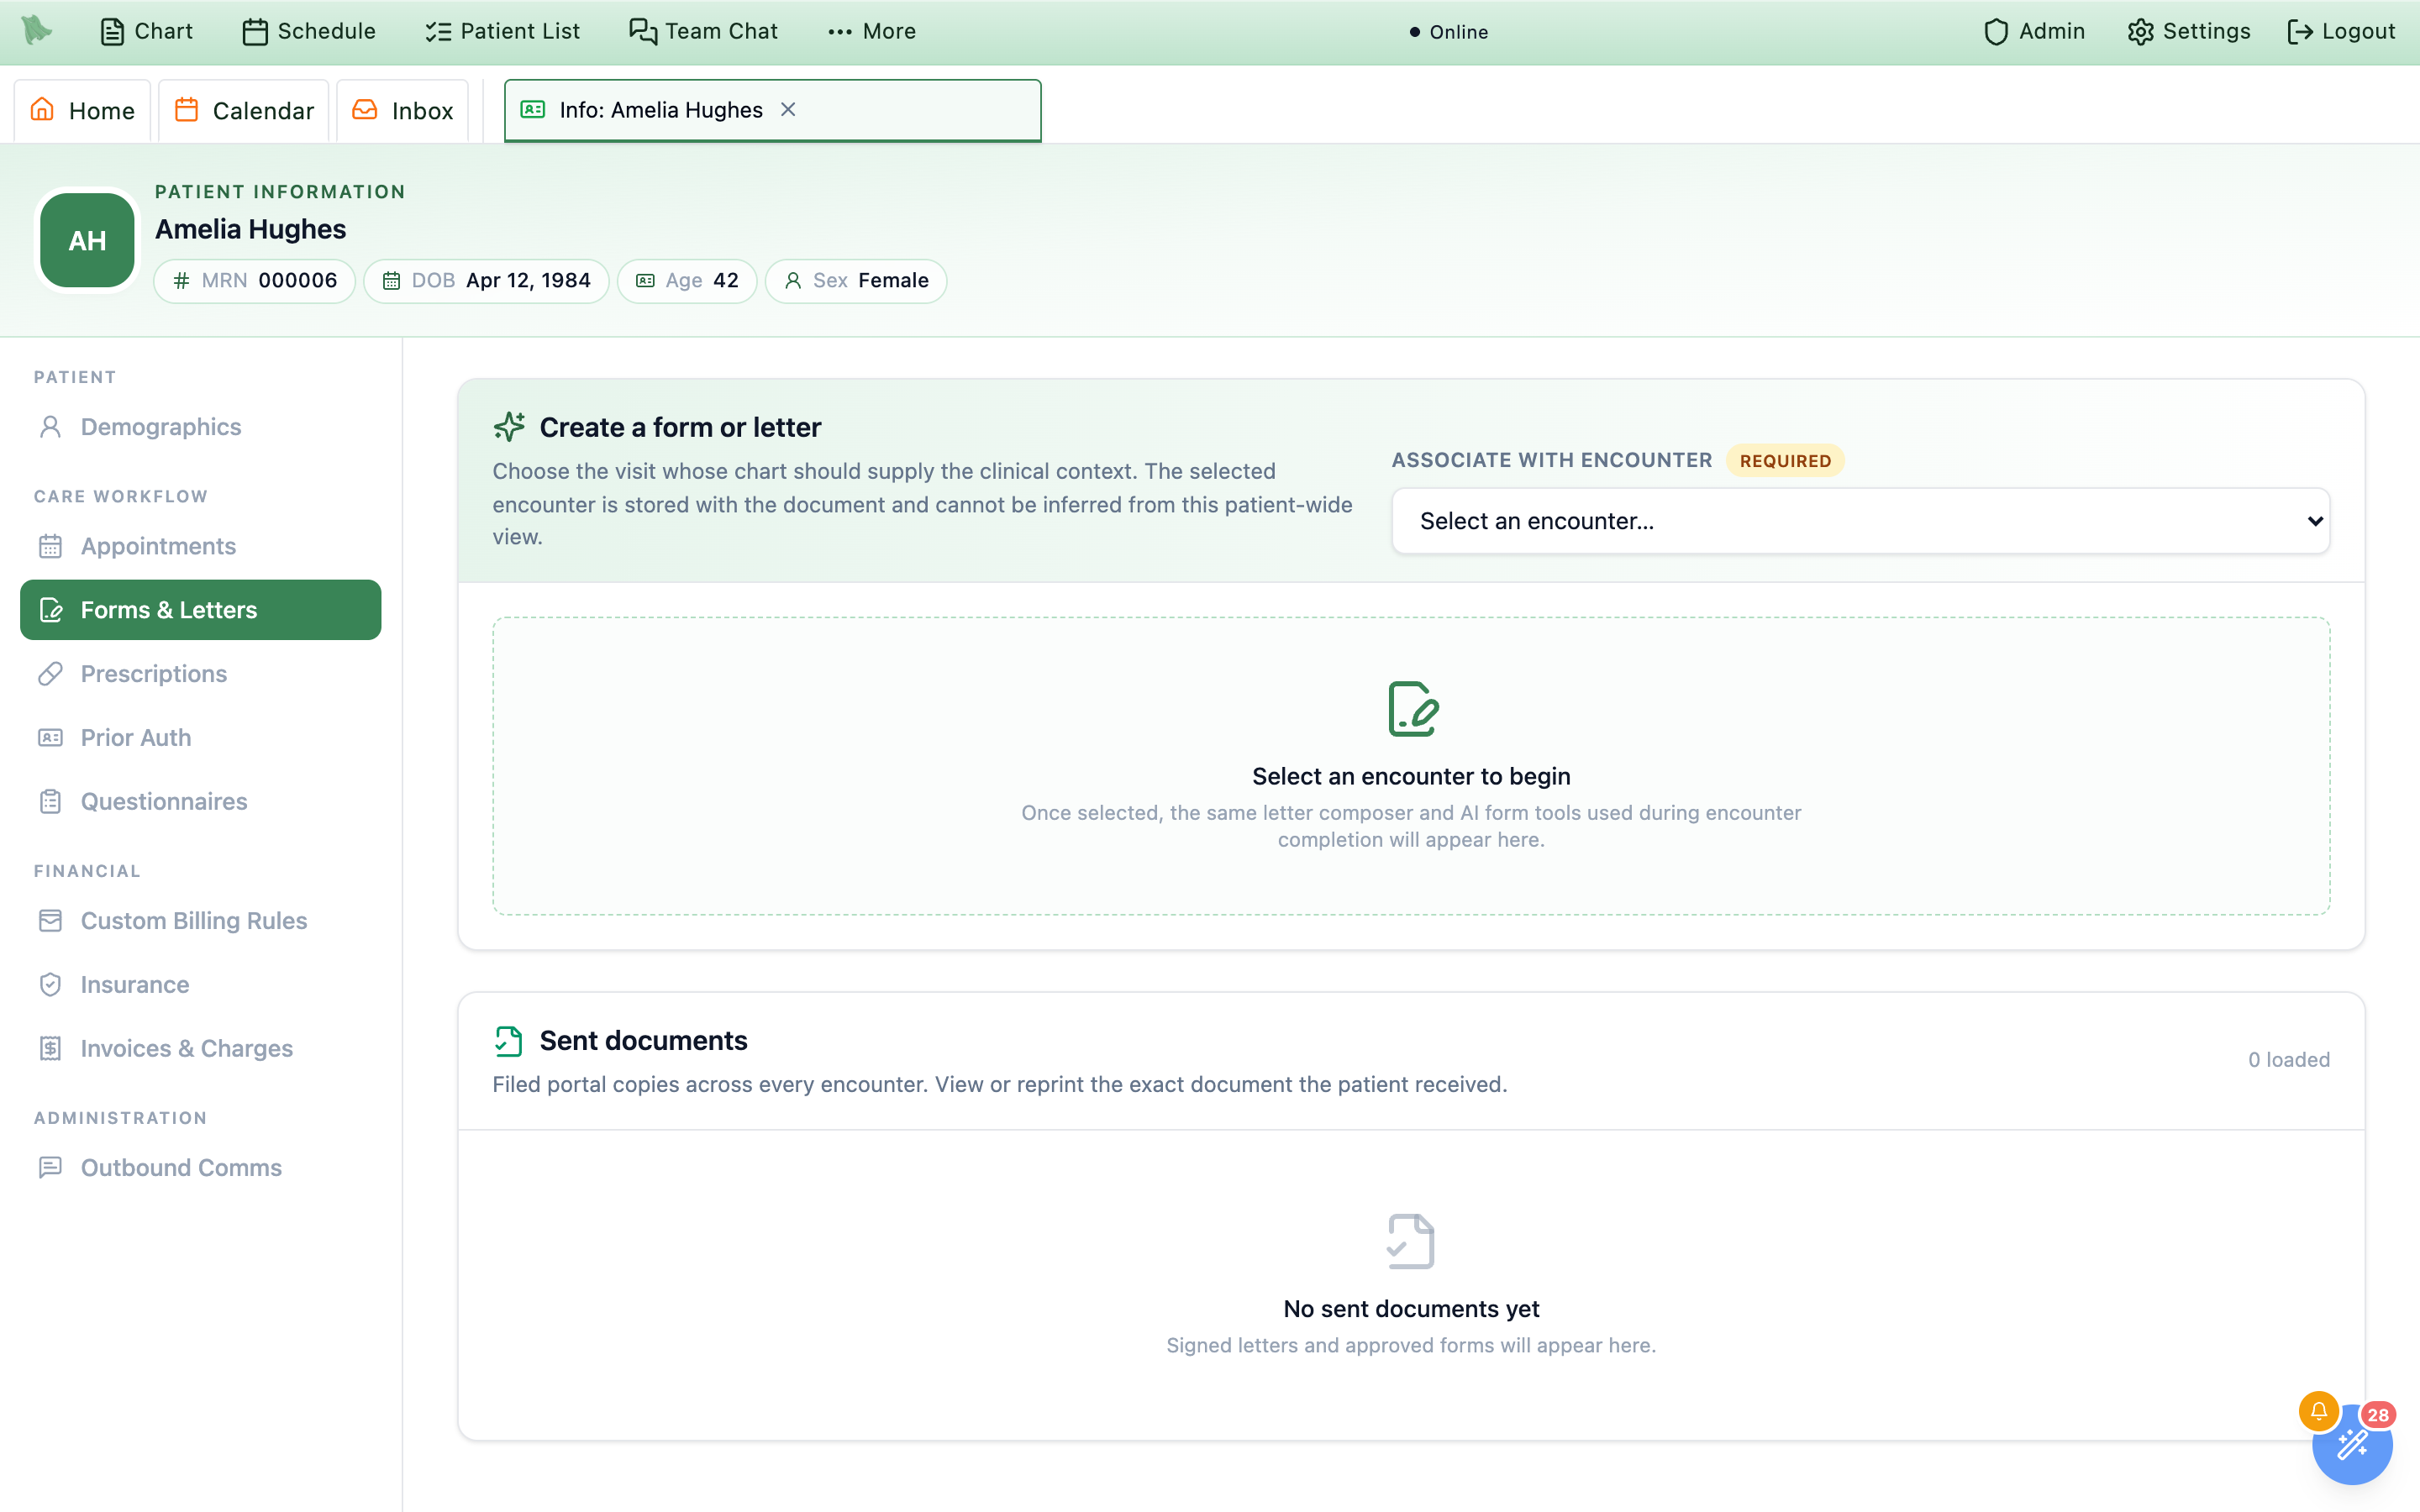
The Forms & Letters item under Care workflow does two things: it lets you produce a letter or an AI-filled form for this patient from any of their visits, and it lists every document that has already gone to their portal, across every encounter. The tab is available to anyone with an active Physician profile on the account — that is every physician, and no purely administrative or billing account, because the underlying document routes need a physician record to sign against. There is no read-only mode: if you can see the tab, you can use all of it.
-
Pick the visit the document belongs to.
Associate with encountercarries an amberRequiredbadge for a reason: this is a patient-wide view, so the encounter that supplies the clinical context cannot be inferred and must be stated. The dropdown opens onSelect an encounter…(orLoading encounters…) and lists visits newest first as{date} · {visit type} · {physician};Load older encounterspages further back. If the patient has no saved visit at all you getNo encounter is available— “A form or letter needs a saved encounter so its clinical source is auditable.” -
Write or generate.
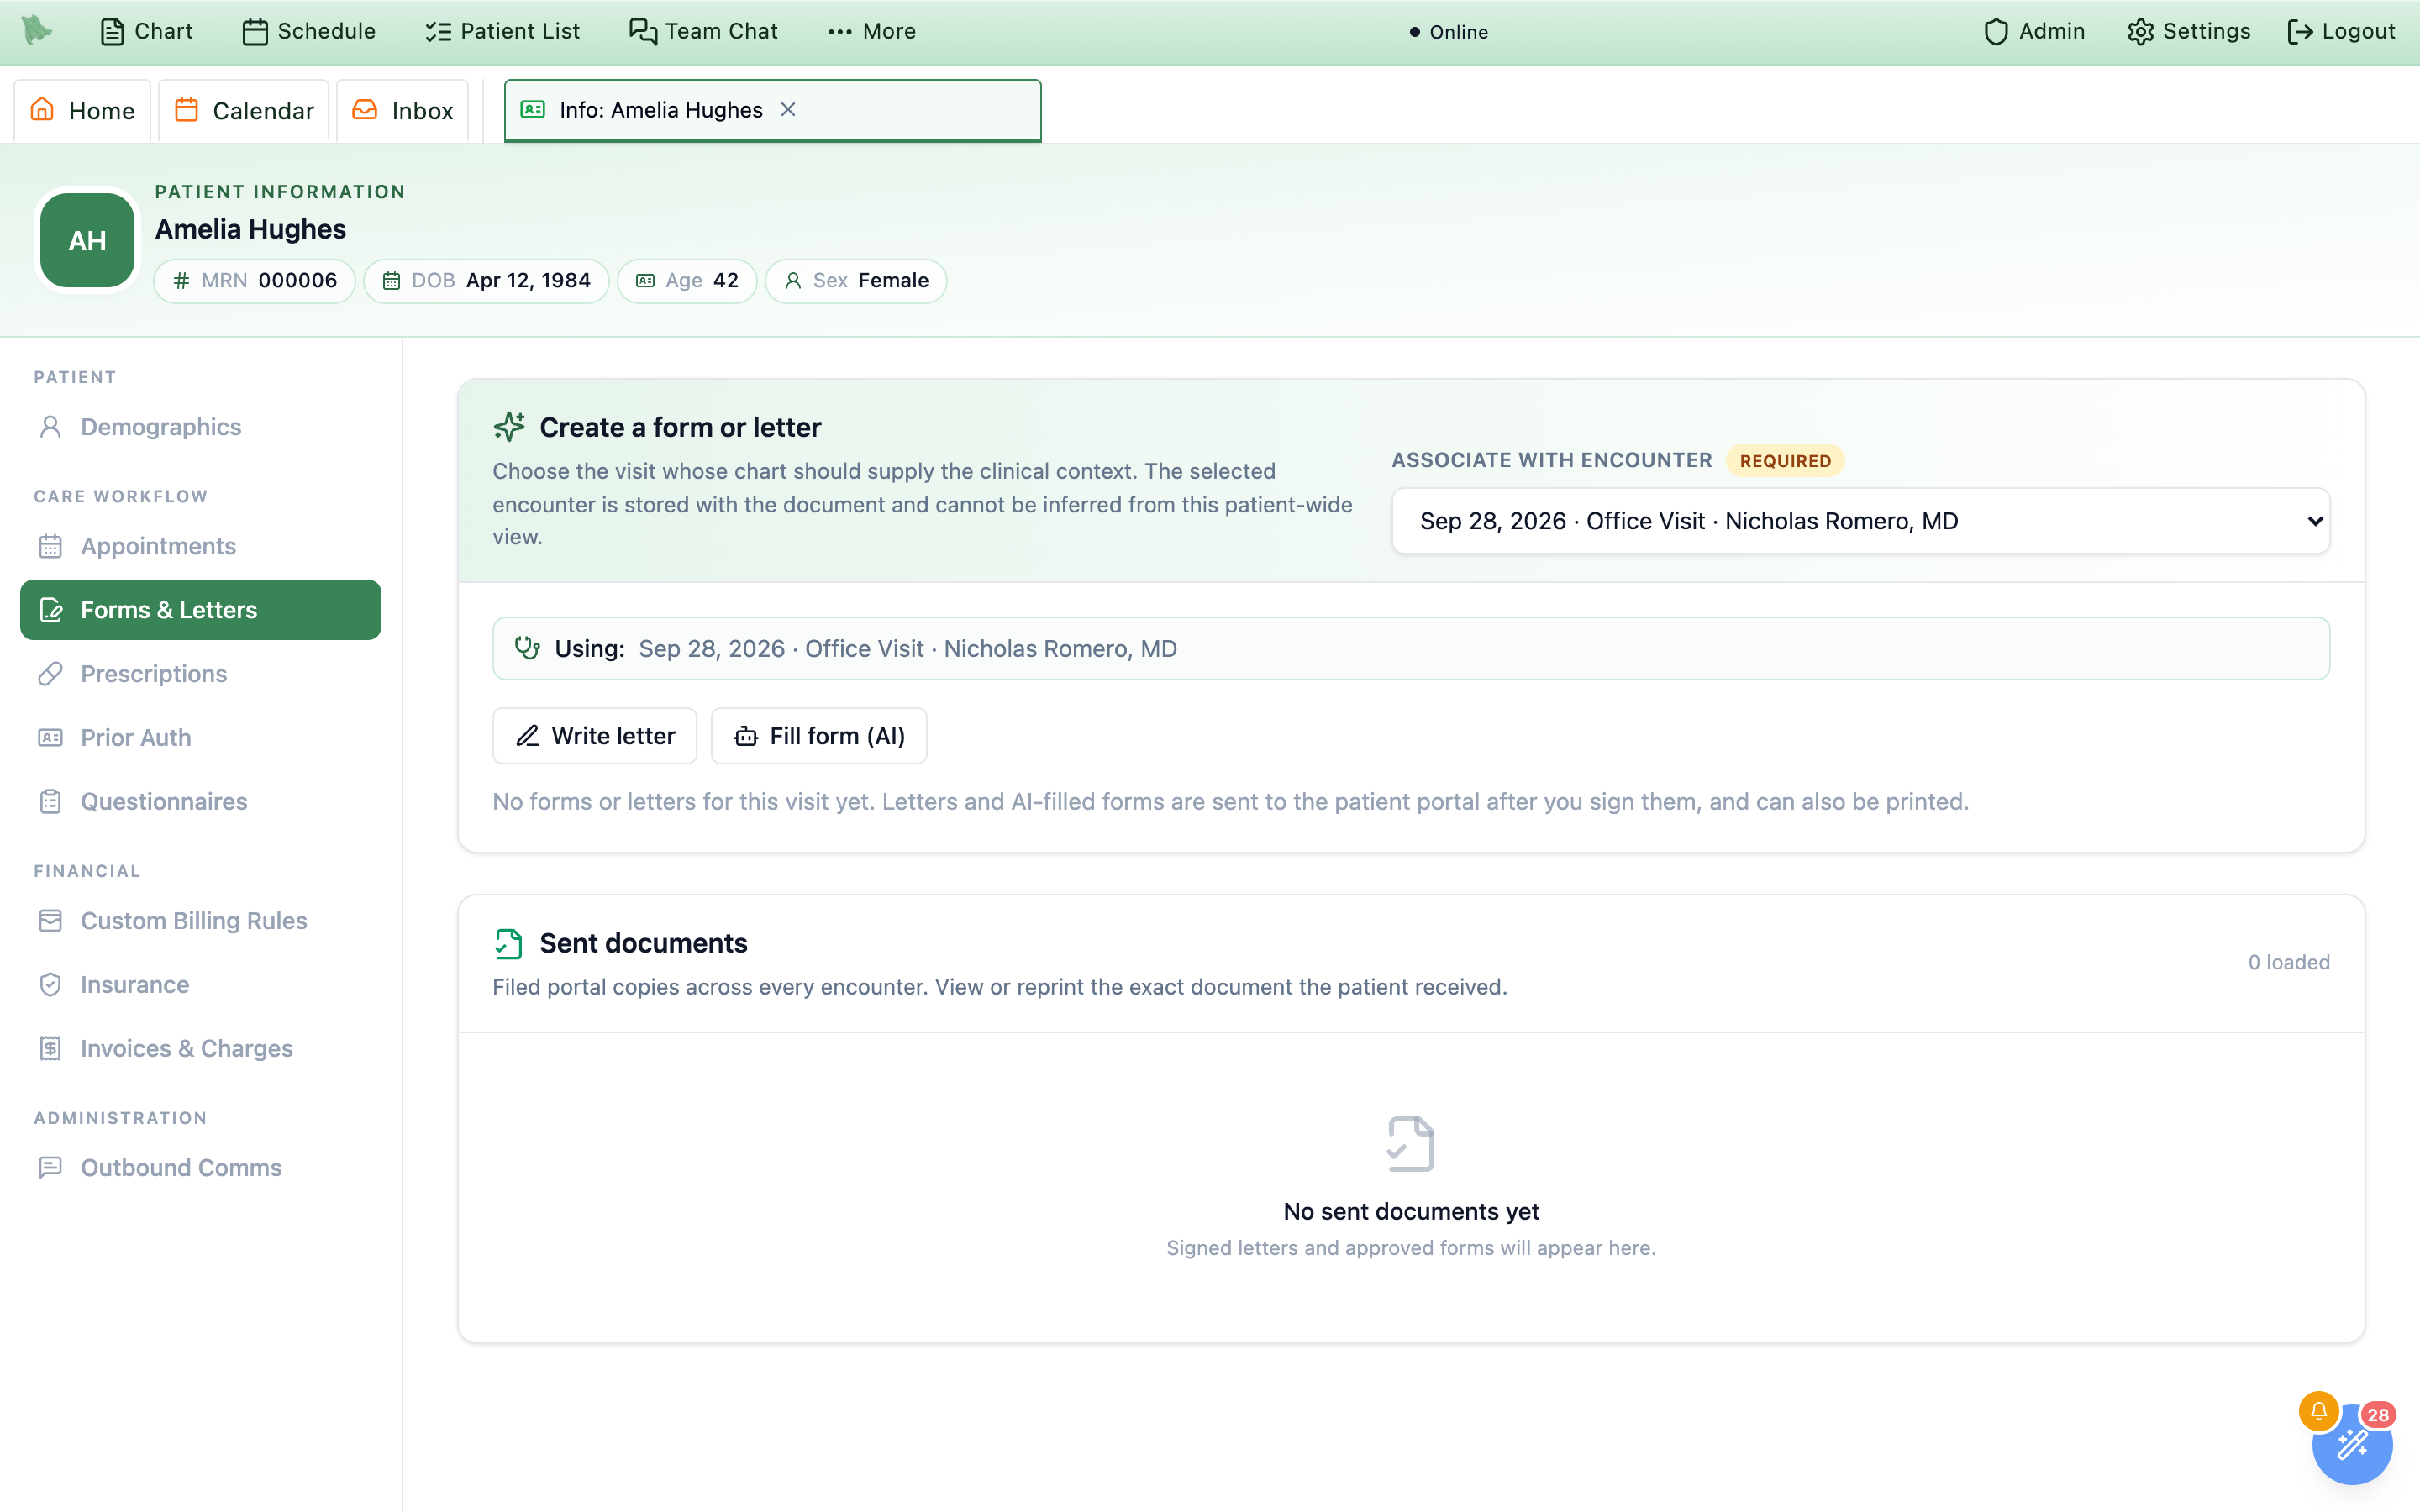
Once chosen, a
Using: {date} · {visit type} · {physician}line confirms the target and the familiar composer appears withWrite a letterandFill a form. This is the same component you use during encounter completion, so the whole authoring walkthrough already applies — starters and the letter editor in Write a letter, the catalog and instructions box in Fill a form with AI, and the sign-off gate in Review & approve. Anything you create here also shows up on the visit itself, and vice versa. -
Find what has already been sent.
The lower card,
Sent documents, is described as “Signed letters and approved forms across every encounter. View or reprint the exact filed document.” It includes fax letters to outside providers, which reach the patient’s portal only when you chose to share them. A right-aligned{n} loadedcounts what is on screen; the empty state isNo sent documents yetover “Signed letters and approved forms will appear here.” -
Reopen or reprint a filed copy.
Columns are
Document,Encounter,Sent, andActions. Under each document name sits one of exactly two labels —Clinician-createdorPatient-requested— and theEncountercell shows the visit date with its chief complaint (or Medical encounter).Viewopens the filed PDF in the review dialog;Reprintprints the same file.Load older documentspages back through long histories.
Only approved documents reach this list. Drafts, forms still generating, and anything waiting on your review live on the visit, not here — which makes Sent documents a reliable answer to “what does this patient already have?” For the chips a document wears on its way there, and what the patient sees at the other end, see What the patient sees.
Reprint records a chart audit entry before it fetches the PDF, and it is deliberately fail-closed — no audit, no print. If a print doesn’t start, the row shows Print failed. Open the document and try again.; open it with View and print from there. There is no download button in this tab.Using: line before you write.Fax a letter to the patient’s doctors, and follow every fax
Faxes under Care workflow appears when your practice has a fax service, for providers and for staff who can view patients. The top card, Fax a letter, lists the patient’s Care team with each doctor’s fax number (marked no fax when one is missing) and the six fax letters: pre-surgical clearance, cardiac clearance, medical records request, lab & test results, care coordination update and consultation report. A provider clicks one and it opens addressed to the right doctor, filled in with their usual choices and filed with the patient’s latest visit; staff see “A provider signs and faxes these letters. You can follow this patient’s faxes below.”
The lower card, Sent faxes, is “Everything faxed from this chart, newest first”: the subject, who it went to and the number, the page count, the time, the reason when a fax failed, and a status chip (Queued, Sending, Delivered, Failed or Cancelled) that updates while a fax is going out. Writing, signing and sending a fax letter are covered in Fax letters.
Track authorizations, approved units, and expiry dates
Prior Auth under Care workflow is where a payer’s approval gets recorded so it can be spent down and watched. The banner states the deal: “Track insurance prior authorizations for {first name}. Approved units are drawn down automatically as linked visits are completed and billed, and staff are alerted before each authorization expires.” Physicians and admins see the tab and may add and edit authorizations without any billing permission; other staff see it only with billing.prior_auth.manage (the Biller and Billing Manager role profiles include it, and they reach it from the Billing workspace’s Patient billing dialog without chart access). Grants are managed under Staff accounts & permissions.
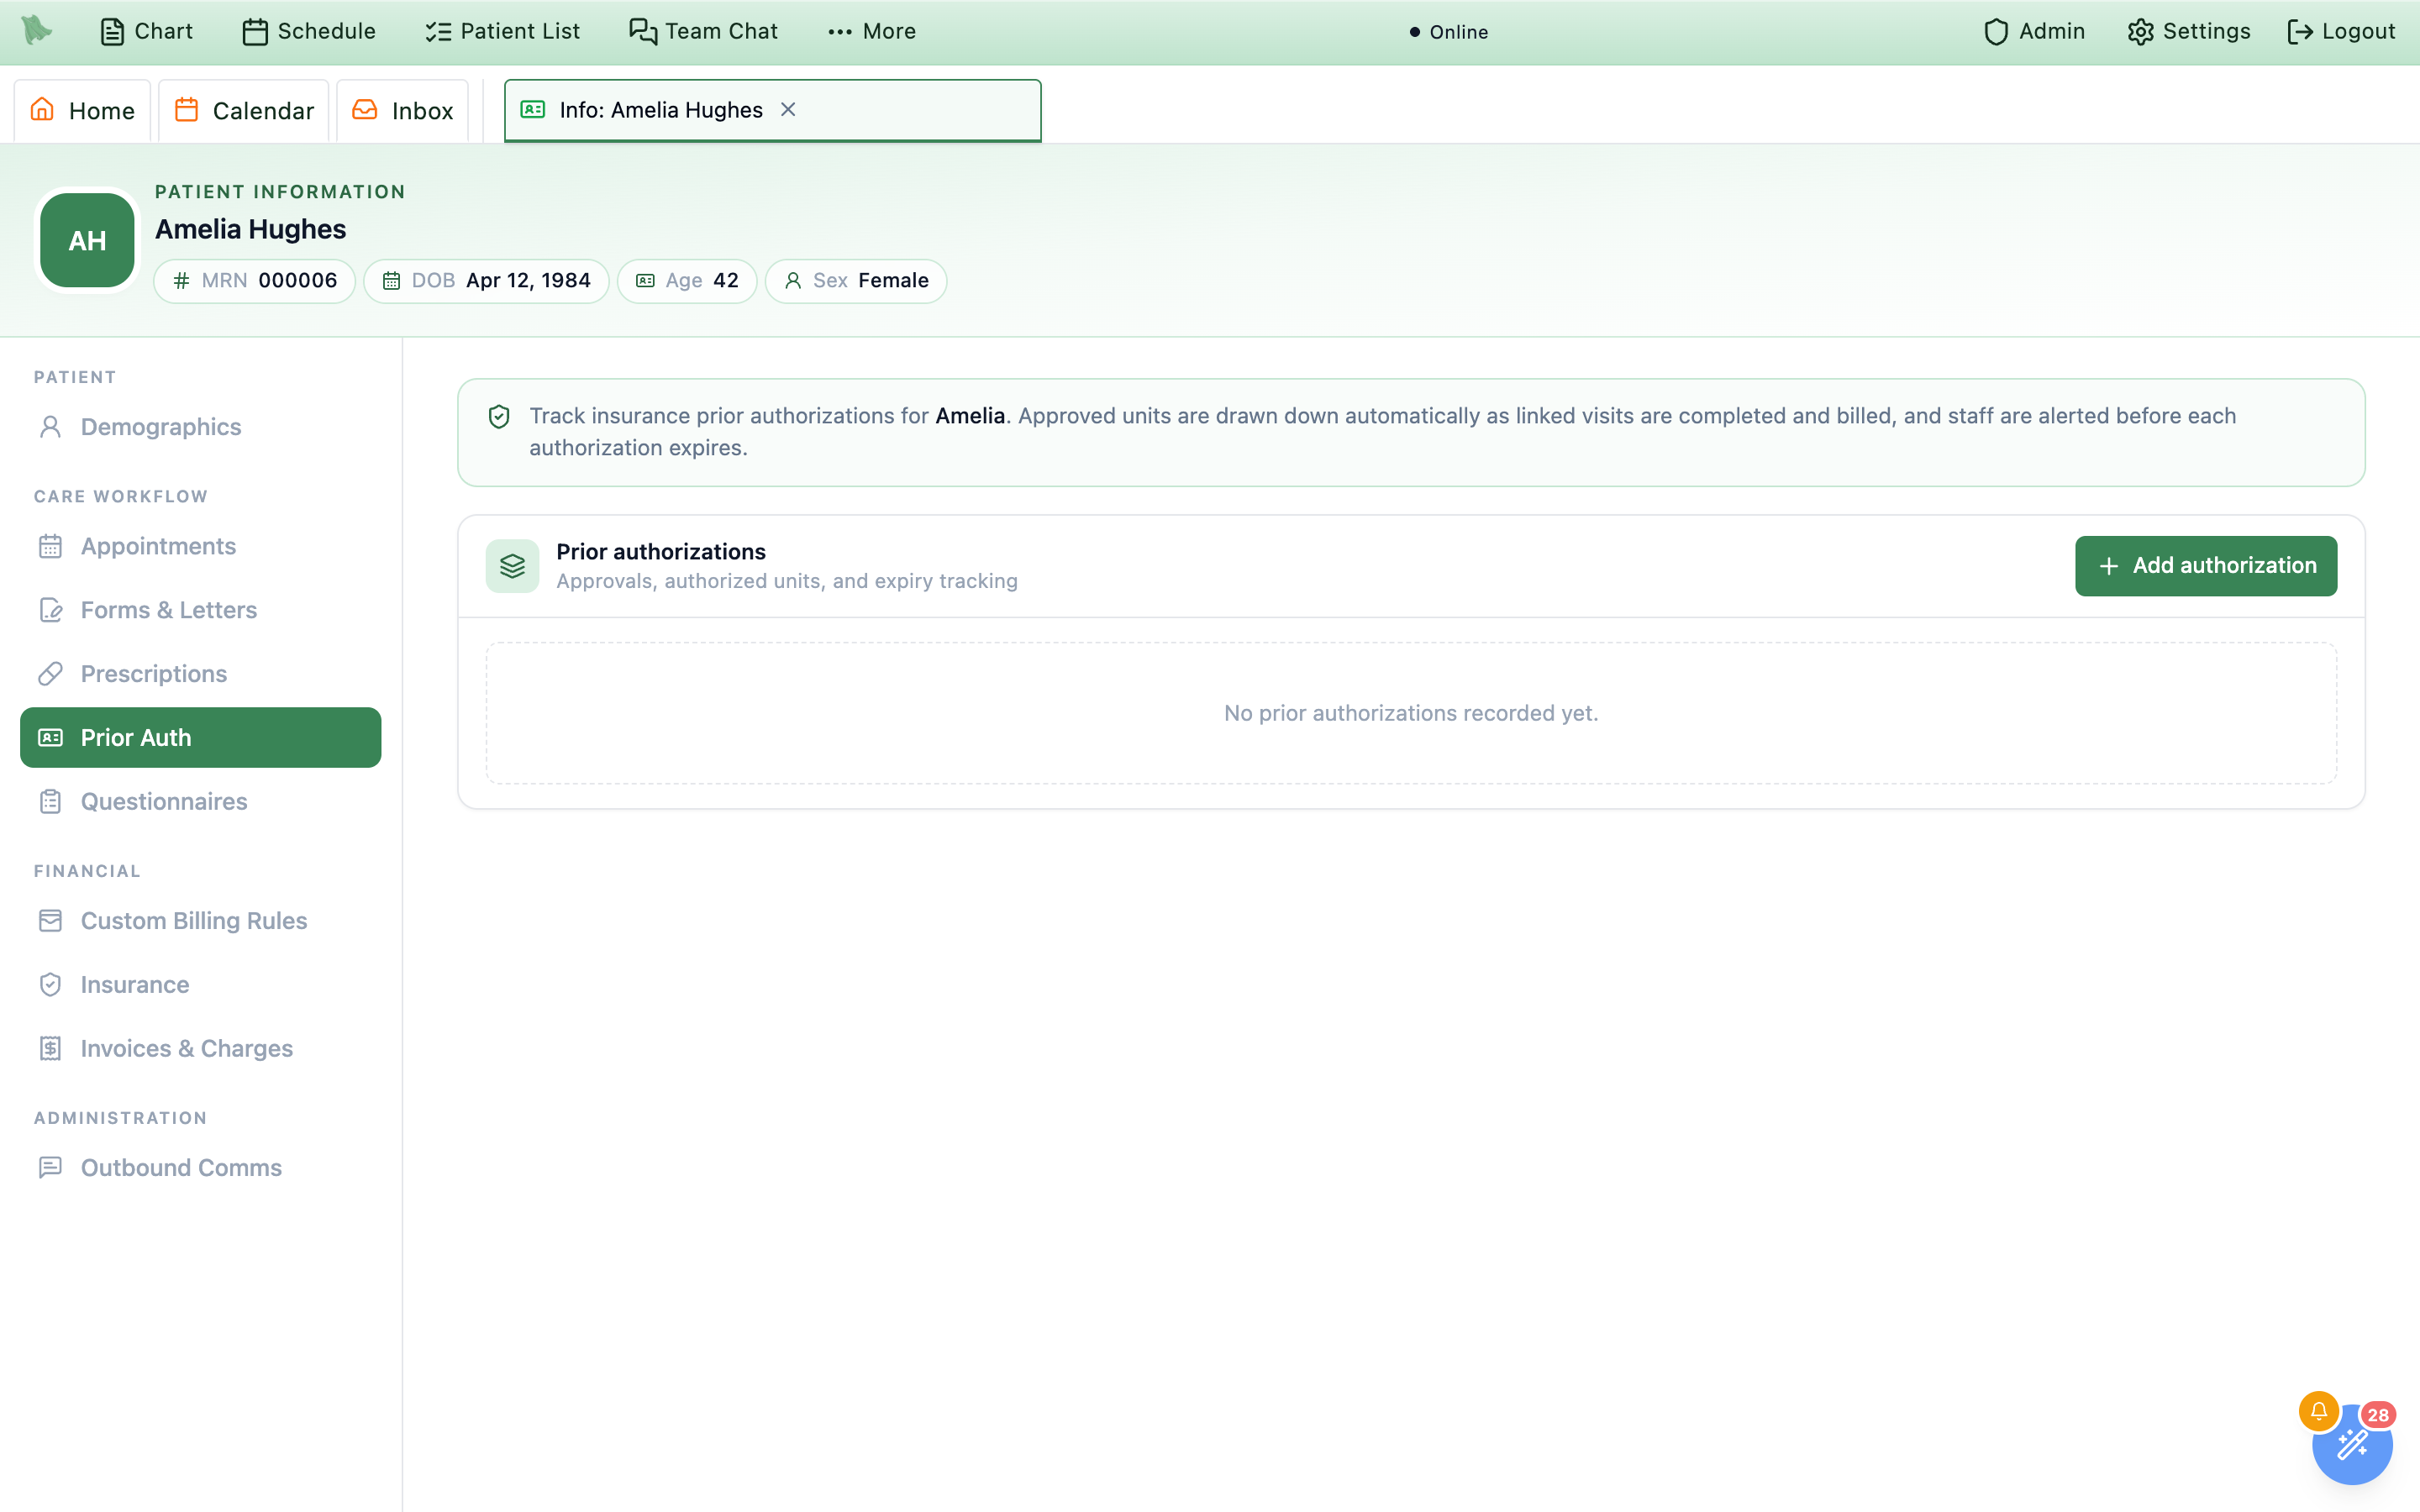
Add authorization is disabled until the patient has at least one insurance policy.-
Start from a policy.
An authorization always belongs to a specific insurance policy, so if the patient has none the card reads “Add an insurance policy on the Insurance tab before recording a prior authorization” and
Add authorizationis disabled with the tooltipAdd an insurance policy first. Add the coverage on Insurance first. -
Record the approval.
Add authorizationopensAdd prior authorization, subtitledFor {first name}.Insurance policyandAuthorization numberare required; everything else is optional. Save withAdd authorization. -
Read the card.
Each authorization is one row: the authorization number, its status pill, an expiry chip when one applies, then a muted line with the policy,
{n} units requested,Follow-up {date},Services:andDiagnoses:when codes are listed, the units, and the effective window. Free-textNotesappear underneath, andCheck visitslists which visits will get the number (see Prior auth letters & corrections). The pencil at the end of the row reopens the same dialog asEdit prior authorization, where the primary button becomesSave changes; the ban icon beside it isEntered in error. -
Let the units look after themselves.
In edit mode a read-only
Units usedbox appears, captioned “Tracked automatically as linked visits are completed and billed” — you set what the payer approved, Hero counts what has been spent. Units readUnits not trackedwhen you left the field blank, otherwise{used} of {authorized} used · {remaining} remaining.
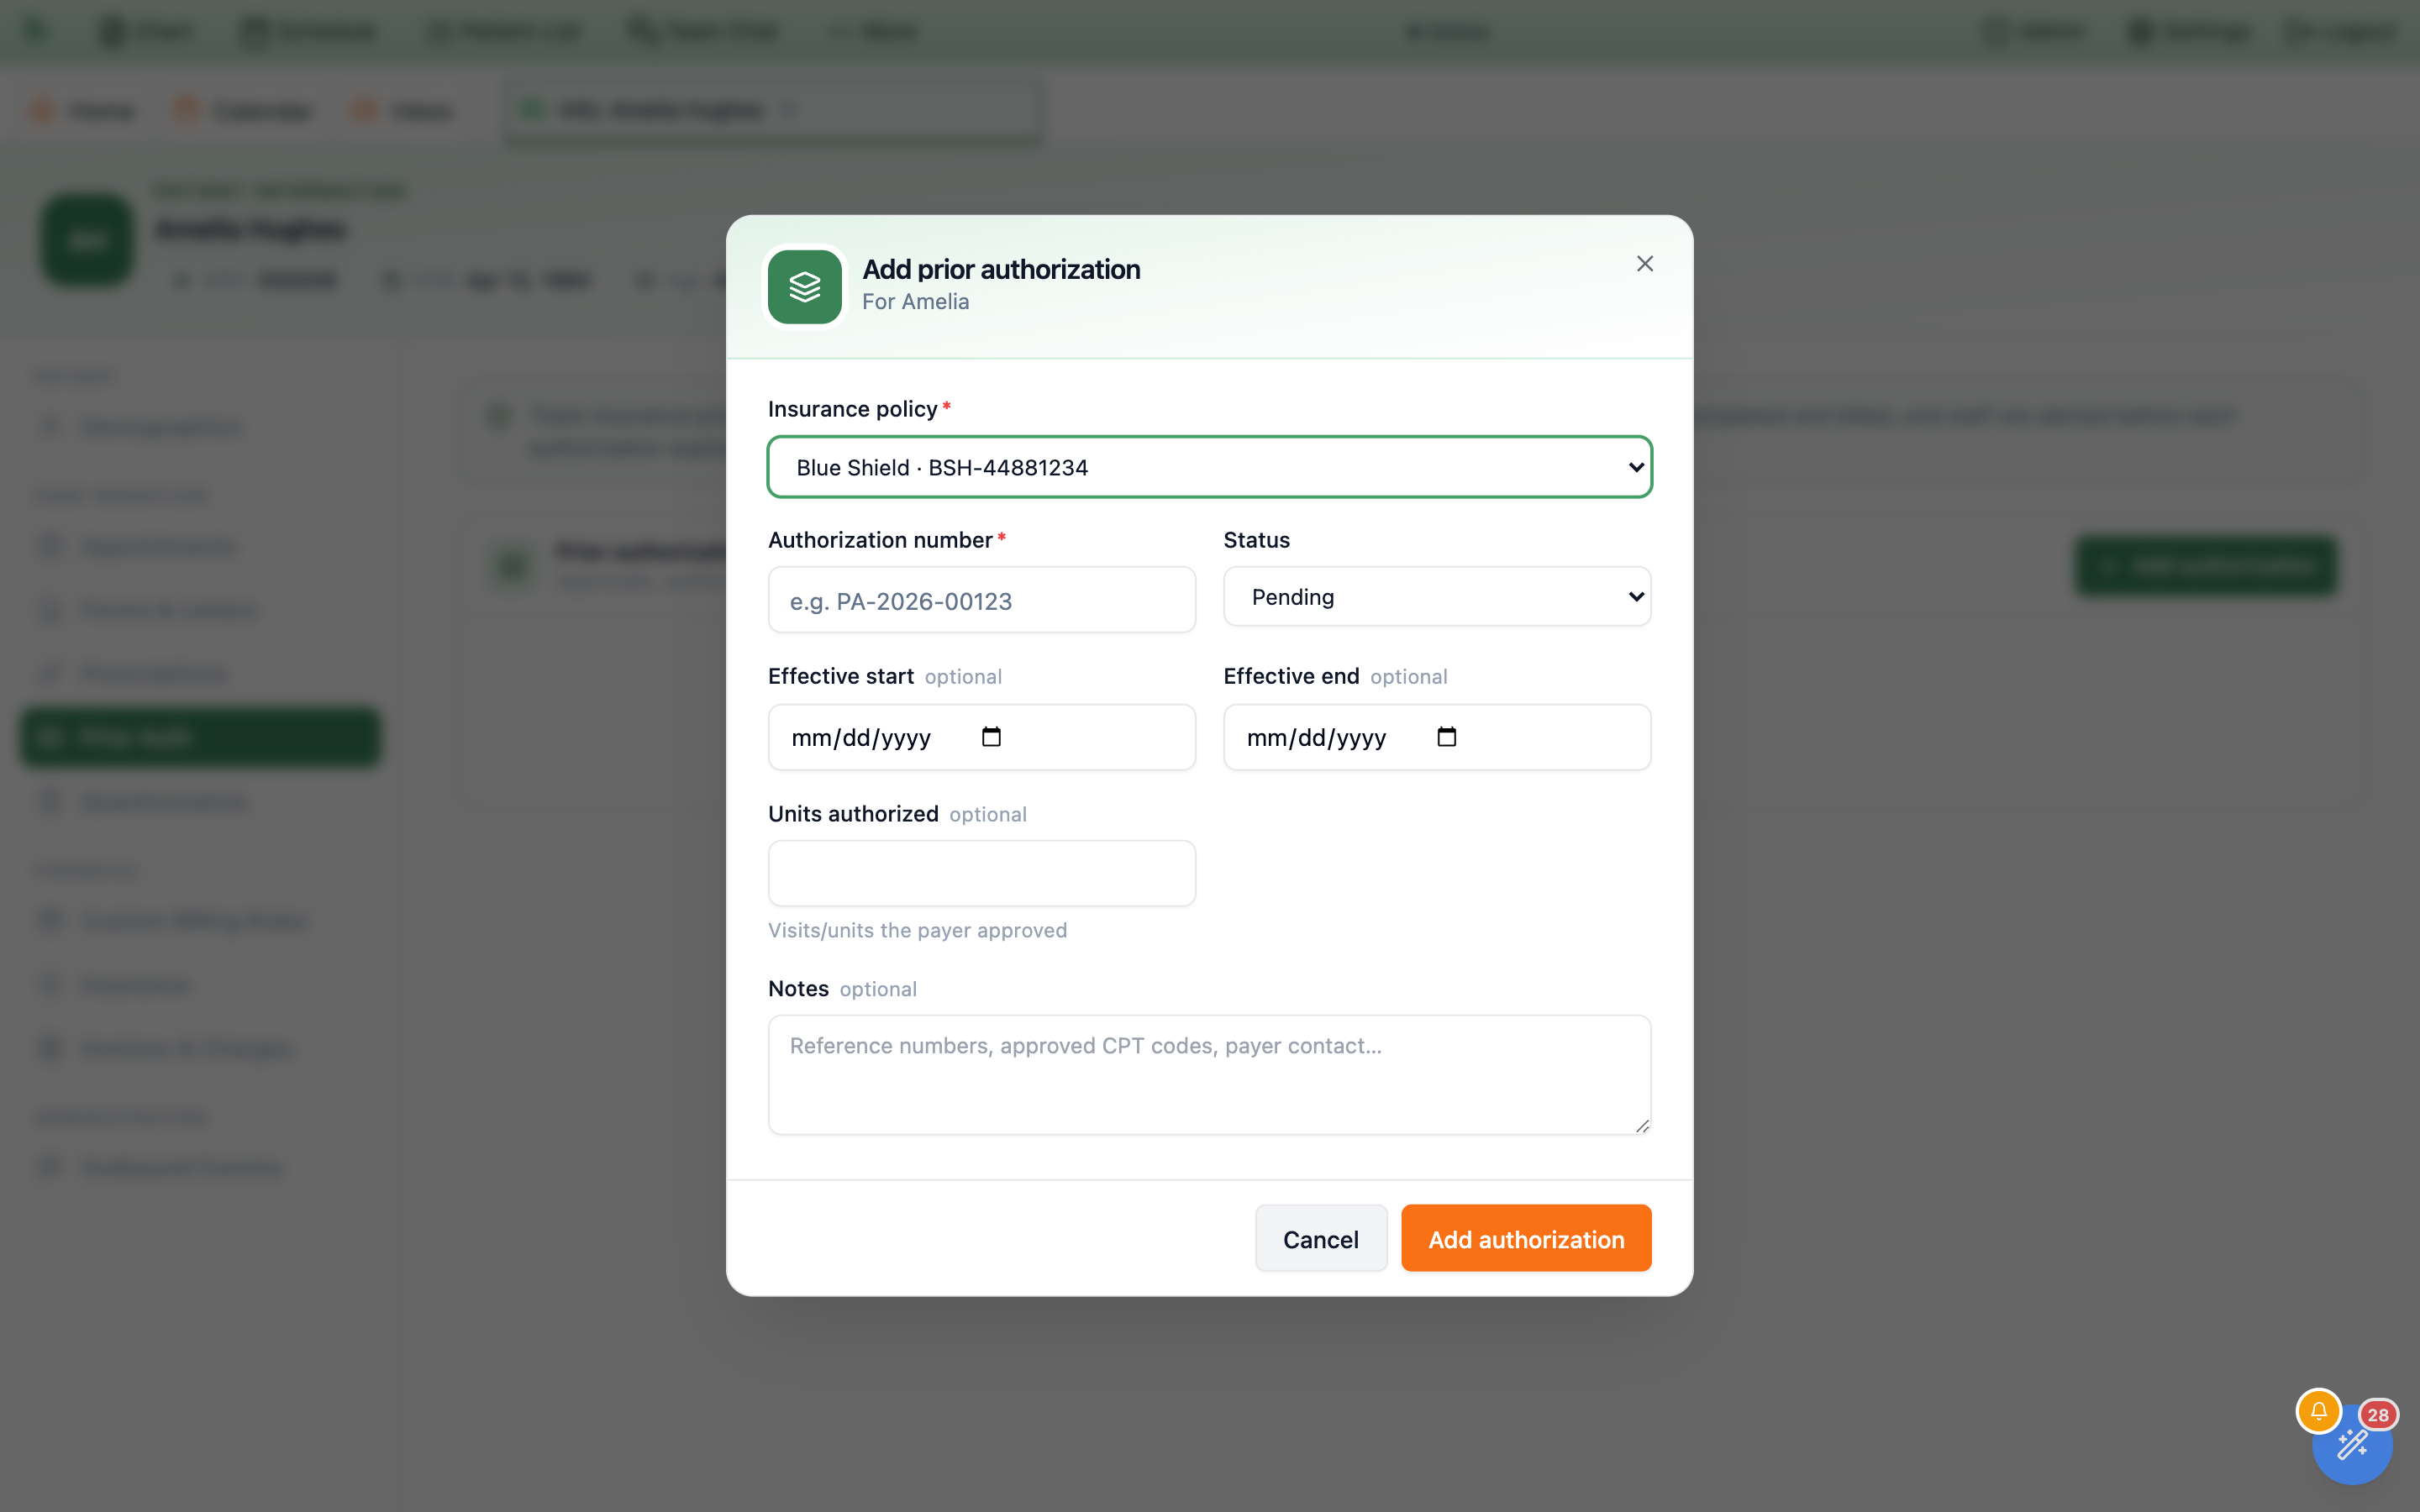
Status starts at Pending; the policy cannot be changed once the authorization is saved. (Since this picture the dialog also asks for Units requested, Follow-up date, Authorized CPT / HCPCS codes and Authorized diagnosis codes.)| Field | What to enter |
|---|---|
Insurance policy (required) | Opens on Select a policy… and lists the patient’s policies as {payer} · {policy number}. Locked when editing. |
Authorization number (required) | The payer’s reference, e.g. PA-2026-00123. It is sent on claims, so words such as N/A or pending are refused (see Numbers Hero refuses). |
Status | Pending, Approved, Denied, Fully used, or Expired. New authorizations start at Pending. An Expired authorization is still sent on claims for visits inside its effective dates. |
Effective start / Effective end | Optional dates; the end can’t be before the start. The end date is what drives the expiry chips. |
Units requested | Optional non-negative whole number. When fewer units are approved than requested, the form and the card show Partial approval. |
Units approved | Optional whole number — “Visits/units the payer approved”. Leave blank and units simply aren’t tracked. |
Follow-up date | Optional date for the next payer follow-up; it also appears in the practice-wide Prior Auths queue. |
Authorized CPT / HCPCS codes | Optional, comma-separated (placeholder 99213, 20610): “Only visits that bill one of these codes get this authorization number and use an approved unit.” Leave it empty and any visit inside the dates on that policy qualifies. |
Authorized diagnosis codes | Optional, comma-separated ICD-10 codes (placeholder M25.561), for reference only: “A visit coded with a different diagnosis still gets the number; its claim shows a warning.” |
Notes | Optional free text — “Payer contact and additional reference information…” |
Beside the status pill, a card can carry one expiry chip: Expired when the status says so, Past end date when the end date has gone by, Expires today, or Expires in {n}d within a fortnight of the end date. Beyond fourteen days — or with no end date at all — there is no chip. The chips are an at-a-glance advisory; the authoritative expiry sweep, and the staff alert that comes with it, runs on the server overnight.
The form refuses to save with a message in the dialog banner: Select the insurance policy this authorization belongs to., Authorization number is required., Units approved must be a whole number., Units requested must be a non-negative whole number., Enter valid five-character CPT/HCPCS codes and ICD-10 diagnosis codes, separated by commas., or Effective end must be on or after the start date. A rejection from the server shows its own wording, falling back to Could not save the authorization. Try again.
Entered in error, not a status. There is still no delete, but setting Status to Denied or Expired is not the way to take one back: an Expired authorization can still go on claims for visits inside its dates. The ban icon on the row marks it Entered in error with a reason, so its number is never sent on a claim; once a visit has used one of its units, edit it with the pencil instead. See Prior auth letters & corrections. The policy behind an authorization can never be changed, so one filed against the wrong coverage is marked entered in error and added again on the right policy.A card shows Partial approval when approved units are fewer than requested. To work all patients’ requests, pending decisions, partial approvals, and upcoming expirations, open Billing → Prior Auths.
Per-patient billing rules, the money already on the account, and superbills
Two sidebar items in the Financial group cover one patient’s money, and they are deliberately different jobs. Custom Billing Rules is settings — how this patient will be charged. Invoices & Charges is the ledger — what they have been charged. Neither appears for a plain physician. Custom Billing Rules needs an account that can see financial amounts plus either organization admin or the staff permission billing.settings.manage; Invoices & Charges needs financial amounts plus admin or one of billing.charges.manage, billing.ar.manage, or billing.sensitive (billing.payments.collect alone, as a medical assistant or nurse has, no longer shows it). Billing staff also open both from any patient name in the Billing workspace, in the Patient billing dialog. If either panel ever fails to render it says so in place — Custom billing rules could not be displayed. or Invoices & charges could not be displayed. — with a Retry button, leaving the rest of the workspace usable.
Custom Billing Rules
The whole tab is one draft: tick boxes and type rates, then press Save changes in the bar at the bottom. The bar reads All changes saved, or Unsaved changes with Discard and Save changes, and confirms “Billing rules saved.” Leaving the tab or closing the dialog with unsaved edits asks first. The Exceptions card holds three checkboxes:
Bypass insurance (treat as cash pay)— “Visit pricing and collection use the cash fee schedule instead of eligibility/copay rules, and encounter signing will not create insurance claim charges without an explicit override. Mirrors the Insurance tab control.” This is the one exception a staff account cannot touch withoutbilling.settings.manage; without it the box is disabled.Bypass card on file— “Card requirements will not block booking for this patient.”Bypass booking collection— “Booking-required collection moves to check-in for this patient.” The patient’s portal and billing view then read Deposit due at check-in instead of at booking.
Under Insurance claims, Automatically file secondary claims is on by default: when the primary insurance finishes a claim and leaves a patient balance, the remainder is filed to the patient’s active secondary policy instead of being billed to the patient. Uncheck it to bill this patient directly.
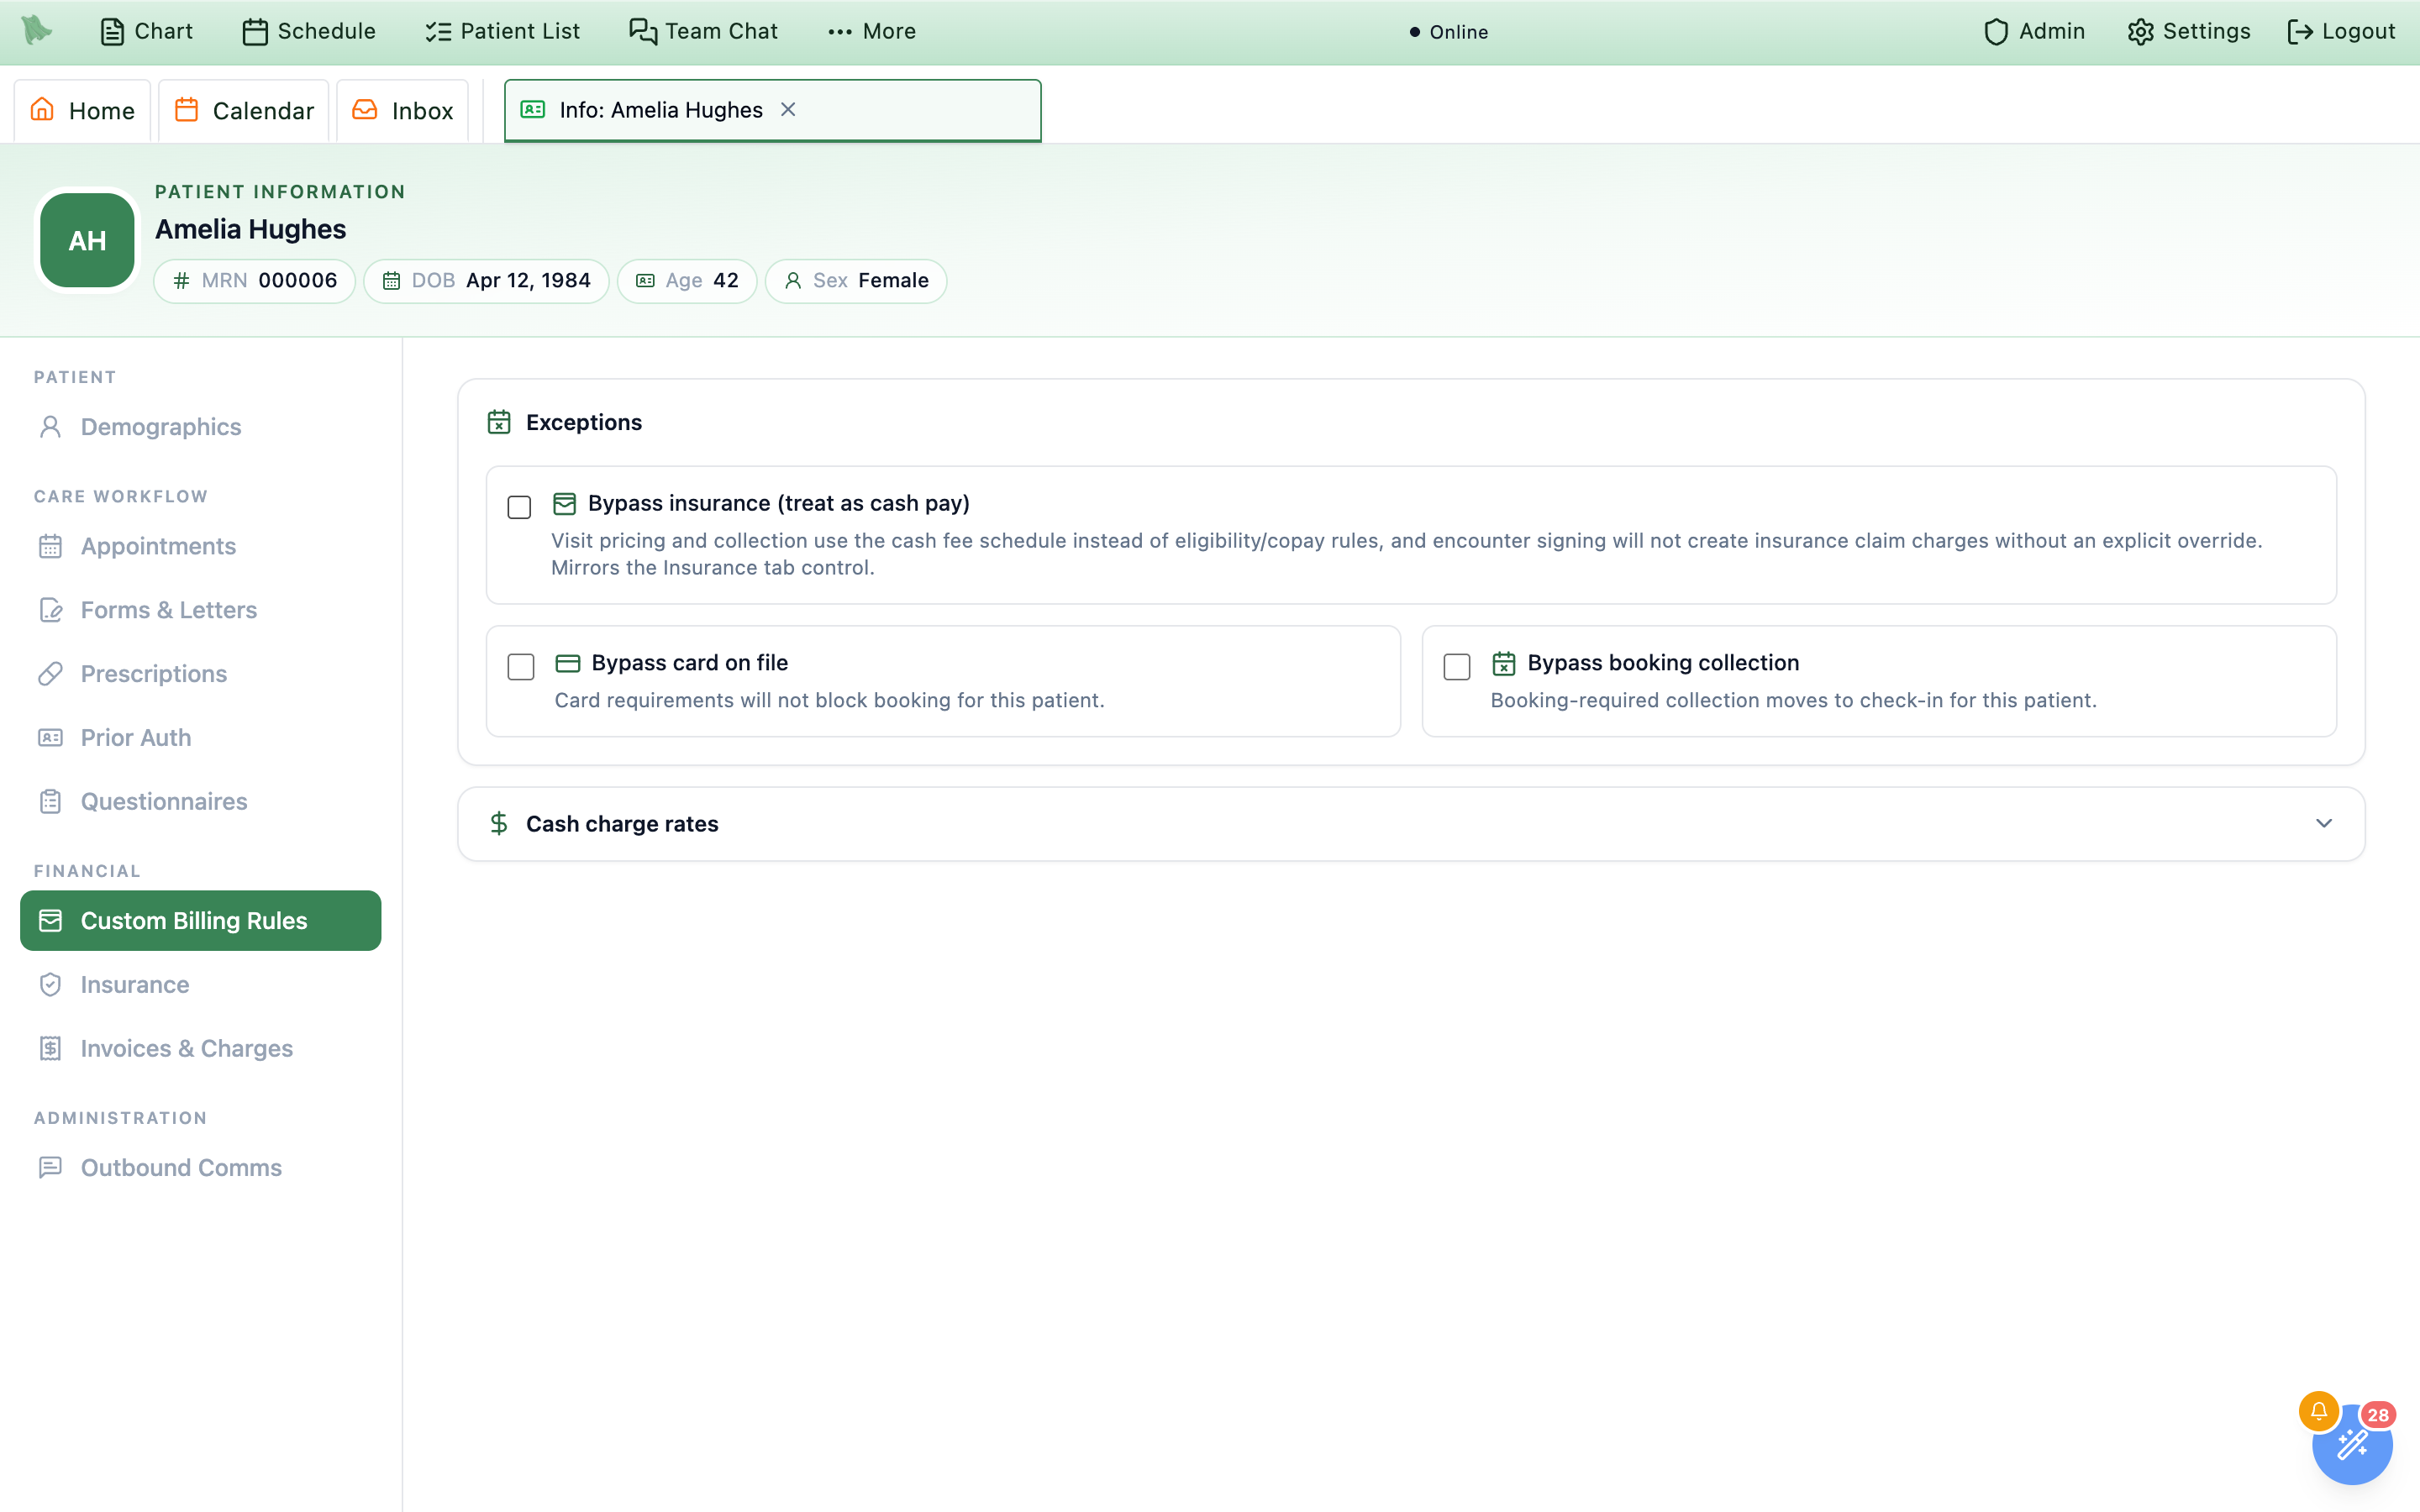
Cash charge rates collapsed. The rate table is not built until you open it.Below them, Cash charge rates is a collapsed accordion — click the button of that name to open the per-visit-type price overrides for this patient. Nothing inside it is loaded until you expand it, which keeps a long provider list from slowing the tab down; once opened it stays available even after you collapse it again. Inside: Search provider or visit type, which matches every word you type across both (a surname plus Standard finds that provider’s Standard visit; rows show the provider’s formal name, so a nickname won’t match), then a row per provider and visit type with Visit type (and its duration, e.g. 45 min / Online), Provider, the read-only Service rate your organization charges, and a Patient cash rate box prefixed with $ and placeheld Default. Type an amount to override; a rate that already has an override also gains a reset button, Use the service rate for {visit type}, which clears it in the draft. In a DPC practice, membership-covered services read Covered by membership as their service rate, with “Not used in DPC: this visit is covered by membership.” Bad input is refused inline with Enter a valid amount. (and the bar reads Fix the highlighted rate before saving.). The fee schedule these overrides sit on top of, and the rest of the patient-exception model, are documented in Patient exceptions.
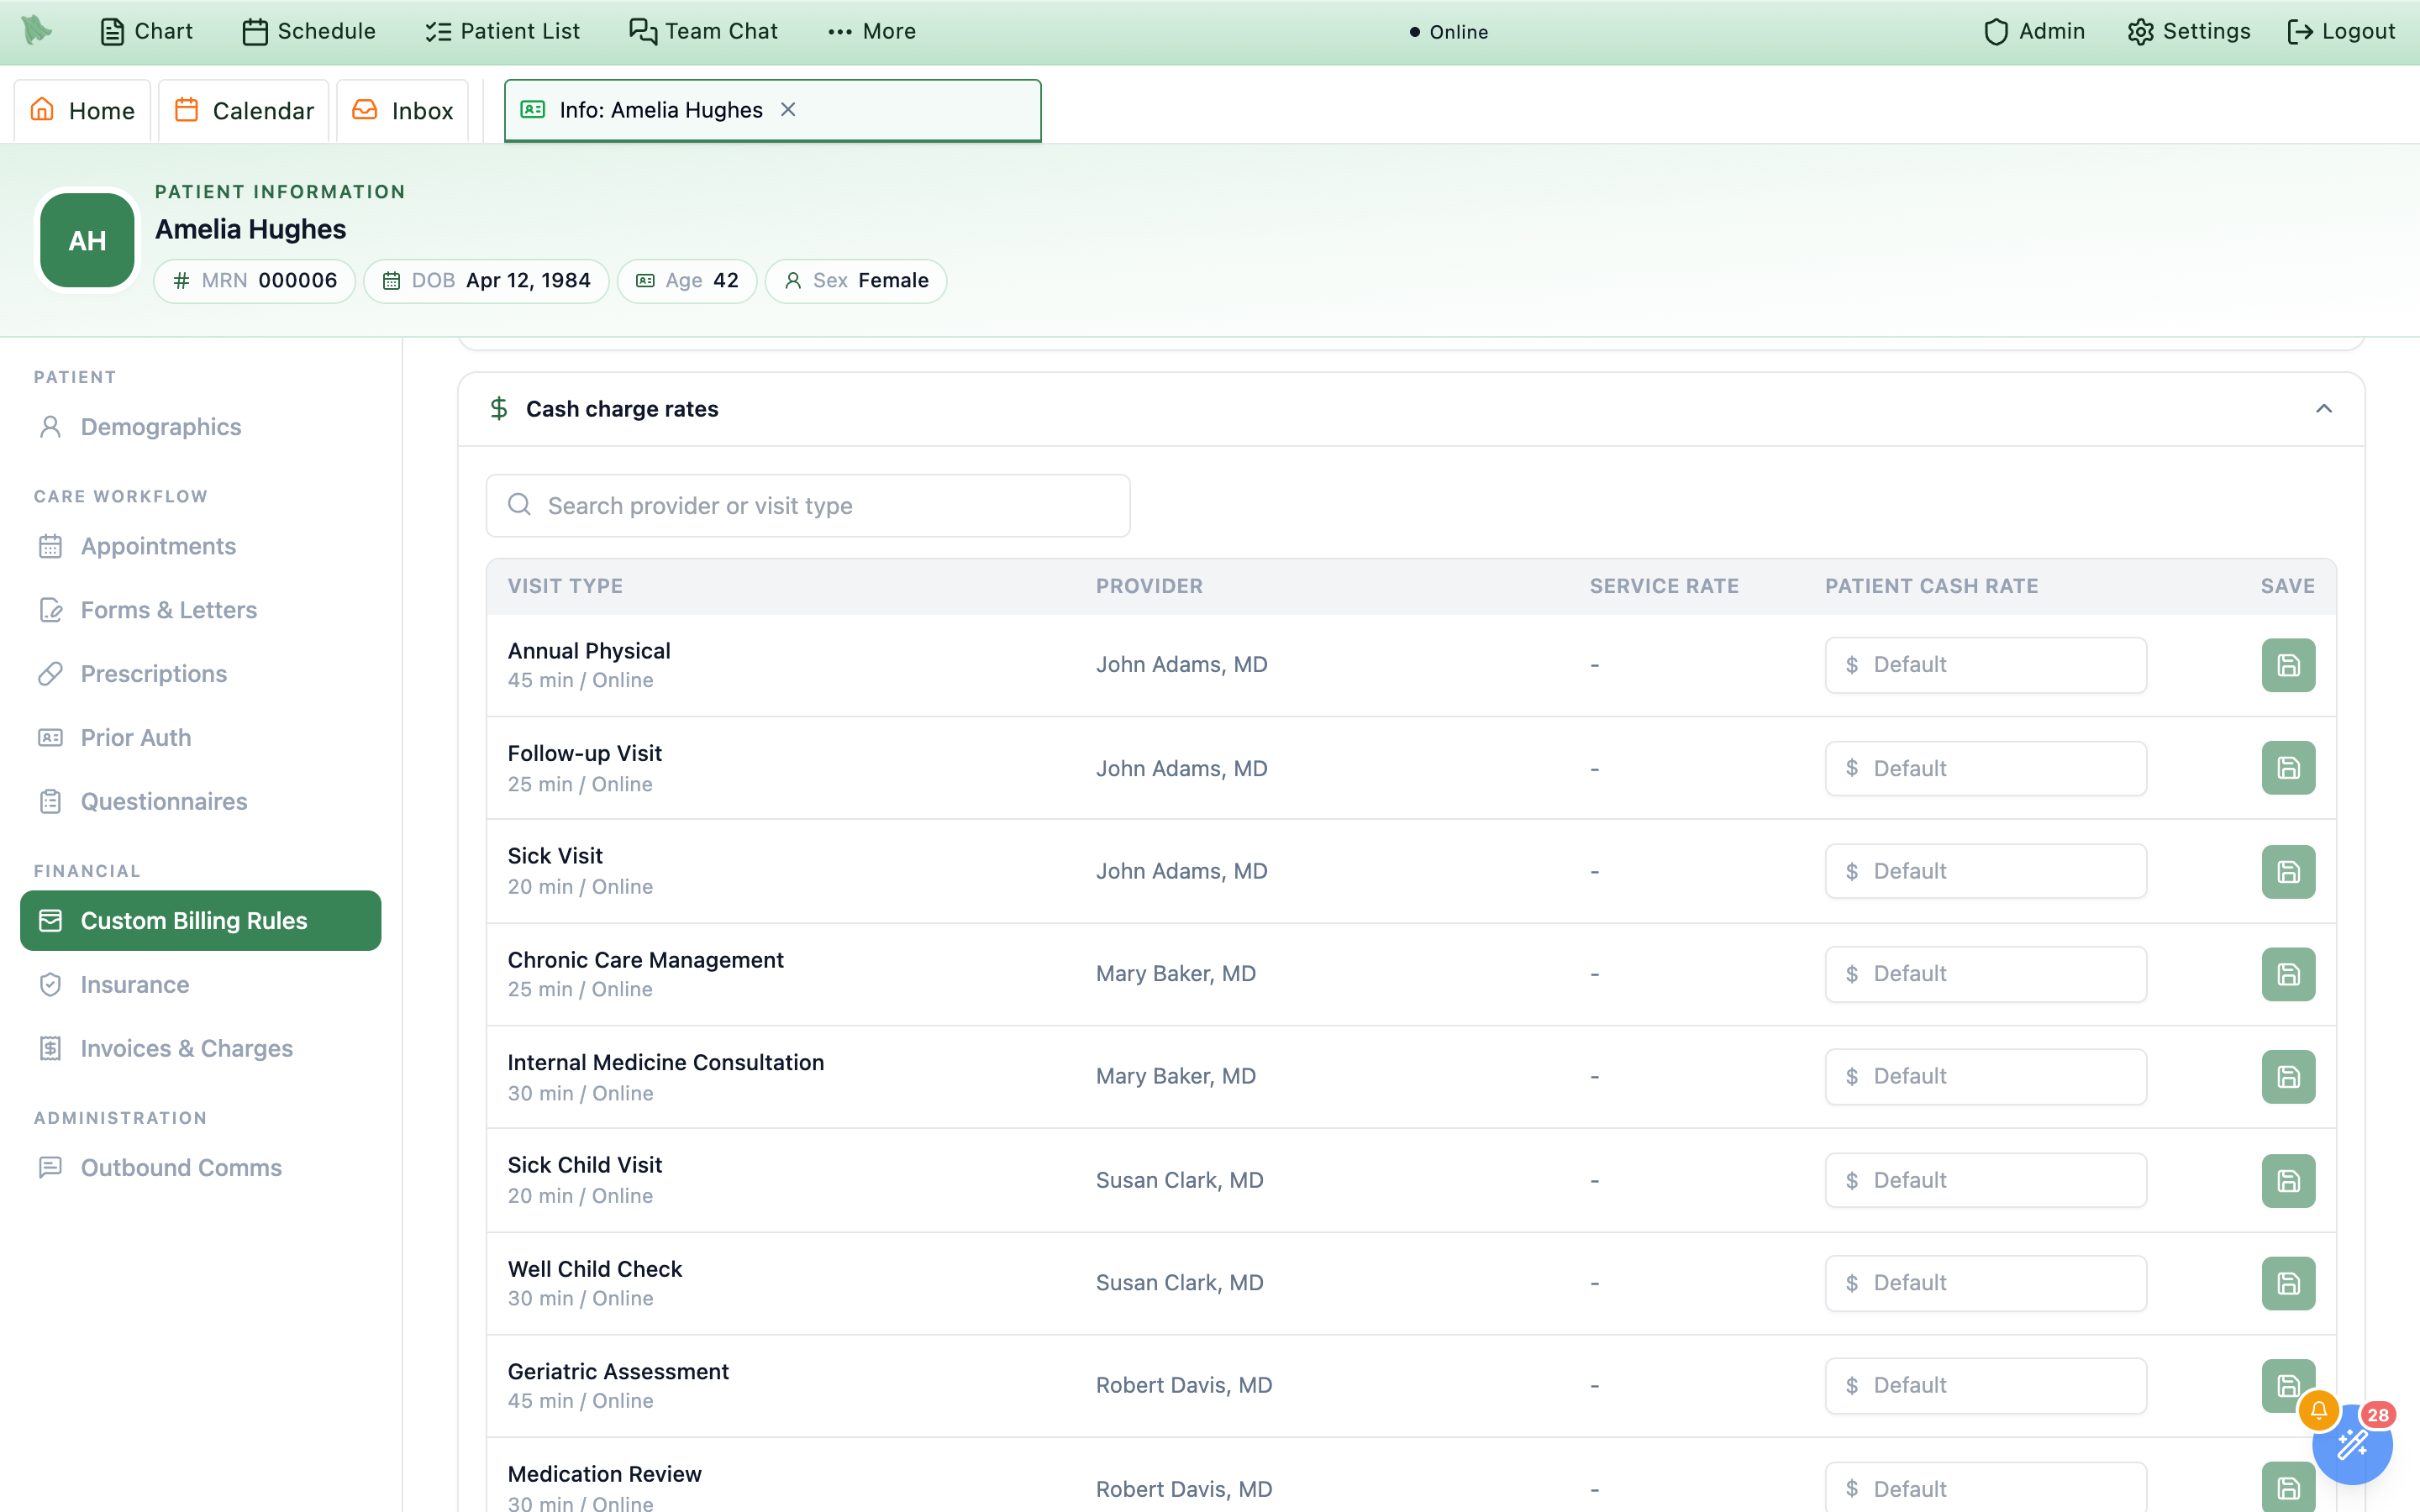
Save changes bar at the bottom of the tab.
Invoices & Charges
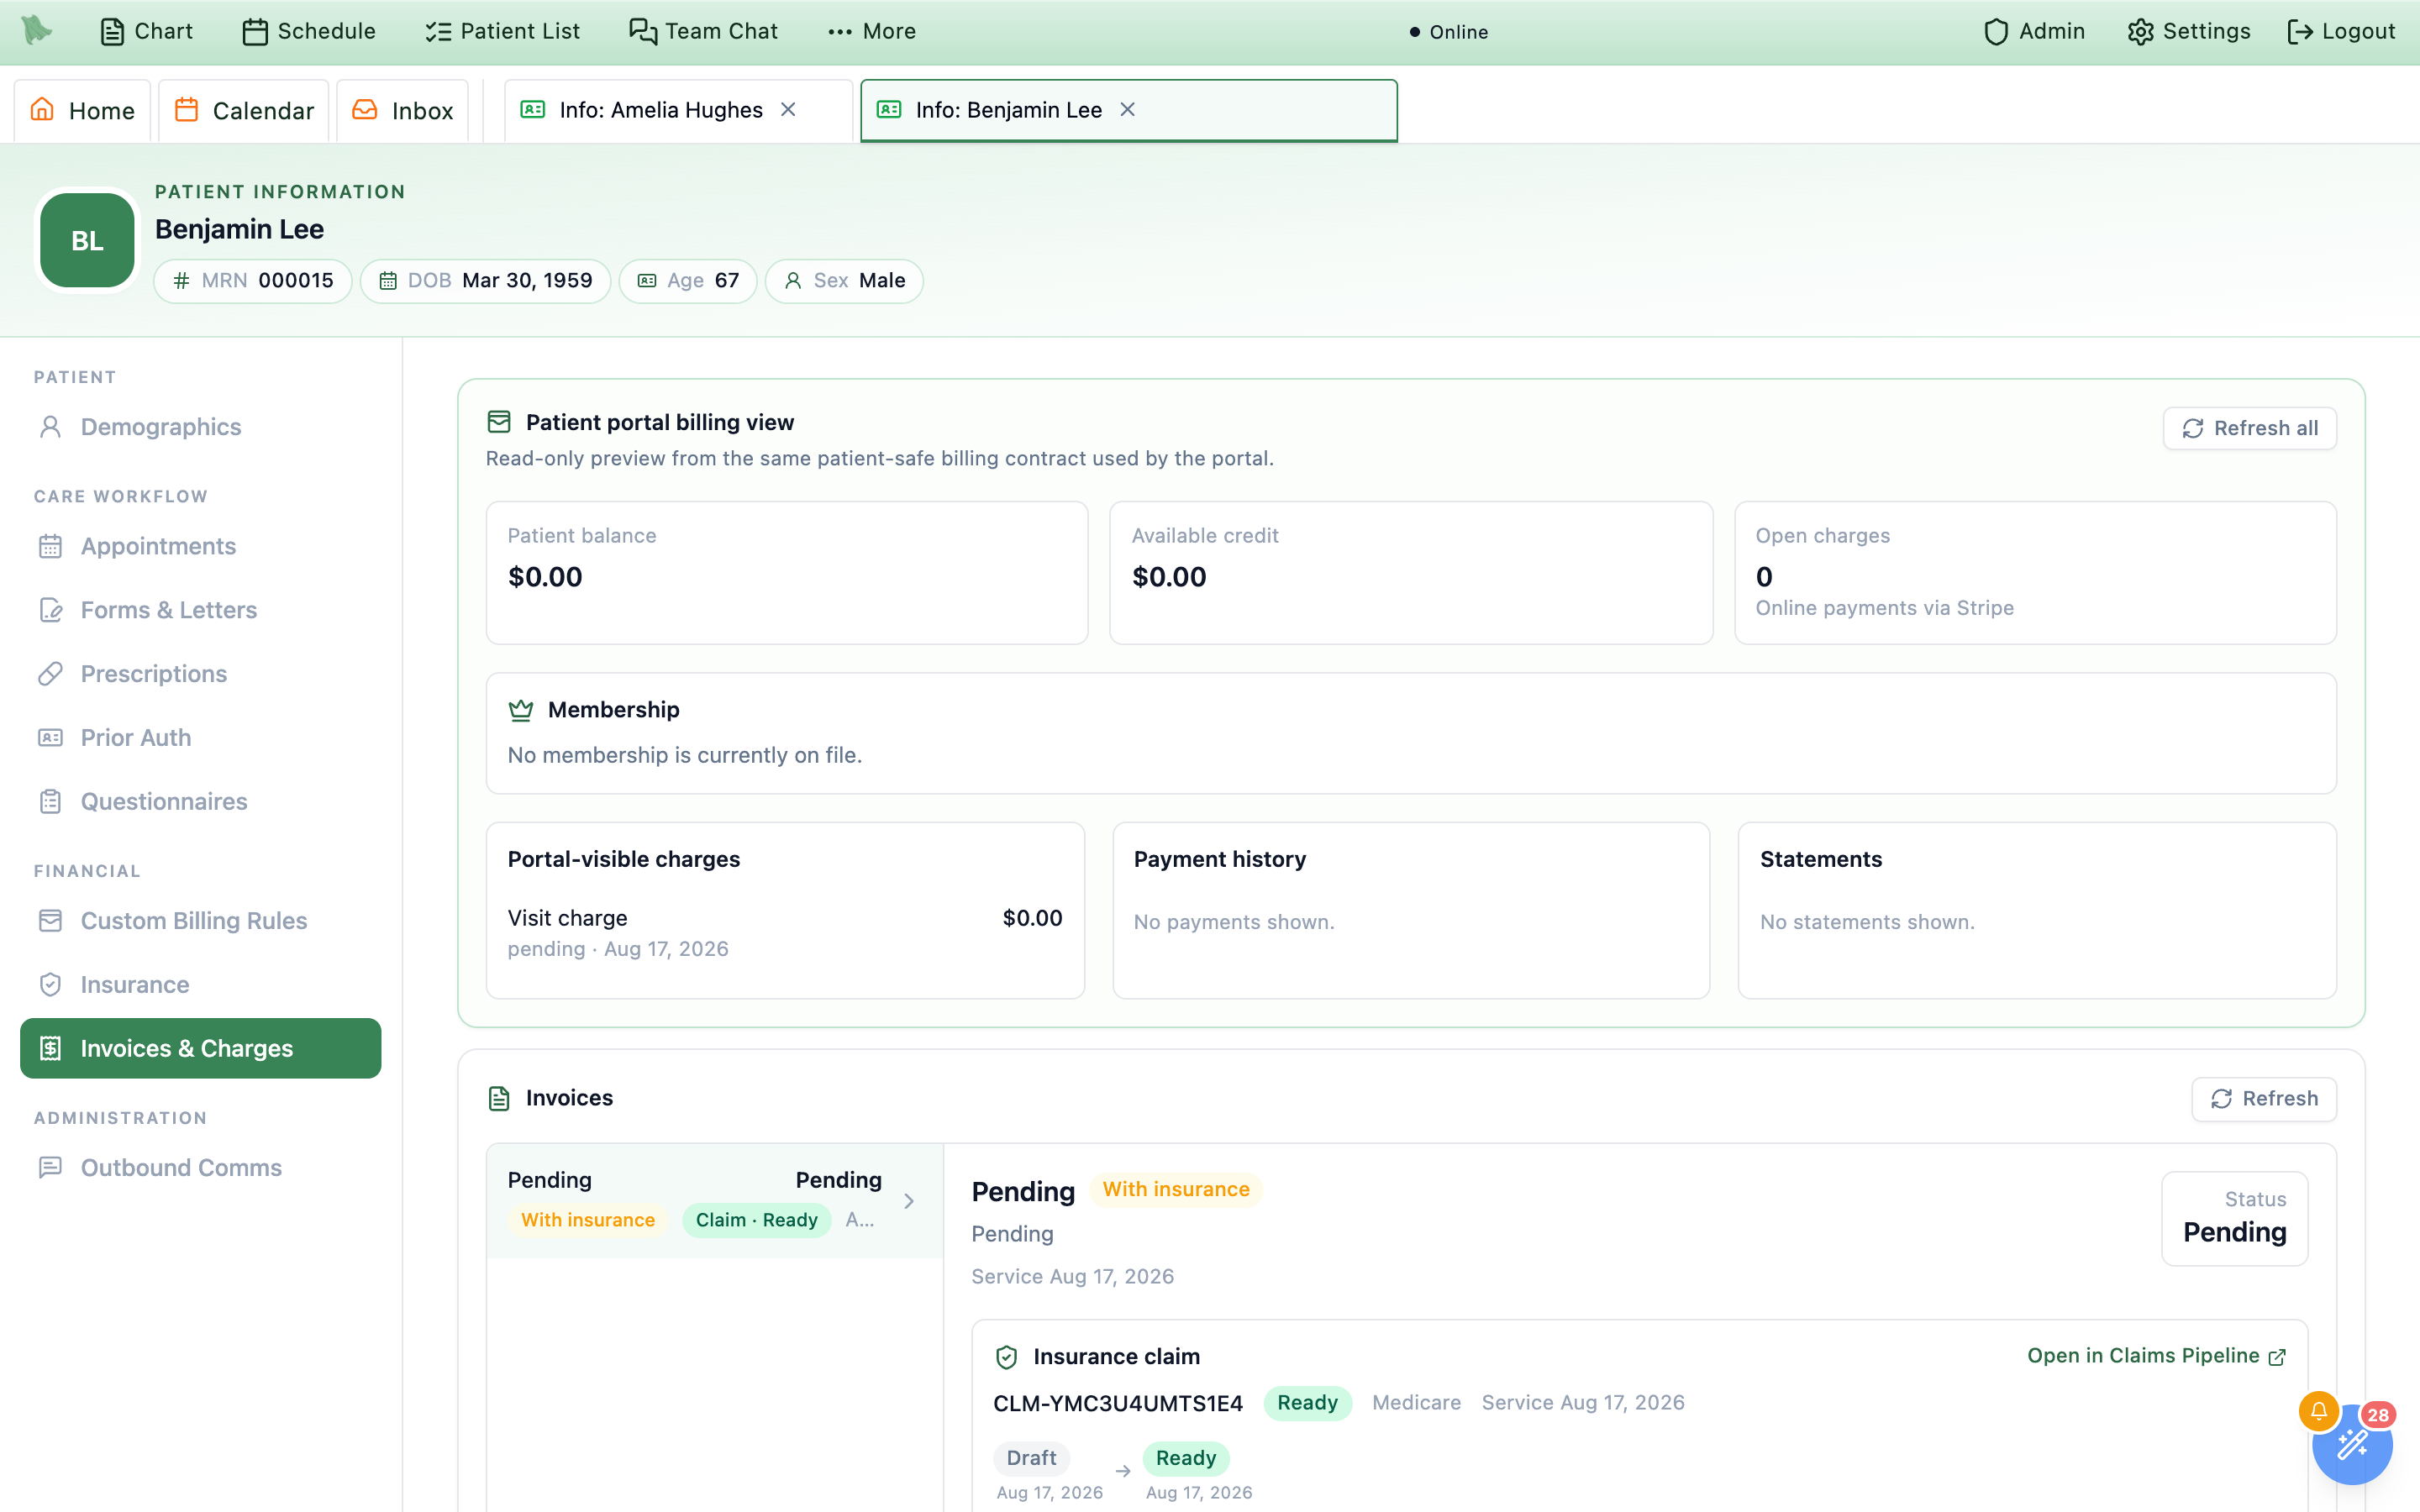
Four stacked blocks, all for one patient, in this order: Invoices, Patient portal billing view, Issue a charge or credit, and Issued charges & credits. Invoices comes first and is the same record the billing workspace uses: a left rail of invoices — open balances first, then those with insurance or in insurance review, then paid, then cancelled — and the detail opens on the first open invoice. Each carries a status pill (Balance due, Partially paid once the patient has paid part, Paid, With insurance, Insurance review, …), an optional Claim · {status} pill and a date, beside a detail pane carrying the reconciling tiles (Billed, Insurance paid, Paid/credits, Adjustments), the service lines, any Explanation of benefits, and an Insurance claim panel with its journey chips, Filed service lines, and Remittances (EOBs). Open in Claims Pipeline jumps to that claim — see the claims pipeline. An invoice still with the payer shows its invoice number and billed amount, its service lines, and a box that says where it stands instead of a balance: Awaiting {payer} — “The patient owes nothing until the payer decides.”; Claim being prepared — “Not sent to the payer yet — the claim is still being prepared.”; or Insurance review — “The payer’s answer needs billing review before the patient is billed.” An invoice whose patient share is held for a pending secondary claim reads Awaiting {payer} in amber, with “{payer} hasn’t processed this visit yet, so nothing is due until it does.”; it lists after the open balances and the detail doesn’t open on it. While that claim is pending no card can be charged for the share, but a cash or check payment the patient hands you can still be recorded; the hold ends when the secondary claim stops being pending (see Patient balances for the full rule). A patient invoice with a balance carries the payment actions for staff who collect payments: Collect card payment, Record cash/check payment, and Record external card payment — for a card your own terminal or a phone payment already took (“Hero records it and updates the balance; it doesn’t charge the card.”), reviewed on a Confirm external card payment step before Confirm and record payment; every payment dialog has Cancel. The same actions appear on the invoice in Patient AR and in Take payment. The invoice of a cancelled or no-show visit whose refund has completed reads Paid, with an Appointment balance released line for the unpaid balance the cancellation released, so it no longer shows as owed here or in Patient AR. A no-show or late-cancellation fee invoice carries Waive fee for admins and staff with billing.sensitive: the dialog (“Waive the no-show fee of $50.00…”) takes a reason, and anything already paid toward the fee stays paid. For balances and collections as a workflow rather than a record, use Patient balances.
Under the invoices, Patient portal billing view mirrors what the patient sees — “Patient-safe balances, saved-card readiness, and payment actions.” — with tiles for Patient balance, Available credit, and a count of Open charges, then membership, saved cards, and three columns: Portal-visible charges, Payment history, and Statements. Portal-visible charges read the way the patient sees them — Visit charge · Paid $25.00, or Visit charge · With insurance · nothing due yet — with no $0.00 rows and no cancelled or refunded charges, and their status uses the same words as the invoice that holds them: Balance due, Partially paid only when the patient paid part (a charge only the payer paid reads Balance due), With insurance. The rows under Issued charges & credits follow the same rule; credits, write-offs, and voids keep their own labels. A share held for a pending secondary claim reads $10.00 pending other insurance · Awaiting {payer} with “Nothing can be charged to a card until the secondary claim is processed. Cash and check payments can be recorded from the invoice above.”, the Patient balance tile adds + $10.00 pending other insurance, and Charge saved card doesn’t appear on it (nor on any charge with nothing payable).
Financial documents: superbills, Good Faith Estimates, and receipts
Below the invoice list, Superbills, estimates, statements and receipts opens the patient’s document shelf. It is the same panel under a patient’s invoices in Patient AR. Everyone who can see the invoices can download from it; admins and staff with billing.charges.manage can also prepare documents and record delivery. Both documents open already filled in, so most need only a check and two clicks to issue. For a cash-pay, uninsured, or out-of-network visit, the same two documents are also one click from the visit’s Charges section.
- What fills in by itself. The provider is the visit’s physician, or the practice’s only physician; with more than one, a physician picker shows the choice and switching it changes the billing name and NPI. Support and system accounts are never offered. The provider’s NPI, tax ID, address, and phone come from Billing Identity, folded into one line;
Edit detailsopens them, and they open by themselves when something is missing. Each service is priced at your CPT List Prices price for that code, or, for a code without one, at your practice’s standard multiple of Medicare; a line under the services says which. Typing a new code fills in its name and price. Each line carries the visit’s diagnoses, at most 12 (the most one service line holds). - Prepare a superbill.
Prepare superbillopens the visit’s superbill with the invoice’s CPT/HCPCS lines. Before the visit has an invoice (opened fromCharges), it uses the codes and diagnoses already entered on the visit — “Filled in from the codes in this visit’s charges. If the codes change before signing, update them here too.” If the visit already has a superbill, the dialog shows it, withMake a correction. - Prepare a Good Faith Estimate.
Prepare Good Faith Estimatefills in the services expected: this visit’s codes, the codes set up for the patient’s next booked visit type, the codes billed most often for that visit type, the patient’s last visit, or your practice’s most billed service, in that order; a line under the services says which. Planned date is the next booked visit’s date (changing it changes every line); Requested on starts at today. “The patient is uninsured or not using insurance for this care.” is already ticked when Hero knows the patient pays out of pocket, with the reason (cash pay, no insurance on file, or out of network with their insurer); for an insured patient you tick it only when they chose not to use their insurance. Other providers or services scheduled separately starts as none; open it to list them. - Cash price or list prices. When the visit has a cash price — a fixed price on the visit type in the Service Menu, or this cash-pay visit’s price — the document opens at that price, and Price with shows both choices with their totals:
Cash priceandList prices(each service at your list price, or your standard multiple of Medicare). One click switches every line. TickRemember my choice for estimates(orfor superbills) and your next one opens on the same choice; untick it to go back to the cash price. The choice is saved for you, not for the whole practice. An invoice’s superbill always shows what was actually charged. - Preview, then issue.
Previewopens the document on screen — “Draft — nothing is saved until you issue it.” — withDownload draftandBack to editing. Anything still needed is listed under Before issuing, andIssue superbill…(Issue estimate…) waits until it is done. It then asks once: “Issue this superbill for $120.00? By issuing it you confirm you checked the provider, services, codes and amounts. It’s saved permanently in the patient’s record; a mistake is fixed by issuing a correction.” —BackorIssue superbill(Issue estimate). To correct an issued document, useCorrectnext to it in the list (orMake a correction); the earlier version is kept and marked Replaced by a later document. - Deliver it, then record delivery. After issuing,
Download PDForPrint, give or send it the way the patient asked, and record how with one click (Handed to patient today,Mailed today, orSent securely today). From the list,Record deliverytakes the method (Paper handed to patient, Postal mail, or Secure electronic delivery) and date; the list shows Delivery not yet recorded until you do. Issuing does not send an email or collect money; patients with billing portal access can download issued documents. For a Good Faith Estimate, deliver within 3 business days of a request, or sooner for care scheduled soon. - Download receipts and statements. The same panel lists payment receipts (
Download receipt), past statements (Download historical statement— older ones without a retained copy download as a labelled summary), andDownload current statement.
Manual charges and credits
Issue a charge or credit records an account adjustment. Staff need charge-management permission to issue charges and billing-adjustment permission for credits; administrators can do both. Pick Charge or Credit, enter Amount, choose Encounter, and enter a Reason for the patient’s statement. The default is Account charge (no clinical visit) or Account credit (no visit). The amount must be $0.01–$100,000.00 with no more than two decimal places. Review the confirmation before issuing.
For taxable account items, the practice can enable Charge sales tax; review the displayed rate, tax, and patient total. Visit fees are not taxed. See Sales tax. Eligible invoice charges can also receive self-pay discounts.
The Issued charges & credits history offers Void charge, Reverse credit, or Reverse write-off when the entry and your permissions allow it. Enter a correction reason; the original history is retained. A paid taxable item can instead offer Cancel charge — item returned: this reverses its tax and turns money already paid into account credit unless already refunded. Returning money to a card is a separate refund.
When enabled for the practice, Send add-card link lets authorized staff send the patient a secure portal link to save a card. The result reports delivery or its failure reason; sending the link does not collect payment.
Every reminder, receipt, and message this patient has been sent
Outbound Comms is the only item in the Administration group and the answer to “did we tell them?” The heading reads Outbound communications over “A record of reminders, confirmations, receipts and messages sent to {first name}. This is an audit view — two-way conversations live in the inbox.” It is for organization admins and staff holding admin.outbound_comms.view; a plain physician never sees the item, on the server as well as in the sidebar. Sending from here needs the further admin.outbound_comms.manage grant. Verification and login codes are deliberately excluded from the log. Ongoing conversations belong in patient threads, and bulk outreach to a list of patients in campaign messaging.
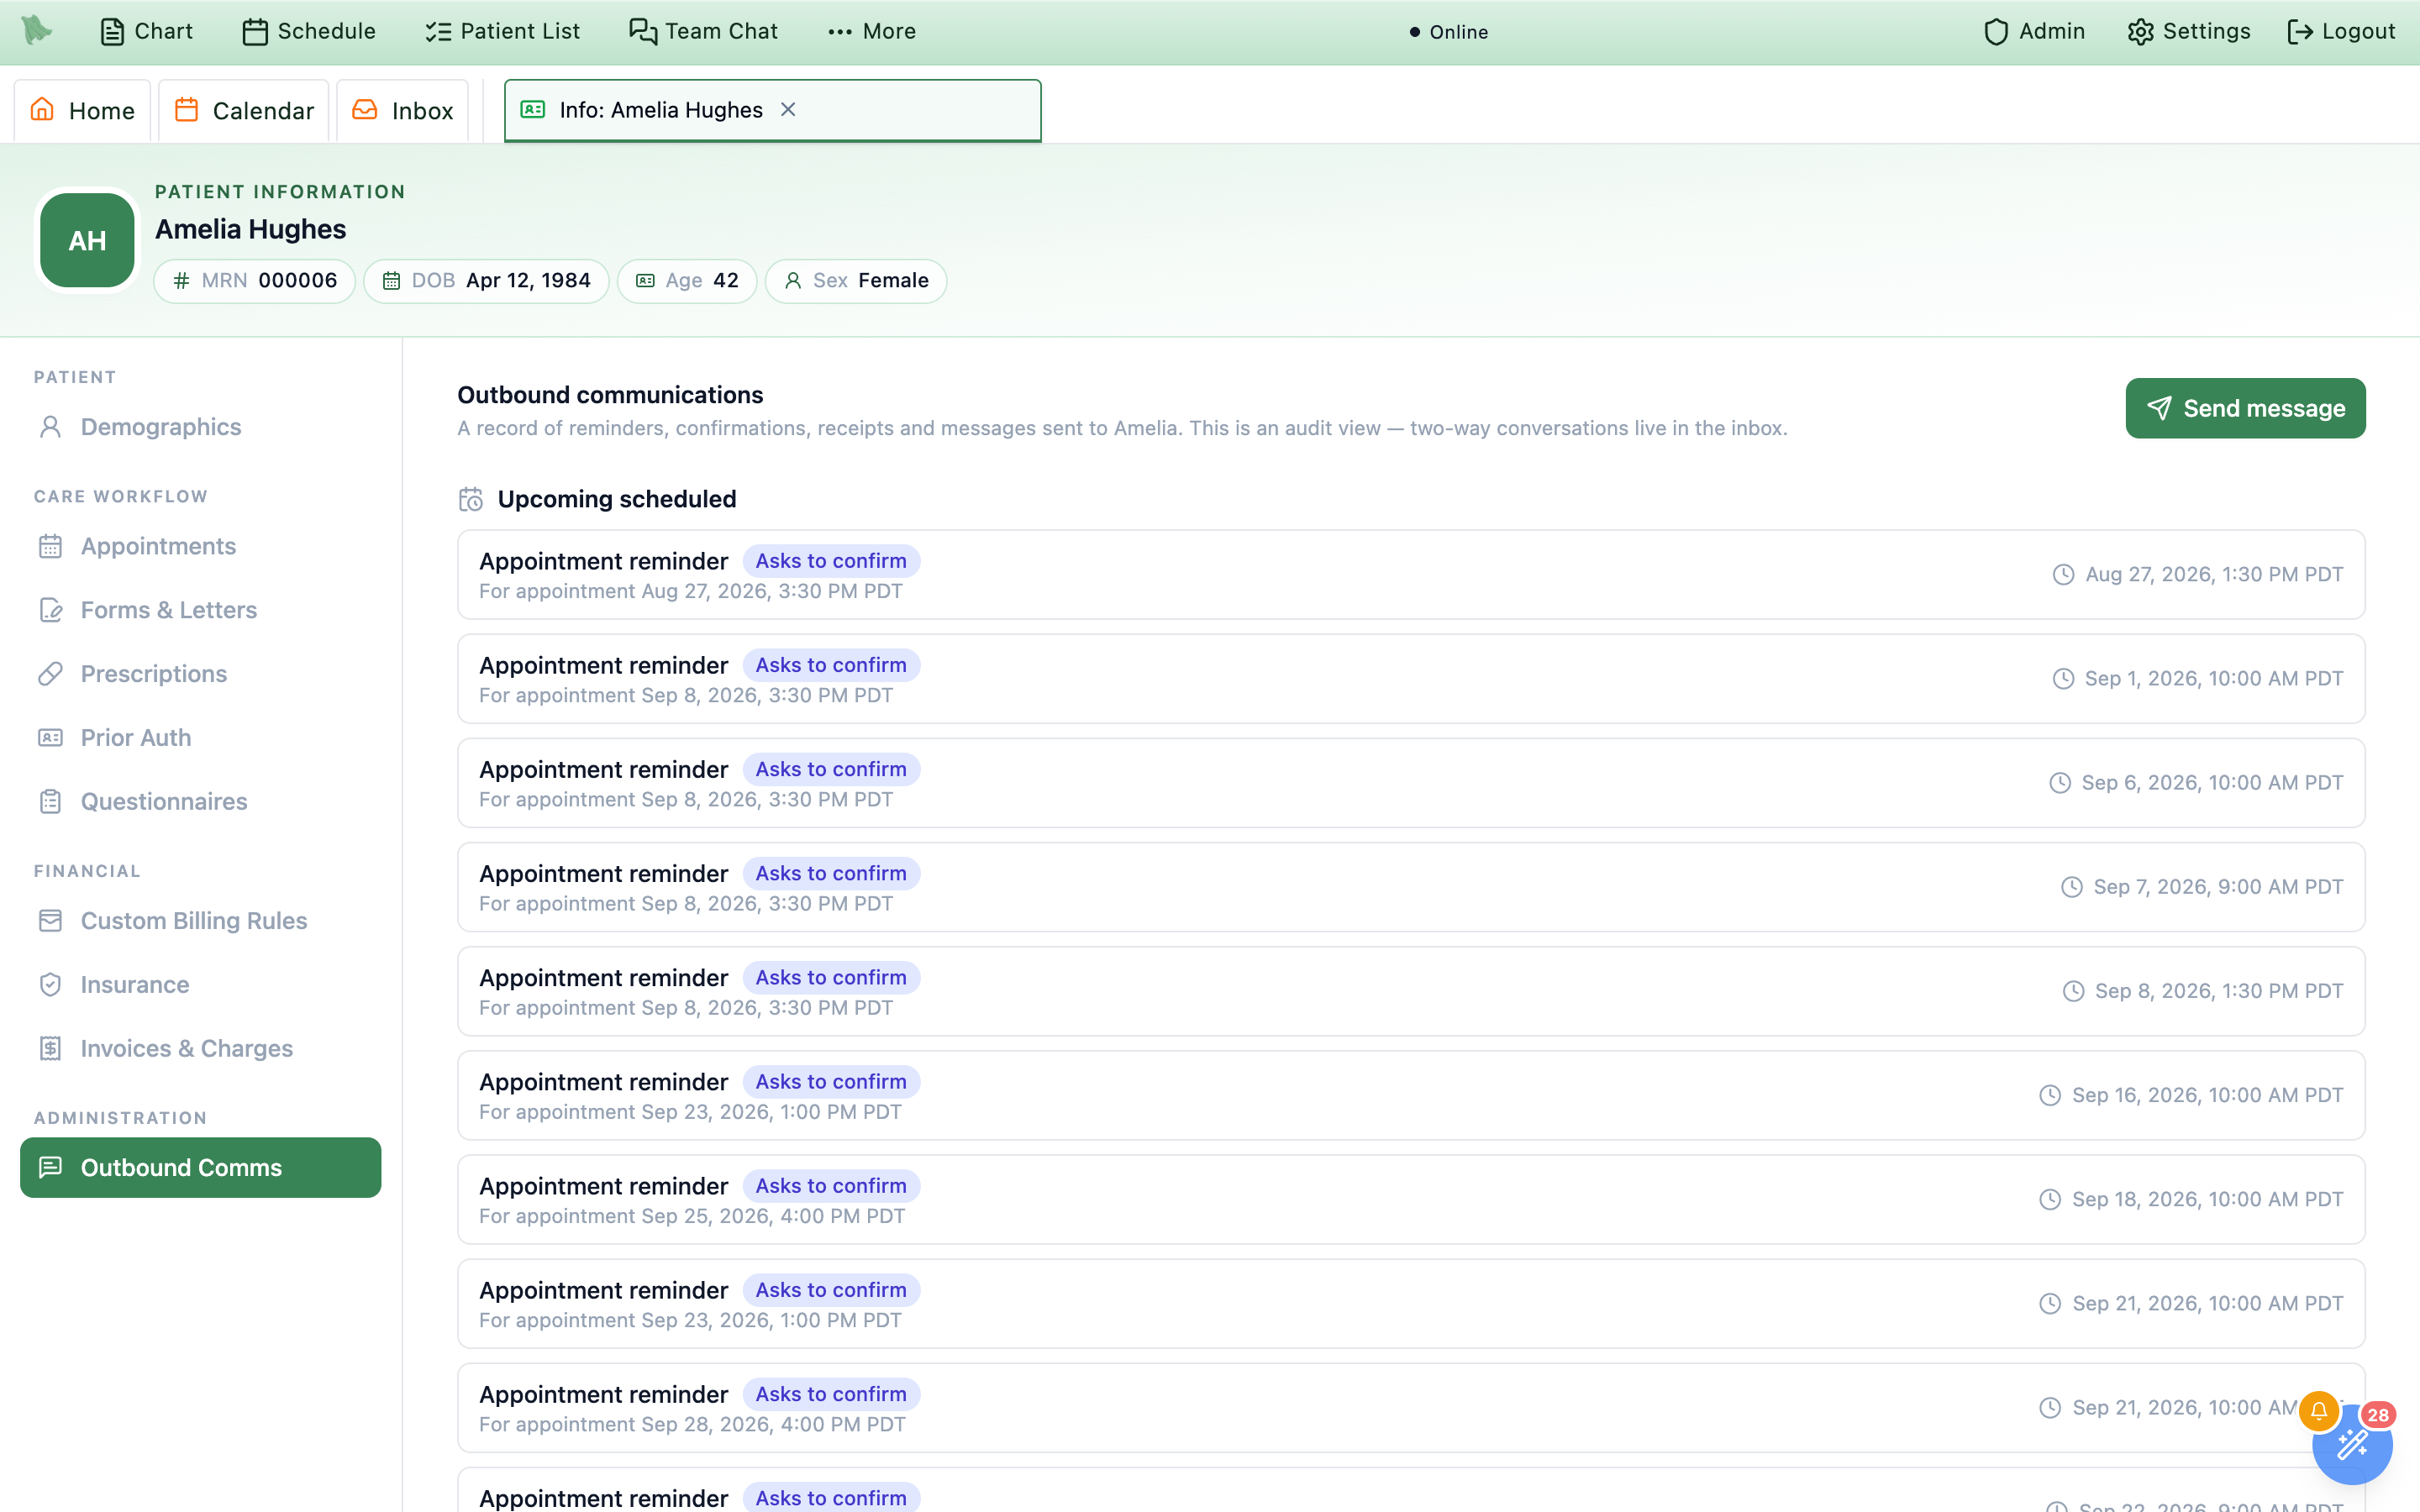
Upcoming scheduled lists what is already queued, with the projected send time on the right.-
Check what is still coming.
Upcoming scheduledlists the messages already queued for this patient: the message type, an indigoAsks to confirmpill when a reply is expected, aFor appointment {date, time}line when one is attached, and the projected send time. Empty it readsNo reminders are scheduled to go out.These are real queued sends — cadence-only projections are not shown, so this is a floor, not a forecast. Which reminders exist at all is configured under Patient notifications. -
Read the history.
Sent historycarries the total in parentheses. Each row shows the channel (SMS,EMAIL, and so on), the message type, a violetManualpill when a person sent it by hand, the subject on email, and a two-line preview of the body. The bottom line is the send time — always with its time-zone abbreviation, e.g.Aug 26, 2026, 12:33 PM PDT— plus· {n} segmentson SMS. -
Interpret the pills.
On the right of each row: a delivery pill reading
delivered,sent,pending,failed, orbounced, and beneath it, on messages that asked for a reply, a response pill readingConfirmed,Declined,Awaiting reply, orNo response. Afailedrow also prints the carrier’s reason in red —Invalid destination number, for instance. -
Send a one-off message.
Send messageopensSend a one-off message, subtitledTo {first name}. ChooseChannel—EmailorSMS— add an optionalSubjecton email, and write theMessage, capped at 2,000 characters with a live{n}/2000counter. The closing note reads “This is a one-way message. If the patient replies, their response lands in the inbox.” ThenSend.
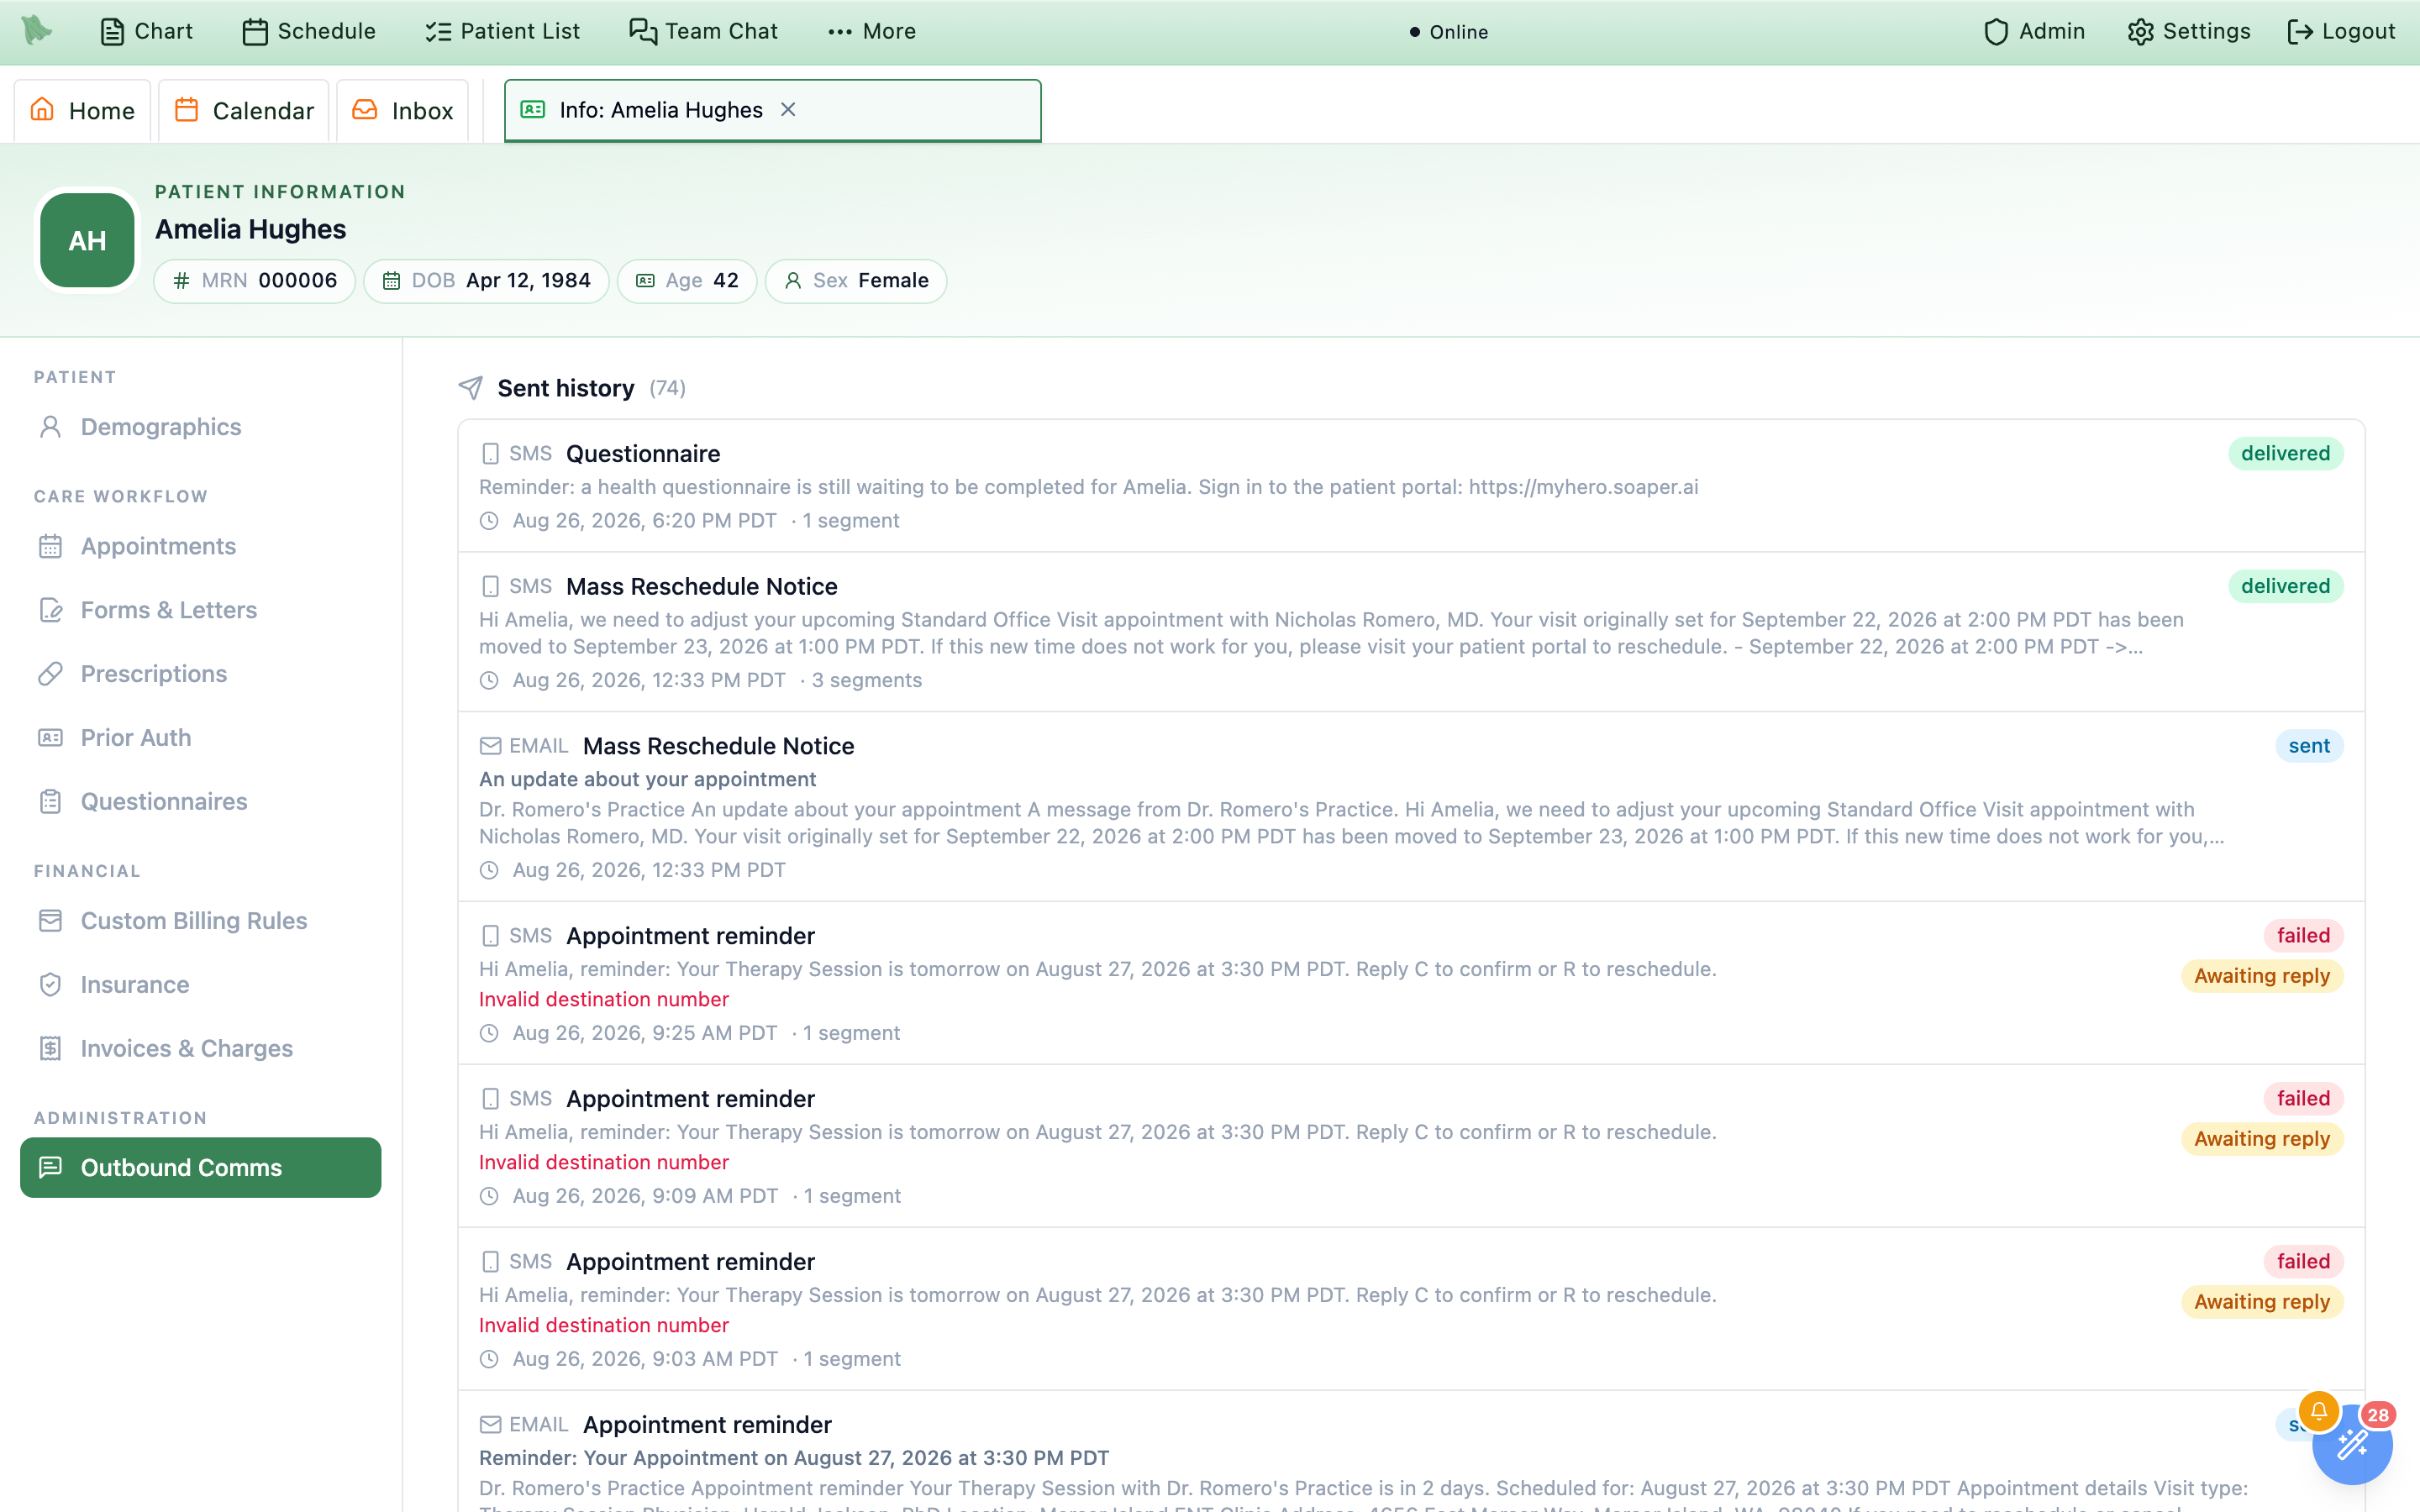
Some patient states stop outreach. When they do, a banner sits above both sections quoting the reason — “This patient is discharged from the practice; automated communications are suppressed”, for example — and spells out the consequence: reminders, follow-up prompts, questionnaires, surveys, campaigns, balance reminders, and statements will not be sent, and either “A message you send manually from here (or from the secure inbox) is still delivered” or “Manual messages are also blocked”. A deceased patient falls in the second group and Send message is disabled outright. Setting the patient back to Active resumes everything. Where a suppression is in force, Upcoming scheduled replaces its list with a count of the reminders that will be skipped.
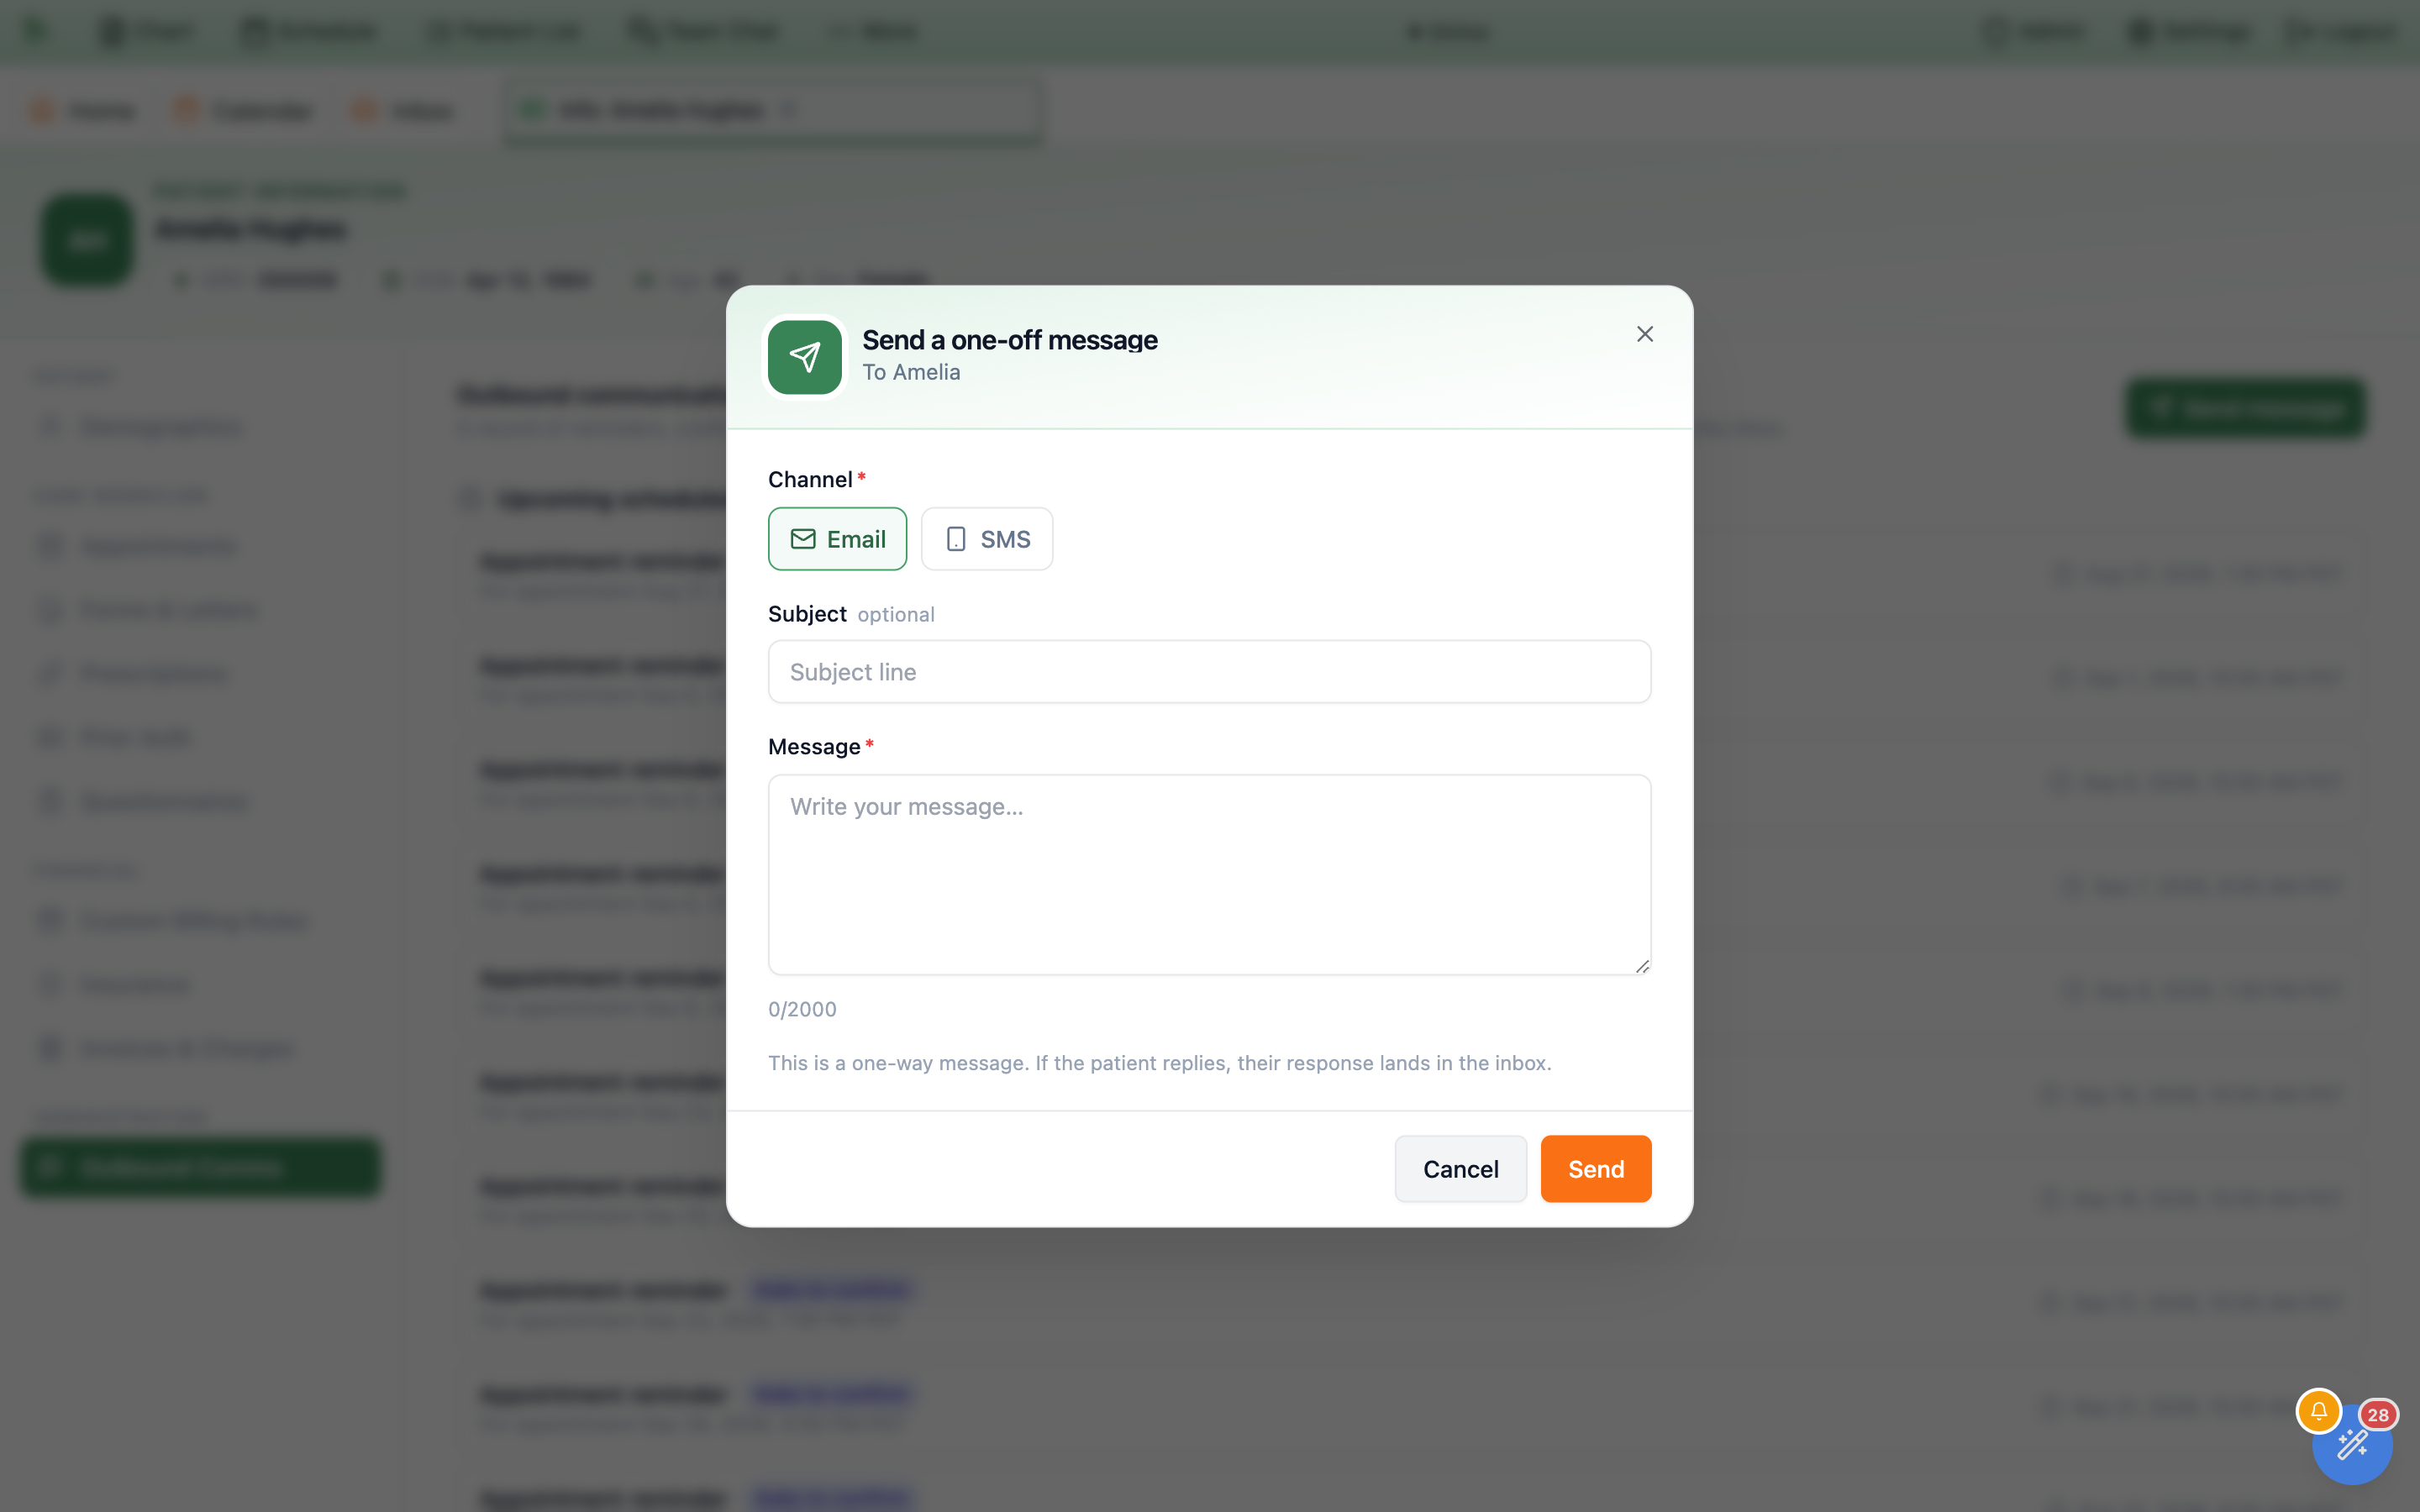
SMS changes the placeholder to a reminder that long texts bill as multiple segments.Send dispatches immediately — and it can cost money. There is no queue, no draft, and no way to recall a message from this tab; the row simply appears in Sent history. SMS is billed per segment, which is why the SMS placeholder reads “Keep it short — long texts are billed as multiple segments” and each sent row prints its segment count. The opt-out warnings — This patient has opted out of SMS. The message will not be delivered. and No phone number on file for this patient. — warn but do not block: the button stays enabled and the failed attempt is still recorded.Eligibility history, a separate eligibility payer, and Medicare payers
These parts of the Insurance tab help you see every check Hero ran on a policy, point eligibility checks at the right payer, and pick the right Original Medicare payer.
Every eligibility check of a policy
Open a policy’s View benefits detail. Below the latest result, Eligibility checks (N) opens the full history: “Every check of this policy, newest first, including Billing Hero’s checks of proposed details.” It shows 25 at a time (Show more) and refreshes when a newer result lands.
- Who asked: the staff member’s name (for example {name}, from Pre-visit), an automatic check (Automatic check before the visit, Automatic check when the policy was added, Automatic check after the policy was changed, Urgent care check-in…), or Billing Hero (Billing Hero, approved by {name} when a person approved it).
- The result:
Active coverage,Coverage inactive,Member not found,Name or birth date didn't match,Payer didn't confirm,Setup problem,Payer error,Couldn't check,Skipped, orWaiting for the payer. - The details: when it ran (your practice’s time), which payer was asked, the date of service, the last four digits of the member ID, the clearinghouse, and whether the check was billed.
Billing Hero sometimes asks the payer about details it wants to propose (for example a corrected member ID) before anyone changes the policy. Those rows say so: “Billing Hero asked the payer about proposed details … This check did not change the policy or its eligibility status.” A negative answer there is shown in amber, not red. Billing Hero also adds such a row when it works a claim held or turned back over its member ID or group number: it checks the policy as it is and reads the member ID and group number the payer has for the member (see Member ID and group number). COB checks are not in this list.
Check eligibility with another payer
Some medical groups take the claims while the patient’s health plan answers eligibility. For those patients, keep the medical group as the policy’s payer and tell Hero where to check eligibility:
- Open the section. In the add-policy form or
Edit policy, openAdvanced: check eligibility with another payer. It opens by itself when the chosen payer can’t answer eligibility checks, or when one is already set. - Pick the health plan. Search
Check eligibility with (optional): “Pick the health plan here; claims still go to the payer above.” Pick it from the list; a payer that doesn’t answer electronic eligibility checks is refused. - Save. Saving re-checks eligibility. The policy card then shows Eligibility checked with: {payer} ID {id} under its Files to: line.
It changes only who answers this policy’s eligibility checks: claims and COB checks still go to the policy’s payer. To stop, tick Stop using it: check eligibility with the claims payer again in Edit policy. Patients can’t set it from the portal.
Original Medicare payers and Medicare IDs
- Your practice’s Medicare payer comes first. When your practice has set its
Default Medicare payer(see Medicare claims), payer searches for Original Medicare list it first, markedYour practice's Medicare payer. - A warning when you pick another one. Choosing a different Original Medicare payer shows “Your practice bills Original Medicare through {payer}. Claims and eligibility checks for Original Medicare go to the contractor where your practice sees patients, not where the patient lives.” with
Use {payer} instead. Keep the other one only if your practice really bills this patient’s care there. Medicare Advantage, supplement and railroad plans are never flagged. - Medicare ID format. For an Original Medicare payer, the member ID must be the 11-character Medicare ID: “Medicare ID must have 11 letters and numbers in the format 1EG4-TE5-MK73. Check the Medicare card; B, I, L, O, S and Z are not used.” Dashes and spaces are removed for you. Medicare Advantage, supplement and other private Medicare plans keep the member ID printed on their own card.
- Part B decides Original Medicare coverage. When the payer says only Part A is active, the policy shows
Inactive coverage: Part A alone doesn’t cover office visits.
When the insurer didn’t check that date
Some insurers only answer checks dated close to today. Instead of a red failure, the card shows a blue notice, The insurer didn’t check that date, explaining that this isn’t a problem with the member ID and that Hero re-checks with today’s date. Hero retries once with today’s date and then re-checks such policies once a day while the patient has an upcoming insured visit. These answers never block a booking or hold a claim.
Card photos
Photos of the insurance card, whether scanned by staff, uploaded by the patient in the portal, or brought in from another system, show on the policy card as Card front and Card back thumbnails; click one to see it full size. Staff without access to insurance billing details don’t see them.
Read authorization letters, take back a mistake, and see which visits get the number
These additions to the Prior Auth tab save typing, keep wrong numbers off claims, and show which visits an authorization will be sent on.
Read the payer’s letter instead of typing it
Letter reading starts off. A practice administrator, or staff with the billing-settings permission, turns on Read authorization letters with AI at the top of Billing → Operations → Prior Auths: “Adds Scan authorization letter to each patient’s Prior Auth tab.” Turning it off later keeps the letters already read in the chart.
-
Click
Scan authorization letter. It sits next toAdd authorizationonce the patient has an insurance policy. Read an authorization letter opens:Upload a photo or PDF(a phone photo works, up to 15 MB), or choose a photo or PDF already in the chart under Or choose a document already in the chart. An uploaded letter is also saved to the patient’s documents as Prior authorization letter. - Wait a few seconds while Hero reads it. It reads the first pages of the letter (up to six).
- Check the authorization. Check the authorization shows what Hero filled in: the insurance policy (with how it matched, for example “Matched to {payer} by the member ID on the letter.”), the authorization number, status, effective dates, units requested and approved, the authorized CPT/HCPCS and diagnosis codes, and notes with the approved units per code and the letter’s conditions. Fields marked in yellow (Check this against the letter.) were unclear or missing.
-
Click
Save authorization. Nothing is saved until you do. The letter’s pages stay attached to the authorization.
If Hero can’t read the letter, it says so (“Hero could not read this letter. Try again, or close this and type it in.”) and an uploaded letter is still kept in the patient’s documents.
From a fax. Once a fax is filed to a patient’s chart as a Prior Authorization document, its detail pane in the Fax inbox offers Add authorization from this fax under Open chart (letter reading must be on). It reads the fax’s pages straight away and opens the same check-and-save form; afterwards “Authorization saved. It is in the patient’s Prior Auth tab.”
Entered in error
An authorization added by mistake (a placeholder number, the wrong patient’s letter) is taken back with the ban icon next to its pencil, Entered in error. This replaces setting its status to Denied or Expired: an expired authorization can still be sent on claims for visits inside its dates.
- Click the ban icon. Mark as entered in error? explains: “It stays on {first name}’s list, marked ‘Entered in error’, but its number is never sent on a claim, its visits aren’t counted, and no expiry alert is raised for it. Its open alerts are closed. This can’t be undone; add a new authorization if you need one.”
- Say
What was wrong?(required), then clickMark entered in error.
The row moves to the bottom, struck through, with Marked entered in error on {date}: {reason}. Never sent on a claim. It can’t be edited, and it drops out of every bucket and count in the Prior Auths queue. Once any visit has used one of its units, the button is disabled (“… its number may be on a claim. Edit it instead.”): correct that authorization with the pencil.
Numbers Hero refuses
The authorization number is sent on claims, so Hero refuses words in its place: “Enter the authorization number the payer gave you. Words like ‘error’, ‘N/A’, ‘pending’ or ‘TBD’ are not authorization numbers, and the number is sent on claims.” Also refused: all zeros or X’s, punctuation only, and answers such as none, see letter or no auth required. Real numbers that only start with such a word (for example PEND-0042) are fine. Numbers are at most 50 characters. If the payer hasn’t given you a number yet, add the authorization when it does.
Which visits get the authorization number
Hero matches an authorization to a visit when the claim is built: the same policy, an Approved status (or Expired, when the visit falls inside its dates), the visit inside the effective dates, and, when the authorization lists Authorized CPT / HCPCS codes, a billed code on that list. “Only visits that bill one of these codes get this authorization number and use an approved unit.” Diagnoses never decide: Authorized diagnosis codes are for reference, and a visit coded with a different diagnosis still gets the number, with a warning on its claim, The authorization lists a different diagnosis. The warning never stops the claim.
Check visits on an authorization lists the patient’s recent and upcoming visits and says, for each, whether the number will be sent and why not, for example “Will be sent on the Oct 14 visit.”, “Will be sent on the {day} visit only if it bills {codes}.”, or “Won’t be sent on the {day} visit: the visit is after the end date.” It also warns when the approved visits are used up.
A replaced authorization expires quietly
When a newer approved or pending authorization on the same policy picks up where an ending one stops (and covers its codes), Hero sends no “expiring soon” or “expired” alert for the old one. At its end date it turns Expired with a note, Replaced by authorization {number}; this one ended {date}., and leaves the queue’s Expiring and Expired lists. An authorization that ends with no replacement still alerts as before.
More demographics: race, ethnicity, language, sexual orientation, gender identity and more
More demographics records the details that the standard Demographics card keeps to one plain answer: several races and ethnicities with detailed choices, a preferred language from the full list, sexual orientation and gender identity, a sex for clinical use, name prefix and suffix, previous names and addresses, tribal affiliation, occupation, phone types and date of death. Each answer is saved with a standard code, so it travels correctly when the record is shared with another practice or exported.
-
Turn it on.
A practice administrator opens
Admin → Additional Features, switches onMore demographics, and clicksSave Changes. It is off by default. The pronoun choices also needPatient pronounsturned on. -
Open it.
In Patient Information, choose
More demographicsunderPATIENT(or link to it with?section=more-demographics). It shows four cards:Identity,Background,Life, work and contact, andPrevious names and addresses. A question nobody has answered readsNot recorded. -
Click
Edit. The formEdit more demographicsreplaces the cards, withCancelandSaveat the top. Pick answers from the chips and search boxes (see the table), thenSave. -
Add previous names and addresses.
These save on their own, without
Edit.Add previous nameasks for a first and last name and theKind of name(Previous name,Name at birth / maiden name, orNickname), thenAdd name.Add previous addressasks for the street, city, state and ZIP, thenAdd address. The bin icon on a row removes it.
| Card | Question | Choices |
|---|---|---|
Identity | Name to use, Name prefix, Name suffix | Free text (for example Dr., Jr. or III). |
Sex | Female, Male, Don't know, Prefer not to say. | |
Gender identity | Man or boy, Woman or girl, Transgender man / trans man, Transgender woman / trans woman, Non-binary or genderqueer, Another identity (then type it In the patient’s words), Prefer not to say. | |
Sexual orientation | Straight or heterosexual, Lesbian, gay or homosexual, Bisexual, Something else (then type it in the patient’s words), Don't know, Prefer not to say. | |
Sex for clinical use (reference ranges and settings) | Use female-typical settings and ranges, Use male-typical settings and ranges, Use specified settings (explain in the comment), Unknown, with an optional comment. | |
Pronouns | Only with Patient pronouns on. she/her, he/him, they/them, Other pronouns (then type them, for example ze/zir), Prefer not to say. You can pick more than one. | |
Background | Race | Search (for example Cherokee, Filipino or White) and choose every race that applies. Detailed choices are grouped under the five main categories. Also Prefer not to say and Don't know. |
Ethnicity | Search (for example Puerto Rican or Not Hispanic); several allowed. Also Prefer not to say and Don't know. | |
Preferred language | Search any language, or Prefer not to say. | |
Tribal affiliation | Search federally recognized tribes, then tick Enrolled member if it applies. | |
Life, work and contact | Occupation, Industry, Primary phone type, Secondary phone type, Date of death | Occupation and industry are free text; each phone type is Mobile, Home, or Work. |
Prefer not to say means the patient was asked and declined to answer. It replaces any other choice for that question, and picking a choice replaces it.
Who can use it
- Anyone who can open Patient Information sees the tab once the practice turns it on.
Edit, adding and removing previous names and addresses: physicians, administrators, and staff withpatient.manage. Everyone else reads it.
How it fits with Demographics
- Saving also fills in the matching single answers on Demographics (sex, gender identity, preferred language, and pronouns).
- If someone later changes one of those single answers somewhere else (the Demographics form, the patient portal, an import), that newer answer wins, and More demographics shows it with
(from the single-answer field)until you edit it here again. - Turning the feature off hides the tab; nothing is deleted.
| You see | What to do |
|---|---|
| “Someone else changed these demographics. Cancel and edit again to see their changes.” | Another person saved while you were editing; your changes were not saved. Click Cancel, then Edit again and redo them. |
| “More demographics could not load. Close and reopen the patient to try again.” | Close Patient Information and open it again. |
No More demographics tab | The feature is off for your practice. Ask a practice administrator to turn it on in Admin → Additional Features. |
Keep a list of the patient’s implanted devices
Pacemakers, joint replacements, stents, cochlear implants: Implantable devices lists what the patient has implanted. You scan or paste the device’s UDI (the barcode on the device label or implant card), Hero reads the device ID, lot, serial number and dates from it, and fills in the brand, model, maker, MRI safety and latex information from the FDA device database.
-
Turn it on.
In
Admin → Additional Features, switch onImplantable devicesand clickSave Changes. It is off by default. -
Open the list.
In Patient Information, choose
Implantable devicesunderPATIENT. In the vertical chart layout the same list is anImplantable devicessection in the patient panel, with a count of active devices. Each row shows the device name, the maker and model, and chips such asMRI: MR ConditionalorContains latex; click a row for every detail. -
Add a device.
Click
Add device. InScan or paste the device's UDI, scan the barcode (a scanner fills it in and looks it up) or paste the whole UDI and clickLook up(or press Enter). -
Check what Hero read.
The preview is headed with the device name and lists
Device ID (DI),Lot,Serial,Expires,Made,Issuer, the description,MRI safetyandNatural rubber latex. Add anImplant date (optional), then clickAdd device. -
Mark a device inactive when it is removed.
Mark inactiveon a row keeps it on record but takes it off the active list;Mark activeundoes it.Show all devicesincludes inactive ones;Show active devices onlygoes back.
Not found in the FDA device database (“You can still add it with the details read from the UDI.”), or FDA device details unavailable when the database could not be reached. You can still add the device; only the details read from the UDI itself are saved.| You see | What it means and what to do |
|---|---|
| “This does not look like a UDI. Scan the device barcode or paste the whole UDI.” | Only part of the barcode was entered, or it was not a UDI. Scan again or paste the complete text from the implant card. |
| “This device is already on the patient's list.” | The same device is already recorded. Find it in the list (try Show all devices). |
Add device is greyed out | “Adding devices needs permission to edit the problem list.” Ask an administrator for problem_list.manage (the Medical Assistant and Nurse presets have it). |
No active implanted devices. | Nothing active is recorded; inactive devices are behind Show all devices. |
Physicians and administrators can add devices and change their status. Staff need patient.view to see the list and problem_list.manage to add or change devices. Turning the feature off hides the list; nothing is deleted.
Record the patient’s goals, health concerns and health status
Goals & health concerns keeps three short lists the care team updates over time: what worries the patient or the team (health concerns), what the patient is working toward (goals), and coded answers about functional, disability, cognitive and pregnancy status (health status). Positive answers on a social needs screener can add concerns and goals here in one click (see Questionnaires).
-
Turn it on.
In
Admin → Additional Features, switch onGoals, health concerns and health statusand clickSave Changes. It is off by default. -
Open it.
In Patient Information, choose
Goals & health concernsunderPATIENT. In the vertical chart layout it is also a section in the patient panel; its count is the open concerns and goals. -
Add a health concern.
Add concernopensHealth concern(for example Worried about falls at home); clickAdd concernto save.Resolvecloses one andReopenbrings it back; resolved concerns hide behindShow resolved concerns (N). -
Add a goal.
Add goalasks for theGoal(for example Walk 30 minutes, 5 days a week),Whose goal?(Patient's own goalorSet with the clinician), an optionalTarget date, and, when there are active concerns,For which concern? (optional). Each goal’s status menu offersProposed,Active,On hold,CompletedandCancelled; completed and cancelled goals hide behindShow finished goals (N). -
Record health status.
Record health statusasks for theArea, then a question and its answer, and saves withSave. The newest answer to each question shows;Show earlier answers (N)lists the history with dates.
| Area | Questions | Answers |
|---|---|---|
Functional status | Functional status | Walks independently, Bathes independently, Feeds self independently, Uses the toilet independently, or Describe it in your words. |
Disability status | Has a disability; Deaf or serious difficulty hearing; Blind or serious difficulty seeing, even with glasses; Serious difficulty concentrating, remembering or making decisions; Serious difficulty walking or climbing stairs; Difficulty dressing or bathing; Difficulty doing errands alone | Yes or No. |
Mental and cognitive status | Cognitive function | Normal cognition, Impaired cognition, or Describe it. |
Pregnancy status | Pregnancy status; Pregnancy intention in the next year | Pregnant / Not pregnant; Wants to become pregnant, No desire to become pregnant, Ambivalent about becoming pregnant, Not sure of desire to become pregnant. Both also offer Don't know. |
- Chips.
Social needmarks a concern or goal that came from a social needs screener;Patient's goalmarks a goal the patient set. - Entered by mistake? The
×on a row,Remove (entered in error), takes it off the list. - Who can do what. Physicians and administrators can add and change entries. Staff need
patient.viewto see the section andproblem_list.manageto add or change entries; without it the add links are greyed out with “Adding needs permission to edit the problem list.” - What it does not do. Adding a concern or goal does not add a diagnosis to the problem list; record diagnoses there as usual (see Problems & allergies).
Need help? Email support@heroemr.com.