Billing operations
Work the money day to day: how the pipeline fits together, the Billing Command Center workspace, the Billing Monitor, the pre-visit readiness queue, claims, payment posting, patient balances and statements, memberships, and the APCM program.
Billing operations
Work the money day to day: how the pipeline fits together, the Billing Command Center workspace, the Billing Monitor, the pre-visit readiness queue, claims, payment posting, patient balances and statements, memberships, and the APCM program.
How billing works end-to-end
Before working the individual tabs, it helps to see the whole pipeline. Hero EMR is built so that money follows the chart on its own: every hand-off below happens automatically, and the system only asks for a person when it hits something it can’t fix itself.
- A visit is signed. Billing starts the moment the clinician signs and closes the encounter (see Sign & close) — there is no separate “send to billing” step.
- Charges are priced. The visit’s E/M and CPT codes become charges. Cash visits are priced by your layered billing setup — organization defaults, service overrides, and per-patient exceptions. Insurance charges bill the payer’s contract rate, else a price you set in CPT List Prices, else a rate learned from that payer’s payments, else the list’s default price (CPT prices & payer rates). A code with no price at all holds the visit’s claim until you price it — Hero never files a $0 line.
- A claim is built and checked. For insured visits Hero EMR assembles the claim and runs readiness checks, so coding, demographic, and policy problems surface as fix before send issues in your queue instead of as payer rejections weeks later.
-
Claims go to the clearinghouse.
Ready claims leave by your practice’s claims route: Stedi sends them automatically every few minutes; Office Ally SFTP (and Availity SFTP) take them in a daily batch at a set time in your practice’s time zone; Optum-only practices send through Optum; or a biller submits them by hand or downloads a claim file (Manual 837P download) to upload elsewhere. The Claims Pipeline’s route line says which applies to you (see the claims pipeline). The clearinghouse answers with acknowledgements — a per-claim 277CA verdict, plus a file-level receipt (TA1 / 999) from clearinghouses that send one — confirming each claim actually arrived and was accepted for processing. Some connections never return a file-level receipt; Hero then relies on the 277CA and shows the missing receipt as
Not returnedrather than pending forever. A claim the clearinghouse bounces at this step shows asRejected: it never reached the payer, so there is no decision to appeal — you fix the data and refile it (see the claims pipeline). - The payer adjudicates — and the money posts itself. The payer decides what it pays, what it writes off, and what the patient owes, then sends back an electronic remittance (an 835 / ERA file). Hero EMR ingests it automatically and posts the payments and contractual write-offs to each claim — an 835 you upload yourself posts the same way. Anything a person has to decide waits in Unposted Remittances with the reason and the next step.
- What’s left becomes patient responsibility. Only after adjudication does the remainder — copay, coinsurance, deductible — move onto the patient’s balance, where statements and collections take over. Patients are never billed amounts insurance is still deciding.
Open and navigate the Billing Command Center
Day-to-day money work happens in the Billing Command Center — one workspace for pre-visit readiness, claims, payment posting, patient balances, and recurring-revenue programs. The header shows your organization name and the active payment-model label (Insurance, Pure Cash, DPC, Hybrid Insurance + Cash, or Not Set), and the whole workspace adapts to that model and to each user’s permissions — so two staff members can legitimately see different tabs.
-
Open the workspace.
Administrators and physician practice owners can open
Billingfrom theAdmintoolbar menu; anyone who can use Billing gets aBillinglink and aBilling inboxcount on the Home page, and Alt + 6 jumps to it from anywhere. Staff whose permissions include billing work start in Billing when they sign in. Other parts of Hero EMR deep-link in too: the calendar’s appointment window can jump straight to a visit’s billing records, opening the Claims Pipeline focused on that encounter (see the calendar). -
Pick up where you left off.
Billing opens on the
Dashboard— or, for logins without Dashboard access (Front Desk, for example), onPatient AR→Day Sheet. Leave Billing for another workspace tab and come back (the tab, Alt + 6, or the Home link) and it reopens the page you were on, with its filters, for as long as that browser tab stays signed in. The very first time, the sidebar shows grey placeholders and the page reads Loading billing workspace… until your tools are known, so nothing jumps under the pointer. -
Learn the sidebar groups.
Operations—Dashboard(the Billing Monitor, the pipeline-health view covered in Monitor billing health),Pre-visit(the upcoming-visit readiness worklist — see Visit readiness),Claims Pipeline,Appeals(while the appeal kit is on, for people who manage claims),Prior Auths,Payments,Patient AR. The billing reports moved to Practice Health → Reports (old links to Billing → Reports open it), with the same numbers, date-range and group-by controls, and one-clickCSV/Excel/PDFexport; a report runs as soon as it opens. Date ranges are calendar periods in your practice’s time zone, with the resolved dates shown under the select and on the result. The AR Aging Report places each account in one bucket (0–30 … over 120 days) by its oldest open balance and splits it into Patient AR, Pending with insurance, and Insurance AR, adding up to the same Total receivable as the Billing Monitor. The Revenue & Collections Summary shows charges, payments net of refunds, and the collection rate, with membership dues listed separately (for users who may see membership money). Reports grouped by payer show one row per payer, with its Payer IDs. The payer denial-rate report counts only claims the payer actually adjudicated and denied; claims the clearinghouse bounced before the payer saw them are broken out in their ownRejected Before Payercolumn, so routine transmission fixes never inflate your denial rate. Payers Hero knows to be clearinghouse test payers (the sandbox payers a demo or test practice uses) are left out of the payer reports — Denial Rates by Payer (rows, totals and exports), CPT Payment Analysis, and the by-payer view and spike alerts of Denial Trends & Spike Alerts — with the line “Clearinghouse test payers are not included: {names}.”; a practice without one sees no change.IDR— a narrow out-of-network dispute workflow under the No Surprises Act — appears here only if your practice enables it underAdditional Features. The group ends withBilling Hero, the AI billing assistant, andBilling Queue(formerly Human Review), which opens the Billing Queue page, the queue of billing problems that need a person; it also has its own tab in the top menu.Programs—APCM, covered in APCM billing;RPM, when remote patient monitoring is on;Maternity, the global maternity-package worklist where proposed obstetric episodes are reviewed (Pending review,Pending facts,Confirmed,Dismissed), their facts and linked visits checked, and the global package confirmed into a claim; andSubscriptions, the membership workflow documented in Memberships. APCM, RPM, and Maternity appear only when enabled —Maternityneeds obstetrics turned on underAdditional Features, and confirming an episode additionally requires the claims-management permission.Configuration—Payment Model,Collections & Fees,Card readers,Service Menu,Discounts & Coupons,Sales Tax,CPT List Prices,Denial Self-Pay,Negotiated Rates,Claim Submission,Eligibility,Billing Identity,Rules & Overrides, andSimulator. This is the setup material covered in Billing setup. If you switch tabs with unsavedCollections & Feesedits, anUnsaved changesdialog asks before discarding (Keep editing/Discard). Dialogs that hold unsaved edits work the same way: theirCancelorClosebutton, ×, Esc, or a click outside asks “Discard unsaved changes?” before throwing the edits away.
-
Open a patient’s billing from any name.
Every patient name in Billing — Claims Pipeline rows and claim headers, Pre-visit, Patient AR (Aging, Invoices, Day Sheet), Subscriptions, Payments, APCM, IDR, and Maternity — opens the Patient billing dialog over the tab you are on, which keeps its filters (hover: Open patient billing). The dialog shows the patient’s name, MRN, DOB, age, and sex, an
Open chartbutton for users who can open charts, and the tabs your permissions allow, in this order:Demographics·Prior Auth·Custom Billing Rules·Insurance·Invoices & Charges. With the standard role profiles, a Biller gets Demographics, Prior Auth, Insurance, and Invoices & Charges; a Billing Manager, Office Manager, or admin gets all five; Front Desk gets Demographics, Insurance, and Invoices & Charges. Billers fix a patient’s address and guarantor and their insurance here. TheBillerrole profile (and soBilling ManagerandOffice Manager) also includes read-only charts and visit notes, Media documents, appointment scheduling, and moving a claim to another payer in Correct & Refile. A practice that takes chart access away from a biller keeps them to the billing screens, andOpen chartis hidden for them. -
Understand why tabs differ per person.
Tab visibility follows the payment model first — Pure Cash practices don’t see
Claims Pipeline,Negotiated Rates, orRules & Overridesby default, and DPC practices also don’t seeCPT List Prices— and is then filtered by each staff member’s billing permissions (assigned with role profiles). The rule is the same for staff and admins. A staff member with no matching permission seesNo billing tools are available for this staff profile.When the model hides a tool you are allowed to use, the sidebar footer showsShow all tools(and, once on,Use model defaults); a Dashboard chip or link that points at such a hidden tool shows all tools for the rest of that visit and opens the tool.
Show all tools only appears when the payment model hides something you may use (Pure Cash and DPC); in an Insurance or Hybrid practice nothing is hidden by the model, so there is no toggle. It is saved to your account, so it follows you to other browsers and computers.
For Take payment, reader setup, and front-desk refunds, see Payments & card readers. Optional code-pair checks, tertiary claims, and denial self-pay prices are covered in Insurance follow-up.
Monitor billing health (the Billing Monitor)
The Dashboard tab is the Billing Monitor — one live picture of the organization’s billing pipeline over a window you pick (7d / 30d / 90d, plus Refresh). Instead of hopping between tabs to ask is billing healthy?, you read one strip left to right and click whatever looks wrong.
-
Read the lifecycle strip.
Eight linked stages mirror the end-to-end pipeline:
Signed→Charges→Claims→Submitted→Acknowledged→Adjudicated→Posted→Patient balance, each with its count or dollars for the window. A dashed amberNo billing / Cashtile sits directly afterSigned, counting signed visits that never enter the insurance pipeline (no claim) — it is informational, not an exception chip, so there is nothing to click and nothing to work. Every stage is clickable and jumps to the tab that works it — the claim stages open the Claims Pipeline, the money stages open Payments or Patient AR. - Work the exception chips. Chips appear under a stage only when something there needs attention, colored by severity and stamped with the age of the oldest problem (oldest Nd). A clean strip means a clean pipeline — there is nothing to dismiss. Each chip deep-links to the tab where you fix it; the table below shows what can surface where.
-
Scan the Billing Inbox rollup.
The
Billing Inboxpanel summarizes the alert rail without leaving the workspace: anN activebadge, one chip per alert type and severity (for example Charge AR drift 17 or ERA manual review 2), and the newest alerts with timestamps.Open billing inboxjumps to the main Inbox’sBillingfolder (see Inbox queues for how that folder groups and dates alerts), and the same active count shows as a red badge on theDashboardtab in the sidebar — visible from anywhere in the workspace. -
Read the money row.
A line above the cards adds up what the practice is owed: Total receivable = Patient AR + Pending with insurance + Insurance AR · Same total as Reports → AR Aging. Then three cards:
Insurance AR— “Not filed yet, or back from the payer and needing billing review — excludes claims waiting on the payer”, split into Not filed yet and Needs billing review and aged 0–30 days through Over 120 days;Patient ARwith its aging buckets and a Pending with insurance line (“Filed claims waiting on the payer; excluded from Patient AR”); andCollected in windowsplit into insurance and patient collections, with a footer showing ERA ingestion health — how many remittance runs landed in the window, by source and status in plain words (for example ERA runs in window: 79 · Manual upload: 60 posted, 19 waiting to post, or Office Ally for clearinghouse files), and when the last one ran. -
Expand the Revenue Overview for trends.
The collapsible
Revenue Overviewhas period buttons from7 daysto12 months, summary cards such asInsurance BilledandOutstanding AR, aClaim Status Pipelinechart, and anAR Agingcard with the same total and buckets as the AR Aging report. In Insurance and Hybrid practices it sits collapsed below the Monitor. In a DPC practice it is the Membership Overview (with Gross membership payments received · selected period (USD)), and in a Pure Cash practice the Collections Overview; there it comes first, expanded, with the Monitor below it, and the Monitor drops its claim stages when there is no claim activity.
| Stage | Exception chips that can appear |
|---|---|
Signed | Unbilled insured — insured visits signed but never billed, including ones whose claim was deleted or that carry custom fees; Self-pay review — self-pay visits left with an open balance. |
Claims | Readiness blocked — claims failing pre-submission checks; Duplicate live claims — two live claims covering the same visit. |
Submitted | Rejected unworked; Batch failures; Voids unconfirmed; Voided, payer-live — a claim you voided that the payer still shows as active. |
Acknowledged | Stale in-flight — no acknowledgement 14 days after submission, or no adjudication 25 days after acknowledgement; Missing 277CA acks. |
Adjudicated | Denials unworked; Unposted ERAs; Orphan/reversal ERAs — remittances that match no claim or take money back; Filed outside EMR. |
Patient balance | Charge/AR drift — bookkeeping drift between charges and the patient ledger; Stuck payments — payment attempts that never completed. |
Behind the monitor, automated checks sweep the whole pipeline nightly — unbilled insured visits, self-pay balances, stale in-flight claims, claim-integrity problems (duplicates, void confirmations, orphan charges, bookkeeping drift), payment-posting problems, claims a claim-file run had to leave out (see the claims pipeline), and statement, refund, and batch failures — and file each finding as a billing-inbox alert. The chips and the rollup are two views of that same alert rail.

Billing Inbox rollup, and the money row along the bottom.Dashboard sidebar tab counts the alerts still active, so a quiet badge genuinely means a healthy pipeline.
Open Claims Pipeline button. Failed online payment attempts land in the main Inbox under the Billing folder with charge and error details plus Chart and Patient AR jump buttons — see Inbox queues. The Monitor shows a warning (Failed to load billing monitor, with the time of the cached figures it is showing) only when loading actually failed; while it refreshes older figures, the window line just adds · Updating….
Work the pre-visit billing readiness queue
The Pre-visit tab is the Upcoming Visit Readiness worklist — every scheduled visit in the next 14 days (by default), built to catch eligibility and insurance problems before the patient arrives. It has its own sidebar tab next to the Billing Monitor on the Dashboard. The header shows the date range plus Filters, CSV, and Refresh buttons. Dates and times — on the rows, in the drawer, and in the CSV — are in your practice’s time zone, providers show by full name, and your filters stay put when you switch tabs or reload, for the rest of the practice day.
The eligibility rule shown above the queue follows Collections & Fees → Insurance eligibility checks. Staff who manage billing settings can use Change to open it. Besides Re-check insurance eligibility after (30 days by default), that card has Check insurance this many days before a visit (1 to 30 days; 1, the day before, by default): Hero checks eligibility on its own for visits that many days ahead, so a failed check can be fixed before the patient arrives. It can’t be more than the re-check window, because older results are checked again anyway. A check someone on your team runs is never skipped. What happens when a check fails is up to your practice: see When an insurance check fails. When the practice enables front-desk paperwork, the Paperwork column shows None assigned, All done, or how many items remain, with their names. With add-card links enabled, authorized staff can use Send add-card link on a row without a saved card. Check the result message for whether delivery succeeded; the link saves a card without collecting money.
-
Scan the chip strip.
Summary chips count
Upcoming,Missing elig.,Stale elig.,COB missing,Open problems, andIn progress, plus payer-class chips forMedicare,Medicaid,Private, andUnknown. The counts cover the date range and filters, whichever chip is on, and clicking a chip shows just those visits (it replaces any other chip filter). Hover a chip for its definition:Missing elig.— “No eligibility check on file for this visit’s primary policy.”;Stale elig.— the last successful check will be older than the practice’s re-check window by the visit date (30 days by default; a new calendar year also needs a check), and Hero re-checks these on its own “the day before the visit” (or as many days ahead as your practice chose, below);COB missing— “Another plan is on file, or eligibility named another payer, and there is no COB result yet.” The automatic re-check skips self-pay visits.Filtersnarrows byStart date,End date,Payer search(Aetna, BCBS…),Provider,Visit type,Payer class, eligibility status (Any eligibility),Problem(Any problem state/No problem/Open/Resolved),New patient(New patient only/Established only), andSecondary insurance(Has secondary/Primary only).Reset filtersclears the lot. -
Run eligibility checks.
Each row’s
Recheckbutton queues a live eligibility verification with the payer for the patient’s primary policy, through Stedi (or Optum, if your practice uses it for eligibility) — you’ll see Eligibility check queued. On rows without an active primary policy the button is greyed out — hover it for the reason (No active primary policy). Checks run in the background, so results don’t appear instantly;Refreshafter a few minutes. -
Read setup problems separately from patient problems.
When checks can’t run because of your practice’s setup, the row keeps its real
MissingorStalebadge with a small amberNot set upnote, and one banner above the list explains it — for example “Eligibility checks aren’t set up · 3 upcoming visits couldn’t be checked. No eligibility clearinghouse is connected for this payer.” A policy whose last check failed back when Office Ally still checked eligibility reads Office Ally no longer checks eligibility; make sure Stedi eligibility is on and re-check. Admins getOpen External Providers; everyone else reads “Ask your practice administrator to set this up in External Providers.” Problems with the patient’s own coverage still readFailed, in plain words rather than codes. An insurer that only answers checks dated close to today is not a failure: the row keeps its realMissing,Staleor active state with a neutral note instead ofFailed, and the policy card a blue The insurer didn’t check that date notice, while Hero re-checks with today’s date once a day. -
Run a COB check, and act on the answer.
The row’s
Run COBbutton (Run COB check ($1)) queues a paid coordination-of-benefits check against the visit’s primary policy — the same check, confirmation dialog, and cost as the one on the patient’s Insurance tab. It needs the COB permission (without it the button readsAsk a billing manager or office manager to run a COB check.) and an active primary policy, and it is disabled, with the reason on hover, when your practice can’t run COB checks (for example while the clearinghouse connection is in test mode, or with COB turned off). The same reason appears as a note above the list only when a visit in the current list actually needs an other-coverage check (its COB cell readsMissingorFailed) — for example “Other-coverage checks can’t run while your practice’s clearinghouse connection is in test mode. They work once the connection is live.”. TheCOBcell readsNot neededwhen nothing points to a second plan, andMissing(hover: Another plan is on file or Eligibility named another payer) when something does. While a check runs it readsChecking…; a check the payer refuses leavesFailedwith the reason on the row. When a result finds other coverage the cell grows an amberReview orderbutton that opens the same coverage-order dialog, so you can fix primary/secondary from the worklist without opening the chart. Once applied it readsOrder applied. -
Hold automatic charging when needed.
For practices that charge saved cards before visits, the row’s auto-charge cell shows the next attempt (Next attempt in 3h), and
Hold/Releasestops or restarts automatic charging for that visit. Once the visit’s start time has passed the button is disabled — “This visit has started; automatic charging no longer applies.” The calendar’s right-click menu follows the same rule:Hold auto-charge…/Release auto-charge hold…andWaive pending depositappear only before the visit starts, andWaive pending depositalso disappears once the patient has arrived (checked in, or joined a video visit, even early). A deposit the patient owes after arriving is handled on the patient’s billing instead — the refusal says “The patient has already arrived, so the deposit can’t be waived here. Use Invoices & Charges → Adjust / write off balance on the patient’s billing (needs sensitive billing access).” -
Flag what needs a human.
Flag(Flag billing problem) opens a dialog asking “What needs human resolution before this visit?” withReason,Priority, andNotesfields; flagged visits later showResolve. Both actions require billing AR permission (tooltip:Requires billing AR permission). -
Open the detail drawer.
Clicking a row opens a drawer with
Visit & patient,Eligibility,Insurance policies,Coordination of benefits,Work items,Billing messages, andBilling notes— notes are visible to billing staff only. TheCoordination of benefitspanel repeats the determination and coordination order, lists what the payer reported, and carries its ownRun COB checkandReview coverage orderbuttons; it says plainly when a result is in hand but the chart’s primary/secondary order has not been updated yet. The check log reads in plain words — Checked, Failed, Staff review, Checking…, and triggers such as Pre-visit recheck, Appointment, New policy, and COB check.

Pre-visit tab, with its chips, filters, and visit table.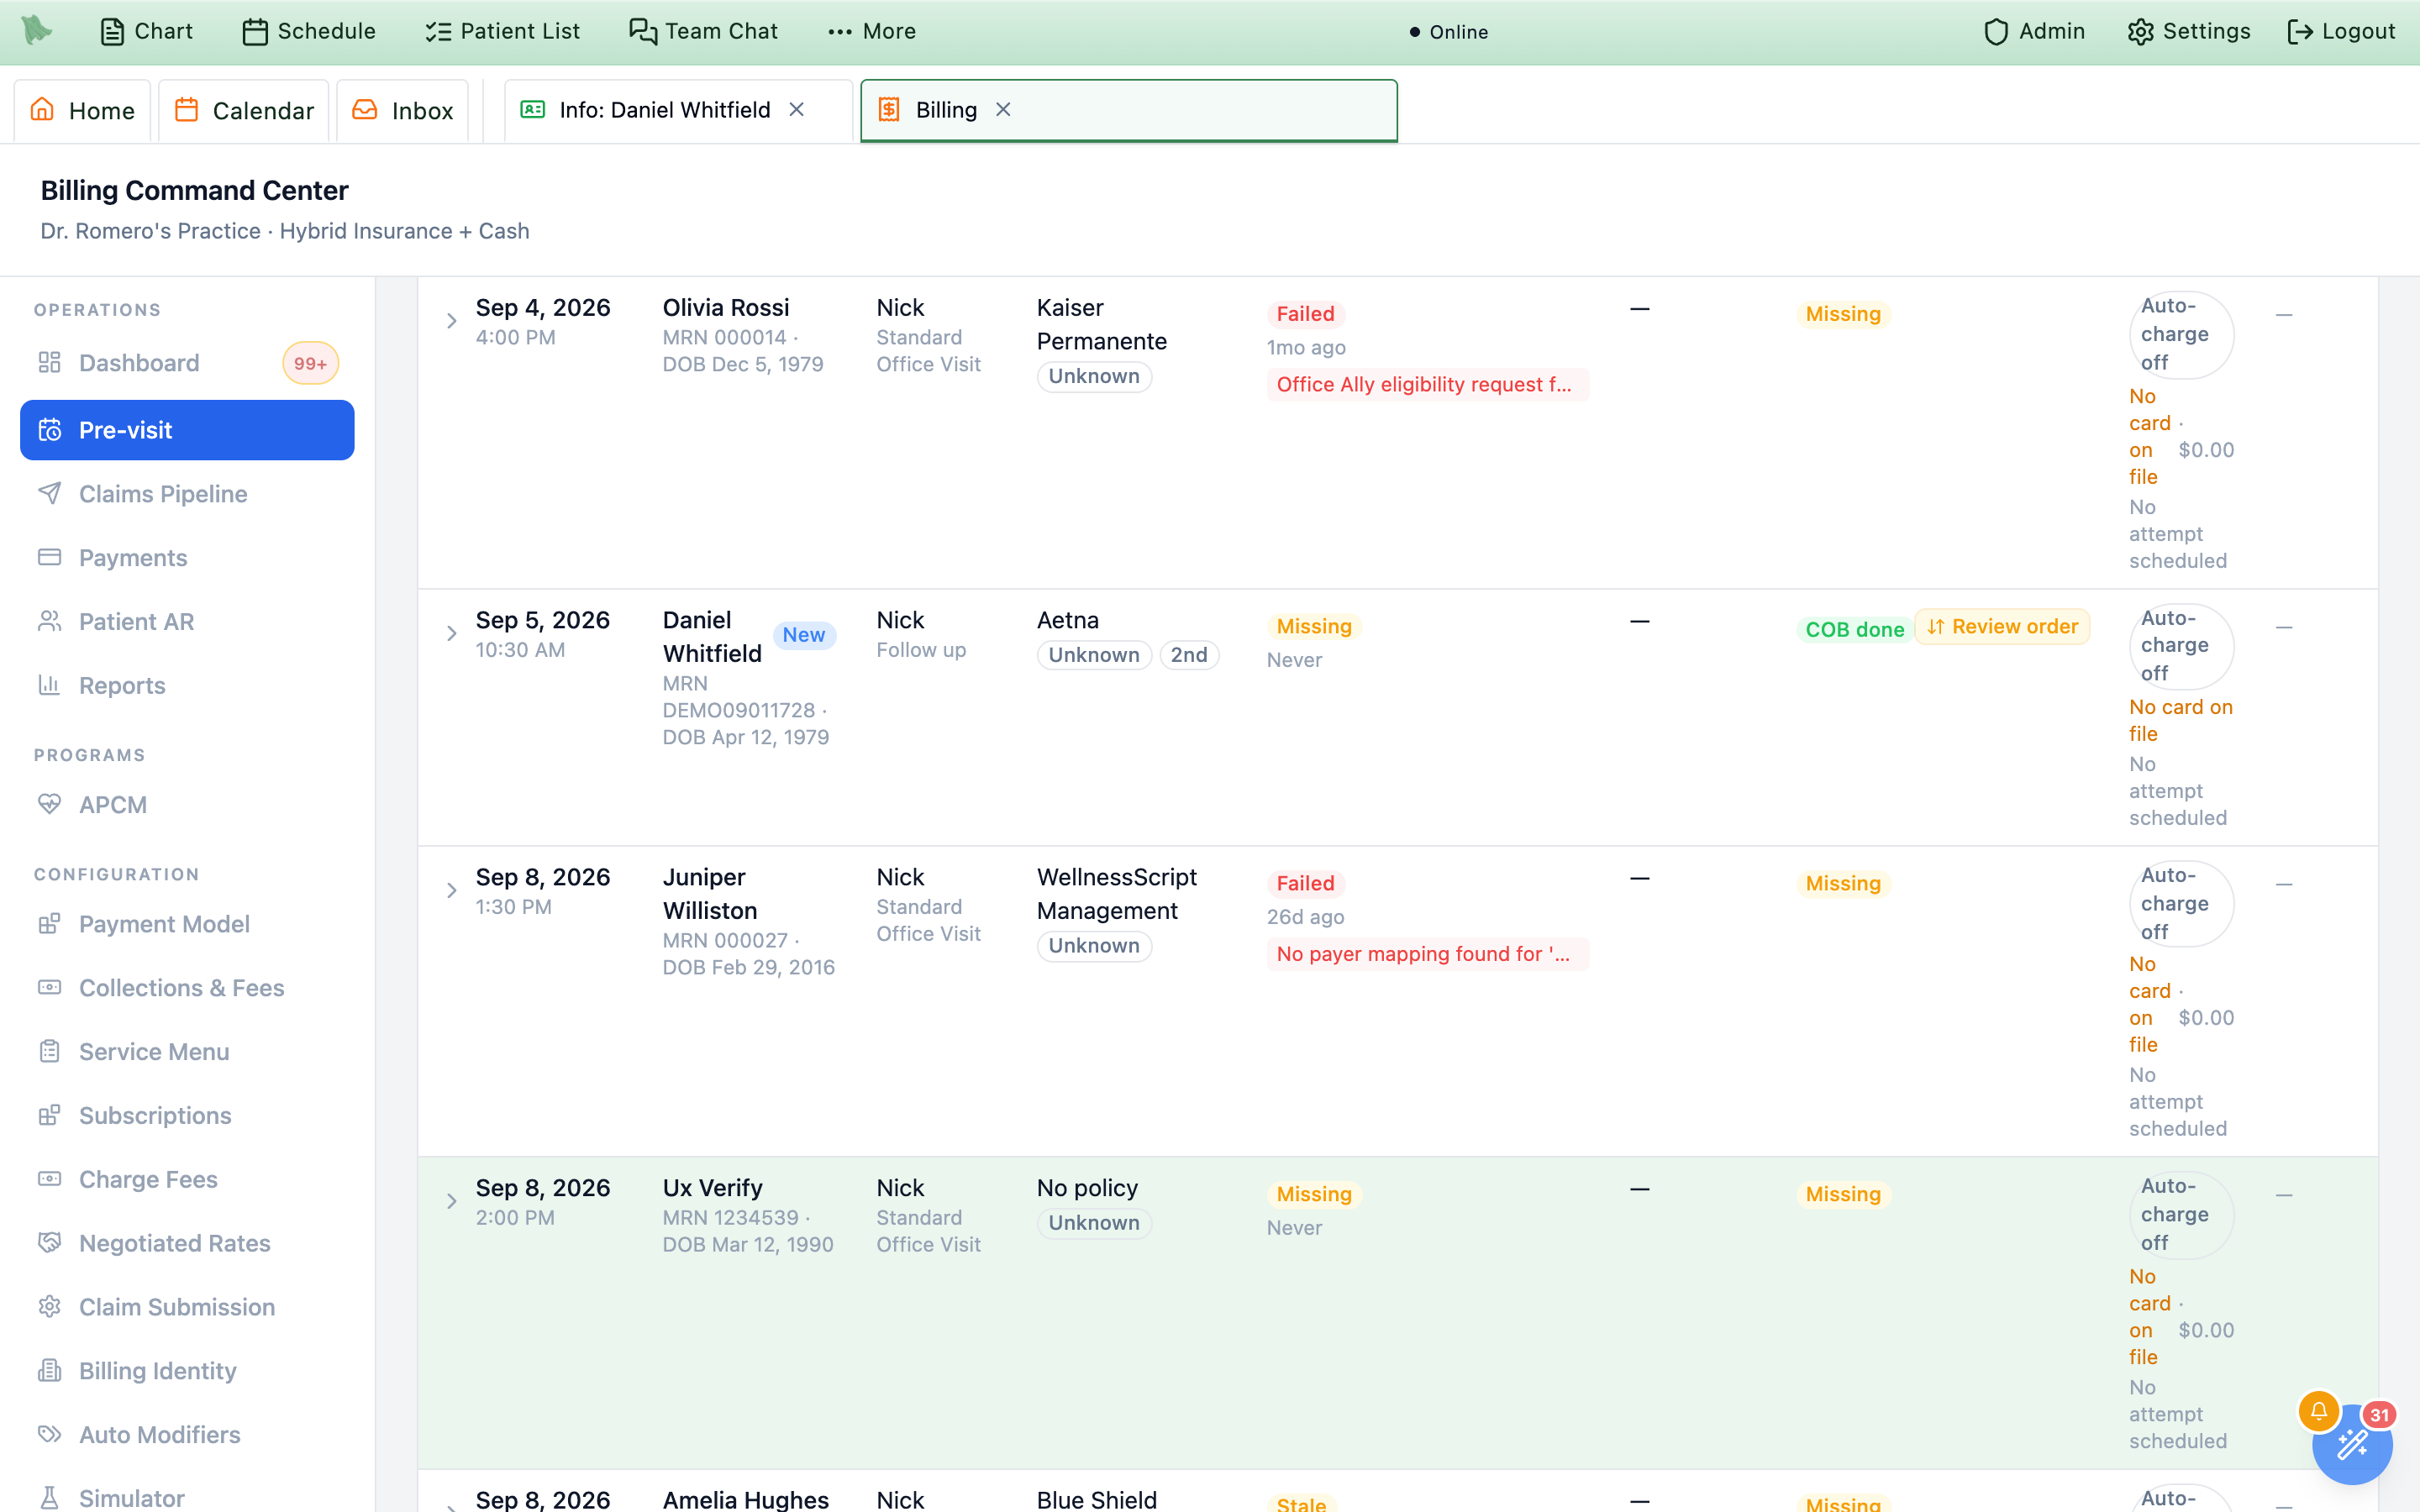
COB cell into Review order — the coverage-order dialog opens straight from the worklist.Recheck, Run COB, Hold / Release, Flag / Resolve) instead of icons; a visit with no sign of a second plan reads Not needed in the COB column; and practice setup problems show the amber Not set up note and banner instead of a red Failed.
A visit says “Billing path not set”
Billing path not set appears in the Billing part of a visit you open from the patient’s Appointments tab (Patient Information). It is common for a new patient’s first visit and is not an error by itself: it means the visit has an encounter but no claim and no charge yet, so Hero can’t say yet whether the visit is billed to insurance or paid directly. Nothing about the patient needs a setting called “billing path”.
The line changes on its own once billing happens:
- Billed to insurance once the visit has a claim (live or closed).
- Cash / direct pay once the visit has a charge but no claim.
- Billing starts once the visit has an encounter. for an upcoming visit, and No encounter was created for this visit. for a past one with no encounter.
- Sign the note. Charges and claims are created when the provider signs the visit note (How billing works). An unsigned visit stays Billing path not set.
- Check the patient’s coverage. If the visit should go to insurance, make sure the patient has an active policy on the
Insurancetab (Insurance & eligibility). For a self-pay patient,Bypass insurance (treat as cash pay)prices the visit from the cash fee schedule, and signing won’t create an insurance claim. - Still not set after signing? Open the visit in Billing’s
Claims Pipeline(the calendar’s appointment window can jump straight to it) to see whether its charges were held and why (Claims pipeline).
Review charges and run the claims pipeline
Charges created when a visit is signed and closed (see Charges & E/M) flow into the Claims Pipeline, which moves them from review through submission to resolution. The tab has four views — with clickable summary stats (needs review, ready, active batches, follow-up, stuck 25+ days) that jump you to the matching slice. Every view has the same search box (Search patient, MRN or claim #), and names match in any order (“First Last” or “Last, First”). In Flight and Resolved search every claim on the server, not just the page you have loaded, and also match partial names, the payer’s claim number (ICN), the clearinghouse claim number, and the payer name. Switching views, searching, or changing a lane keeps the page in place: the list shows Loading work items… or Loading claims… the first time; after that the current rows stay, dimmed, with Updating… beside the title, and change once when the answer arrives. An open claim that is still in the list stays open. In Flight says when it shows only part of the list — “Showing 50 of 132 in-flight claims. Search to find the rest.” or “Showing 50 of 70 matching claims. Narrow the search to see the rest.” Patient names open the Patient billing dialog (§5.7).
A claim file the clearinghouse never answered is flagged at the top of the Claims Pipeline for staff who manage claims, on whichever view you open first: “Claim file B2 has had no clearinghouse response for 17 days (7 claims).” / “Confirm with the clearinghouse before sending these claims again.” with Review claim file, or, for several, “3 claim files have had no clearinghouse response — the oldest for 17 days (21 claims).” with Review claim files. It is red when a file is eligible for recovery or already a delivery incident, and amber when it is only delayed. If not every claim file could be checked from there, it adds “Not every claim file could be checked here — open In Flight for the full list.” The button opens In Flight at the Clearinghouse delivery lane.
-
Review new charges.
Ready to Submitsplits intoNeeds Review— charges carrying issue badges such as coding or demographic problems — andReady to Send. Fix the issue, then useMark readyon the charge’s work item in the Action Center. A visit held because a code has no price reads No claim yet: 99050 has no price… with aSet a price for 99050button (§5.4b). Cash-pay and self-pay charges, deposits, and patient fees never appear here. -
Read how your claims are sent.
Ready to Sendopens with one line that says how this practice’s ready claims leave — the same sentence Claim Submission and External Providers show. For example: “Ready claims go to Office Ally SFTP in the daily batch. Next batch: today at 2:00 PM EDT.” (always in your practice’s time zone), “Ready claims go to Stedi automatically, about every 15 minutes.”, “Nothing is sent automatically. Select claims below and create a claim file to upload to your clearinghouse.”, or “Claims can’t be sent yet. …” with what is missing. -
Send claims yourself.
In
Ready to Send, tick claims (orSelect all) and pick the channel:Office Ally SFTP,Availity SFTP,Stedi, orManual 837P download. The select starts on your route’s channel (or the first one that works), and a channel that can’t send yet says why — Not connected, Setup not finished, or Missing settings. The button follows the channel:Create Batch,Create Claim File(a downloadable 837P file for upload elsewhere), orSubmit through Stedi. When nothing can send, the panel says “No way to send claims is set up yet.” and offers onlyHold selected. -
Hold claims.
Hold selectedopens Place submission hold. Held claims wait underHeld (N), which follows the search box (No held claims match your search). The Held view also has an Insurer holds panel:Hold claims to an insurerholds everything going to one payer, andLift holdends it. Both dialogs leave the Follow-up date empty (“Leave empty for no reminder.”); the date you set is a date on your practice’s calendar, and for an insurer hold billers get an alert when it arrives. Hero also holds some claims by itself, with the reason in the note under the badge: for exampleHeld · Awaiting reviewfor a policy whose member ID and group number are the same, at a practice that sends claims only through Stedi (see Member ID and group number). -
Track what’s in flight.
The
In Flightview lists batches with per-batch actions:Download 837P, submit to the channel,Mark manual portal upload complete, andCheck acknowledgements. Each batch sums up its acknowledgements as one plain-language chip —Clearinghouse receipt ✓,Clearinghouse receipt ✗, orClearinghouse receipt pending— instead of raw TA1/999 codes; the control numbers and raw acknowledgement text are still there for support calls, tucked into a collapsedTechnical detailsdisclosure inside the expanded batch. A batch the clearinghouse answered only with 277CA claim verdicts still counts as received (Clearinghouse receipt ✓; its tooltip adds 277CA: Received), and on the claim’sSubmissionbox a file receipt that never came readsNot returned. Expanding a batch also shows the per-claim roster: every claim in the batch with a plainAcceptedorRejectedverdict (no more ack-code legend to decode), the status message that came back, and a link that jumps straight to that claim’s Action Center item. A payer duplicate rejection readsRejectedwith aDuplicatechip (“The payer already has a claim for this service. Check that claim before refiling.”). A claim moves throughDraft,Ready,Submitted,Acknowledged, andIn Process, then resolves toPaid,Denied,Partial,Pended,Appealed,Voided,Replaced,Removed at clearinghouse, orClosed(theResolvedview filters on each) — and a claim the clearinghouse bounced shows asRejected, stays in this view tinted red, and carries aCorrect & Refilebutton right on its row (the one exception is a rejected void — a claim you were cancelling has nothing to refile, so it reconciles from the batch view instead). A claim Hero couldn’t hand to the clearinghouse at all readsSubmission failed. Rows also print the last submission error as readable text rather than hiding it behind an icon. A claim Stedi refused at its own checks shows Stedi’s code and wording, for example “33: The Subscriber Primary Identifier (NM1-09) and Subscriber Group/Policy Number (SBR-03) should not be the same. Correct and resubmit.” (see Member ID and group number); any member ID, group number, date or other value Stedi echoed reads[redacted], and a refusal recorded before Hero kept Stedi’s wording may read only its code and[redacted]. The status filter only offers statuses the view you’re on can actually contain. Claims with no activity for 25+ days raise an amber banner with aReview oldest stuck claimsfilter as soon as In Flight opens. -
Watch for a claim file the clearinghouse never answered.
The Clearinghouse delivery lane sits first in
In Flight, above In Flight Claims. With nothing waiting it is a single line — Clearinghouse delivery · No uploaded claim file is waiting on a clearinghouse acknowledgement. withRefresh— and the Acknowledgement poller (separate from batch receipt) status under it. When files are waiting it shows a card for each uploaded batch that got no acknowledgement — batch number, a status such as Recovery eligible, Acknowledgement delayed, or Delivery incident, Uploaded — no acknowledgement, the clearinghouse, upload time, time elapsed, and claim count — withRelease lost batch…to put its claims back to work. -
Tell rejections from denials.
Hero EMR treats these as different problems, because they need different responses.
Submission failedmeans Hero couldn’t hand the claim over; fix what the error names and send it again.Rejectedmeans the clearinghouse (or the transmission itself) bounced the claim before the payer ever processed it — no one adjudicated anything, so there is nothing to appeal; fix the underlying data and send a corrected claim withCorrect & Refile.Deniedmeans the payer processed the claim and decided not to pay — a real adjudication you work withPrepare appealorLog Appeal,Resubmit as-is, orWrite Off. Earlier versions of Hero EMR showed both as “Denied”; if you learned the pipeline then, the practical change is that a rejection is routine data-fixing on the way to the payer, not a lost decision. -
Work the Action Center.
The
Action Centeris a smart-sorted worklist across six lanes (table below). The lane cards across the top show each lane’s count, dollar total, and the age of its oldest item (oldest Nd) — so a lane that’s quietly aging stands out at a glance — and each claim row carries a readiness badge that leads with the first blocking problem by name —Patient ZIP code is invalid, say — with the issue count beneath it, so you know what to fix before you even open the claim (a claim with nothing blocking simply readsReady). Each row’s reason line says what happened in plain words: on the Denied lane “Underpaid: Paid $121.60 of $190.38. $30.38 is unpaid and isn’t a contractual adjustment or the patient’s share.”, “Denied: Paid $0.00 of $190.38.” (plus what the patient owes, if anything), or “Line denied: Paid $150.00 of $190.38; a service line was denied.”, and once you log an appeal “Appealed: Paid $0.00 of $190.38. Appeal logged; waiting on the payer’s decision.” (a denied claim you write off leaves the lane); on the Rejected lane Rejected as a duplicate: … for payer duplicates; on the Pended lane the payer’s pend reason, else “The payer is holding this claim for review or more information.”; on the Fix lane the first blocking issue itself (for example Fix and submit: Patient ZIP code is invalid). A note you add shows under the reason as Note: …, and a claim appears once, not again as a separate charge row. Search bySearch patient, MRN or claim #, sort bySmart sort/Newest update/Highest dollars, and narrow withMy items,Include snoozed, orGroup by lane. Selected claims take bulkSnooze selected/Flag; each item also offersFlag,Note,Assign me,Snooze,Mark ready(charges), andMark uploaded(manual batches). -
Resolve a claim.
Expanding a claim shows
Exact Problems(denial and rejection issues with codes, financial impact, and appeal deadlines — denial codes are decoded into plain language by a glossary the server builds from your payers’ actual responses, e.g. CO-16: “Claim is missing information or has invalid information.”; codes it can’t decode still appear with their raw code rather than being dropped), anIssues & fixespanel (the same readiness checks behind the row badge, each issue with its own fix button),Codes(editable diagnoses and per-line CPT/modifier edits with save-and-resubmit),Financials,Submission, and aManual Submission PackagewithShow Raw 837P/Copy raw 837P/Download raw 837P. Denied claims offerPrepare appeal(the appeal kit, on unless your practice turned it off),Log Appeal,Resubmit as-is, andWrite Off; partially paid (underpaid) claims offerPrepare appeal,Log AppealandWrite Off; rejected claims offerCorrect & Refile, andResubmit as-iswhile the claim never reached the payer. A rejected original claim you don’t intend to send again (for example a $0.01 tracking line) can be closed withWrite Off(“Close this rejected claim without resubmitting it by writing off its balance.”); it needs the write-off permission, and a rejected replacement or void stays withCorrect & Refile. When Medicare splits a claim and answers some lines on a separate notice, the claim reads Waiting for Medicare’s second notice as information, not as a problem, and the lines still to come are not counted as an underpayment.Log Appealopens the Log appeal dialog: “Hero records the appeal here; it doesn’t send it. File the appeal with {payer} in its portal or by mail or fax, then log it here.” — with the appeal deadline when known, a required Reason for appeal, and an optional Payer’s appeal reference.Mark reviewedfiles a claim away inResolved(“It comes back automatically if the payer sends anything new.”); for a denied claim it needs a Reason of at least 5 characters — why it needs no appeal, refile, or write-off — and any unpaid balance stays in insurance A/R until you write it off. Selecting several claims gives a bulk Mark claims reviewed prompt that requires the note when a denied claim is among them.Resubmit as-isis the action formerly labelled “Correct & Resubmit” — the new name says what it always did: it re-sends the claim unchanged, so make your corrections first. And buttons that aren’t available are no longer silently greyed out — hover a disabledEdit Codes,Regenerate, PDF editor, orMark Manually Submittedbutton and a tooltip says exactly why (for example “Locked: this claim already reached the payer — use Correct & Refile to change it.”). -
Fix demographics without leaving the claim.
Patient-address problems — the most common reason a claim blocks or bounces — are now fixed in place. On the claim’s
Issues & fixespanel, and on the blocker list inside theCorrect & Refiledialog, demographic issues carry anEdit demographicsbutton that opens the patient’s demographics editor right there, already in edit mode — no jump to the chart, no lost context. Save the correction and the claim, its row badge, and its worklist item all refresh on their own. Insurance issues carryEdit insuranceorAdd replacement policythe same way. Billers and billing managers get these fixes without chart access: billing staff who manage claims but not the full patient record get a trimmed editor limited to address and guarantor fields (which is all their save can change), and staff with the claims permission can add, edit, and expire policies. Links that would leave Billing for the chart or a note are shown only to users who can open them. When the practice’s claims route can’t send at all, the panel says Claims can’t be sent yet with the setting to fix —Open Stedi settings,Open Office Ally SFTP settings, orClaim Submission settingsfor admins, and “Ask your practice administrator to finish this in External Providers.” for everyone else. Once the data is right, a demographic issue on a claim that hasn’t reached the payer also offersRebuild claim, which rebuilds it from the corrected chart; a claim that has already reached the payer routes throughCorrect & Refileinstead, so payer tracking is preserved. -
Correct & Refile a claim the payer has.
Correct & Refilebuilds the corrected claim from the chart, shows it beside the original, and picks the kind of claim the payer will accept: a replacement, a new claim, a new claim with only the denied lines, or a claim to a different payer. It has its own section: Correct & Refile. -
Trust what the claim-file viewer tells you.
The raw 837P viewer labels what you’re looking at:
Transmitted file from batch Nfor bytes that actually went out,Stored file (not yet transmitted)for a built-but-unsent file,Upload outcome unknown — this file may have reached the clearinghousewhen a hand-off was interrupted, orLive rebuild — not yet transmitted. If the chart changed after the file was built, an amber banner warns that the file is not the current claim content, with aView current rebuildbutton beside it — so “the file still shows the old address” confusion is over. When a preview can’t be generated, the viewer prints the reason instead of failing silently, and the CMS-1500 preview does the same: blank boxes come with an explanation (for example “Address boxes are blank: the patient chart has no complete address on file.”).
| Lane | What lands there |
|---|---|
Denied / underpaid | Claims the payer denied, partly denied, or paid below what it explains — the reason line says which, in dollars. Work them with Prepare appeal or Log Appeal, Write Off, or Mark reviewed (a reason is required for a denied claim). |
Rejected | Claims the clearinghouse bounced before the payer saw them — fix the data and Correct & Refile. Payer duplicates read Rejected as a duplicate. |
Pended | Claims the payer is holding for review or more information. |
Fix & submit | Charges and claims with review issues to fix and mark ready, each showing its first blocking issue — including visits waiting on a price for a code. |
Awaiting manual upload | Manual-portal claim files waiting to be uploaded and marked complete. |
Follow-ups due | Claims whose follow-up date has arrived. |

2 issues — fix before send.Write Off is hidden entirely without the sensitive-billing permission. Assign role profiles to match who does what. Writing off a denied line takes off only the insurance balance: what the patient owes on the claim, such as coinsurance on a paid line, stays on their balance.
410561234 stores 41056-1234). An empty ZIP is allowed at intake, but an insured claim will not transmit until the address is complete and valid — the readiness check names the problem (Patient ZIP code is invalid) and links straight to the fix, and the same check watches your practice’s own billing address (Billing ZIP code is invalid points you at Billing Identity). If a scheduled claim-file run has to leave a claim out over a data problem, it files a billing-inbox alert — Claim excluded from claim file — naming the claim and the error instead of letting it sit; and a claim wedged behind a blocked claim file raises an immediate Claim stuck after blocked claim file alert.
Correct & Refile: send the claim the payer will accept
Use Correct & Refile when a claim has to change after it reached the clearinghouse or the payer. Fix the chart first (codes, the patient’s address, the insurance); Correct & Refile then rebuilds the claim from it, shows the original beside the corrected claim, and works out which kind of claim to send so the payer accepts it and the visit is never paid twice. Nothing is sent until you press the button at the bottom of the dialog. It needs the claims-management permission.
You open it from Correct & Refile on a rejected claim (its row in In Flight and its claim detail), from the fix buttons in a claim’s Issues & fixes panel when the fix needs a corrected claim, and from Prepare appeal when a corrected claim is the better answer to a denial. Billing Hero uses the same rules when it refiles a claim for you.
-
Choose the policy.
Target insurance policylists the patient’s policies with the payer, a masked member ID, the sequence and the status; the patient’s primary is markedcurrent primary. Choosing a policy with a different payer turns the correction into a move to that payer (see below). -
Compare the two claims.
Original (as submitted)andCorrectedsit side by side with the changes highlighted; a Member row shows each side’s masked member ID and relationship. If Hero no longer has the file that was sent, a note says the Original column was rebuilt from the claim record. - Read What will be sent. One sentence says which kind of claim goes out and why (table below), and the button at the bottom follows it. When the new payer prices the visit differently, Price change shows it, for example “Charge changes from $271.22 to $86.78 (Aetna contract rate)”.
-
Give a reason and send.
Type the
Reason for correction. TickHold for review before sendingto keep the corrected claim inReady to SendunderHelduntil you release it. A correction with a code-pair or unit problem is always saved on hold (Save correction on hold): fix it or record an override on the corrected claim, then release it. The confirmation says where it went, for example “Held — release it from Ready to Send” or “Staged on hold — release it from Ready to Send when it is ready to go”.
| What will be sent | When | Button |
|---|---|---|
| A replacement (frequency 7) | The payer accepted the original claim and the member is the same: “Sends a replacement (frequency 7) for {payer} claim {number}, so {payer} updates the original claim.” | Replace & Refile corrected claim |
| A new claim, because the member changed | The member ID, or whether the patient is the policyholder or a dependent, changed. A replacement can’t change the member, so the payer would deny it; the original claim stays in history. | File new claim |
| A corrected claim | The payer never accepted the first one, so there is nothing to replace. | Refile corrected claim |
| A new claim with only some lines | You ticked Send a new claim with only these lines (below). | File new claim with these lines |
| A new claim to Medicare | Traditional Medicare rejected the earlier claim before processing it, or returned it as unprocessable. Medicare takes no replacement claims. | File new claim |
| A new claim to another payer | You chose a policy with a different payer. It is always staged on hold first. | Stage new claim on hold |
Send a new claim with only the denied lines
When the payer split the claim, or denied some lines while it paid or hasn’t answered others, the dialog offers Send a new claim with only these lines: “Pick the lines it denied: Hero sends them on a new claim to the same insurance, and this claim keeps its other lines.”
- Tick
Send a new claim with only these lines. Each line shows its code and modifiers, what the payer did (Denied, nothing paid,Paid,Not answered yet,Partly denied,On another claim, orOn a new claim not sent yet) and the billed amount. Only lines the payer denied in full can be picked. - Fix a modifier if the denial was about one. A picked line gets a modifiers box (empty reads No modifiers); for example, remove
51. Modifiers are the only change allowed on a line the payer already answered. - Press
File new claim with these lines. The new claim goes to the same insurance. The original keeps its other lines; if you picked every line, the original is retired and stays in history.
Hero refuses a line, with the reason, when the payer paid it, hasn’t answered it yet (it may come on the payer’s separate notice), denied only part of it, put part of it on the patient (contact Hero support), when it was written off (reverse the write-off first), or when it is already on another claim the payer has. A new claim with only some lines can’t also split a charge, update prices or change the department, and it goes to the same insurance as the original; if the payer never got the original, correct the whole claim instead.
Move a claim to a different payer
A claim to a new payer is always staged on hold: “A claim to a new payer is always staged on hold first. Release it from Ready to Send after you review it.” Tick “File to {payer} as a new claim (frequency 1). The {original payer} claim stays in history.” to confirm. An unpaid charge is re-priced for the new payer, and Hero won’t file to a policy that isn’t in force on the date of service: a coverage panel shows Date of service, Coverage starts and Coverage ends, with Edit coverage dates.
- The original payer rejected the claim before processing it: nothing more is needed (“… rejected this claim before processing it, so no reroute record is needed.”).
- The original payer turned the claim back because it couldn’t find the member: a panel reads {old payer} turned this claim back and explains that the old payer never accepted the claim, so filing to the new payer can’t pay the visit twice. One button,
File to {new payer}, records the old payer’s rejection as the reason for the move and stages the new claim on hold. - The original payer reached and answered the claim: before staging, record why that payer isn’t responsible for the visit.
Record routing denialasks for theReason(Wrong payer,Not the responsible payer,Payer instructed a reroute,Coverage terminated before date of service), theEvidence source(Payer portal,Clearinghouse rejection,Payer phone call,Paper notice,Payer letter), aNoteof at least 10 characters, and the details that kind of evidence needs (a reference, when you saw it, who you spoke to). - The original claim is still open at the old payer: the panel reads Already filed to {payer} and lists Next steps: record the old payer’s $0 denial (
I have a real $0 EOB from {payer}→Post $0 EOB, which needs the permission to post payments), or wait for its ERA. If the old payer paid, ask it to void the claim and take the payment back, then contact Hero support.
When Hero has no eligibility answer from the new payer for the date of service, confirm coverage from the patient’s card: fill in Where you confirmed coverage (for example Medicare card on file, Part B effective 12/1/2014) and tick “I confirm {payer} covered this patient on {date}.” If the new payer can be checked, run an eligibility check for that date instead. If its answer says the patient wasn’t covered, Hero won’t file the claim there.
Biller, Billing Manager and Office Manager role profiles, administrators and the practice owner have; without it the dialog says “Someone with reroute permission must file this claim to {payer}.” Confirming coverage from the card needs the sensitive billing permission, or the reroute permission while the new payer can’t be checked because of your practice’s setup.
Traditional Medicare
Original Medicare doesn’t accept replacement claims, so Correct & Refile never sends one there. What it does depends on what Medicare did with the earlier claim:
| You see | What it means and what to do |
|---|---|
| Medicare already processed this visit | A second claim for the same services would be denied as a duplicate, so Hero won’t send one. Each earlier claim shows when Medicare processed it, its codes and its ICN. Ask Medicare to reopen that claim to correct it, on your Medicare contractor’s portal or by phone with the ICN; if the decision itself is wrong (not a clerical error), ask for a redetermination instead. |
Medicare said unprocessable (MA130 / N704) | Use it only when Medicare’s own notice for that claim says it was unprocessable. It opens Medicare returned this claim as unprocessable: choose the Remark on Medicare’s notice (MA130 (unprocessable, send a new claim) or N704 (no appeal, send a new claim)), Where you saw it (Medicare contractor’s portal, Phone call with Medicare, Paper notice (remittance advice), Letter from Medicare, Other), an optional Reference such as the ICN or call reference, and a Note of at least 10 characters, then Record notice. Hero records who said so and why; the claim’s status and money don’t change. Run Correct & Refile again and it sends a new claim. When Medicare’s electronic notice already carries MA130 or N704, Hero sees it and offers the new claim straight away. |
| Medicare hasn’t decided this visit yet | Medicare takes no replacement or second claim for a claim it is still deciding. Wait for Medicare’s notice. If it says unprocessable, run Correct & Refile again; otherwise ask Medicare to reopen the claim. |
A replacement to traditional Medicare that was staged before this rule stays held, and a claim file leaves it out, with the same next step. Recording Medicare’s notice needs the claims-management permission.
When Hero can’t build the correction
- The dialog says why in plain words, and nothing is changed: for example “The corrected claim couldn’t be built, and nothing was changed. Try again, or contact Hero support if it keeps happening.”
Edit insuranceappears where the fix is the payer on the patient’s policy, andEdit coverage dateswhere the policy’s dates don’t cover the visit. Both open the Patient billing dialog onInsurancewithout leaving Billing, and saving rebuilds the preview.- A replacement needs the payer’s own claim number. If it hasn’t arrived on an ERA, a
Payer claim number (ICN)box appears: enter it from the payer or clearinghouse portal and pressSave & rebuild. - Member ID changed. A claim under a new member ID is sent only after the payer has answered the original without paying it. Until then Member ID changed — waiting on {payer} explains how to wait for the ERA or post the payer’s $0 EOB. If the payer paid the original, Member ID changed — {payer} paid the original claim tells you to ask the payer to void it and take the payment back, then contact Hero support.
- A coding change that would change the visit’s charge amount is refused, and so is a price update on a visit with money already posted. Undo the change, or contact Hero support to reprice the visit.
Choose the clearinghouse for claims, and fill in Manual 837P settings
The clearinghouse is chosen once for the whole practice, not per patient, policy or payer. That is why picking the correct payer on a patient’s insurance offers no clearinghouse choice: the payer decides where the claim is addressed, and your practice’s claims route decides which clearinghouse carries it. Administrators and staff with billing-settings permission set it in Billing → Configuration → Claim Submission.
- Read the banner first. When Stedi or Claim.MD is the practice’s primary claims route, a line at the top says so (for example Claim.MD is the practice’s primary claims route.), with
Open Stedi settingsorOpen Claim.MD settingsfor administrators, or An administrator changes this in Admin → External Providers → Stedi. That route sends ready claims automatically. - Pick the default.
Default claim submission actionlists the routes:Office Ally SFTP,Availity SFTP,Manual 837P download, andStediorClaim.MDwhen your practice uses them. A route that isn’t ready is greyed out with its reason after a dash (for example setup required); the cards below the setting show each route’s status, withOpen setupfor administrators or Ask your practice administrator to set this up in External Providers. When Stedi or Claim.MD sends ready claims, the hint reads “… sends ready claims, so this choice only applies to claim files you create yourself.” PressSave. - Fill in Manual 837P settings if you upload claim files to a payer or clearinghouse portal yourself. The
Manual 837P settingscard takesSubmitter ID,Submitter name,Receiver ID,Receiver name,ISA qualifierandReceiver ISA qualifier(both start atZZand must be two characters), and aFile name prefix, plusTest modeandRequest TA1boxes (both start ticked). Get the IDs and qualifiers from the portal you upload to. PressSave manual settings; Hero confirms “Manual 837P settings saved.” Until every required field is filled, the card lists them after Missing: andManual 837P downloadcan’t be chosen; once complete it reads Manual 837P generation is configured. - Send or download claims. In the Claims pipeline’s
Ready to Sendview you can still pick a route for the claims you tick, andIn FlightoffersDownload 837Pfor a manual batch (Claims pipeline).
Test mode before real uploads. It is on by default for new manual settings; check with the receiving portal whether it expects test or production files.Connecting a clearinghouse is done in Admin → External Providers; for Stedi, see Stedi setup.
Bill a visit when the patient’s insurance is a plan you don’t accept
A practice can list the plans it doesn’t take in Admin → Practice Info → Insurance → Insurance we don’t accept (see Insurance we don’t accept). Each plan gets an action under When a patient has it. Flag only marks the patient’s plan Not accepted on staff screens and leaves billing unchanged. Treat as self-pay also changes billing, as below. With nothing on the list, nothing changes.
What billing does for a Treat as self-pay plan
- At signing. Charge capture starts the visit as Cash pay at the visit’s self-pay price, and no claim is made. The clinician can change it if the visit should still go to insurance.
- Claims are held, not sent. Any claim to the plan waits in the Claims pipeline’s
Held (N)view. In the Insurer holds panel the plan’s hold showsSet in Clinic Informationinstead ofLift hold: change or remove the plan inInsurance we don’t acceptto end it. A single claim can still be released from the held list when you decide it should go out (Claims pipeline). - Collect from the patient. The visit’s charge lands on the patient’s balance like any self-pay visit. Collect it with
Take paymentor a payment link.
Insurance tab (Insurance & eligibility).Post ERAs, manual payments & refunds
The Payments tab is headed Payment Posting, with Manual Entry, Post EOB, Upload ERA 835, and Refresh buttons across the top. It’s where insurance remittances and hand-keyed payments get applied to claims — and where refunds are issued. The tab opens on Payment Posting; the Overpayments & credit balances panel is the last section on the page (shown to admins and staff who can collect payments), and a chip beside the Payment Posting title — Overpayments & credits · 18 open · 3 overdue, or none open — jumps straight down to it. The panel tracks “Payer overpayments and patient credits the practice may owe back” until they’re returned: confirming a case starts its clock — 60 days for a payer overpayment (the legal deadline for Medicare and Medicaid, a work target for commercial payers) and 30 days for a patient credit — or you dismiss it. It has its own search (Search patient, MRN or claim #) and, with nothing open, shrinks to one line: Overpayments & credit balances · None open.
-
Upload an ERA.
Upload ERA 835accepts .835, .edi, and .txt files and posts them the same way remittances from your clearinghouse post; anything that needs a person waits in Unposted Remittances. The result says what happened — for example “Posted 3 of 4 claims (3 payments, 5 adjustments). 1 needs review — see Unposted Remittances.”, “Nothing posted: 2 of 2 claims need review — see Unposted Remittances.”, or “Nothing new to post — all 4 claims on this file were already posted.” A file that was already posted is never posted twice, and a claim that matches nothing in Hero is left for review. -
Post queued remittances by payer check.
Unposted Remittancesholds “Remittances Hero hasn’t posted yet, grouped by payer check. Each one says why it’s waiting and what to do next.” Each check group shows the claim count, the payer’s check date and when Hero received it, and Check total, Not posted, and Posted (plus Other — money on the check that isn’t on a listed claim — when there is any);Post all ready (N)posts every ready row at once. Expand a group for its per-claim rows (Claim, Billed, Paid, Patient Resp, Status), with a note saying why the check wasn’t posted automatically. Each row’s status pill names its situation —Ready to post,Payer take-back,Cancelled out,Match service lines,Claim already paid,Claim closed,Claim voided,Money posted since,Patient share too high, and others — with a sentence saying what happened, and the row shows only the buttons that resolve it:Post,Map lines,Rebuild claim lines from charges,Post to claim of record(type a reason; the payment is recorded on the visit and inert duplicate claims are closed),Record payer reversal(shows what will change before anything posts),Reviewed — no posting needed, orPost anyway(after you tick “I checked: the money recorded since the hold is not this payment.”). If aPostis held after all, the row turns amber — Not posted — {pill}. {reason} — and the matching dialog opens. With nothing waiting, the card reads “Nothing is waiting — every remittance Hero received has posted.” -
Post a paper or portal EOB.
When a payer sends a mailed or portal EOB instead of an 835,
Post EOBopensPost Insurance EOB. Pick the claim with the same live search picker, then key what the EOB says:Payer paid,Allowed,Patient resp. (total),Deductible,Coinsurance,Copay, andContractual write-off, plus aWrite-off CARC(e.g.CO-45), aDenial CARC(e.g.CO-16) with theDenied amount, thePayer claim # (ICN),Check #,Payment date,EOB date, and aNote. For an EOB that splits amounts by service line, Enter EOB amounts by service line takes them line by line; a half-filled denial row is flagged when you leave it or pressPost EOB. Submit withPost EOB. A CARC-coded denial entered here starts the appeal clock just as an 835 denial would. If an electronic remittance for the same payment is already waiting in Unposted Remittances, Post EOB refuses with a red banner that names it — “This claim already has an electronic remittance for this payment that hasn’t been posted yet (check {check #}, {amount}). Post it in Payments → Unposted Remittances instead of keying the paper EOB.” (or, for one on hold, “… Resolve it there instead of keying the paper EOB.”). -
Enter a manual payment.
Manual Entryopens theManual Payment Entryform:Claim #(required),Payment Type(Insurance Payment,Patient - Cash,Patient - Card,Patient - ACH),Payer,Check #,Amount(required),Payment Date, andNote— thenPost Payment. TheClaim #field is a live search picker — type a couple of characters of the patient, claim number, or payer and pick the claim from the results; no more pasting exact identifiers. -
Reconcile the edges.
Two collapsible panels keep the odd cases honest.
External / filed outside EMR (N)lists remittance and status references that match no claim in Hero EMR — typically claims filed directly at the clearinghouse portal (Office Ally references likeC###P##) — with source, payer, service date, and amounts, so money arriving for them is tracked instead of vanishing; at zero it still shows, with “No payer remittance or claim status has come back for a claim filed outside Hero.”Recent ERA Ingestion Runsshows “One row per 835 file, from your clearinghouse or an upload.” — received time, source (Office Ally, Stedi, Manual upload), status (Posted, Waiting to post, Needs review, Unmatched, Failed, and so on), and matched / posted / unmatched counts — your proof that remittances are actually flowing in. -
Look up any check.
Remittance Historyis the ledger of every payer check/EFT received, posted or not. Search byCheck #, payer, or claim #, narrow withFrom/Todates and a status —Not fully posted,Posted,Partially posted,Needs review, orUnmatched, the same words the rows use —, and page through the results. Each row shows the Check date (the payer’s payment date, with a muted received date when Hero got it on a different day), check/EFT number, payer, method, check total, claim count, posted amount, and status — and expands into the per-claim EOBs behind that check, down to CPT-level adjudication. This is where you answer “did we ever get paid for this?” -
Audit and refund.
Recent Payment Activitylists the latest 200 payments with Date, Patient / Payer, Type (ERA-835, Insurance, Cash, Card, ACH), Check #, Billing Entity, Amount (with any Refunded sub-line), Claims, and Status (Posted / Pending). Refundable payments show aRefundaction that opens theIssue Refundmodal — remaining refundable balance,Refund amount, andRefund reason, confirmed withRefund Payment. Card refunds flow back through Stripe automatically.

Unposted Remittances queue — grouped by payer check — up top, Recent Payment Activity below with per-row Refund actions.Post all ready (N) button, rows carry plain-language status pills instead of Needs review (reversal/takeback) or Held: original was voided, and the Paid column shows each remittance’s payment. Overpayments & credit balances has moved from the top to the end of the page, reached from the Overpayments & credits chip beside the Payment Posting title.
Payment lines that did not match a claim: Work payment lines that didn’t match a claim.
Review and approve a refund that is waiting for staff
Some refunds wait for a person before any money moves. When a visit is cancelled and your policy says money goes back, the refund waits for staff review if your practice chose Staff approves each refund under Refunds after a cancellation in Collections & Fees, and always when the money was paid in cash, by check or on an outside card terminal. The Cancel Appointment dialog says so: “$20.00 waits for staff approval in Billing → Payments.”
- Find it. Open
Billing → Paymentsand scroll toRecent Payment Activity. The payment’s status readsRefund needs review, and its action column shows the reason with Awaiting review since {date}. - Review it. Press
Review $X refund. Type the review outcome or reason (3 to 255 characters) and continue. - Confirm what happens to the money. For a card payment made in Hero, confirm “Submit the $X refund to the original payment processor?”; the message then reads “Refund completed.” or “Refund submitted; processor confirmation is pending.” and the status becomes
Refund pendinguntil the processor confirms. For cash or a check, first hand the money back, then confirm “Confirm you have actually returned $X in cash or by check. This records the return; it does not transfer money.”
Review $X refund shows only to administrators and staff with sensitive-billing permission. Staff who can only issue refunds see the waiting refund but not the button.A refund you start yourself, rather than one waiting for review, uses Refund on the same row (Payment posting). Membership dues refunds have their own flow (Memberships).
Download an ERA (835 remittance) or look one up
To download an ERA as a PDF, use the Received ERAs list. The Payments tab shows every remittance but does not offer a download.
- Open Received ERAs. Open
Practice Setup, go to the Stedi tasks step and pressOpen enrollment tracker, then choose theReceived ERAstab. Administrators and staff with billing-settings permission can open it. - Find the ERA. Filter with
Received fromandReceived through, or chooseAll dates. Each row shows when it was received in Hero, the payer and payment, the claim counts and a status such asPosted in Hero,Needs revieworUnmatched. - Download. Press
Download PDFon the row. This also needs claims-management permission. A row reads PDF unavailable when there is nothing to download yet.
Look up a remittance without downloading
In Billing → Payments, Remittance History lists every payer check or EFT. Search by check number, payer or claim number and expand a row to read each claim’s EOB down to the service line. Recent ERA Ingestion Runs shows one row per 835 file received or uploaded. You can upload an 835 file you got elsewhere with Upload ERA 835 (Payment posting).
Match bank deposits to ERAs, and catch insurance payments that never arrived
Bank Deposits is a tab in Billing’s Operations group, right after Payments: “Match insurance deposits in your bank to their ERAs, and catch payments that never arrived.” Link the bank account where insurance payments land, or upload a statement from it, and Hero pairs each deposit with the ERA check or EFT it paid, then flags ERAs with no deposit and deposits with no ERA. This is bank reconciliation; it never moves money or changes a posted payment.
Insurance, hybrid and not-yet-set payment models show the tab; cash and DPC practices find it under Show all tools. Administrators see it. The practice owner and staff need the Bank Deposits permissions: one to see deposits, one to confirm or make matches and upload statements, and one, granted only by the owner or an administrator, to link or disconnect banks and change the settings. Anyone set to hide practice financials never sees it.
- Connect the bank. In
Bank accounts, pressLink a bankand sign in to your bank in the secure window. The first sync reads First sync in progress; afterwards each bank shows Last synced … withSync now(“New transactions show up in a minute or two.”). Each account has anIncluded/Left outswitch, so a payroll or savings account can stay out of matching. If the card reads “Linking a bank directly isn’t turned on for Hero yet, so bank data comes from uploaded CSV statements.”, use the upload in the next step. Staff without the linking permission see “Ask your practice owner or an administrator to link the bank.” - Or upload a statement.
Upload a bank statement (CSV)takes a CSV exported from your bank’s website, up to 5 MB, with anAccount name(use the same name each time) and optionally theLast 4 digits of the account. Uploading a range you already sent adds only the new rows. - Read the summary. Pick the dates with
FromandTo(the last 30 days to start). The tiles totalERA EFTs,Matched,ERAs with no deposit,Deposits with no ERAandDifferences to review; click one to open that list.Match againreruns the matching. - Decide the suggestions. The lists switch between
ERA checks(filtersNo deposit,Suggested,Matched,All) andDeposits(No ERA,Suggested,Matched,Amount differs (all),All; tickInsurance deposits onlyto hide other money). On a suggested pair pressConfirmorNot a match; a suggestion whose amounts differ says so, for example Short $8.40. When several checks share one deposit, deciding one decides the whole group. - Match one by hand. On a deposit,
Match…opensMatch this deposit: “Pick the ERA check or checks this deposit paid.” Pick more than one when a payer paid several checks in one deposit. The dialog shows Amounts match exactly or the difference before you save. - Review a short pay. A deposit whose confirmed checks don’t add up to it is flagged under
Differences to review. Once you’ve looked into it, pressMark reviewed(“Marking it reviewed accepts the $8.40 difference.”). It then shows quietly as Short $8.40 · reviewed.
See the deposit from Remittance History
In Billing → Payments → Remittance History, each check carries a deposit chip once your practice uses Bank Deposits: Deposited Oct 28, Suggested, No deposit (No bank deposit matches this check yet.), or the difference, which reads … · reviewed once someone has reviewed it.
Settings
Settings (for people who can link banks) opens Bank Deposits settings: Flag after (business days) (how old an ERA with no deposit, or an insurance deposit with no ERA, must be before it is flagged), Match window (business days) (how long after an ERA’s check date a deposit can arrive and still match), and Daily Billing Inbox alert, off by default: “Once a day, post one Billing Inbox item while any deposit or ERA is flagged.” Inside the waiting period an item reads Not flagged yet.
Disconnect asks “Disconnect {bank}?”: “Hero stops reading new transactions from this bank.” Deposits and matches already in Hero stay. When the bank needs you to sign in again, or access is about to end, the card says so and offers Reconnect.Capitation contracts: post $0 CO-24 lines as capitation, record monthly capitation payments, and compare expected with received
Use the Capitation tab when a payer pays you a monthly amount per member instead of per visit, for example an ACO or plan that passes a primary-care sub-capitation payment down. Without a contract, a visit the payer answers with a $0 CO-24 line looks like a denial. With one, Hero posts it as capitation: “A $0 line a contract covers posts as capitation, not a denial.”
Turn it on first. The tab is off by default. A practice administrator (or someone allowed to manage additional features) opens Admin → Additional Features, switches on Capitation contracts and saves. The tab then appears in Billing’s Configuration group, after Negotiated Rates. Administrators and the practice owner can do everything there. Staff need billing-settings permission to add or edit contracts, claims-management permission to record capitation payments and see the payment list, and sensitive-billing permission to close earlier CO-24 denials.
Add a contract
- Start a contract. In
Contracts, pressNew contract. Give it aName, thePayer nameand thePayer IDsas they appear on the payer’s remittances: “Hero matches a remittance to this contract by the payer’s name or any of these IDs.” - Say how the payer pays. Choose
Sub-capitation (an ACO or plan passes a primary-care monthly payment down)orFull capitation. Fill inStarts,Ends (optional)and theMonthly rate per member(for example 30.00). - List the codes it pays for. Type or paste them into
Codes the capitation pays for, or pressStart from …to load a ready-made code set when one is offered. Check the list against your contract: only a $0 CO-24 line with one of these codes posts as capitation; any other CO-24 stays a denial to work. Tick anySpecialties the payer pays separately. - Add the member roster (optional). Pick an uploaded roster under
Member roster, or upload the payer’s member list (CSV or Excel, up to 5 MB) with the dates it covers. WithNo roster: every patient of this payer counts, every patient with this payer is treated as a member. - Leave the claim code off unless asked. Tick
Mark claims to this payer as capitated (contract code CN1 05)only when the payer’s claim instructions ask for it. PressAdd contract. To change or end a contract later, open it, edit and pressSave; untickActiveto stop using it.
Record and check capitation payments
- Payments on a remittance are added for you. “Capitation that arrives on a payer remittance (adjustment CT or CR) is added here automatically.” Their From column reads Remittance (CT).
- Record a check or payment file that came another way. In
Capitation payments, pressRecord a payment, choose the contract, the payment date, the amount and the month it pays for, and pressSave. A payment you entered can be removed withRemove; one from a remittance can’t. UseShow payments forto filter by contract, orNot assigned to a contractto find payments you still need to assign. - Compare expected with received.
Expected vs receivedshows, per month, the members, what the roster and rate should bring in, what arrived, and the difference (a shortfall reads, for example, $120.00 short). It needs the contract’s roster and monthly rate.
Close CO-24 denials that came back before the contract
Earlier CO-24 denials your contracts cover lists claims that were denied CO-24 before you set the contract up. Tick the ones to close and press Close N as capitation, then confirm. Each claim closes with its CO-24 booked as capitation and its denial and appeal reminder gone; the patient still owes nothing. This can’t be undone from this page.
Billing → Payments → Remittance History, a claim covered by a contract shows a Capitation amount. A check also lists Payer adjustments outside claims (money paid or taken back that isn’t tied to a claim), and warns “This check doesn’t add up…” when the claim payments and adjustments don’t equal the check amount; compare it with the payer’s remittance advice.Manage patient balances, statements & collections
The Patient AR tab opens the AR Workspace, which summarizes total outstanding (for example $1,601.51 across 10 patients) with Filters and Refresh buttons and a Search by patient name or MRN… box; practices with multiple billing entities also get a Billing entity switcher. Billing-inbox alerts about a specific patient deep-link straight here with that patient already filtered, so you land on the account in question rather than the whole roster. A toggle flips between three views — Aging, Day Sheet, and Invoices (the last one only for staff who may read patient invoices). Under the total, a second line splits the rest of what is owed: $A pending insurance · $B not filed yet · $C needs billing review · $D total receivable — the same figures as the Billing Monitor and the AR Aging report. Patient names open the Patient billing dialog.
Aging — who owes what
- One row per patient: Balance (with Copay / Coins / Ded / Credit / Held breakdowns), Last Statement, Last Payment, and an aging badge —
0–30 days,31–60 days,61–90 days,91–120 days, orOver 120 days(the same buckets every Billing screen and report uses). - Status filters include
Current,Past Due,Payment Plan,Credit Balance, andCollections Warning;Aging FiltersaddsMin Total Receivable,Max Total Receivable(they filter each row’s total receivable — patient plus insurance — not the Patient owes figure), andAge of oldest balancewith all five buckets. A row is marked Collections Warning only when the patient “Owes $100 or more, more than 90 days past due”; a smaller overdue balance reads Past due. - Row actions:
Take payment,Timeline,Statement,Plan(beta),Activity, andCollections(only when the collections rule is met) — plus a checkbox per row for bulk statements.Take paymentlists the patient’s open balances first and a cancelled (“entered in error”) invoice last; an invoice whose share is held for a pending secondary claim reads Awaiting {payer} and isn’t pre-selected.
Day Sheet — one day’s money
- The front-desk view for a single date:
Previous Day/Today/Next Dayplus weekday quick-pick chips, with filters for visit status,Provider,Location, andOnly issues. Logins without Dashboard access, such as Front Desk, open Billing here. - Each visit row shows cash
Owed/Paid, credit and held-credit lines, the pre-visit collection state (e.g. Optional prepay or Collection due amounts), claims owed/paid, membership status, and issue flags. - Row actions:
Take payment,Statement,Plan(beta),Fees, andActivity.
Invoices — every invoice, two ways
- A grouping switch chooses
By patient— an accordion of patients, scoped toOpen balancesorAll invoices, whose name search runs across all matching accounts — orBy invoice, a flat organization-wide table. - The
By invoicetable lists Invoice, Patient, Service date, Status, Billed, Ins. paid, Patient paid, and Balance, filtered by status chips (Balance due,Partially paid,Paid,Cancelled,With insurance,Insurance review),Service from/Service todates,Min amount/Max amount, and aSortof newest, oldest, amount, or balance.Clear filtersresets them. Partially paid means the patient has paid part; an invoice only the payer has paid reads Balance due. An invoice waiting on the payer shows its number and billed amount, not a blank. An invoice whose patient share is held for a pending secondary claim reads Awaiting {payer} in amber (see the callout below). - Results are paged from the server —
Load morereports how many of the total you’re seeing. Expanding any row opens the same invoice detail as the patient’sInvoices & Chargestab, so staff read one invoice record everywhere.
-
Send a statement.
Statementopens theStatement Preview— practice and patient addresses, line items with Charges / Insurance / You Owe columns,TOTAL AMOUNT DUE:, and a Due by date that follows the statement due days in Collections & Fees. Deliver it withDownload PDF to print(records the statement and downloads the PDF — Hero never mails paper, so print and mail it yourself),Email payment link, orEmail + download PDF. The message says which happened, for example “Statement recorded for {patient} — the PDF downloaded; print and mail it.” or “Statement emailed to {patient}.” A line whose share is held for a pending secondary claim ends “— waiting on {payer}”, is left out ofTOTAL AMOUNT DUE:, and the preview adds “Pending other insurance: $10.00 (not due until the other insurance processes the visit)”. When nothing on the account is patient-billable, the statement actions are disabled with “No patient-billable balance — this balance is pending with insurance (including a secondary claim) or already settled, so a statement would be blank.”, and a bulk send skips that patient with the reason. -
Send statements in bulk.
In the
Agingview, tick the checkbox on each row you want (up to 200 at a time), choose the method — Email, Download PDF to print, or Email + download PDF — and clickEmail statements (N),Download statements (N), orEmail + download (N). Printing downloads one combined PDF. The result reports per patient — failures are named — and the failed patients stay selected so you can fix the issue (say, a missing billing email) and retry without double-sending anyone who already got theirs. -
Open the billing timeline.
The
Timelinerow action opens theBilling Timelinedrawer: the patient’s outstanding balance and available credit up top, then the history grouped by visit, newest visit first (Visit Sep 12, 2026 · Office visit). Inside a visit, events read in order — charge, claim, payer payment, payer adjustment, then a Patient share from {payer} line that spells out the coinsurance, copay, and deductible the payer assigned — then the patient’s payments. Statements and account-level events sit under Account activity. It’s the fastest way to answer “what happened with this patient’s money?” without hopping between tabs. -
Offer a payment plan.
PlanopensCreate Payment Planwith a frequency choice and installment preview. Plans record a schedule unless automatic collection is enabled and authorized for that plan. See Payment plans for setup, card authorization, and installment history. -
Review fees and payment activity.
On the Day Sheet,
Feesopens theFee Reviewmodal listing no-show and late-cancellation fees generated by your missed-appointment policy, with aWaive Feebutton that requires a waive reason (shown to admins and staff with the sensitive-billing permission); cancelling after you typed a reason asks before discarding it. The same fees can be waived from the fee’s invoice inInvoices & ChargeswithWaive fee. A fee is kept out of the money still on file for the visit (net of earlier refunds), so only the uncovered part appears as a new fee charge; and once a cancelled or no-show visit’s refund completes, its invoice reads Paid with an Appointment balance released line and the patient no longer shows that balance in Patient AR.Activityopens thePayment Activitymodal — the receipts and credits hub: receipt numbers, amounts, refunded amounts, payment methods, aStatement history(delivery method and status per statement), andIssue Refund,Hold Credit,Apply Held Credit, andRelease Held Creditactions. Refunds accept the separate refund permission or broader billing-adjustment permission; the credit actions still require billing-adjustment permission. Available credits auto-apply to future balances; held credits stay off the balance until you apply or release them. -
Escalate to collections.
Collectionsappears on an Aging row when the patient owes $100 or more and their oldest share is more than 90 days past due (hover: Owes $100 or more, more than 90 days past due) — the same rule as the Collections Warning status. It asks you to confirm sending the patient to collections, then moves the account into the collections workflow. - Prepare financial documents. Superbills, Good Faith Estimates, receipts, and statement PDFs live with the patient’s invoices — see Invoices & Charges.

Aging view — balances, aging badges, and per-patient Statement and Plan (beta) actions.Take payment.
Charge saved card, the kiosk, or automatic charging — while that claim is pending. Cash and check payments the patient hands you can still be recorded from the invoice. The hold ends when the secondary claim stops being pending: when the payer processes it, and also when it is rejected, fails to send, is closed, voided, replaced, removed at the clearinghouse, or deleted. A secondary claim left in draft or waiting for review keeps the share held until someone works it. The Aging view’s balance still counts the held share.
Collections & Fees policies from Billing setup; the patient-side experience is covered in Portal payments.
Bill a guarantor: send statements to the person who pays
A guarantor is the person responsible for a patient’s bill, such as a parent paying for an adult child. Add the guarantor in the patient’s demographics, then choose whether statements go to them. Billing staff can do this without full chart access.
- Add the guarantor. In Patient Information, open
Demographicsand edit. In the guarantor fields, setGuarantor relationship(Self,Parent,Spouse,Legal guardianorOther) and fill in the guarantor’s name, date of birth, phone, email and address.Selfmeans the patient pays. Staff with the claims permission but not full patient-editing permission can change only the address and guarantor fields (Demographics). - Send statements to them (optional). Tick
Send statements to the guarantor: “Emailed and printed statements and payment reminders go to {guarantor}, addressed to them, instead of the patient.” It is off by default. - Record the patient’s agreement. For an adult patient, choose
How the patient agreed(Told us (verbal),Signed form (written)orElectronically) and theDate the patient agreed, then save. Hero records who entered it.
- The guarantor must be someone other than
Self, with a name and an email or mailing address. Otherwise saving says “Choose who the guarantor is (someone other than Self) before sending statements to them.” or asks you to record the agreement. - For a patient under 18 the box isn’t offered: “Statements for a patient under 18 already go to the parent or guardian.”
- While it is on, the statement preview and PDF read Bill to the guarantor and For the account of the patient. Staff statement emails, automatic statements and payment reminders all go to the guarantor. If the guarantor has no email, an emailed statement fails with a billing alert instead of going to the patient.
Run membership & subscription billing
The Subscriptions tab (under Programs in the sidebar) — “Manage recurring membership plans and patient billing.” — is the home of recurring revenue, and the primary billing workflow for DPC practices. All money movement runs through your connected Stripe account, so complete Stripe Connect onboarding first. Which visits a membership covers is set per service in the Service Menu (Membership coverage, §5.3), not on the plan.
-
Turn on subscriptions.
The
Subscription Settingscard gates everything. WithEnable subscriptionsoff, the rest is hidden behind “Turn on subscriptions to set payment, cancellation and access rules.” Turned on, it showsAllow patient self-cancelfor portal self-service;Let patients undo a scheduled cancellation(until their paid period ends, a patient who cancelled can keep their membership from the portal);Members can finish portal setup with a balance due; the Grace period after failed payment; When cancelled, access ends —At end of billing periodorImmediately; Access after a failed renewal; Messaging when membership access is restricted; the Booking exception; andAllow staff membership exceptions. The save bar reads No unsaved changes or Unsaved changes besideDiscardandSave Settings. If Stripe Connect isn’t active you’ll see: “Stripe Connect is not active. Plans cannot be published until Stripe is configured in Admin > External Providers > Stripe.” -
Build your plans.
Under
Membership Plans,New Planopens the plan form —Plan name,Amount,Currency, anEverybilling-interval selector, an optional trial, andPlan group (optional): “Plans in the same group appear to patients as one plan with a Monthly/Annual choice. Leave blank to use the plan name without ‘Monthly’ or ‘Annual’.” Plan groups only pair the monthly and annual versions of one plan — there are no household or family plans. Plan cards (for example v1 · Group: adult · Order 1) support edit, publish/unpublish, and archive; published plans list first, and archived ones stay out of the way until you pressShow archived plans (N). Editing a published plan’s price, billing interval, or trial creates a new version for new enrollments; existing members keep their signup price. -
Enroll members.
Under Enroll a patient, use
Find patient(or paste a patient ID), pick a plan, and send the enrollment link:Text link,Email link, orCopy link. The result says where it went (“Enrollment link texted to •••-1234.”, a guardian’s contact for a minor) or why it couldn’t send — for example the patient opted out of texts, there’s no mobile number or email on the chart, or they already have a membership. A patient without a portal account is asked to sign in first, so send a portal invite if they can’t. The patient completes checkout in the patient portal (see Portal payments). To charge a card the patient already saved instead, use Enroll with saved card; a declined first payment shows in amber with the card’s reason — the membership isn’t active until it’s paid — and raises a Membership payment failed alert in the Billing inbox. Unpaid first payments are cancelled automatically after about 2 hours. -
Find and manage members.
The
Member Roster(“Monitor active subscriptions and resolve billing issues.”) lists Member, Plan, Status, Renews, Billing, and Actions, with aSearch by name or planbox that finds “First Last” or “Last, First”. Above the table,Current (n)— the default — lists memberships that still run, past due, unpaid, and incomplete ones first, then active, trialing, and paused;Ended (n)holds memberships that have ended (an empty view reads “No ended memberships.”);Allshows both. The search works inside the view you picked. Statuses read Active, Trial, Payment overdue, Unpaid, Paused, Setup incomplete, Setup expired, or Ended, and the Billing column names the latest invoice ($99.00 · Unpaid). Per-member actions:Detailsexpands anInvoice timelinewith per-invoice status and hosted Stripe invoice links;Cancelopens theCancel membershipmodal with a proration/access preview, the Cancellation timing, a Reason (Patient requested,Payment issue,Plan fit,Staff review,Other), Notes, Email notification requested, and a Confirm access end date checkbox you must tick — cancelling doesn’t refund or prorate dues already paid, and a dues refund is a separate action described below. The dialog closes with itsClosebutton, ×, Esc, or a click outside — asking “Discard unsaved changes?” if you typed Notes — and can’t be closed while the cancellation is running.Resumeundoes a scheduled period-end cancellation; andCollectretries the open invoice immediately (enabled only while the latest invoice is open). Active and trialing members also haveChange plan,End trial now(trials), andPause payments/Resume payments(active members). A member who owes a payment — the same members the recovery queue lists — gets Payment link:Text link·Email link·Copy linkunder the row’s buttons, with the result line under it; paid members’ rows have no payment link. -
Work the recovery queue.
The
Payment recovery queuehighlights members with failed invoices, each with its status and the card’s decline reason (Setup incomplete · Your card was declined.) andText link/Email link/Copy linkto send the patient a payment link; rows flagPayment recovery needed,Cancels at period end,Plan no longer offered, andSnapshot needs staff review, alongside Stripe sync health. The queue doesn’t follow the roster’s view or search: it keeps every member who may owe a payment, including an ended membership that still owes. Staff with the access-override permission can useRecord overrideto grant temporary access while billing is being fixed — care continues, the invoice gets chased.
Customize columns. It shows the membership status with how long the patient has been a member (for example Active · 1 yr 3 mo, Trial, Dues overdue, Paused), the date that matters next under it (Renews {date}, or Ends {date} for a cancelled membership), and Not a member for patients without one. In DPC practices the visit preview’s Saved card & membership section is on by default for staff who handle money.
Membership Health card — active paying members, gross MRR, trialing members, past-due-after-grace and grace-period counts, scheduled cancellations, canceled this month, top churn reason (in plain words, such as Patient requested (3)), and failed invoice recovery. Net MRR and MRR at Risk aren’t on that card; they are summary cards in the DPC block above it, alongside Active Paying Members and One-off Patient AR. The Membership Report quick report exports the roster, snapshots, invoices, and cancellation reasons (see the Billing Monitor).
Refund dues in Hero
In Subscriptions → Membership refunds and payment notices, an administrator or staff member with billing-settings permission can turn on Allow membership dues refunds in Hero and choose Save membership settings. It starts off. In a member’s Details, authorized staff choose Refund dues on a paid invoice, enter the amount and Reason for refund, then Review refund and Confirm refund. The dialog shows paid, refunded, pending, and remaining refundable amounts.
The refund returns to the original payment method without cancelling the membership or changing access. Wait for the recorded outcome; use Refresh refund status if it is pending or needs review. Invoice history retains earlier refunds after the practice turns the feature off.
Send payment-failure notices
In the same settings card, Email members when a dues payment fails starts off. Turning it on covers new failures, not the existing overdue backlog. Set Email send window in practice time, Days before grace ends, whether to Include the amount due in emails, and the practice wording. Preview email sends nothing; Save membership settings applies the changes.
Hero sends a failure notice, a reminder before grace ends, and an access notice only when membership-covered booking becomes restricted. Stripe’s retries and its own emails are separate. Staff who manage memberships can use a member’s Payment notice preferences to select Do not send payment notices or change Amount in payment emails.
Require a signed membership agreement
Under Subscriptions → Membership agreement, an administrator or staff member with billing-settings permission enters Practice agreement text, turns on Require a signed membership agreement before enrollment, and uses Save membership agreement. It starts off. One practice agreement covers all plans; Hero adds the selected plan’s price, renewal, trial, and cancellation details. Saving changed wording creates a version and does not automatically ask existing members to sign again.
- Request the signature for the intended enrollment or change. Use
Request agreement signature, then share theSecure signing linkor send it using the available email/text controls. The authorized patient or guardian must sign before staff confirm an enrollment, plan change, or trial conversion that requires agreement. - Explain the patient’s step. In the portal the patient chooses
Review membership agreement, reads the terms, accepts electronic signing, enters their name, and selectsSign agreement. Signing alone does not enroll the patient or charge a card. Complete the separate enrollment or change afterwards. - Check and retain the signed version. Use
Refresh agreement status,Review agreement text, andDownload signed agreement. The panel shows document and email-copy delivery separately; useRetry documentorResend signed copywhen offered. Existing members can be asked to sign without changing their membership or charges.
More on memberships: Introductory offers and temporary member discounts and Registration fee and a later billing start date.
Bill the APCM program
APCM (Advanced Primary Care Management) is an opt-in module: the tab is absent until an admin enables it under Additional Features, and it shows only for users with billing dashboard or AR permission. Once on, it manages the full monthly cycle — enrollment, consent, care plans, and G-code billing — across four sub-tabs:
-
Watch the dashboard.
The
Dashboardsub-tab shows tier counts —Enrolled,G0556,G0557,G0558— plusMonthly Revenue, anAlertscard, and anUpcoming Generationcard with a month picker andPreview Generation/Generate Nowbuttons. -
Enroll patients.
Enrollmentshas three views:Enrolled (N),Pending review (N), andEligible (N). From Eligible, select patients and clickEnroll selected (N); from Pending review, bulkApprove (N)orReject (N). Each enrolled row shows Tier,Chronic conditions, Last appt,Coordinating provider, Status, andConsentbadges, with aManagelink to the enrollment detail. An auto-enrollment settings card can scan for eligible patients automatically or on demand (Scan now); the Eligible table showsEst. tierandEst. / morevenue. -
Capture consent.
When you enroll or approve patients, choose a
Consent method:Written consent(an e-signed agreement) orVerbal consentdocumented by staff. A sent invitation is still pending until the patient signs. TheConsentbadge on each enrollment reflects pending vs. obtained consent (with method and date), and the signed consent PDF files to the patient’s media tab. -
Generate and track billing.
Generate Now(orPreview Generationfirst) creates the month’s APCM billing events. TheBilling Historysub-tab lists them by month with Patient, Code, Amount, Status, and Generated columns and aRefreshbutton. Generated events flow into the normal claims pipeline as G-code charges. -
Keep care plans current.
The
Care Planssub-tab manages each enrollment’s plan —Goalswith+ Add goal,Interventionswith+ Add intervention, andSave Care Plan— and surfaces aMissing Care Planslist, since care-plan documentation supports the billed codes. When your practice has turned on Value-Based Care, this sub-tab opens the shared care-plan editor instead, with drafting from the chart, clinician review, and monthly approval — see Care plans.

Upcoming Generation card that creates the month’s billing events.Introductory offers and temporary member discounts
Two kinds of membership discount live in Billing → Subscriptions (§5.12). An introductory offer belongs to a plan and gives first-time members a discount on their first payments. A temporary discount is one a staff member gives one member, with a reason. Both are off until you set them up, and both take money off the membership dues only.
Give a plan an introductory offer
- Open the plan. Under
Membership Plans, useNew PlanorEditon a plan, and findIntroductory offer. - Turn it on. Tick
Offer new members a discount on their first payments: “For first-time members only. A free trial doesn’t use up the offer. Changing it only affects people who sign up afterwards; current members keep what they signed up with.” - Set the discount.
DiscountisPercent off(1 to 100) orDollar amount off(no more than the plan’s price), andDiscounted paymentsis how many payments get it (1 to 24). A free plan can’t be discounted. - Limit the sign-up window if you want.
First sign-up dayandLast sign-up dayare optional; “Sign-up days follow the practice’s time zone.” - Check what patients will read, then save. The form shows the sentence patients see, for example “Patients see: 50% off your first month, then $59.00 per month.” (with (once the plan is published) on a draft). The plan card then reads Introductory offer (first-time members): … with its window (All new sign-ups, Sign-ups from …, Sign-ups through …), and Not started yet or Sign-up window ended when it applies.
Who gets the offer
- Only patients who never had a membership at your practice that actually started. An abandoned sign-up (a first payment never completed) doesn’t count against them.
- When staff enroll a returning member, the review says “The introductory offer is for first-time members.”, and the portal doesn’t show them the offer.
- Free trial days, and the time before a later billing start, don’t use up discounted payments; neither does a registration fee.
What the patient sees
- In the portal, the plan shows the offer sentence, and Sign up by {date} to get this offer. when it has a last sign-up day. The terms the patient accepts repeat it.
- If the price, fee, billing start date or offer changes after the patient opened the plan, nothing is charged: “The price or sign-up terms for this plan changed. Review the updated terms and try again.”
- A member’s membership page shows an active discount.
Give one member a temporary discount
- Turn the setting on. In
Subscription Settings, someone who may change billing settings turns onAllow staff to give temporary discountsand saves: “Staff with the membership refunds and credits permission can take a percent or dollar amount off one member’s next payments, with a reason. Discounts already given can always be ended.” It is off by default. - Open the member. In the
Member Roster, pressDetails. TheDiscountpanel reads No discount. and offersGive a temporary discount. Only an active, trialing or past-due membership can get one. - Fill it in. Choose
Percent offorDollar amount off, the amount,Discounted payments(1 to 24), aReason(for example Financial hardship) and an optionalNote. The preview reads, for example, “20% off the next 3 payments, then $79.00 per month. The patient sees this in their portal; the reason and note stay internal.” - Press
Add discount. Hero confirms Temporary discount added. While it is being confirmed with the payment processor the panel says so; refresh in a few minutes.
A member can have one discount at a time. The roster row shows it under the plan, such as 20% off · 2 of 3 left. To stop it early, press End discount in the member’s details: “End this discount now? The next payment is charged at the regular price.” Changing a member’s plan ends their discount too, and the plan-change preview says so; the new plan’s introductory offer is only for new sign-ups. Giving and ending discounts needs both permission to view memberships and the membership refunds and credits permission.
Discount alerts
When a discount isn’t behaving, Hero puts an item in the Billing inbox for staff who can view memberships, and clears it by itself once the problem is fixed: Membership discount still applied after its last payment, Membership discount took $0 off a payment, Membership discount missing in Stripe, Membership discount not applied, and Discounted membership payment voided after the discount ended. The member’s history lists discount events in plain words, such as Discount added, Discounted payment, Discounted payment voided and Discount ended (payments used up).
Registration fee and a later billing start date
Each plan can have a one-time registration fee, and a date its membership billing starts, for example when a practice opens for members on January 1 and wants people to join in December. Both are in the plan editor under Registration fee and billing start. Both are optional and empty by default; “Changes affect people who sign up afterwards; current members keep what they signed up with.”
| Field | What it does |
|---|---|
Registration fee ($) | “Charged once at sign-up, even with a free trial or a later billing start. Discounts never apply to it.” From $0.01 to $10,000. A plan with a fee needs a card at sign-up, even a free plan. The plan card reads $29.00 registration fee at sign-up. |
Membership billing starts | “People who join before this date (the practice’s time zone) are first charged for the membership on it, instead of any free trial. From that day on, the plan works as usual.” The plan card reads Membership billing starts January 1, 2027 while that date is ahead. |
Members can use their membership before billing starts | Shows once a billing start date is set; off by default. “Off: people who join early get covered visits and member messaging from the billing start date. On: from the day they join.” |
The editor previews the patient’s wording, for example “Patients see: $29.00 registration fee due at sign-up. Membership billing starts January 1, 2027. Membership benefits begin on that date.” When staff enroll a patient, the review lists the Registration fee, when membership billing starts, and Due today. In the portal, the plan shows the fee due today and when billing starts, instead of a free-trial badge.
Members who joined before billing starts
| Where | Benefits begin on the start date | Benefits begin when they join |
|---|---|---|
| Member Roster status | Not started, with Membership starts January 1, 2027 | Billing not started, with Billing starts January 1, 2027 |
| Chart header chip | Membership starts January 1, 2027 | Membership · Billing starts January 1, 2027 |
| Calendar Membership column | Not started · Membership starts Jan 1, 2027 | Active · Billing starts Jan 1, 2027 |
| Patient portal | Not started yet, Membership starts January 1, 2027, and a banner: “Your membership starts January 1, 2027. You can book membership visits on or after January 1, 2027 now.” | Billing not started and Membership billing starts January 1, 2027 |
- Booking before benefits start. While a member’s benefits wait for the start date, a membership visit can be booked for a day on or after that date, but not before it. A patient who picks an earlier day reads Your membership hasn’t started yet; staff are told “This patient’s membership hasn’t started yet; visits on or after its start date can be booked as membership visits.” Moving a visit to an earlier day is refused the same way, unless staff use their usual booking override. Member messaging also waits for the start date.
- Start billing early. In the roster, such a member has
Start billing now(instead ofEnd trial now). The dialog says billing starts now at the plan price, that the saved card may be charged immediately, and when billing currently starts. Starting billing early also starts the member’s benefits. - Introductory offers discount the first billed payment, on the start date; the time before it doesn’t use up the offer.
- Renewals fall on the same calendar date in your practice’s time zone as the billing start, even across daylight-saving changes.
Bill, report and reconcile by department and legal entity
A practice that runs several departments, sometimes under different businesses (legal entities, each with its own tax ID), sets them up in Admin → Departments. Once departments are on, billing keeps track of which department and business each charge and claim belongs to. Practices without departments see none of this.
What is recorded
- Each claim and charge keeps the department and legal entity of its visit when it is created; secondary and tertiary claims keep the original’s.
- That record doesn’t change later: a stamped visit keeps billing under it even if departments are turned off.
- In the Claims Pipeline, claim rows, claim detail and
Needs Reviewcharges show Billed by {legal entity} with the department. - Statements, invoices, receipts and the patient’s portal charges label each line Department · Legal entity.
Manual charges
- When you issue a charge in Patient Information →
Invoices & Charges, aDepartmentfield says which department, and its business, the charge is billed under. - A charge for a visit defaults to Use the visit’s department.
- An account charge (no visit) needs one: Choose a department for this account charge.
Collect differently by department
What a visit collects (copay or deposit, the office copay tier, billing-type rules, the saved-card rule, patient responsibility, and cancellation and no-show fees) can differ by department. Each department’s own sections are set in Billing → Collections & Fees with the Settings for bar, and a visit follows the department it is booked in. See Collections & Fees by department.
Filter reports and remittances
- Reports. In
Billing → Reports, theAR Aging Report,Revenue & Collections Summary,Provider Productivity,Visits by departmentandWork RVUstake aDepartmentfilter (All departmentsor one) and aLegal entityfilter (All legal entitiesor one). Money is counted by the department and business recorded on each claim or charge; visit counts by each visit’s department. With no filter, a report is the same as before. The filters you used are named next to the date range of the result. - Your working department. If you have chosen a working department, the
Departmentfilter starts on it and says Showing {department} only, withAll departmentsto show everything. - Reports for departments. With departments on, three reports are added to Practice Health → Reports:
Patient payments by legal entity(patient money collected and refunded in the period, split by the business that billed each charge, for settling between bank accounts; money not on a charge with a legal entity is Unattributed (no legal entity)),Visits by department(appointments completed, missed, cancelled and still open), andWork RVUs(work and total RVUs of primary claims by service month). The last two have aGroupchoice:By department,By legal entityorBy provider. - Remittance History. In
Billing → Payments,Remittance Historyhas aLegal entityfilter and names the legal entities of the claims each check paid. When the payer’s payment file names a payee tax ID that isn’t the tax ID of those claims’ legal entity, the row is flagged Payee TIN ending 1234 doesn’t match: “Check the payer’s enrollment.” The flag is information only; it doesn’t hold or move the payment.
Move a claim to another department
Correct & Refile (§5.9b) has a Bill under department choice. A department under the same business sends a replacement claim as usual. A department under another business can’t replace the original claim with the payer, so Hero sends a new claim under the new business instead, and holds it while the payer has paid on the original: “New claim under {business}, held: {payer} paid the original”. The steps it lists are to ask the payer to void the original and take the payment back, and, when the take-back posts in Hero, to release the held claim from Ready to Send. If the original claim can’t pay at all (for example the payer denied it by phone), the claim’s hold panel takes a note under The original claim can’t pay because… and Record reconciliation and release; the note is saved in the claim history. That way the practice is never paid twice.
Work payment lines that didn’t match a claim
A payer’s electronic payment file (ERA) lists each claim it paid by the claim number Hero sent. When a line names no claim Hero knows, Hero keeps it instead of dropping it, and lists it under Didn’t match a claim in Unposted Remittances (§5.10). In Remittance History, the check reads 2 didn’t match a claim, and each such line says Work it in Unposted Remittances → Didn’t match a claim.
Each line shows the claim number in the file, the payer claim number, the service date, and what was Billed, Paid and left as Patient share, with why it didn’t match:
| You see | What it means |
|---|---|
No matching claim | No claim in Hero has that claim number, or the file has none. Post it to the claim it belongs to, or close it if nothing needs posting. |
Claim voided or replaced | The claim the payment names was voided or replaced in Hero. Post it to the claim it belongs to. |
Filed outside Hero | The claim was filed outside Hero, so there is nothing to post here. |
Already on another claim | The payment is already on a claim from an earlier copy of this file. Correct it there first, then close this line. |
May already be posted | The check has identical payment lines and one is already posted; Hero can’t tell which, so check before posting. |
Payments for claims filed in your previous billing system. After a move to Hero, payers keep paying claims your old system sent. For a practice that moved from CharmHealth, Hero support can turn on a setting that matches those payments to the old system’s visit, creates the claim in Hero and posts the payment automatically; practices can’t turn it on themselves. When Hero can’t do that safely, the line stays here with the reason, for example Not posted from the previous billing system: …, so you can post it yourself or close it.
- Post it to the right claim.
Post to claim…listsLikely claims(for example Has this claim number, Hero filed it under this number before, Same payer claim number), or search underFind the claimby claim number or patient name. If the billed amount or payer differs, Hero says so: “Post only if this is the claim the payer paid.” PressPost $X to {claim}. If posting would put more on the claim than it billed, Hero asks once, withPost anyway. - Or close it.
No posting neededasksWhy nothing needs posting(for example, the payer sent another practice’s claim, or a paper EOB for it is already posted), thenClose without posting. Nothing is posted, and the line records who closed it, when, and why.
Close as repeat – nothing posted. It closes the copy with a note and posts no money. When Hero isn’t sure it is a repeat, the same button first asks you to confirm it with the payer.Pay Hero’s invoice by bank account, and verify micro-deposits
Your practice’s own Hero invoices, and the bank account that pays them, are in Admin > Usage / Invoices → Payment Method. Administrators can open it; staff need permission to view Usage / Invoices, and only administrators and staff allowed to manage it can make changes (everyone else sees “You have read-only access to billing settings.”).
- Connect the bank. In
ACH bank account, pressConnect bank account(orUpdate bank account). Add aContact namefirst if Hero asks for one. A secure window opens: find your bank and sign in to it to verify the account instantly. - Read the result. “Bank account connected and verified — automatic invoice payments are ready.” means you are done. If your bank can’t be verified instantly, the account is verified with micro-deposits instead: “Micro-deposits were sent to your bank. Verify the amounts to finish (1–2 business days).”
- Turn on automatic payment. Under
Automatic payments, switch onAuto-charge invoicesto charge the connected account when an invoice is due.
Verifying the micro-deposit amounts
Hero EMR has no field for typing the micro-deposit amounts. To finish, either:
- Press
Update bank accountand connect the same bank by signing in to it in the secure window, which verifies it instantly; or - Contact Hero support to finish verification.
While a new account waits for verification, a bank that was already connected and verified keeps paying your invoices, so automatic payment isn’t interrupted. Invoices on the same page lists each invoice with View (opens it online) and PDF. Invoice emails go to the Contact email under Billing contact; press Save contact after changing it.
Need help? Email support@heroemr.com.