Shuffle mode — mass rescheduling
When a provider calls in sick, move the whole day in one reviewed batch: select appointments, drag or bulk-move them, watch the staged queue and its conflict badges, then apply everything at once and tell every patient.
Shuffle mode — mass rescheduling
When a provider calls in sick, move the whole day in one reviewed batch: select appointments, drag or bulk-move them, watch the staged queue and its conflict badges, then apply everything at once and tell every patient.
Move a whole day of appointments in one reviewed batch
A provider calls in sick at 7 AM. Eighteen patients are on the books. Rescheduling them one at a time means eighteen rounds of open–pick a slot–save–then call or message the patient, with no way to see the whole plan before you commit to it and no consistent story reaching patients.
Shuffle mode is an editing mode on the calendar built for exactly that morning. Turn it on and the calendar becomes a staging area: you drag appointments to new slots, or select a group and hand it to a bulk action, and every change piles up in a queue on the right. Nothing is written to the schedule until you press Apply. Until then you can drag the same visit five times, undo, redo, or walk the whole thing back.
When you do apply, the entire batch is committed together and Hero can send one message per patient — by email, text, portal message, or any combination — explaining what changed, with each patient’s own name, provider, and times filled in.
Staged, not saved
Every drag and every bulk action queues a change. The schedule, the patient, and the portal see nothing until you apply. Exiting the mode without applying throws the whole plan away.
One batch, one message
Apply commits every staged change in a single request, then sends one message per patient — not one per appointment — so a patient with two moved visits is told once.
Shuffle mode works in all four calendar views — Day, Team, Week, and Month — and layers on top of the normal calendar covered in Using the calendar. It is a rescheduling tool only: it never creates appointments and never opens a chart.
scheduling.manage permission (see Staff & assistants); a staff member with view-only scheduling access never sees the control, and the server enforces the same permission again when the batch is applied. Physicians have it by default.
The shuffle button, and the prompt that protects your work
The shuffle icon — two crossing arrows — is the last button in the right-hand cluster of the calendar toolbar, after the list-layout, export, and hide-resolved buttons. It has no text label; hovering it reads “Shuffle mode: drag & multi-select appointments, stage the changes, then apply them all at once.”

You can also press S — on its own, no modifier — anywhere on the calendar to toggle the mode. Like every shortcut in this manual that is a default you can remap; the full list lives under Ctrl+Shift+?.
Turning it on changes three things at once: a mode banner appears under the toolbar, the staged-changes panel opens on the right, and the action bar docks along the bottom. In Day view an extra checkbox column appears at the left of the table, and the appointment-preview pane is hidden to give the grid its full width.
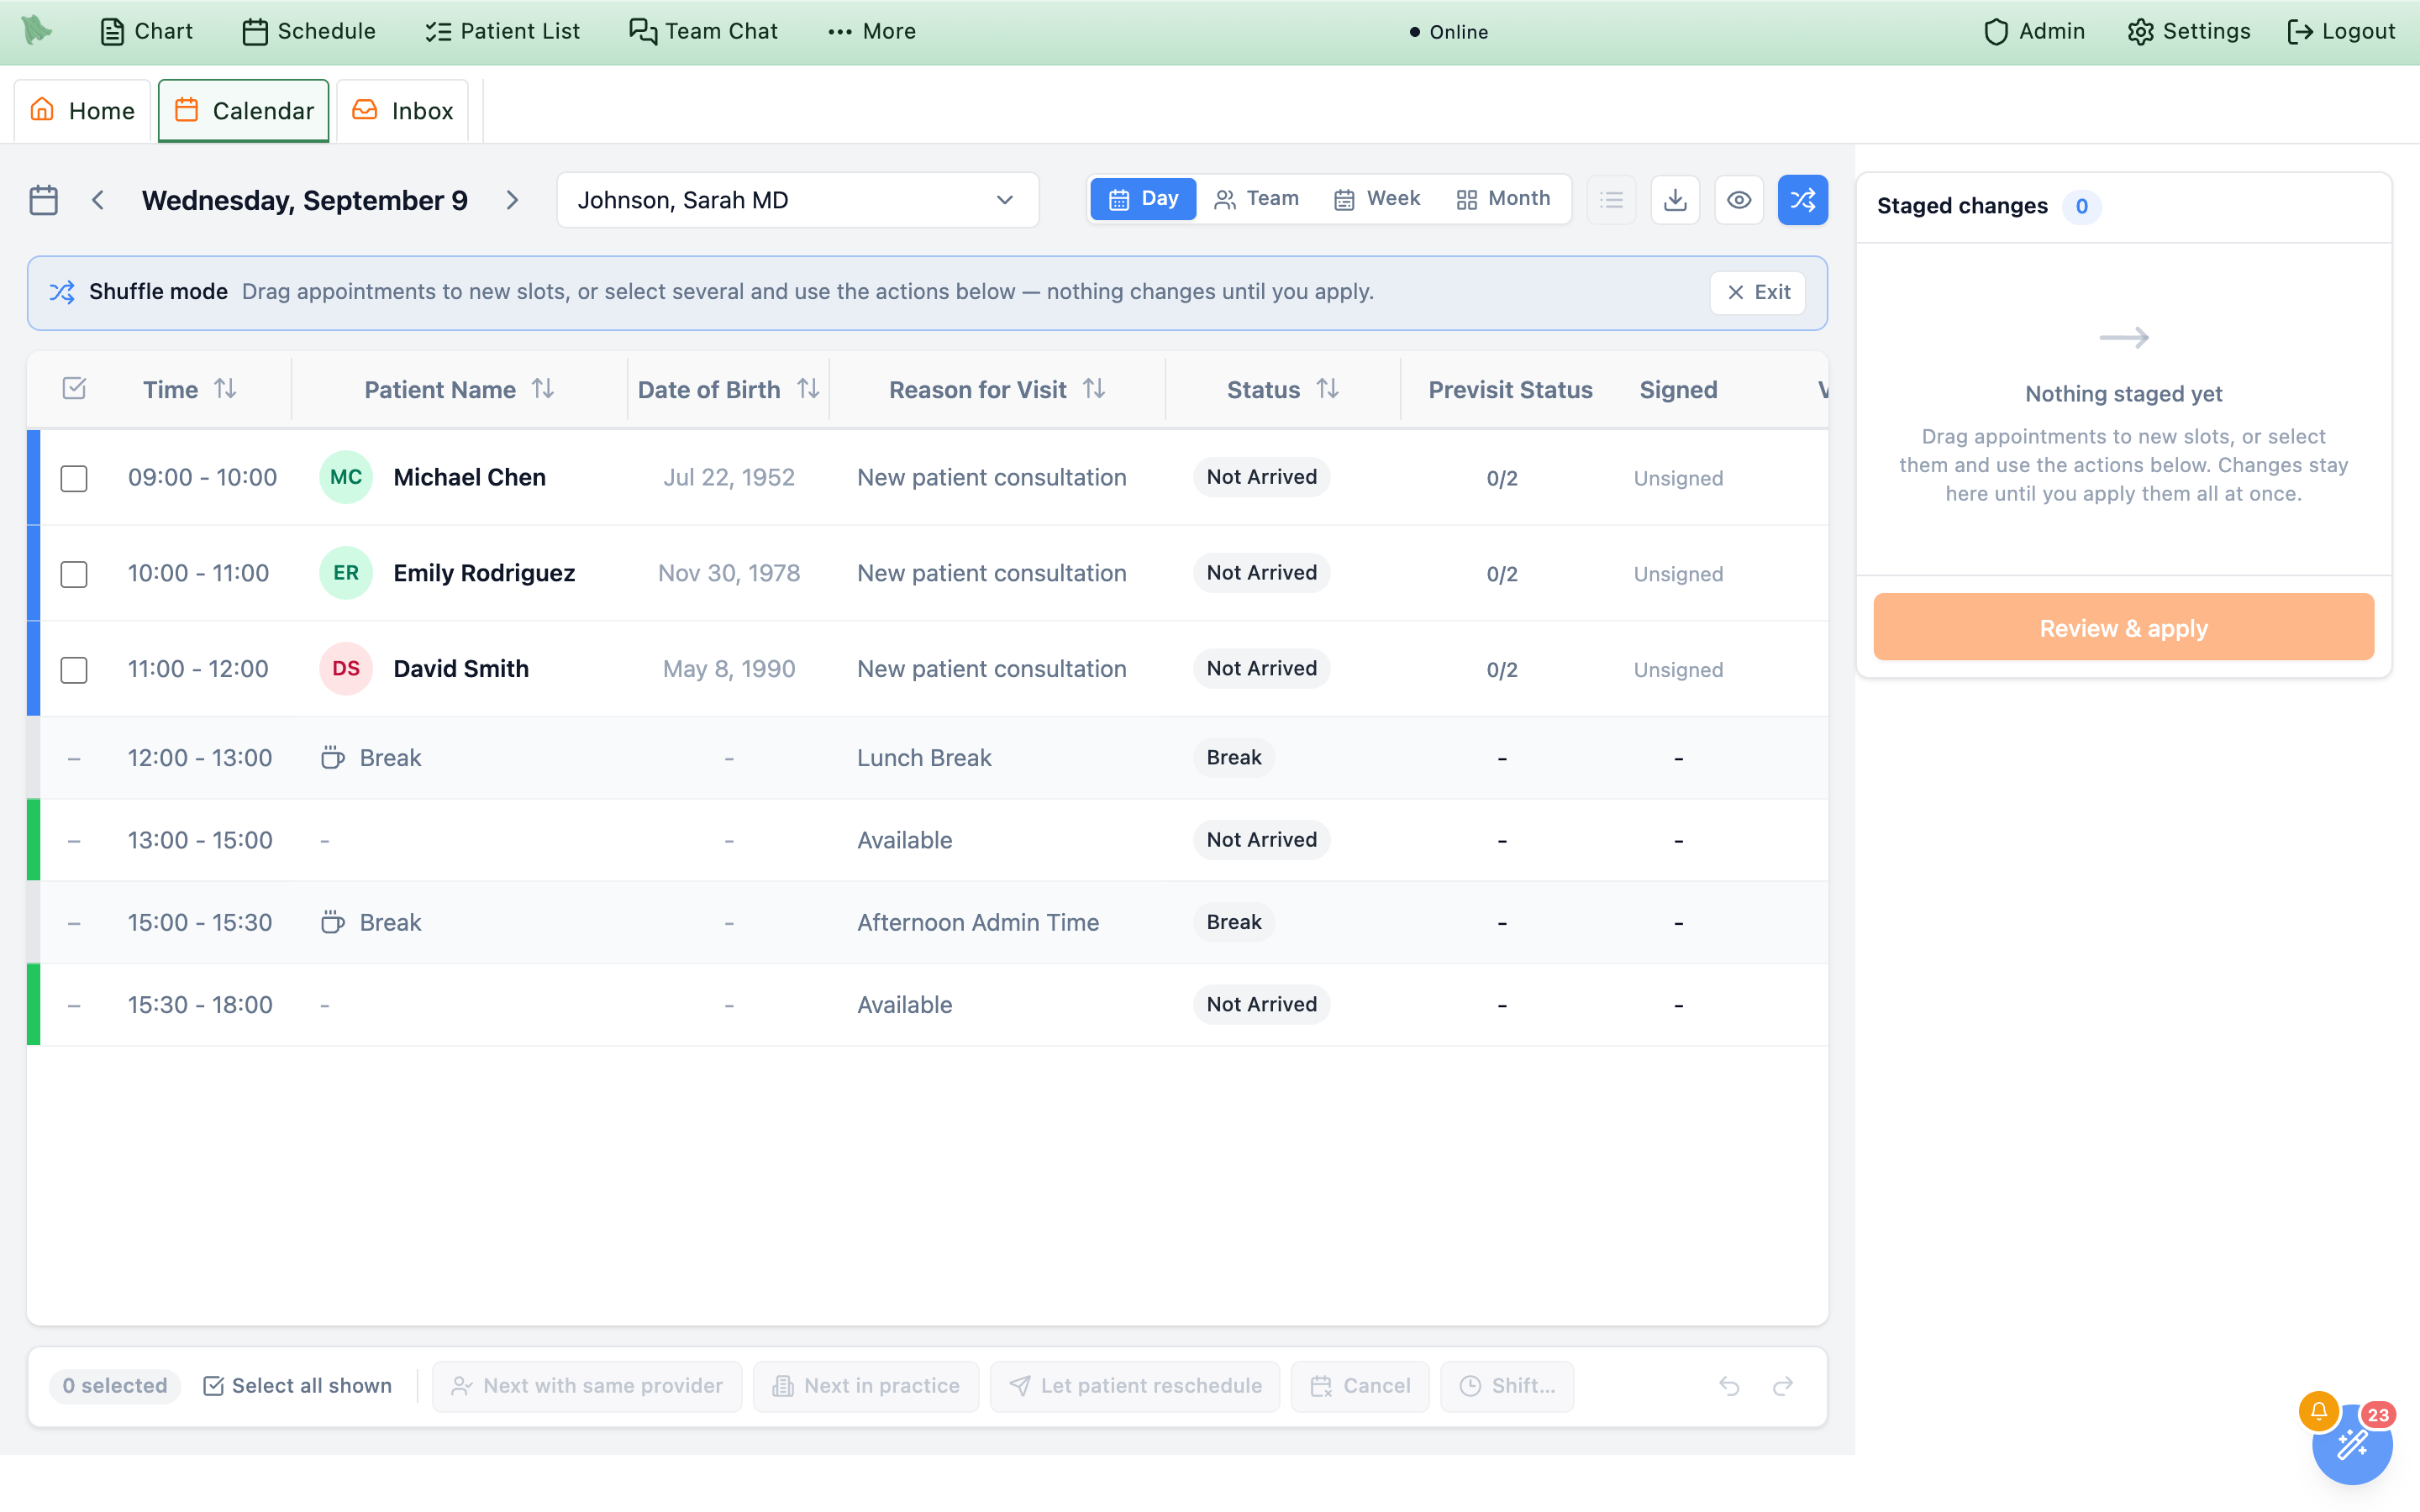
The banner reads “Shuffle mode — Drag appointments to new slots, or select several and use the actions below — nothing changes until you apply” and carries an Exit button at its right end.
Leaving the mode
Three things exit shuffle mode: the Exit button, the shuffle toolbar button again, or Esc. With an empty queue you simply leave. With anything staged you get a confirmation first:
- OK discards every staged change. Nothing was applied, so the schedule is exactly as it was.
- Cancel keeps you in shuffle mode with your queue intact.
Click to tick, shift-click for a run, one button for the day
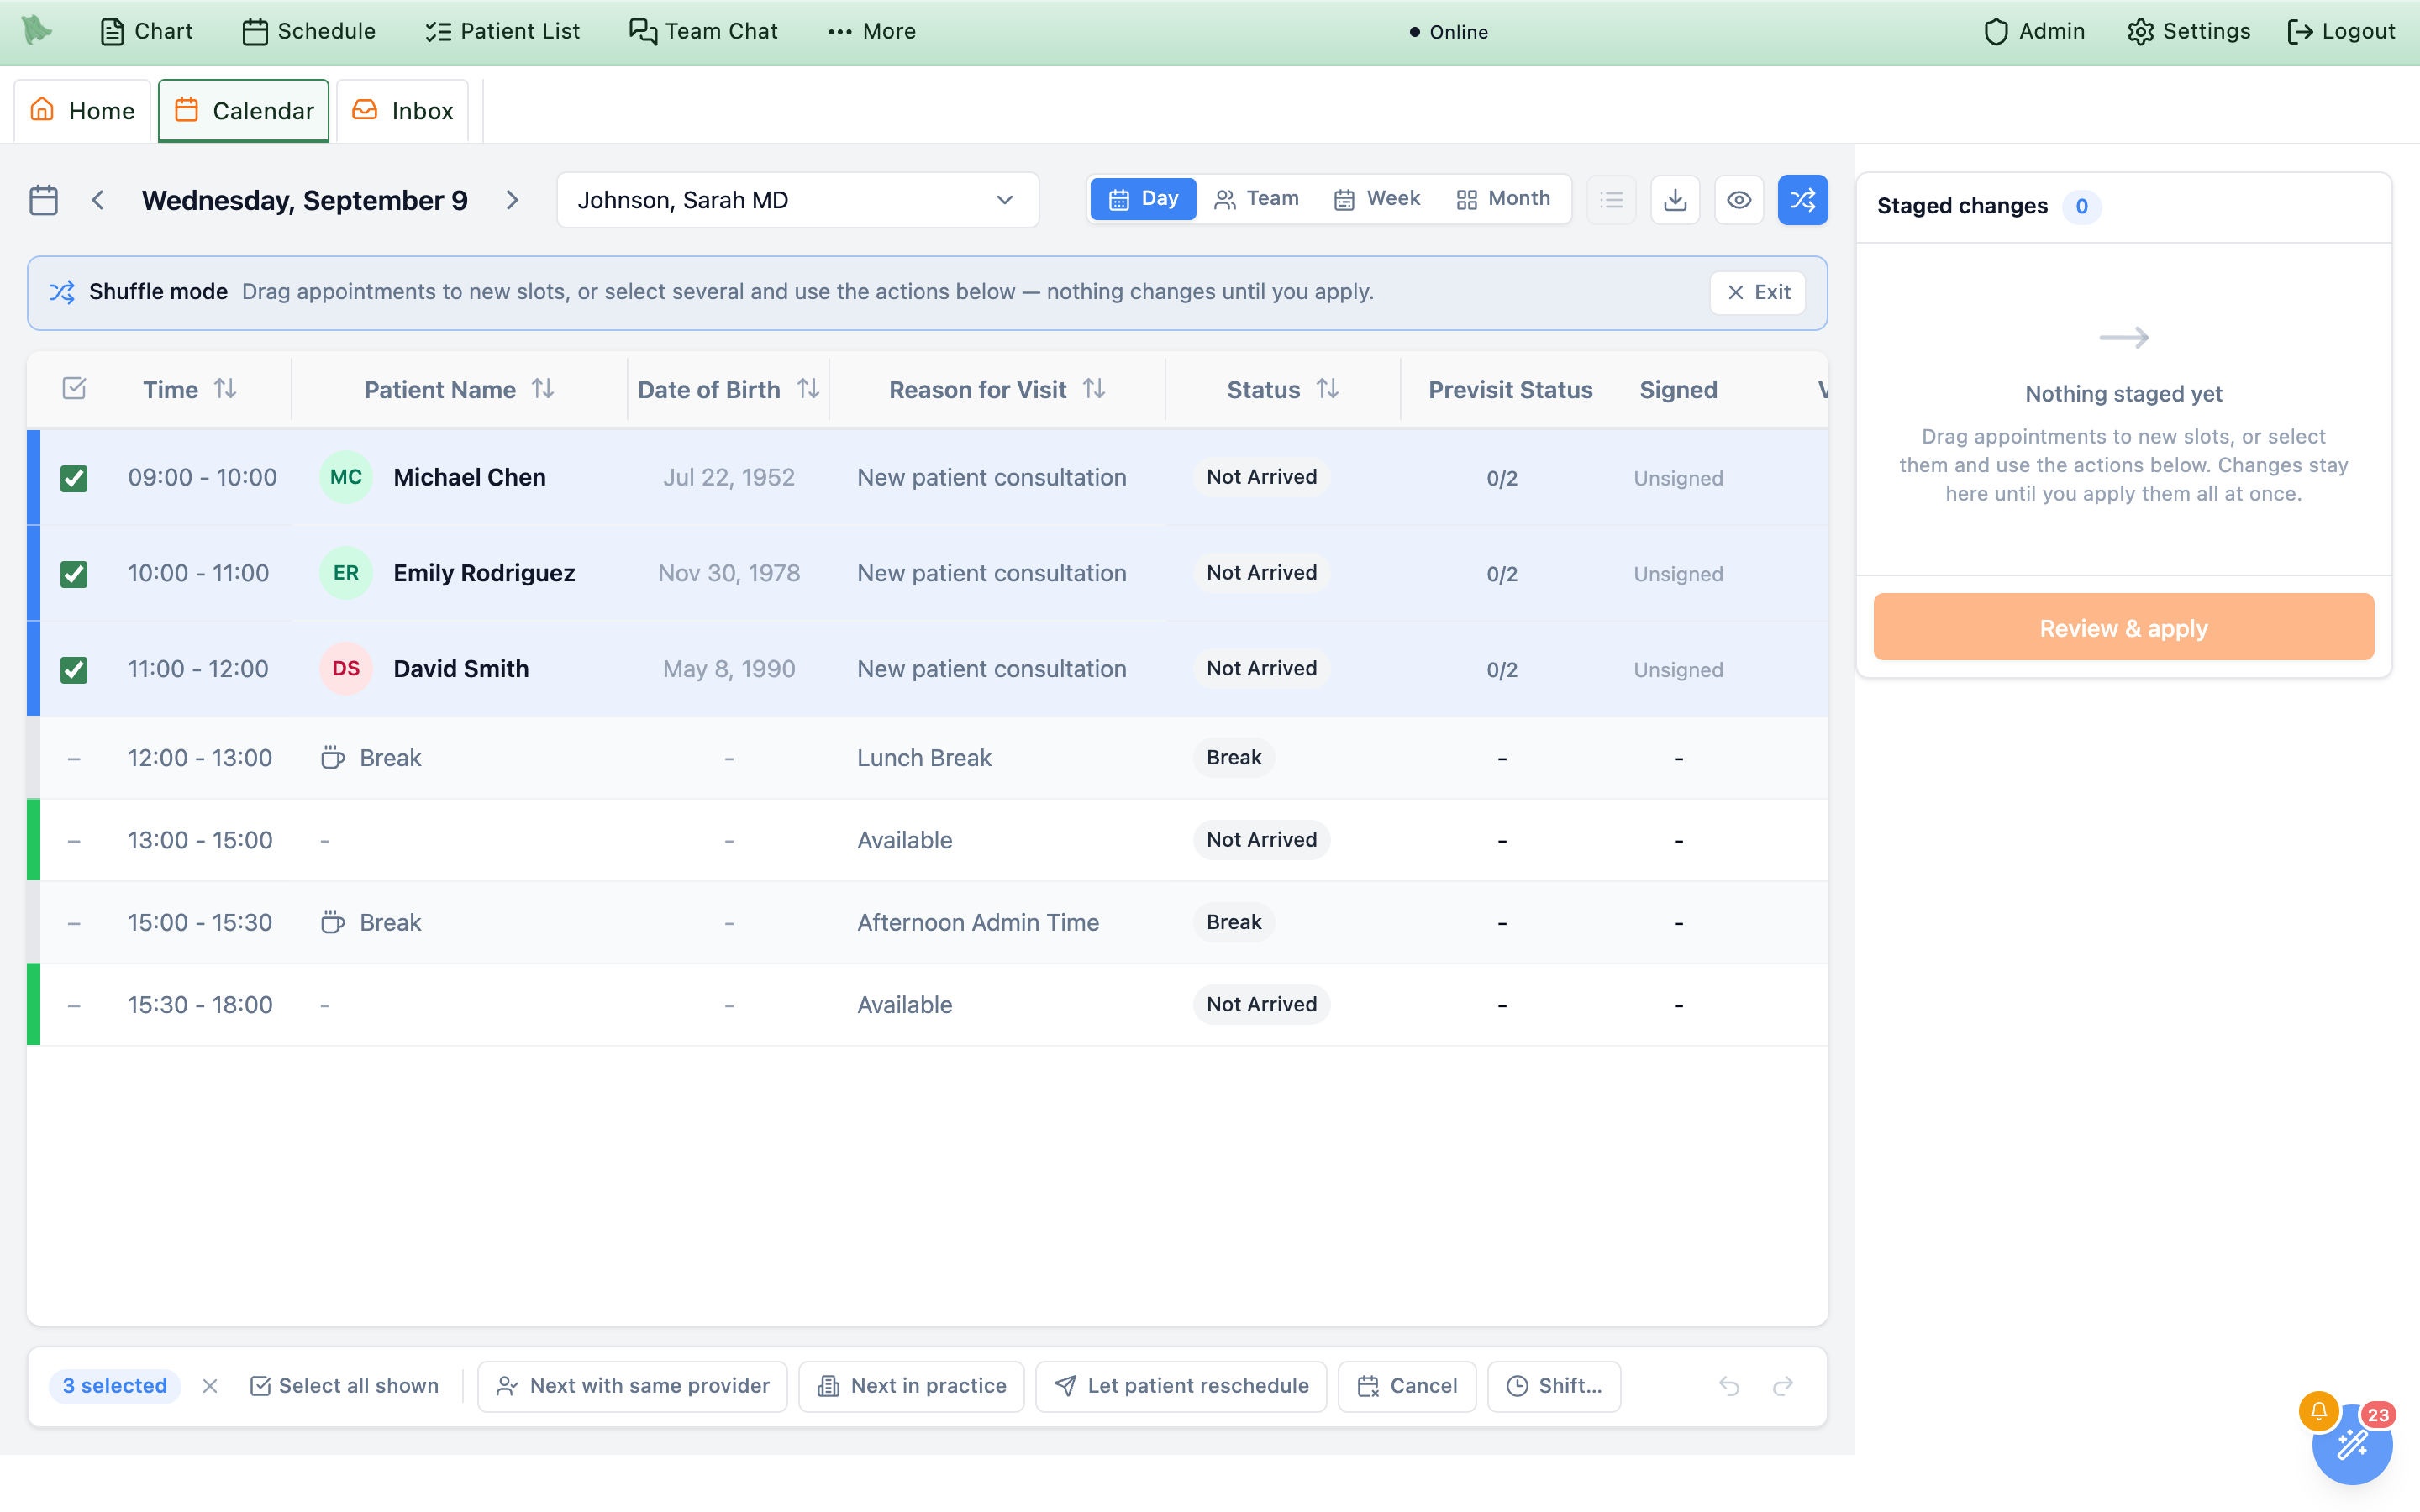
Inside shuffle mode an appointment is a checkbox, not a link. A plain click toggles it in and out of the selection — it never clears what you already picked, and it never opens the appointment. That is deliberate: a stray click must not wipe a selection you spent a minute assembling.
The ways to select
- Click an appointment. Adds it to the selection, or removes it if it was already selected. In Day view you can click the row anywhere — the checkbox in the left column mirrors the state but the whole row is the target.
- Shift-click for a range. Click the first appointment, then shift-click a later one: everything between them in time order joins the selection. The range replaces your selection — hold Cmd/Ctrl as well as Shift to add the range to what you already had. Ranges stay inside one container: one day’s table in Day view, one provider’s column in Team view, one day’s cell in Week or Month.
-
Select all shown. The button next to the count chip adds every eligible appointment in the view you are looking at, respecting your current filters. - Select a whole provider column (Team view). Each provider column header carries a small checkbox icon that selects all of that provider’s appointments for the day. This is the one-click start for the sick-provider morning: open Team view, click that provider’s header checkbox, then pick a bulk action.
- Select a whole day (Week and Month). Each day cell shows a checkbox affordance next to its appointment count — “Select every appointment this day” — which adds that day to the selection. Use it to sweep up a Tuesday and a Thursday together.
The count chip at the left of the action bar reads 3 selected and gains an X that clears the selection. Selected appointments are outlined on the calendar so you can see the set you are about to act on.
Select all shown does not work in Team view. Press it there and Hero tells you to “use the checkbox in each provider column header” instead — because “all shown” across every provider at once is almost never what you mean on a multi-provider day. Select the affected column instead.
What can’t be shuffled
Only booked patient appointments can move. Clicking anything else tells you why and selects nothing:
| What you clicked | What Hero says |
|---|---|
| An open slot, a break, or a placeholder | “Only booked patient appointments can be shuffled.” |
| An event synced from Google or Outlook | “External calendar events are managed in the source calendar.” |
| A visit whose note is already signed | “This visit has a signed note and can no longer be moved.” |
| A cancelled, completed, or no-show visit | “A <status> visit cannot be rescheduled.” |
| The faded original of something you already staged | “This is the original slot of a move you already staged.” |
Checked-in and in-progress visits are excluded for the same reason — only appointments still in a scheduled or confirmed state are eligible.
Drag one visit, or drag the whole selection at once
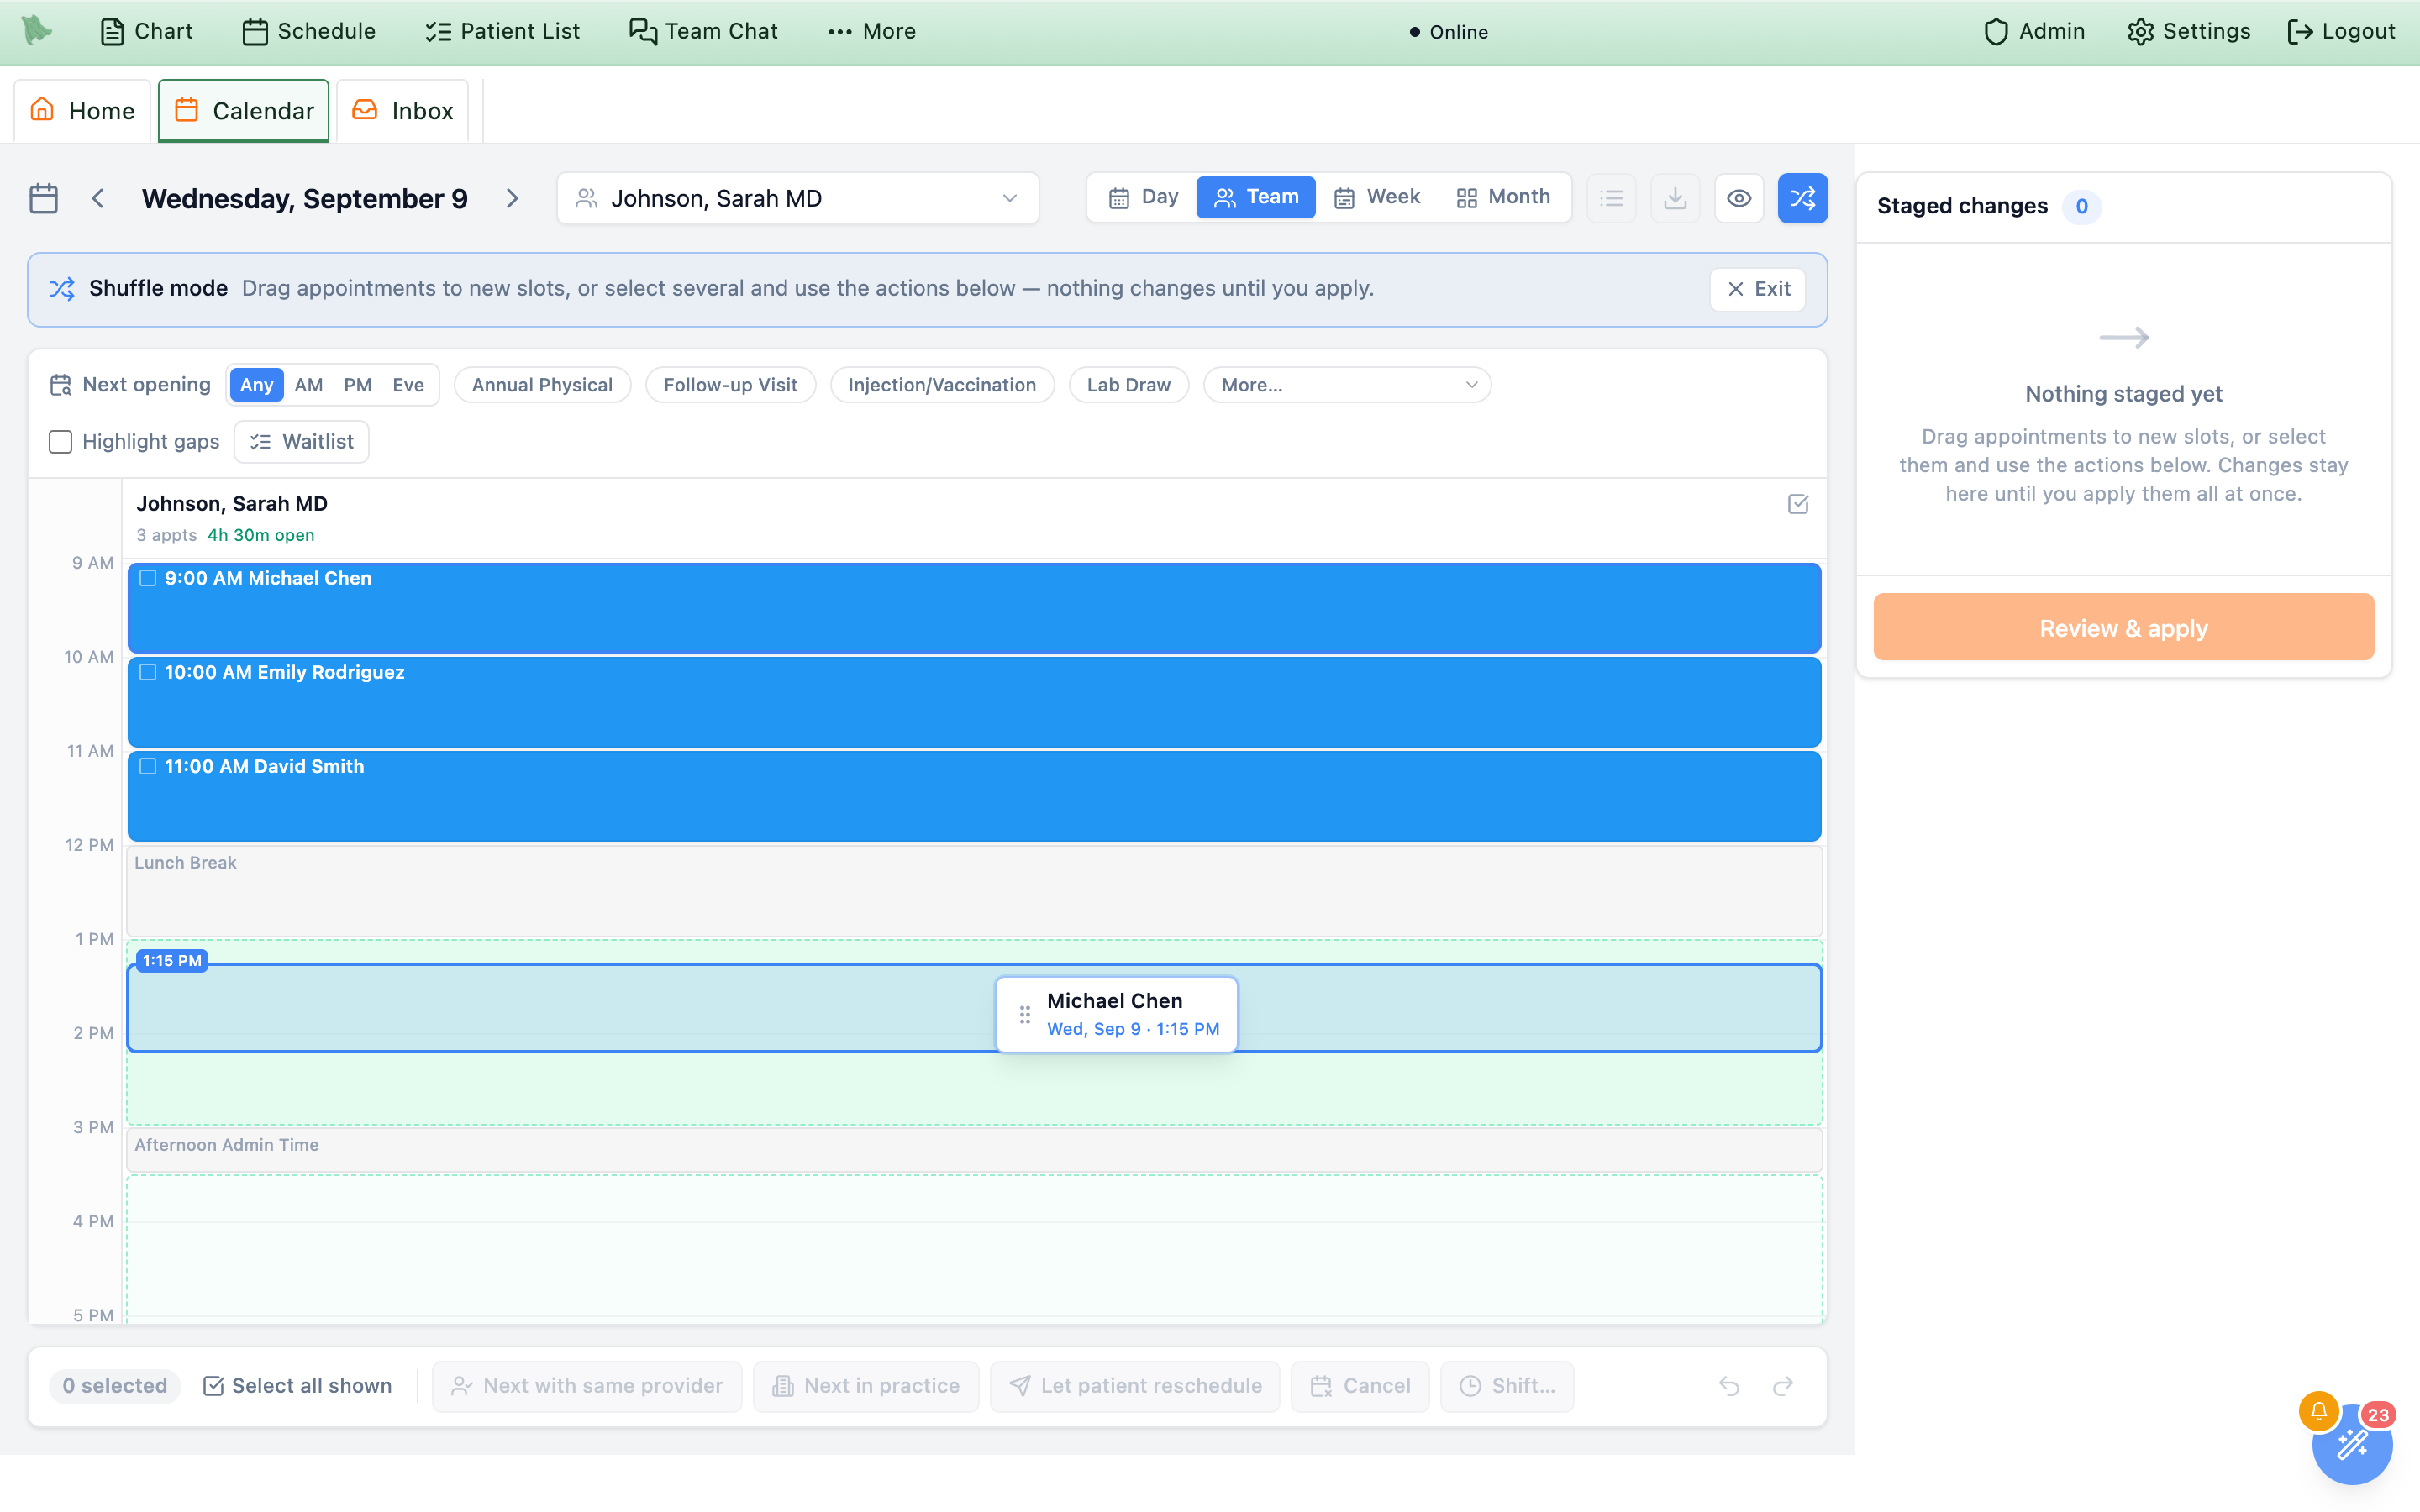
Pick up any eligible appointment and drag it to a new slot. A card follows your cursor showing the patient and the target it would land on, and the slot you are hovering is highlighted. Release to stage the move; the appointment is not saved, it is queued.
How targets work in each view
| View | Drop behavior |
|---|---|
| Day | Drop on any row; the appointment adopts that row’s start time. |
| Team | Drop anywhere on a provider’s timeline. Vertical position sets the time, snapped to 15 minutes; dropping on a different provider’s column reassigns the visit to that provider. |
| Week | Drop on any day column; position sets the time, snapped to 15 minutes. |
| Month | Drop on a day cell. The appointment keeps its own time and only the date changes. |
Week and Month show a single provider, so cross-provider reassignment happens in Team view only.
Group drag
If you drag an appointment that is part of a selection of two or more, the whole selection travels with it. Hero measures how far you moved the one you grabbed and applies that same shift — days and minutes — to everything else, so the day keeps its shape: a 9:00, a 10:00, and an 11:00 dragged forward two hours become 11:00, 12:00, and 1:00. The card beside your cursor reads “Moving 3 appointments” instead of a patient name.
Drag a group across provider columns in Team view and every member is reassigned to the column you dropped on.
Ghosts, snapping, and taking it back
- The original slot keeps a faded grey ghost of the appointment so you can always see where it came from. Ghosts can’t be clicked, dragged, or selected.
- Times snap to 15-minute increments, and a drag can’t push a visit outside the column’s working hours.
- Dropping an appointment back on its exact original slot un-stages it — the queue card disappears and the ghost is reabsorbed. It is the quickest way to change your mind about one visit.
- Releasing anywhere that isn’t a valid slot stages nothing; the card reads “Drop on a calendar slot” while you hover dead space.
Five ways to re-home a selection without dragging
Dragging is right for a handful of visits. For a whole day, use the action bar along the bottom — every button acts on the current selection and, like a drag, only stages.

Next with same provider
Stages each selected appointment onto its own provider’s next open slot — the earliest free slot from now onwards that fits the visit’s own duration and type, searched up to 60 days ahead. Hero looks up the whole selection in one pass and makes sure the proposals don’t collide with each other, so a full day can be re-seated with one press. Use this when the provider will be back and you just need their patients later in the week.
Next in practice
Same idea, but the search fans out across every provider in the practice who offers that visit type, and takes the earliest slot anyone has. Patients moved to a different provider are staged as a reassignment. Use this when the patients matter more than the provider — an acute clinic, or a locum covering the day.
If nothing can be found for some of the selection within 60 days, Hero says so (“No open slot found for 4 appointments in the next 60 days”) and stages the ones it could place.
Let patient reschedule
The honest option when you can’t pick a good time on the patient’s behalf. It stages a reschedule request, and on apply Hero does two things for each patient:
-
Releases the slot.
The appointment is cancelled — recorded as provider-initiated, with the reason
provider_unavailableand any cancellation fee waived. The visit stays visible on the calendar in a muted state rather than vanishing, so the day’s history is still readable, and the time itself becomes bookable again. -
Messages the patient a link to rebook.
The message carries a secure portal link tied to that specific request. Opening it takes the patient to the portal’s booking screen with a
RESCHEDULE NEEDEDbanner naming the visit that has to move, and the original provider and visit type already selected — they just pick a new time.
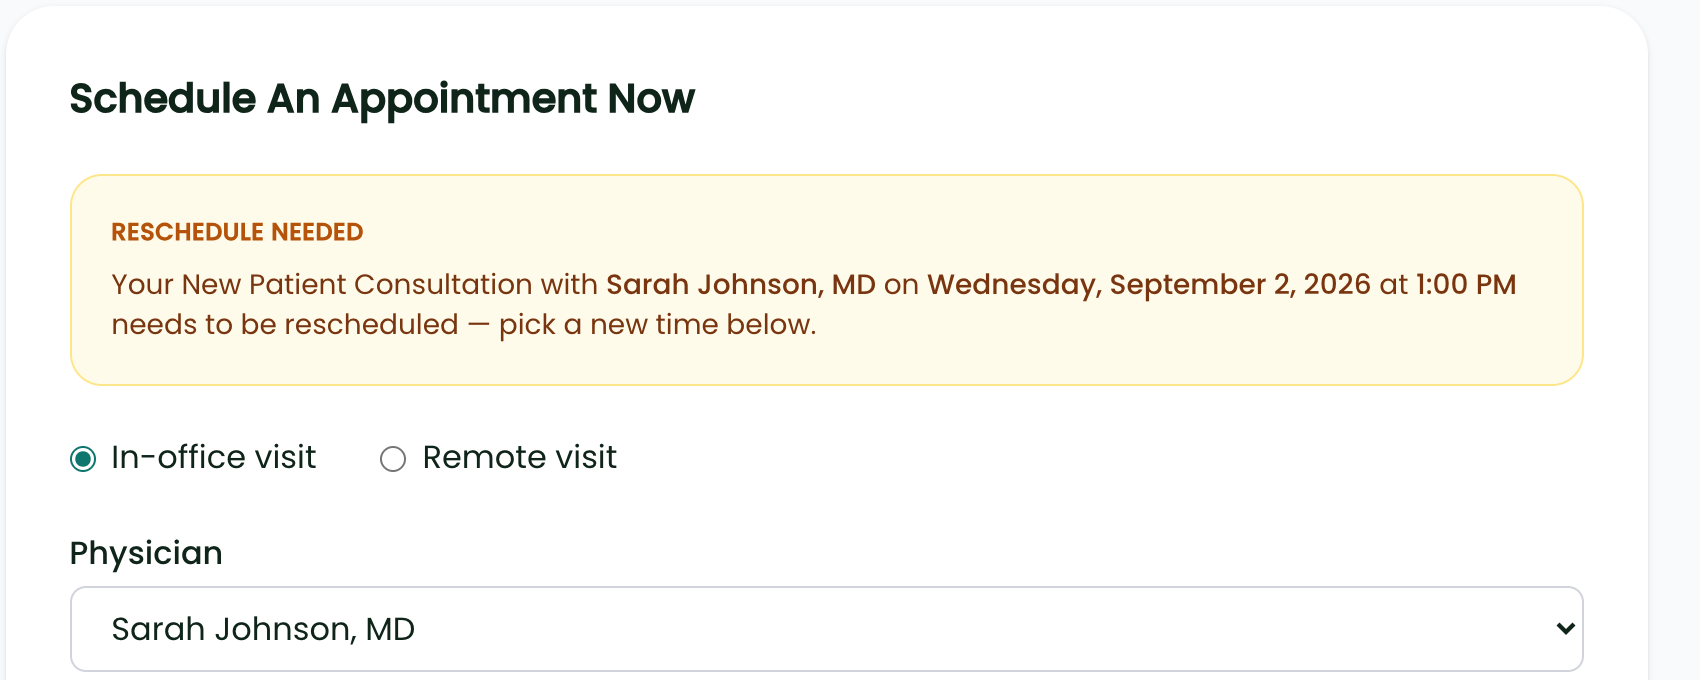
Requests stay open for 30 days. If a patient never acts, the request quietly expires and the banner disappears from their portal — so check back on anyone you released rather than assuming they rebooked.
Cancel
Stages a plain cancellation for the selection — the same provider-initiated, fee-waived cancellation described above, without a reschedule request or a rebooking link. The patient still gets whatever message you write in the composer. Use it when the visit shouldn’t simply be moved: a cancelled clinic that patients will be re-contacted about separately.
Shift…
Opens a small popover for moving a selection relatively, which is usually what “the morning is running late” or “Tuesday moves to Thursday” actually means.
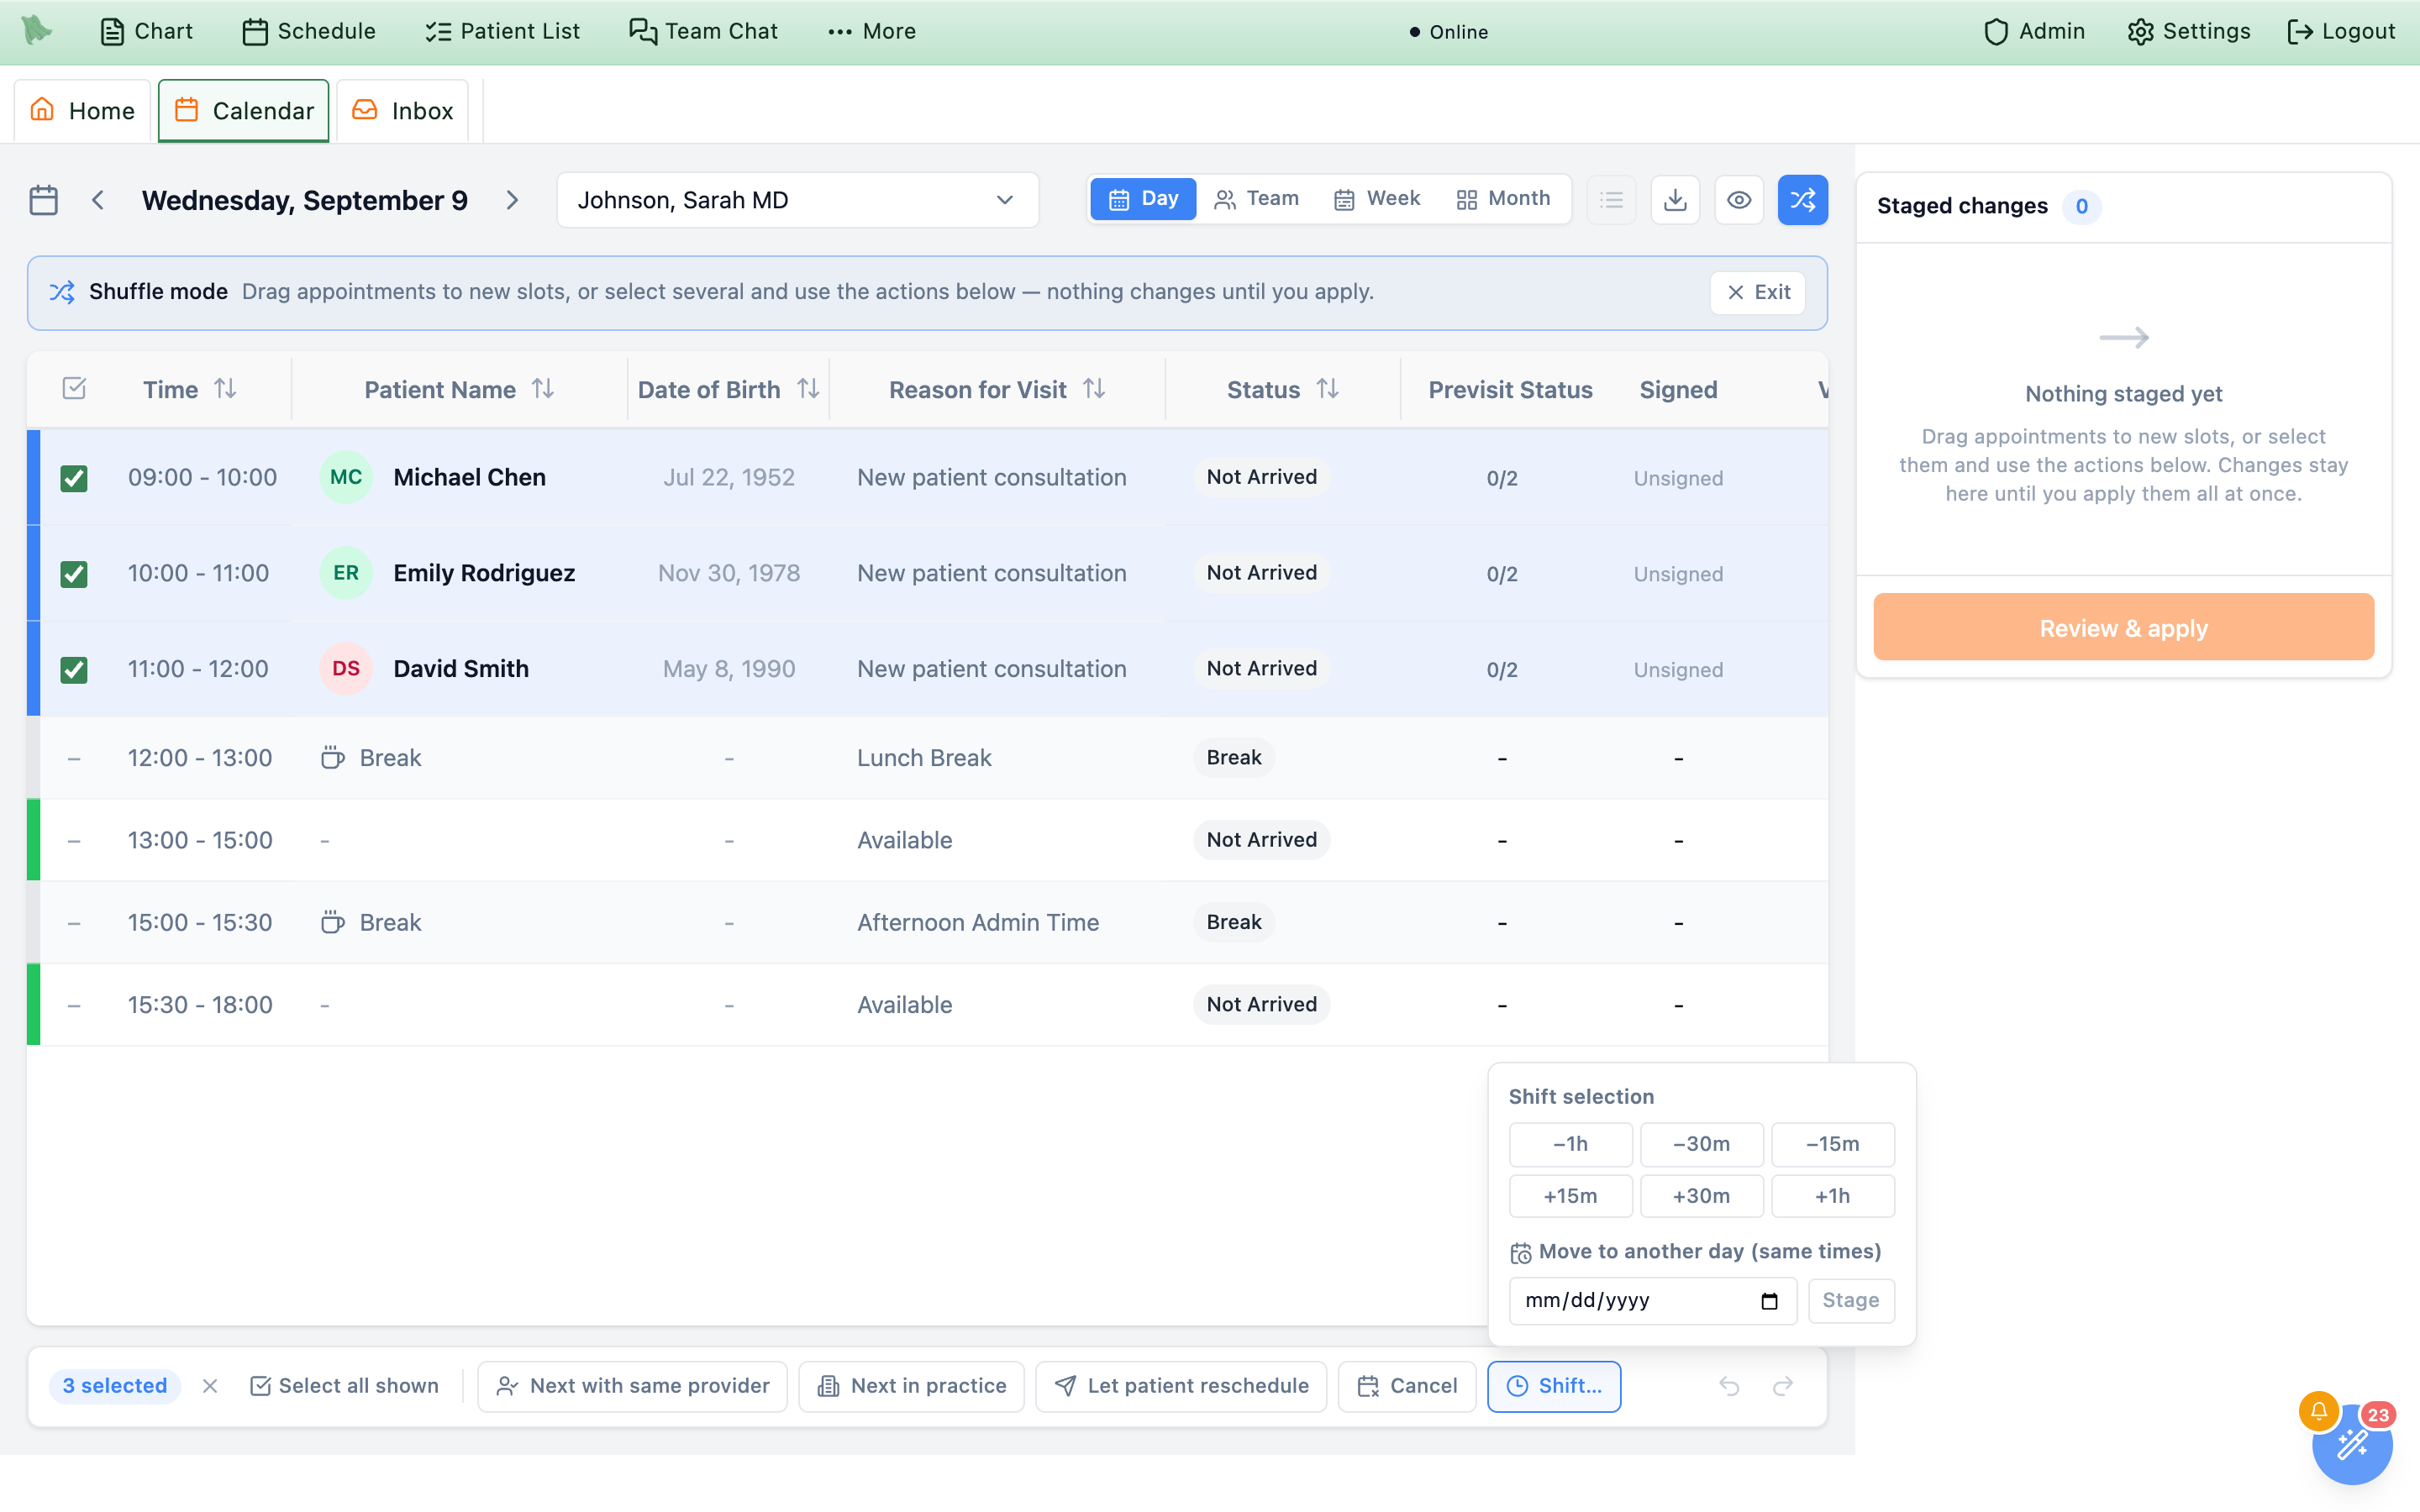
Shift… popover. The six presets nudge the whole selection along the same day; the date field below moves it to another day at the same clock times.- Offset presets —
−1h,−30m,−15m,+15m,+30m,+1h. Each press moves every selected visit by that much from wherever it currently sits, so pressing+30mtwice is an hour. Providers are unchanged. - Move to another day (same times) — pick a date and press
Stage. Every selected visit keeps its clock time and its provider and lands on that day. This is the direct answer to “move the whole of Tuesday to Thursday”.
Everything you’ve changed, before any of it is real
The panel on the right is the plan. Its header reads Staged changes with a running count, and each queued change gets a card naming the patient, the visit type and length, and the move itself as old → new.
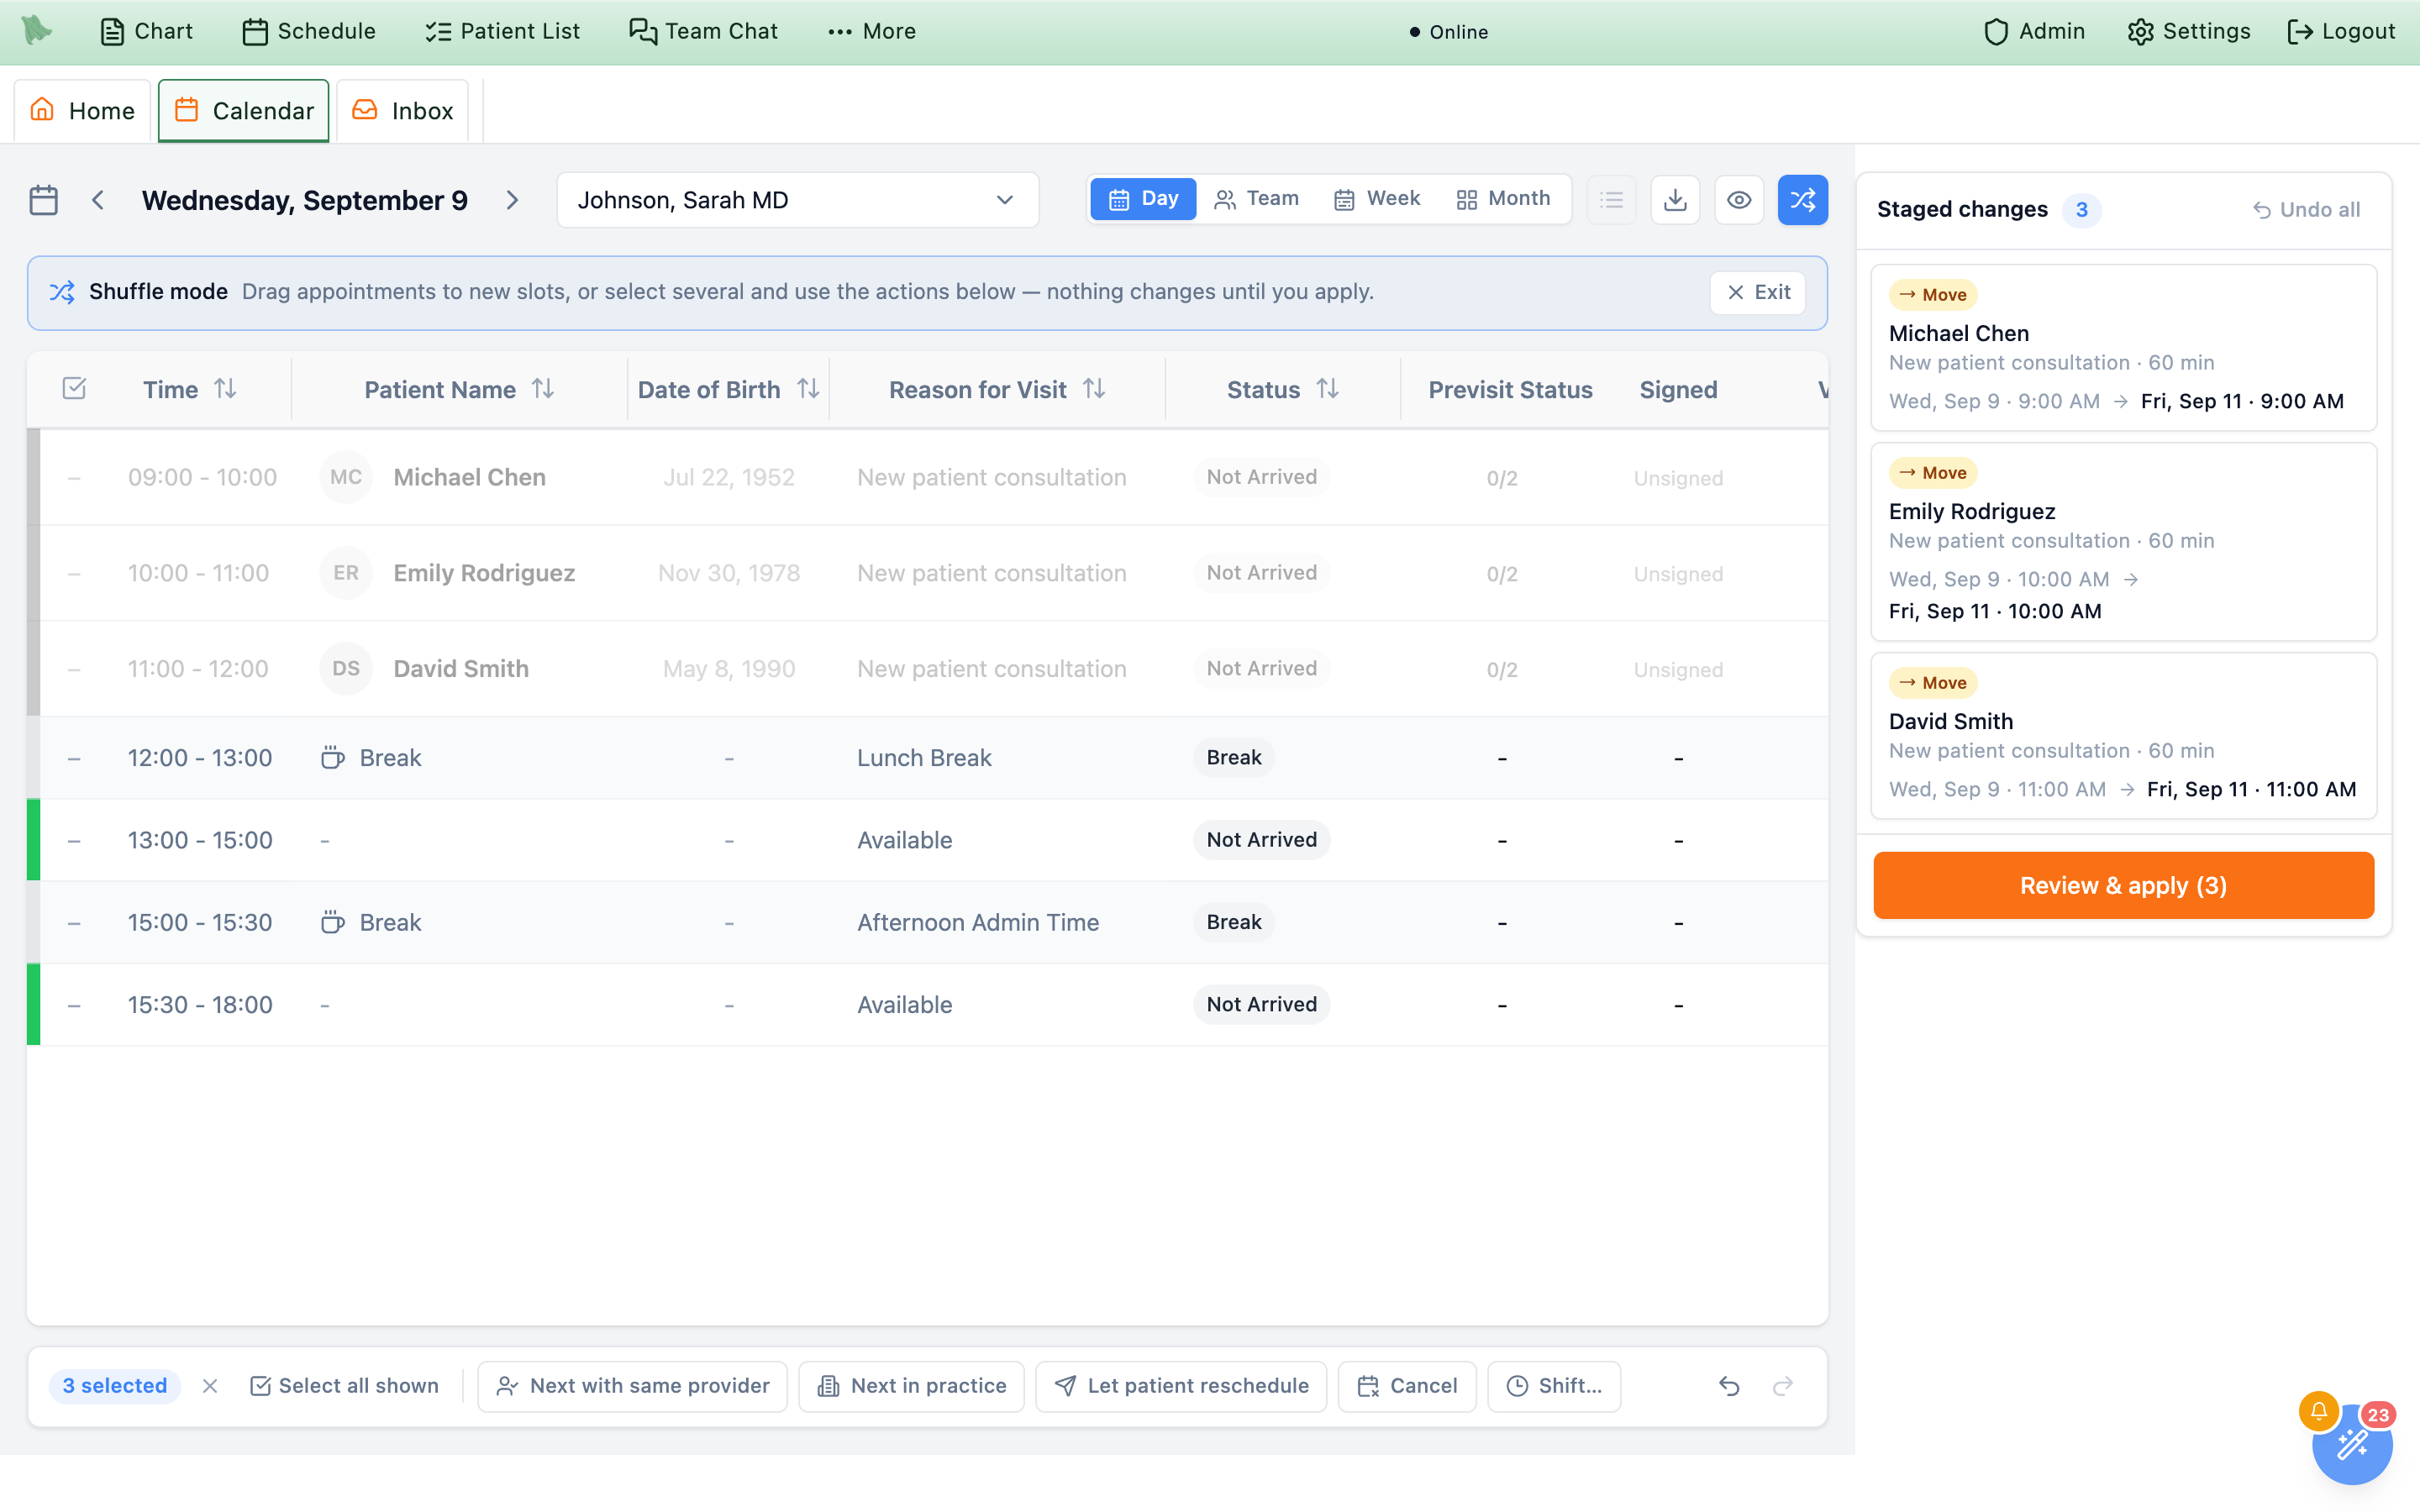
Move badge and its before-and-after, and the button at the bottom counts what will be applied.One appointment is only ever one card. Drag the same visit three times and the card simply updates — the latest target wins — so the queue always reads as the plan, never as a history of your fiddling.
Badges
Each card is tagged with what will happen to it:
| Badge | Meaning |
|---|---|
Move | Same provider, new date and/or time. |
Reassign | A different provider (with or without a time change). The card adds a line naming the old and new provider. |
Ask patient | Staged by Let patient reschedule — the slot will be released and the patient invited to rebook. |
Cancel | Staged by Cancel — the visit will be cancelled outright. |
Conflict badges
A moment after each change is staged, Hero checks the target against the real calendar and adds a second badge if there is a problem. Hover it to read exactly what it found.
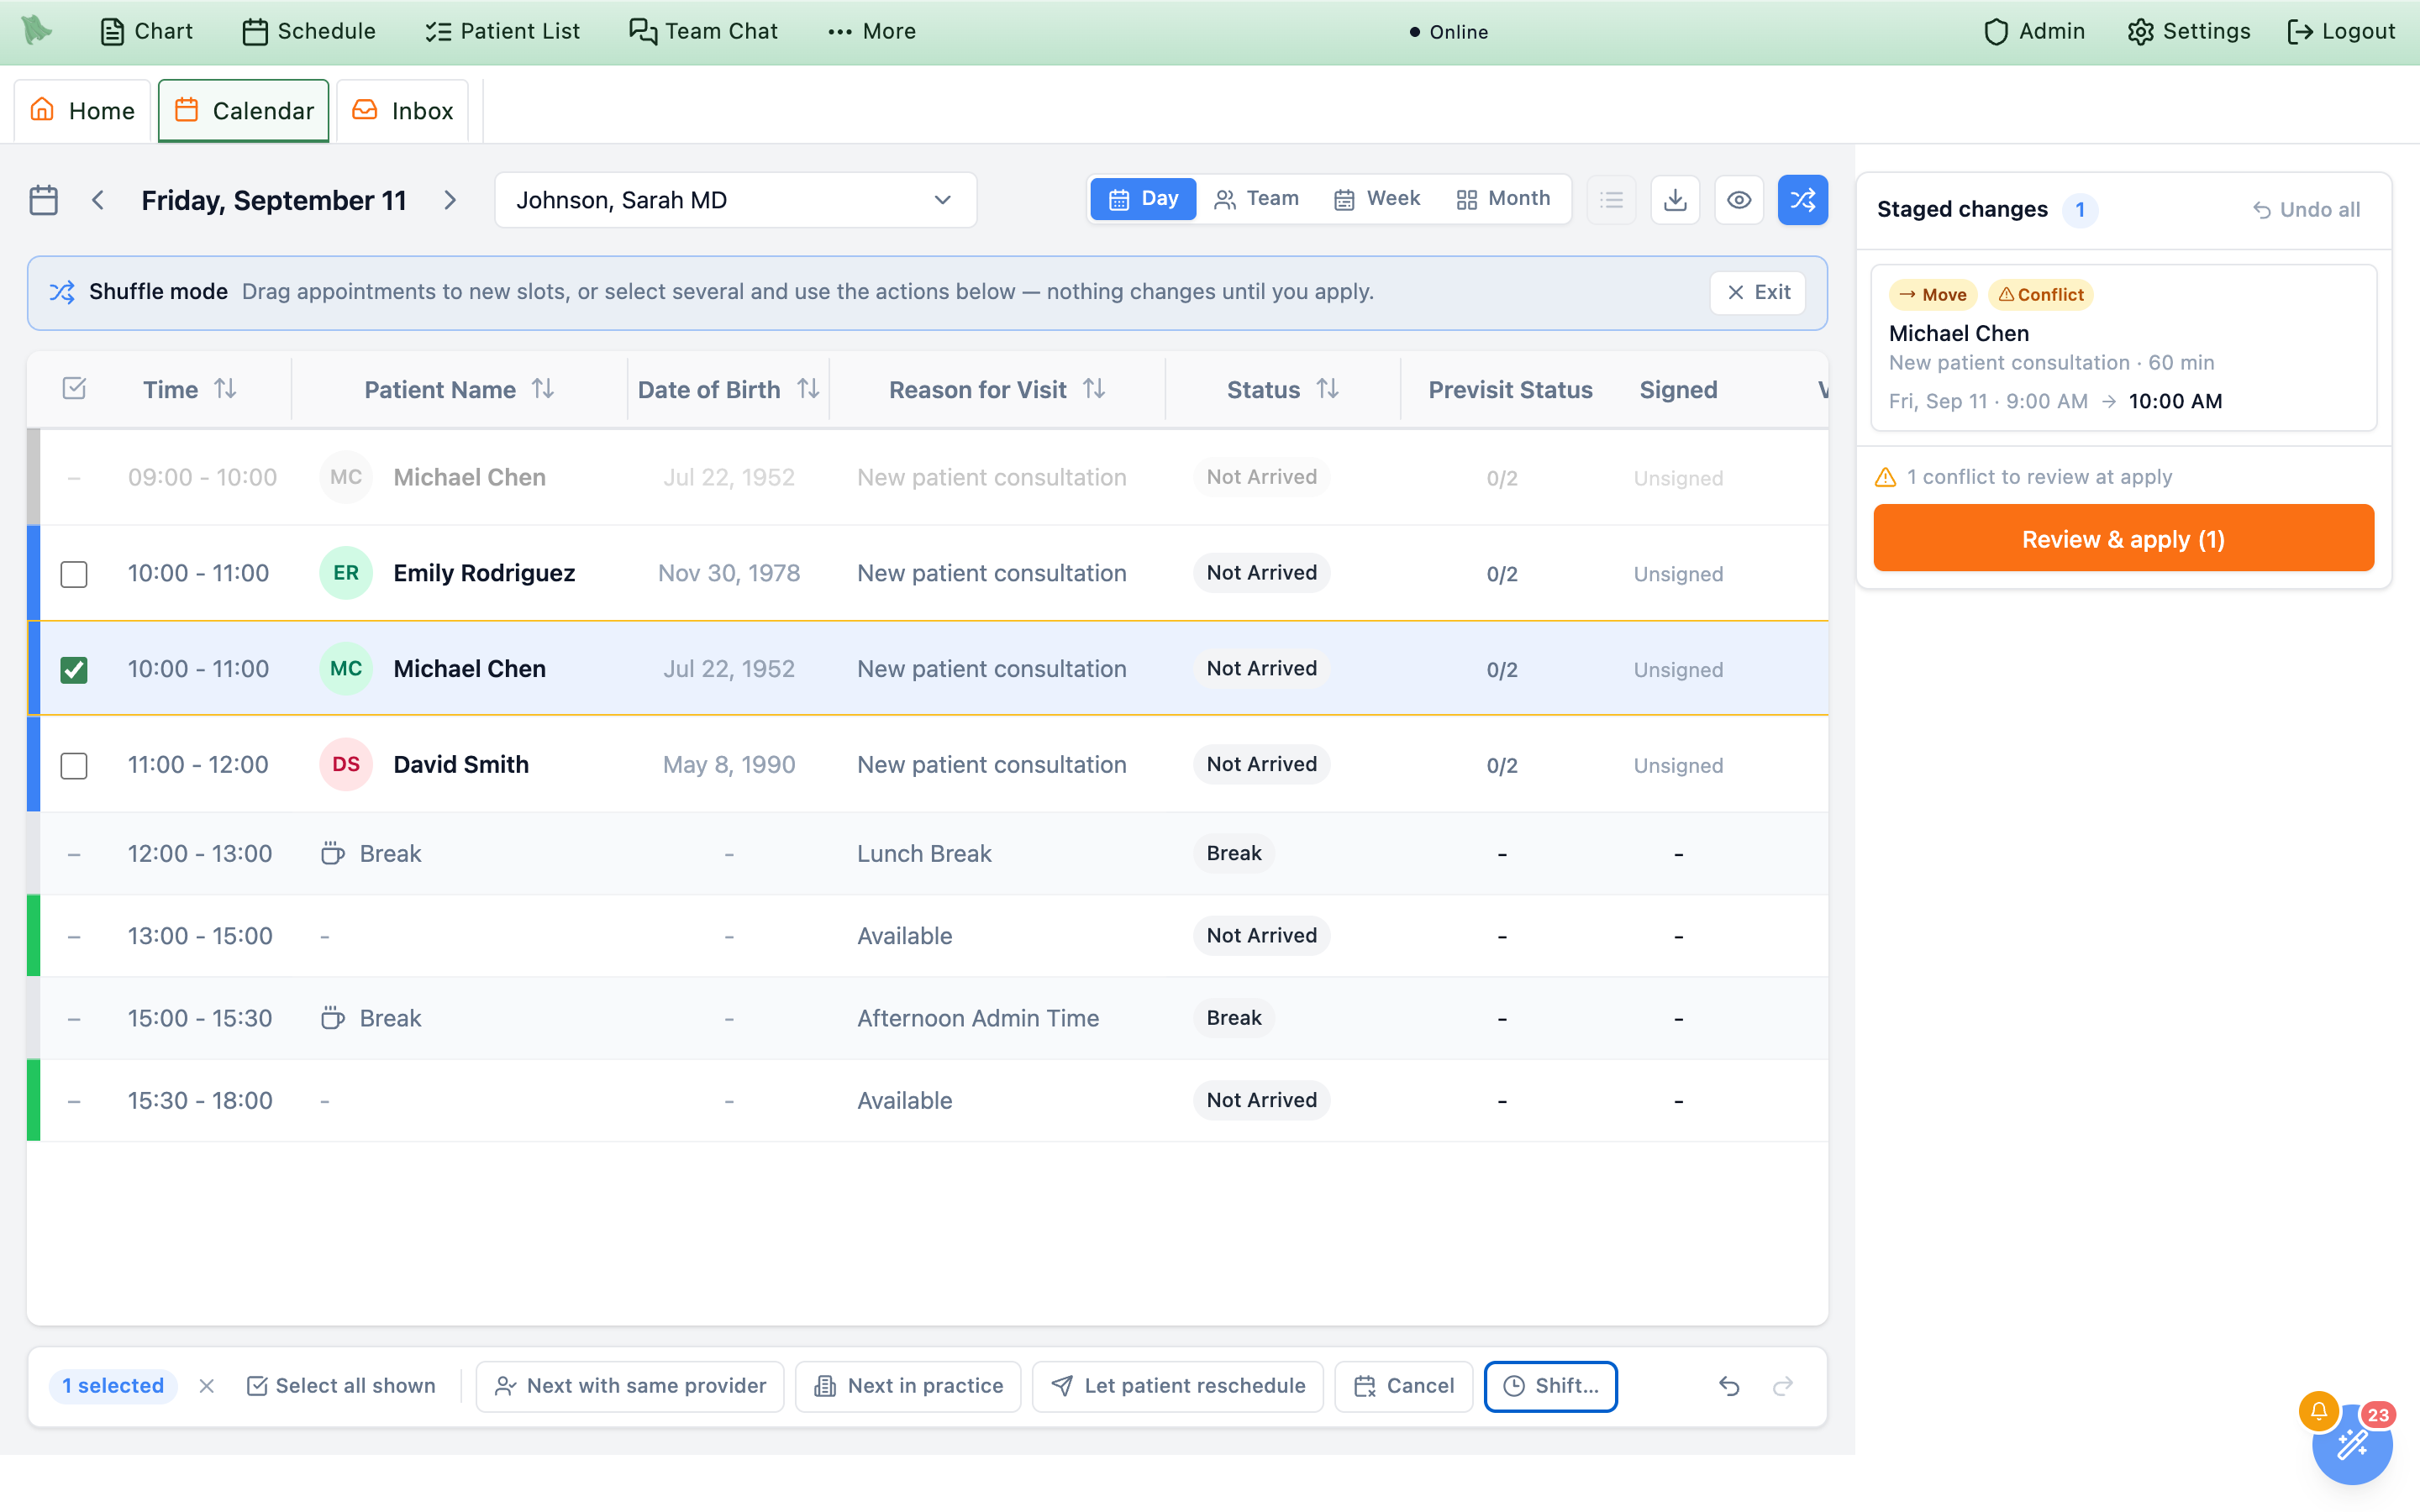
Conflict badge. Nothing is blocked — the footer just warns that it needs a decision at apply time.Conflict(amber) — the target collides with something that can be overridden: a double-booking, blocked time, or a booking rule (including a date past the visit type’s booking limit). You can apply it, but you must confirm it first.Blocked(red) — the change cannot be applied at all: the appointment has vanished or been changed by someone else, the visit is locked or in the past, or the target provider doesn’t offer that visit type. Blocked items must be fixed or removed.
The panel footer summarizes: “2 conflicts to review at apply”, or “1 blocked change — resolve or remove before applying” when anything is blocked.
Undoing
- One card — hover it and click the X to drop just that change.
- Everything —
Undo allat the top right of the panel clears the queue in one step (itself undoable). - Step by step — the undo and redo arrows at the right of the action bar, or Cmd/Ctrl+Z and Shift+Cmd/Ctrl+Z, walk back and forth through your staging history — up to 50 steps.
Commit the batch and tell every patient once
Review & apply at the bottom of the queue opens the last stop before anything is written. The dialog is headed Review & apply changes and opens with a count of what is about to happen, summarized by kind: 3 moved, 2 reassigned, 4 patient reschedules, 1 cancelled.
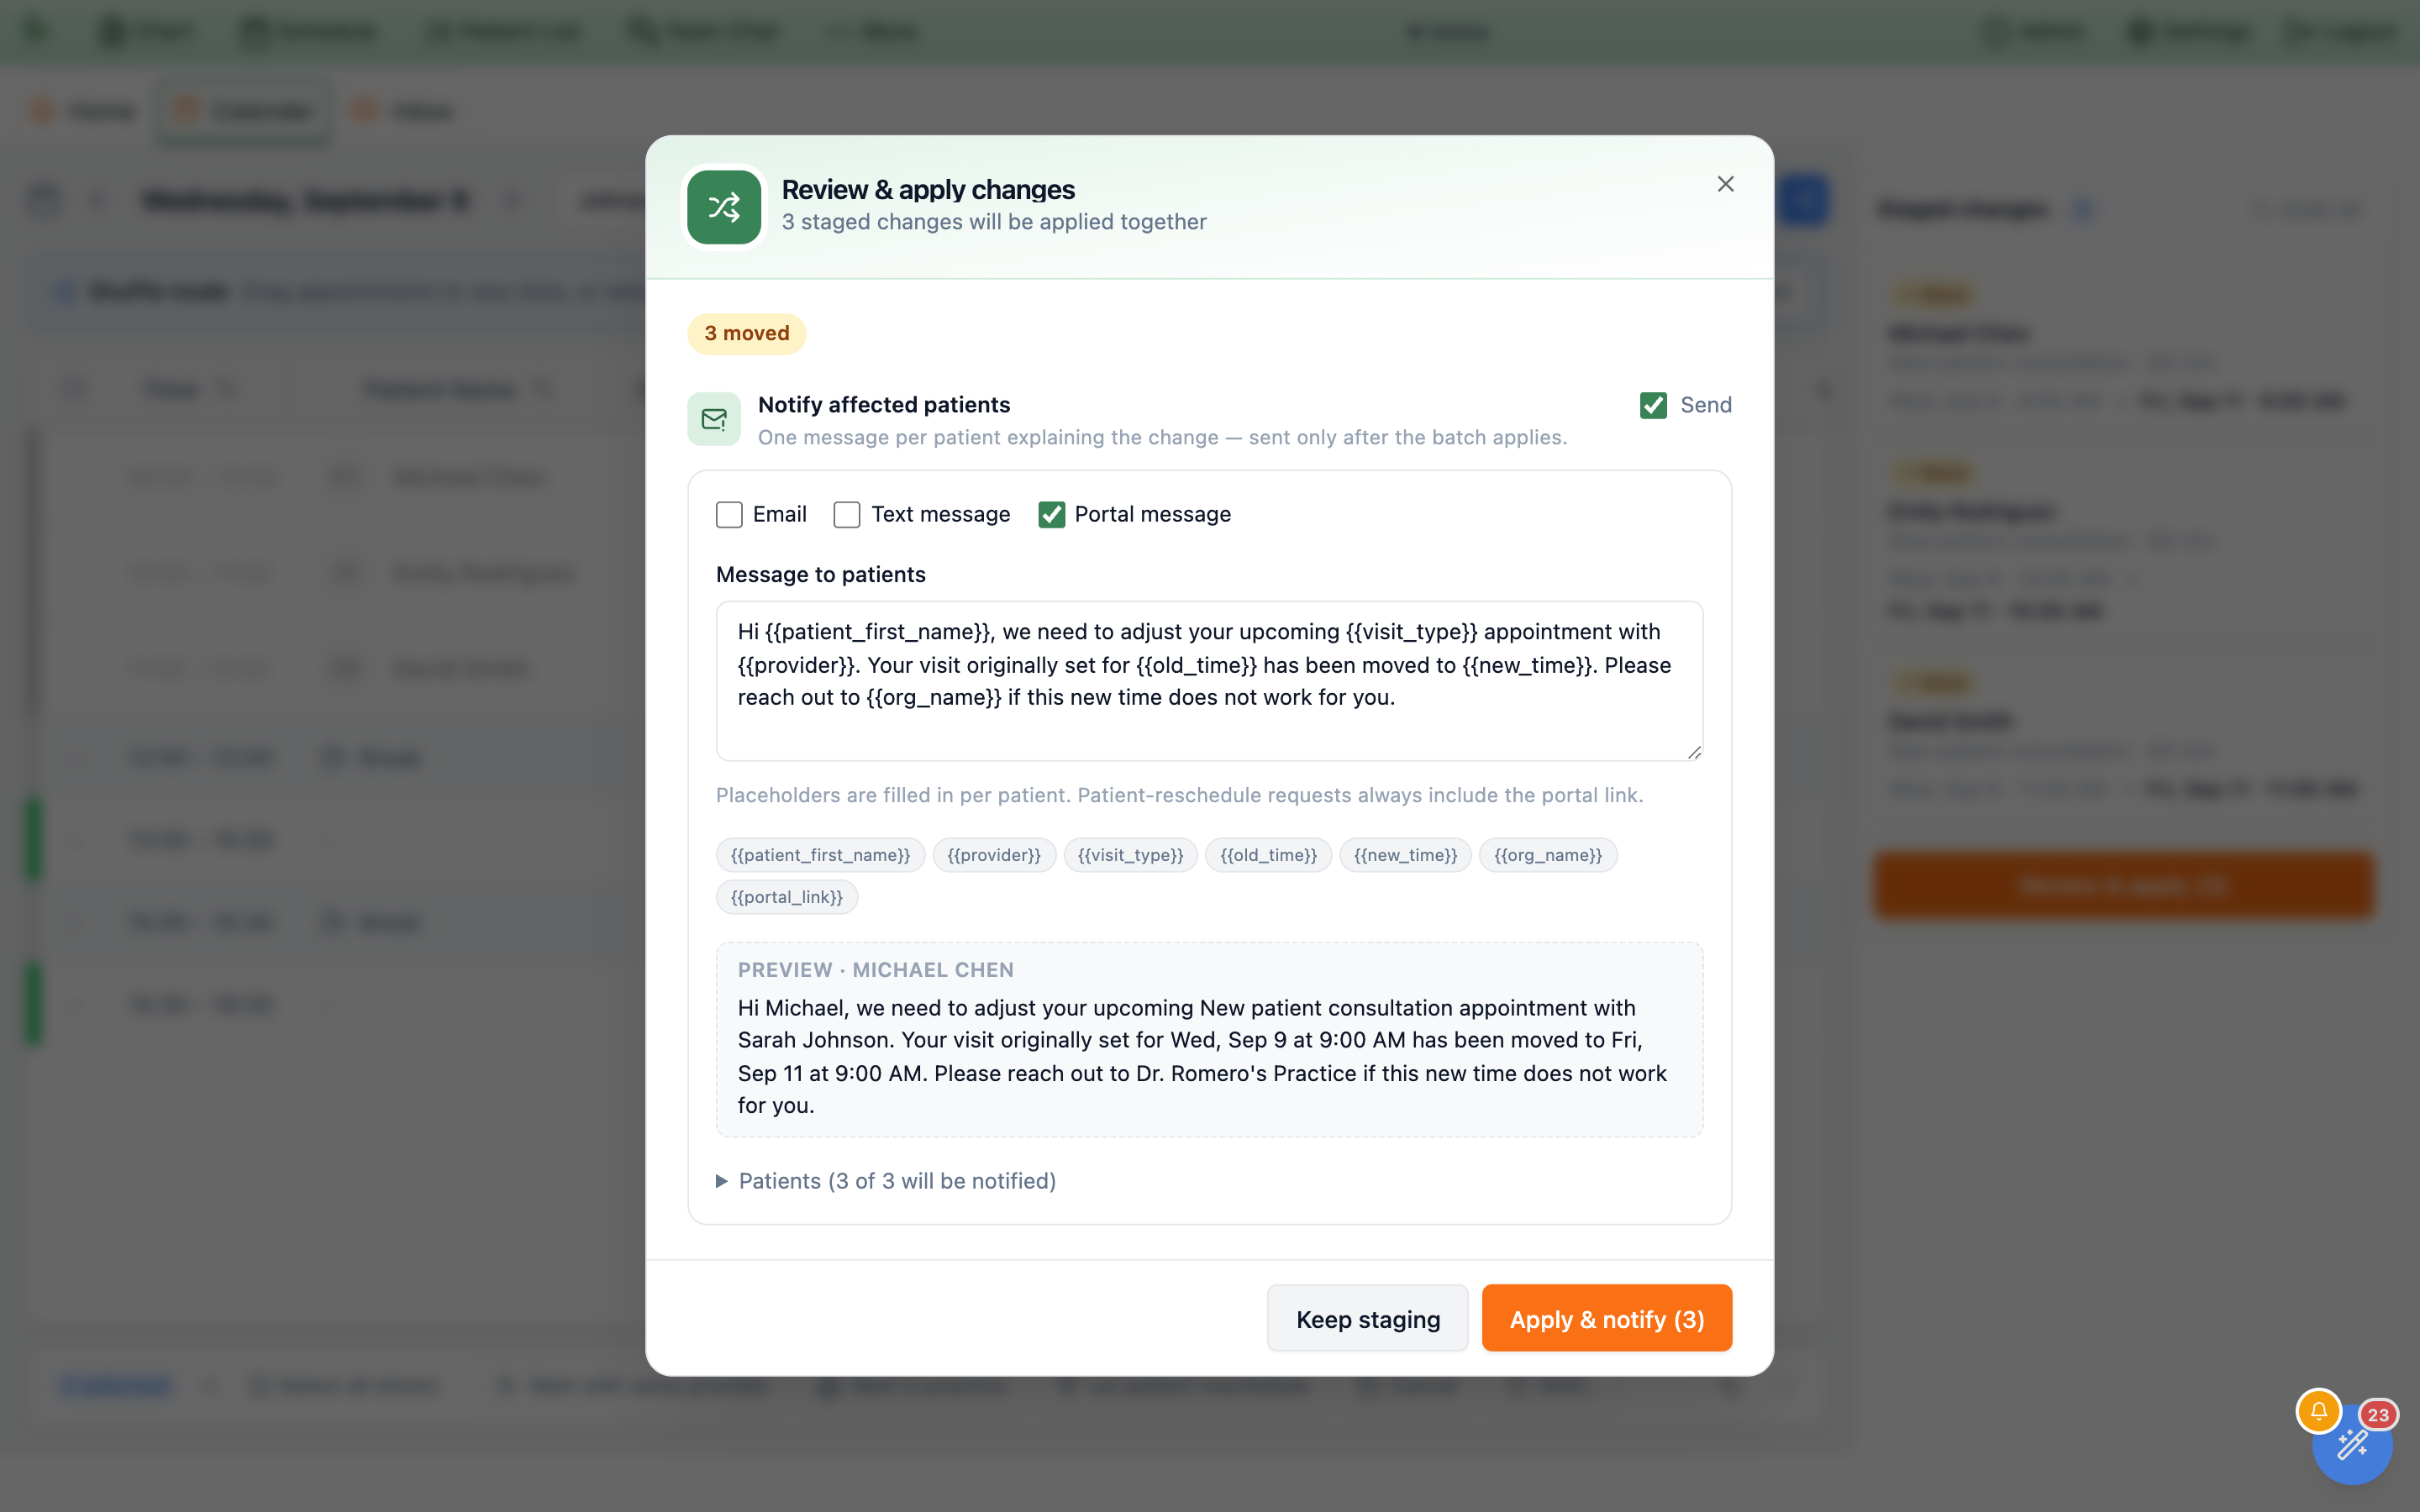
Portal message is ticked; the preview underneath shows the message exactly as the first patient will read it.Conflicts and blocks
Anything blocked is listed first in red, each with an inline remove link that drops it from the batch. Blocked items cannot be forced — leave one in and it will simply fail.
Anything conflicted gets its own section listing each collision in plain language. To proceed you tick one checkbox — “Apply these conflicted changes anyway (recorded as a scheduling override)” — which reveals an Override reason field pre-filled with Mass reschedule. The reason is stored with the override for audit.
override_required error while the rest of the batch still applies.
The notification composer
Under Notify affected patients sits the message that goes out, with the promise printed above it: “One message per patient explaining the change — sent only after the batch applies.” Nothing is sent if the batch fails, and failed items are left out of the blast.
The Send checkbox at the top right of the section turns messaging off entirely; untick it and Hero confirms that patients will not be messaged and you can tell them individually later.
Three channels can be combined, and all three are on by default:
| Channel | What it does |
|---|---|
Email | Queues one email per patient. The subject is set for you: “An update about your appointment”, or “Please choose a new appointment time” for released visits. |
Text message | Queues one SMS per patient, subject to their consent and opt-outs as with any other text. |
Portal message | Posts the message into the patient’s portal inbox from the provider. Requires the patient to have a portal account and portal messaging to be enabled for your practice. |
Placeholders and the preview
The Message to patients box starts from a default that already reads as a complete message, and every token is filled in per patient. Click a chip to insert it:
| Placeholder | Becomes |
|---|---|
{{patient_first_name}} | The patient’s first name. |
{{provider}} | The provider on the visit. |
{{visit_type}} | The appointment type, e.g. “New patient consultation”. |
{{old_time}} | The original date and time, in your practice’s timezone. |
{{new_time}} | The new date and time. Blank for cancellations and releases, which have no new time. |
{{org_name}} | Your practice name. |
{{portal_link}} | The patient’s secure portal link. Reschedule requests always include it whether or not you add the token. |
A dashed Preview box below renders the message for the first patient in the batch, so you can see the real wording rather than the tokens before you send it to thirty people.
Leaving individual patients out
The Patients (12 of 14 will be notified) section expands into a list of everyone affected, each ticked. Untick anyone you would rather call yourself — a patient mid-treatment, or someone you already spoke to. Their appointment still changes; only the message is suppressed. Patients whose contact preferences or account status make them ineligible are skipped automatically.
Applying
The submit button reads Apply & notify (12) when a channel is selected, or Apply 12 changes when messaging is off. Keep staging backs out and leaves the queue untouched.
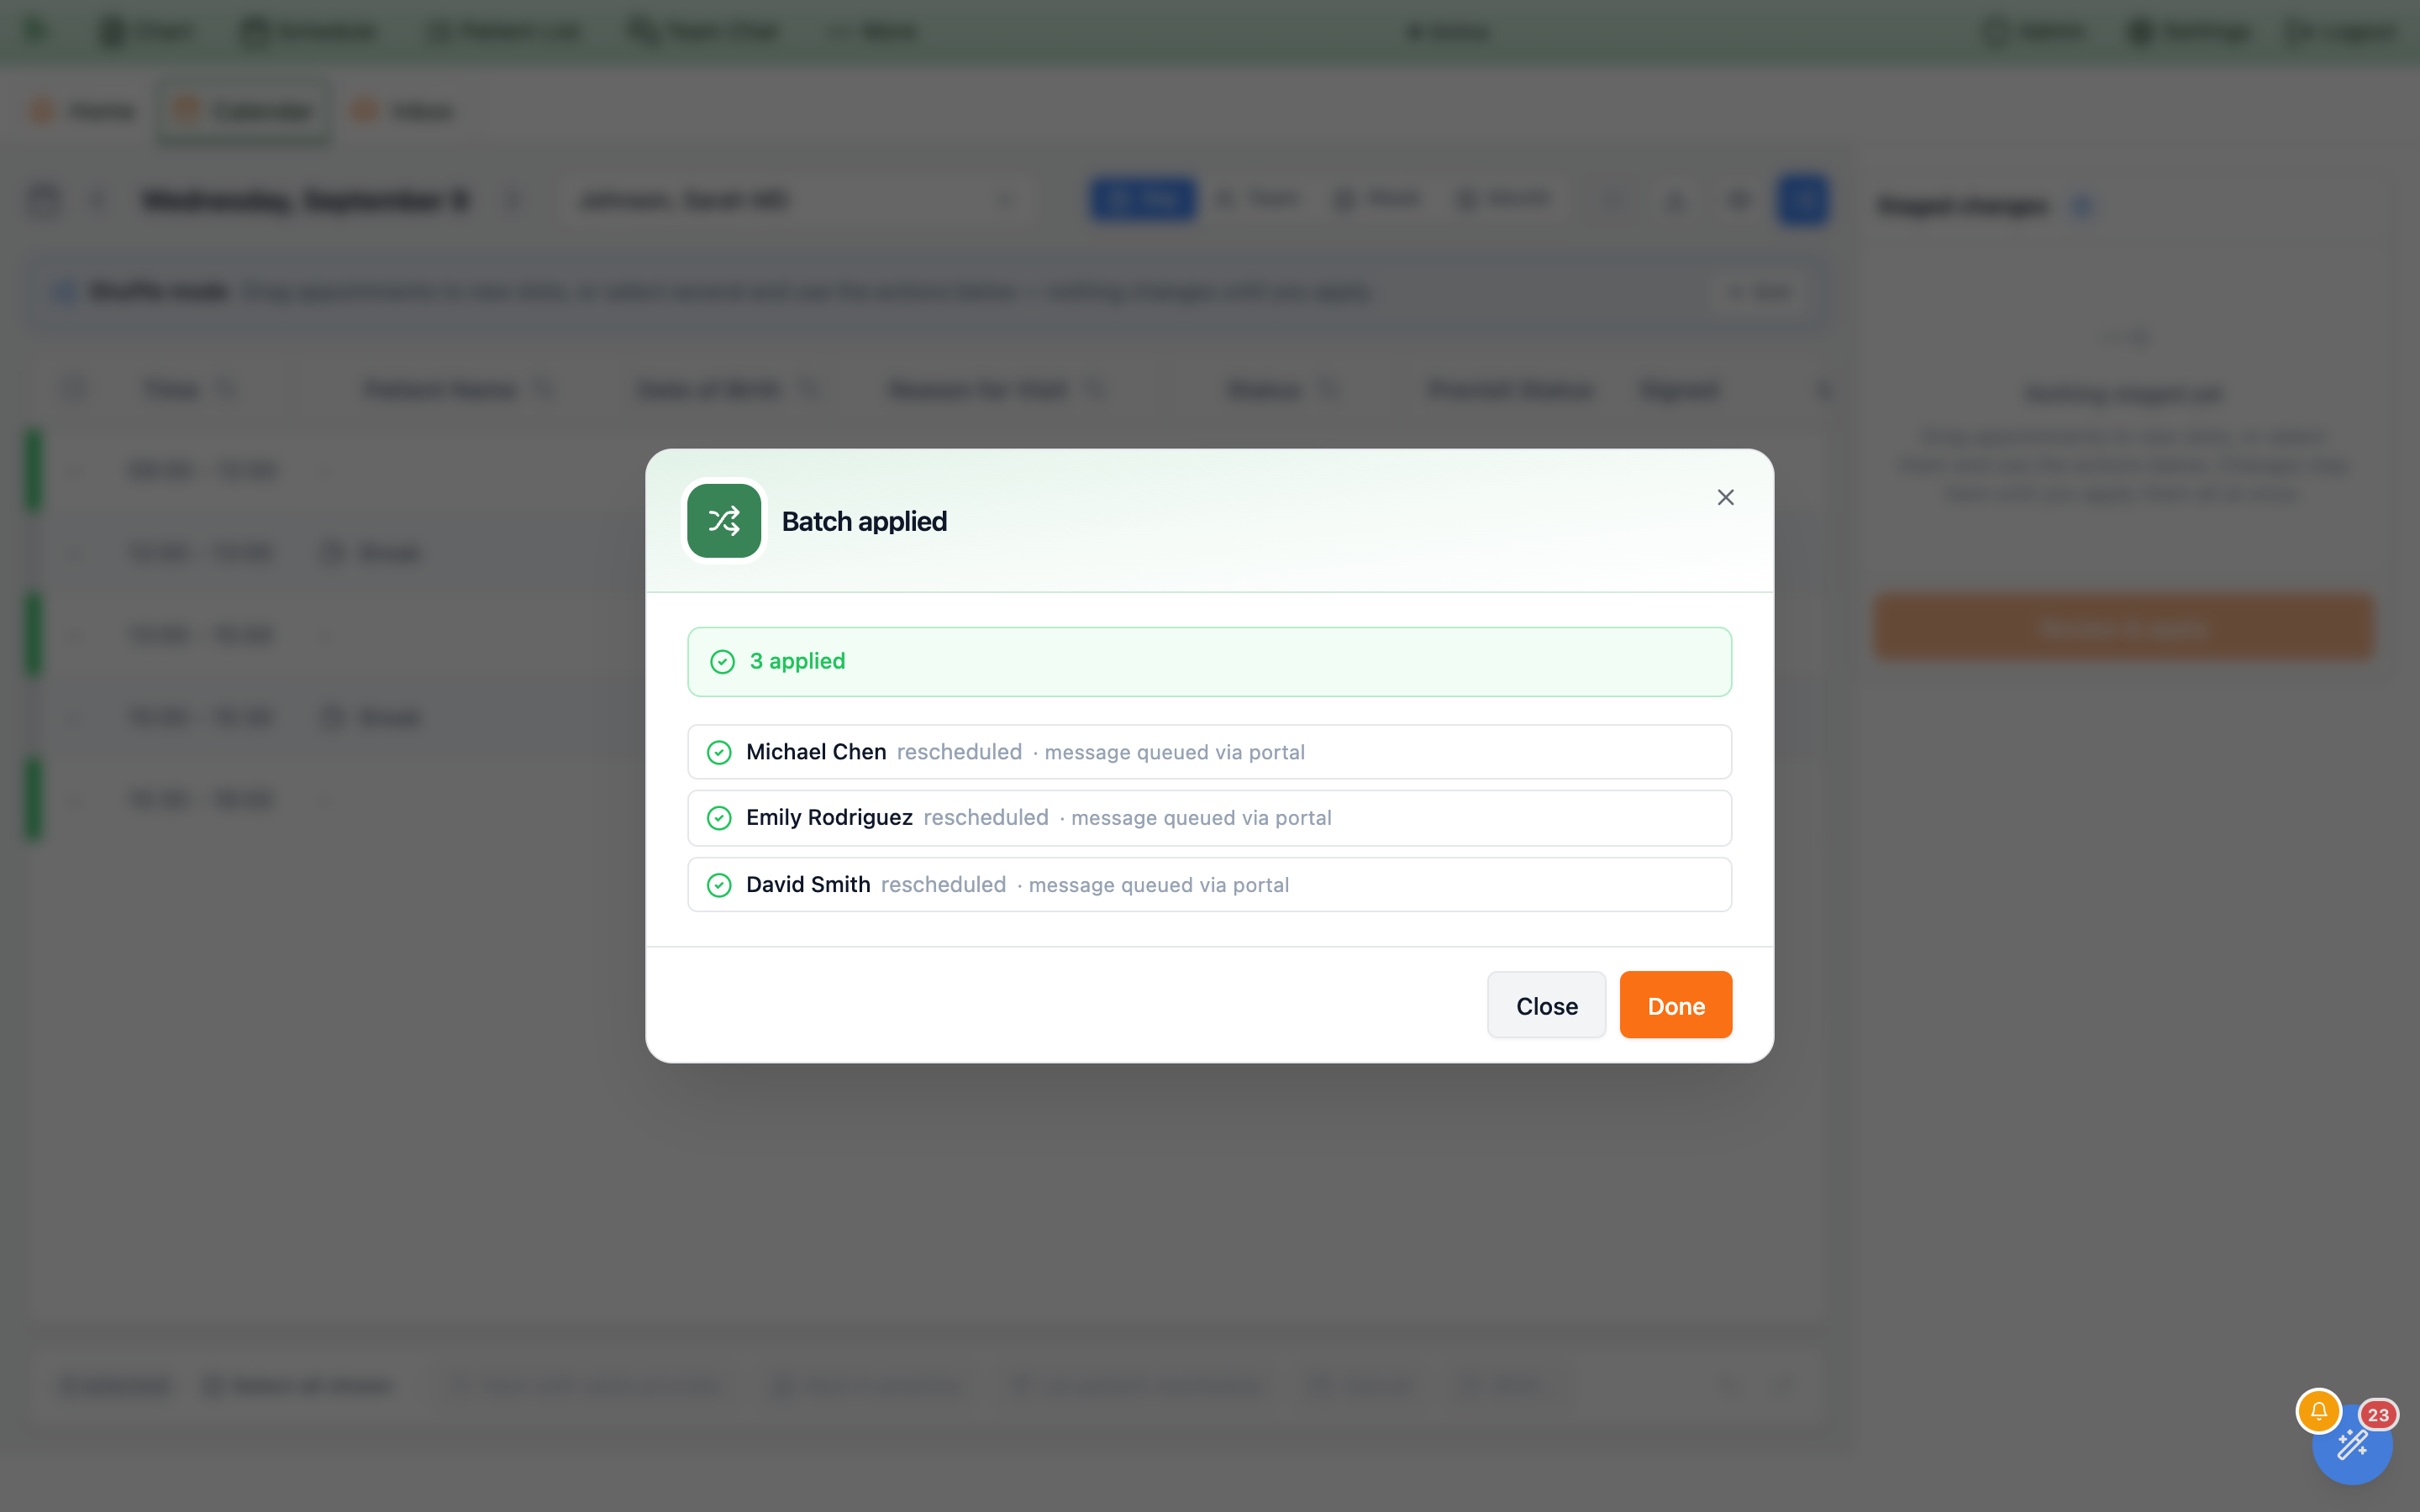
Results come back per item — rescheduled, cancelled, or released — patient asked to rebook, each noting the channels used. If anything failed, the banner says so and names the reason against each item.
Once applied, the calendar refetches for every provider involved, on both sides of the move, and your undo history is cleared — applied changes cannot be pulled back into the queue.
What shuffle mode will not do, and what the errors mean
Known limits
- No undo after applying. There is no “revert this batch” button. Once applied, putting things back means shuffling them back — which is easy enough, but the patients will have had the first message. Review before you apply, not after.
- Recurring appointments move one at a time. Shuffle mode has no concept of a series; staging a visit that belongs to one moves that single occurrence.
- One appointment, one batch. The queue holds a single change per appointment — the latest one you staged.
- 200 changes per batch. Split larger sweeps.
- No send scheduling. You cannot time the message blast. Messages are queued the moment the batch commits — though a patient’s quiet-hours preference can still hold their message until a reasonable hour, so “sent on apply” does not always mean “delivered on apply”.
Times are always your practice’s times
Every time you see and every time you drop onto — in the calendar, on the queue cards, in the preview, and in the message the patient receives — is your organization’s local time, not your computer’s. Shuffling from a laptop in another timezone moves appointments to the times you see on screen.
Common failures
| What you see | What happened & what to do |
|---|---|
| “This appointment changed since you staged it. Refresh the calendar and try again.” | Someone else moved or edited that visit while it sat in your queue. Hero refuses rather than overwrite their work. Remove the item, refresh, and redo it. |
| “This appointment is no longer available.” | The visit was cancelled or deleted elsewhere. Drop it from the queue. |
| “Another booking is in progress for this time slot.” | Someone is booking that exact slot right now. Wait a moment and retry, or pick a different target. |
| “The selected provider does not offer ‘<visit type>’.” | A cross-provider reassignment landed on someone who doesn’t do that visit type. Add the visit type to that provider (see Visit types) or choose another column. |
| “This appointment requires administrative review before it can be changed.” | A billing policy is holding the visit. It has to be handled outside shuffle mode. |
An override that failed with override_required | You confirmed a conflict but your account can’t authorize scheduling overrides. Ask someone who can, or remove the conflicting item. |
Every batch is recorded
Shuffle batches are written to the audit trail — who applied it, when, what each item changed from and to, the message that was sent, and any override reason. If a patient asks why their appointment moved, the answer is recoverable.
Need help? Email support@heroemr.com.