The patient chart
Everything in one record: find the patient, read the chart's tabs and header strip, keep problems, allergies, demographics, and vitals current, and review past encounters alongside upcoming visits.
The patient chart
Everything in one record: find the patient, read the chart's tabs and header strip, keep problems, allergies, demographics, and vitals current, and review past encounters alongside upcoming visits.
Find a patient and open their chart
Every chart starts at the global Patient Search. Click the Chart button (document icon) in the top toolbar, or press F6 from anywhere in the app, and the same search modal opens. Staff accounts see the Chart button only when their profile includes at least one patient-chart permission; physicians always have it.
-
Start with your recent patients.
Before you type anything, the modal lists
Recent Patients— the charts you opened most recently (orNo recent patientson a fresh account). Sort the list with theName,Date of Birth, andLast Accessedbuttons; each row shows the patient’s MRN and DOB plus when you last opened the chart (for example “2 days ago”). -
Or just type.
Results update automatically as you type — there is no separate search button. The box accepts four lookup styles, as its placeholder says:
Search by name, email, MRN (5-10 digit #), or DOB (YYYY-MM-DD)…. If nothing matches, the empty-result message tells you which style it detected. - Click the patient. The chart opens as its own tab in the workspace tab bar, so several charts can stay open side by side. Opening the same patient again reuses the existing tab rather than creating a duplicate.
| Lookup | What to type |
|---|---|
| Name | Any part of the patient’s name. |
| The patient’s email address. | |
| MRN | A 5–10 digit number — MRN search requires the full 5–10 digit format. |
| DOB | A full date in any of three formats — YYYY-MM-DD, MM/DD/YYYY, or MM-DD-YYYY. It has to be complete: an all-numeric partial date such as 1985-01 matches no lookup style at all, so type the whole date or search by name instead. |
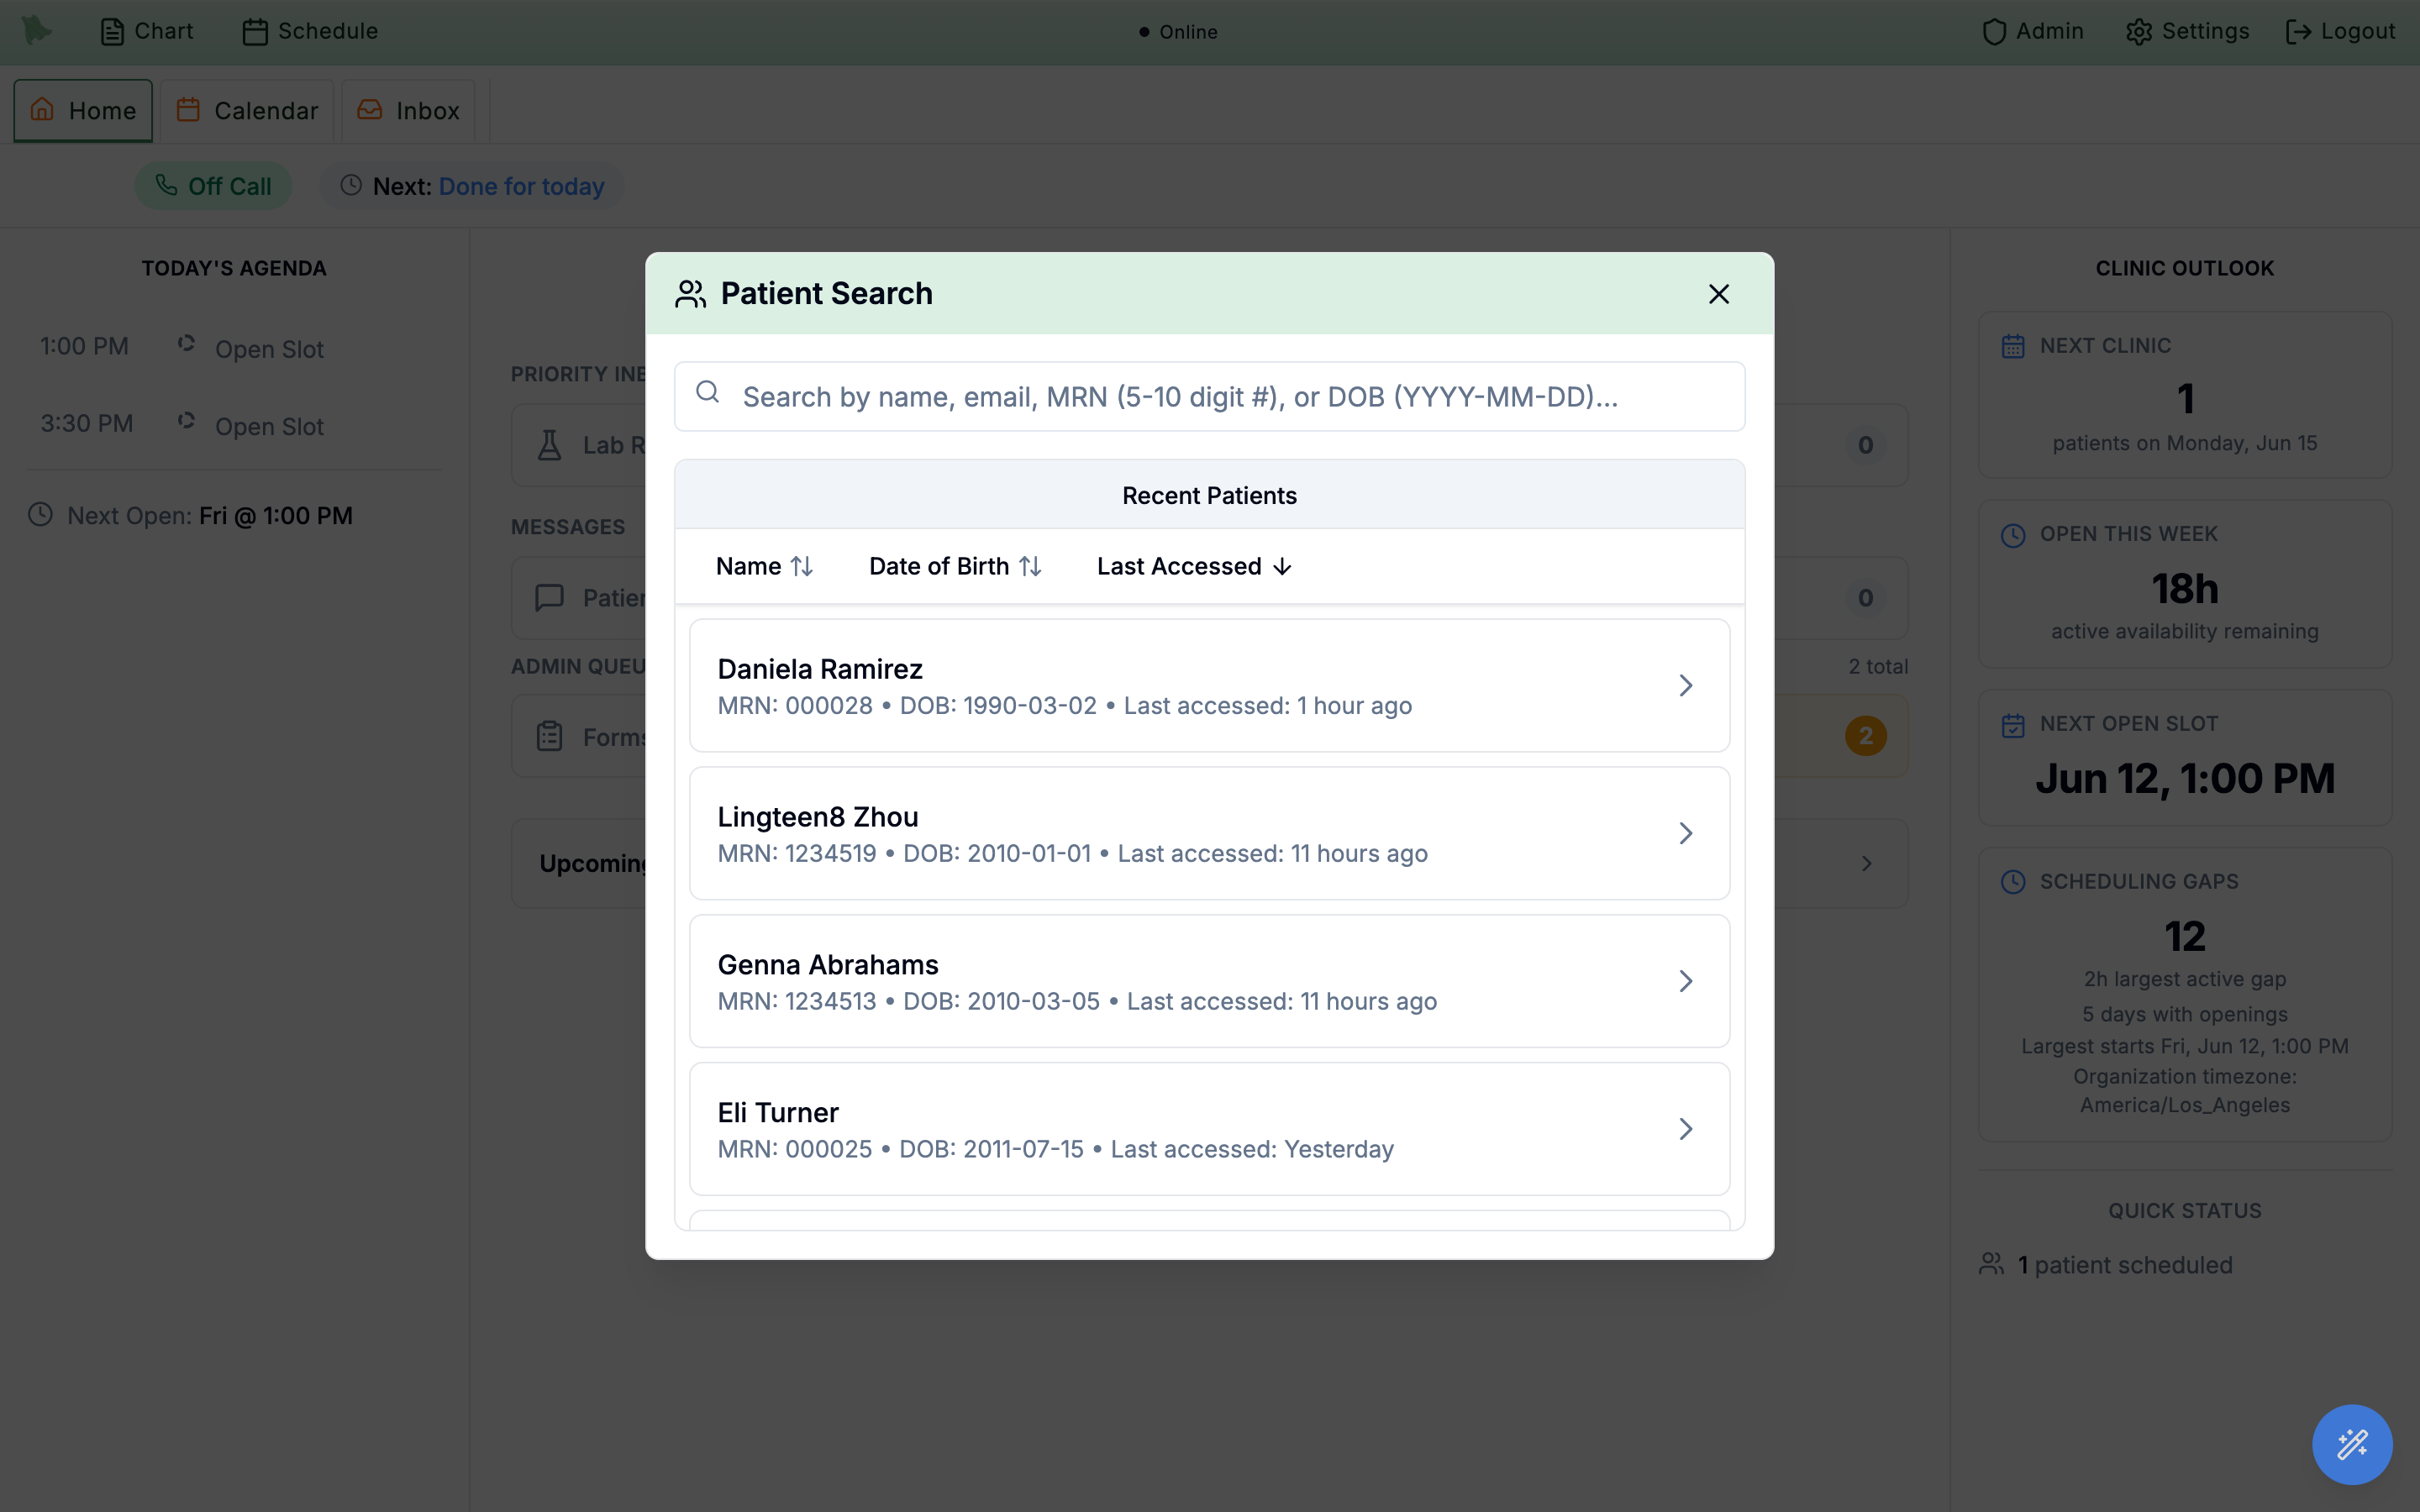
Recent Patients list appears before you type; the Last Accessed sort is hidden while a search is active.Schedule toolbar button opens the identical search, but selecting a patient lands in their scheduling workspace rather than the chart — see Work the calendar.
Read the chart: layout, tabs & in-chart search
The chart screen has two zones: the patient header strip across the top (covered in the next section) and the Chart Review card below it, with a row of section tabs. Encounters is the default tab.
Those eight are the row a default practice sees. Three more — Immunizations, Prenatal, and Brain Health — are conditional and slot in after Medications only where they apply, so don’t expect them on every chart. Each fails closed — if the setting is still loading, the tab stays hidden rather than flickering into view:
Immunizationsappears only if your practice has enabled it as an additional feature (see Practice setup).Prenatalneeds obstetrics enabled and at least one pregnancy episode on this patient, so it shows up on the patients it applies to rather than on every chart.Brain Healthappears when the neurology brain-health feature is enabled for the practice.
For staff accounts, each tab shows only when the staff profile holds the matching permission — a profile with no chart permissions sees No chart sections available instead.
- Jump between tabs. Cmd+1–Cmd+9 (Ctrl+1–Ctrl+9 on Windows) go straight to a tab — hover any tab to see its shortcut hint. Only the first nine tabs you can actually see get a number, so on a chart carrying the optional tabs the last ones are click-only. Tabs load on first visit and then stay loaded, so switching back is instant. If the row overflows the window, chevron buttons appear to scroll it.
-
Search inside the chart.
The magnifier at the right end of the tab row expands a
Search…box (Ctrl+F focuses it). It full-text searches the patient’s Notes, Labs, and Imaging, groups the matches under headings, and clicking a result jumps to that item in the matching tab. -
Pick a layout.
The small monitor icon on the header toggles between the default horizontal bar (
Switch to vertical layout) and a vertical left sidebar (Switch to horizontal layout) that lists Allergies, Problems, Other History, Immunizations (when enabled), Preferred Pharmacies, and Referral Communications as expandable sections.Referral Communicationsonly appears when this patient came in through an inbound referral, and an active-pregnancy chip sits in the panel for obstetric practices. - Order without opening a note. Physicians can press F7 or Ctrl+O from the chart to open Create Orders directly — see Standalone orders.
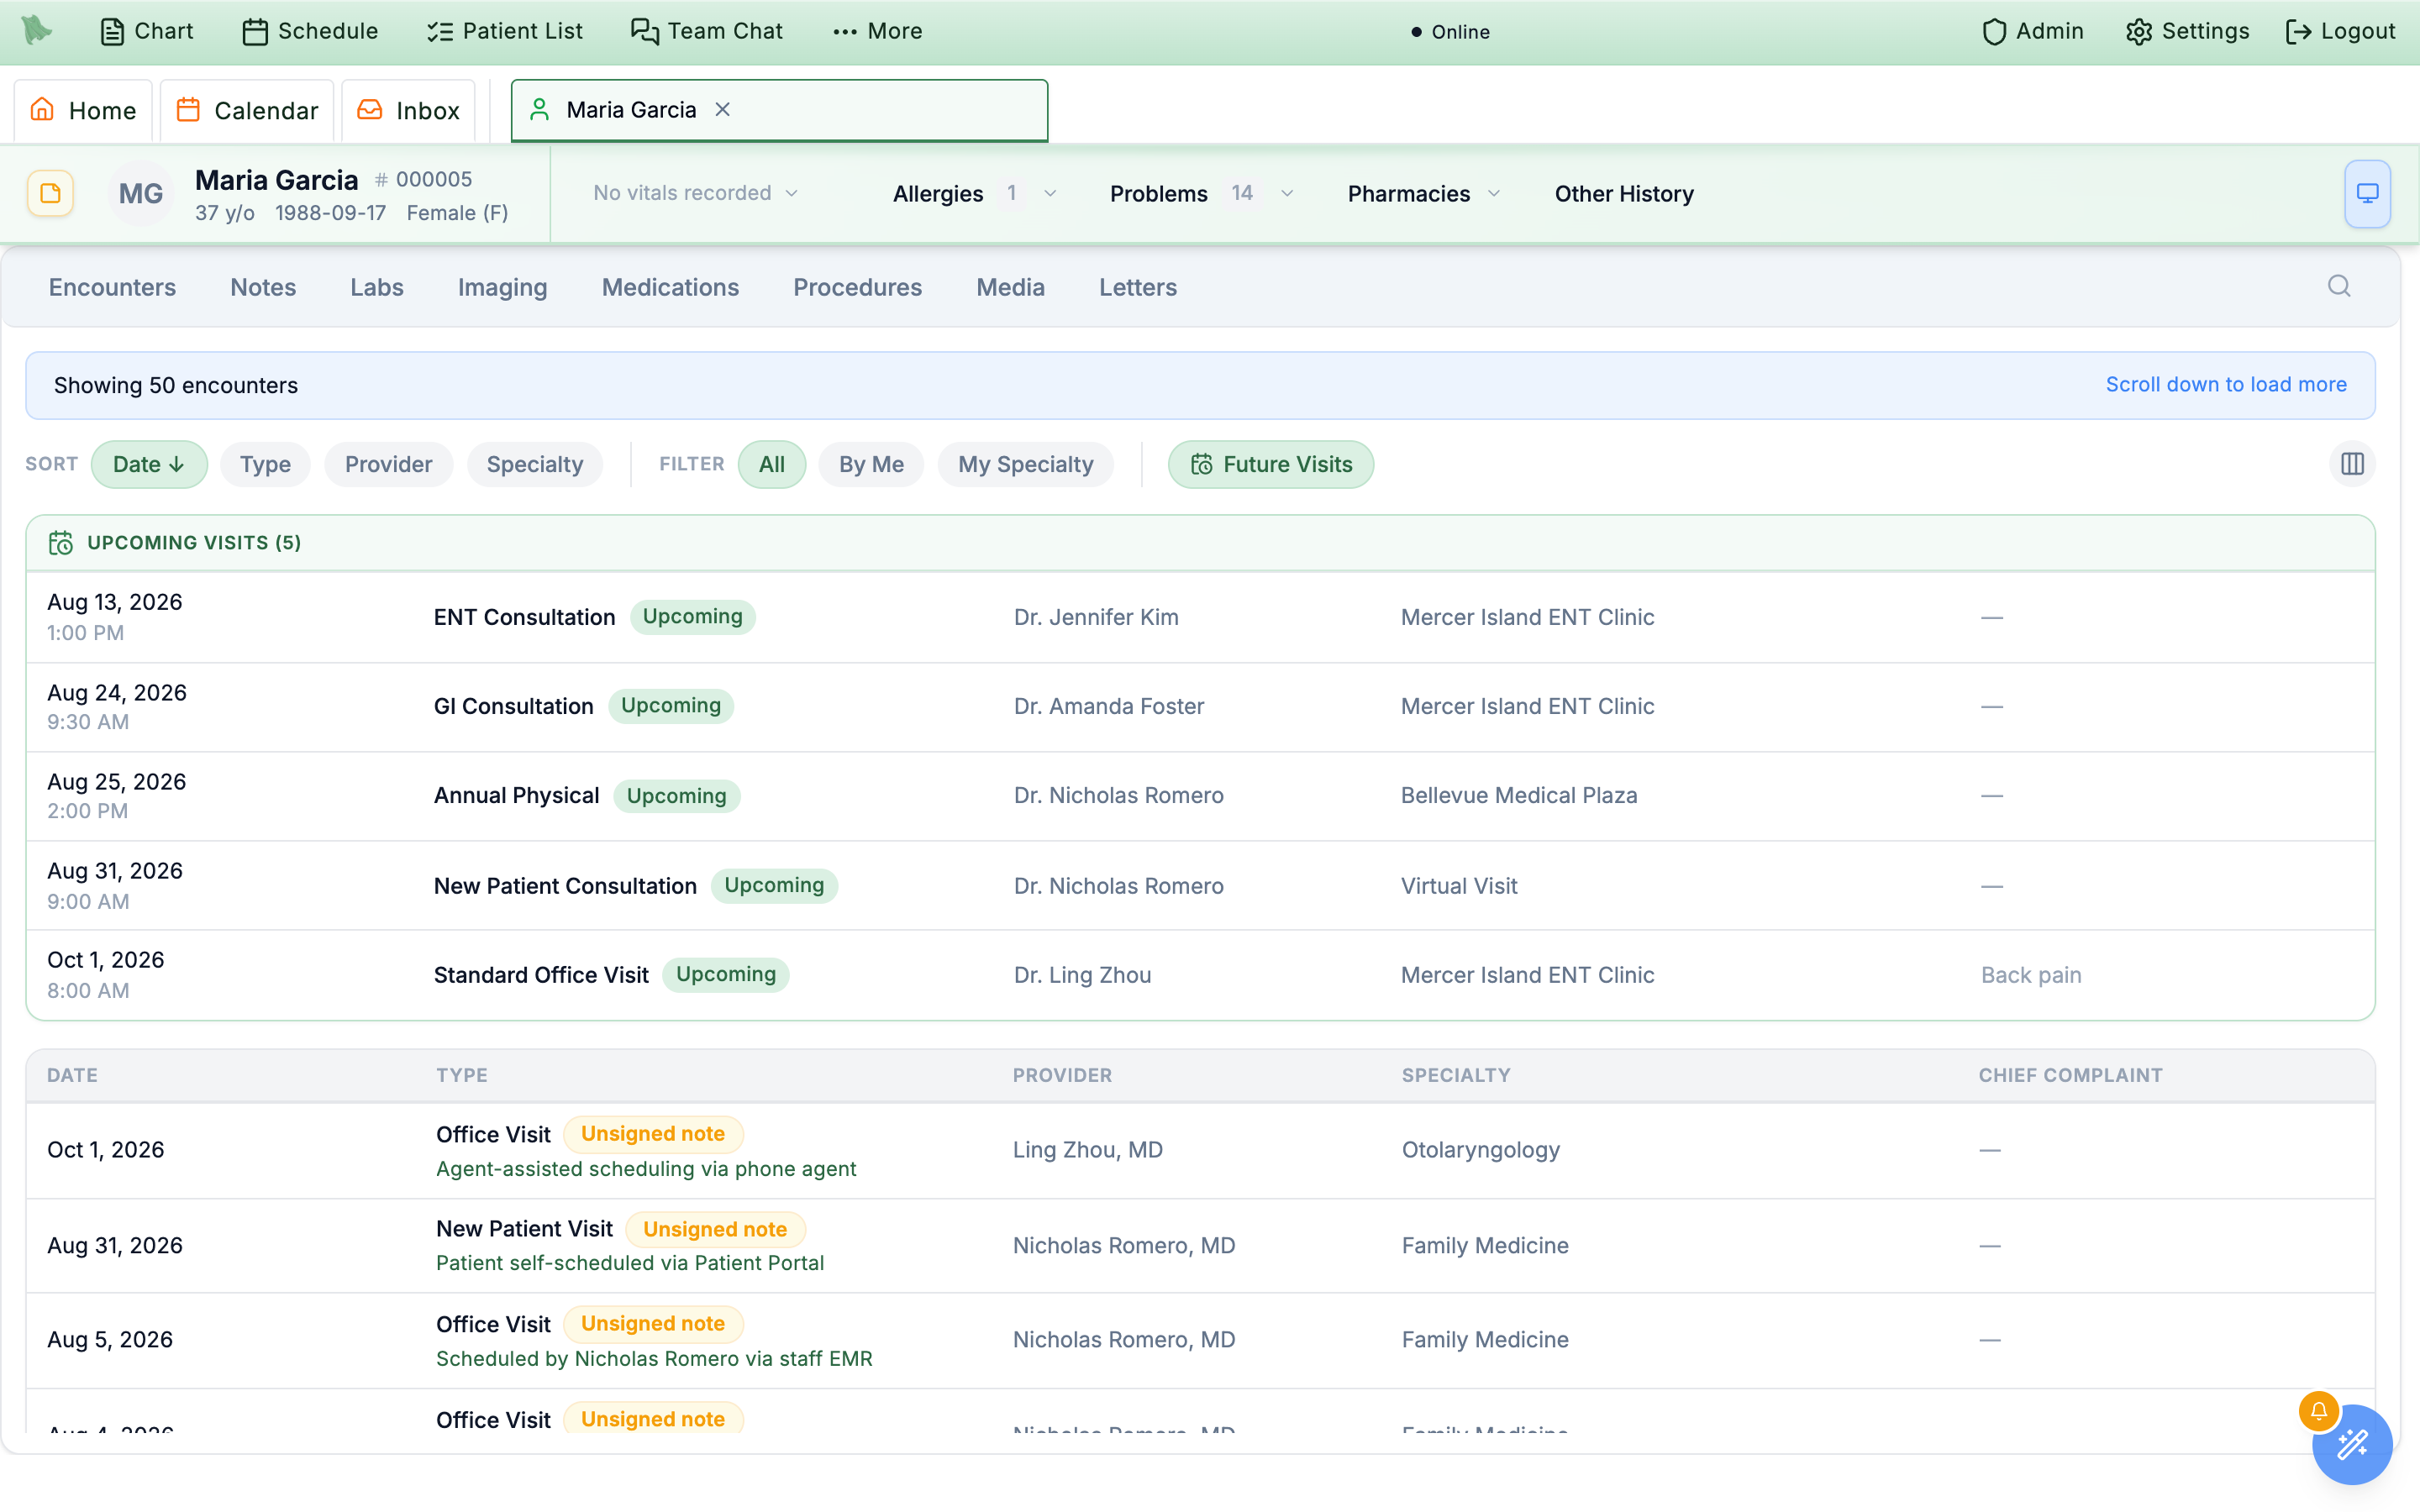
Encounters tab with upcoming visits above the history.The patient header: identity, vitals & safety at a glance
The header strip stays in view no matter which tab you’re on. It packs the patient’s identity, latest vitals, allergies, problems, and preferred pharmacies into one bar — each block is clickable and drops down its detail.
Identity
Avatar initials, name, MRN, age, DOB, and sex. Hover for a demographics summary tooltip; click to open Patient Information — for physicians and admins a full workspace page in its own Info: {patient} tab, and for staff without a patient-chart permission the same content as an overlay dialog. In the vertical layout the MRN is a badge — Click to copy MRN.
Vitals readout
The most recent Wt: and Ht: with a recency suffix such as “(today)” or “(3d ago)”, or No vitals recorded when empty. Clicking it opens the vitals action menu — see Vitals & trends.
Allergies
A live count; the dropdown sorts severe-first with Severe / Moderate / Mild / Unknown pills. Add New records one, and clicking a listed allergy opens it for editing.
Problems
A live count; the dropdown has All / Active / Inactive / Resolved filter chips, sorts active problems first, and badges the rest. Add New adds to the list.
Pharmacies
Drops down the Preferred Pharmacies list. The gear opens Manage and Select Pharmacies — set a primary, remove entries, or search under Add New Pharmacy. See Pharmacies for the full workflow.
Other History
Opens past surgical, social, and family history in one dialog. The button is there for physicians and admins; staff need the patient-history permission (patient_history.manage) to see it at all.
Sticky note
Physicians (not staff) get a yellow Sticky Note button that opens a draggable per-patient note. It autosaves and reopens automatically whenever it has content.
Save Changes in the manage dialog — closing it discards your changes. Removing the primary pharmacy silently promotes the first remaining one to primary.
APCM: Eligible or APCM: Enrolled) that can document verbal enrollment consent — see the APCM program.
Maintain the problem list & allergies
Problems and allergies are managed straight from their header dropdowns, and both follow the same add–edit–delete pattern. Keeping them current matters beyond the chart: the allergy list feeds the medication safety checks (see Safety checks).
-
Open the dialog.
Click
Problems→Add New, or press Ctrl+Shift+P anywhere in the chart; for allergies it’sAllergies→Add Newor Ctrl+Shift+A. To edit, just click an existing entry in the dropdown. -
Name the entry.
A problem requires an
ICD-10 Code: type intoSearch ICD-10 codes…and press Enter (or the magnifier) to open the code search; the official description appears beneath the field once chosen. An allergy requires anAllergen NameviaSearch allergens…— pick a database match or keep your free-text entry. -
Fill in the detail and save.
Save with
Add ProblemorAdd Allergy. When editing, the button readsUpdate Problem/Update Allergyand the code or allergen is read-only — only the details below can change. -
Delete with confirmation.
Open the entry and click
Delete; an inlineConfirm delete?prompt with Yes / No appears before anything is removed.
Problem details
Notes— free text, up to 5,000 characters.Severity (1-10)— annotated (Mild) 1–3, (Moderate) 4–7, (Severe) 8–10.Status—Active,Resolved, orInactive.Chronic Conditioncheckbox.
Allergy details
Severity— Mild / Moderate / Severe / Unknown (defaults to Moderate); severe allergies sort to the top in red.Reaction Type— Rash, Hives, Itching, Swelling, Respiratory, Anaphylaxis, GI Upset, Nausea, Vomiting, Diarrhea, Headache, or Other.Reaction Description— locked by design unless the type is Other, where it becomes required.Notes— up to 5,000 characters.
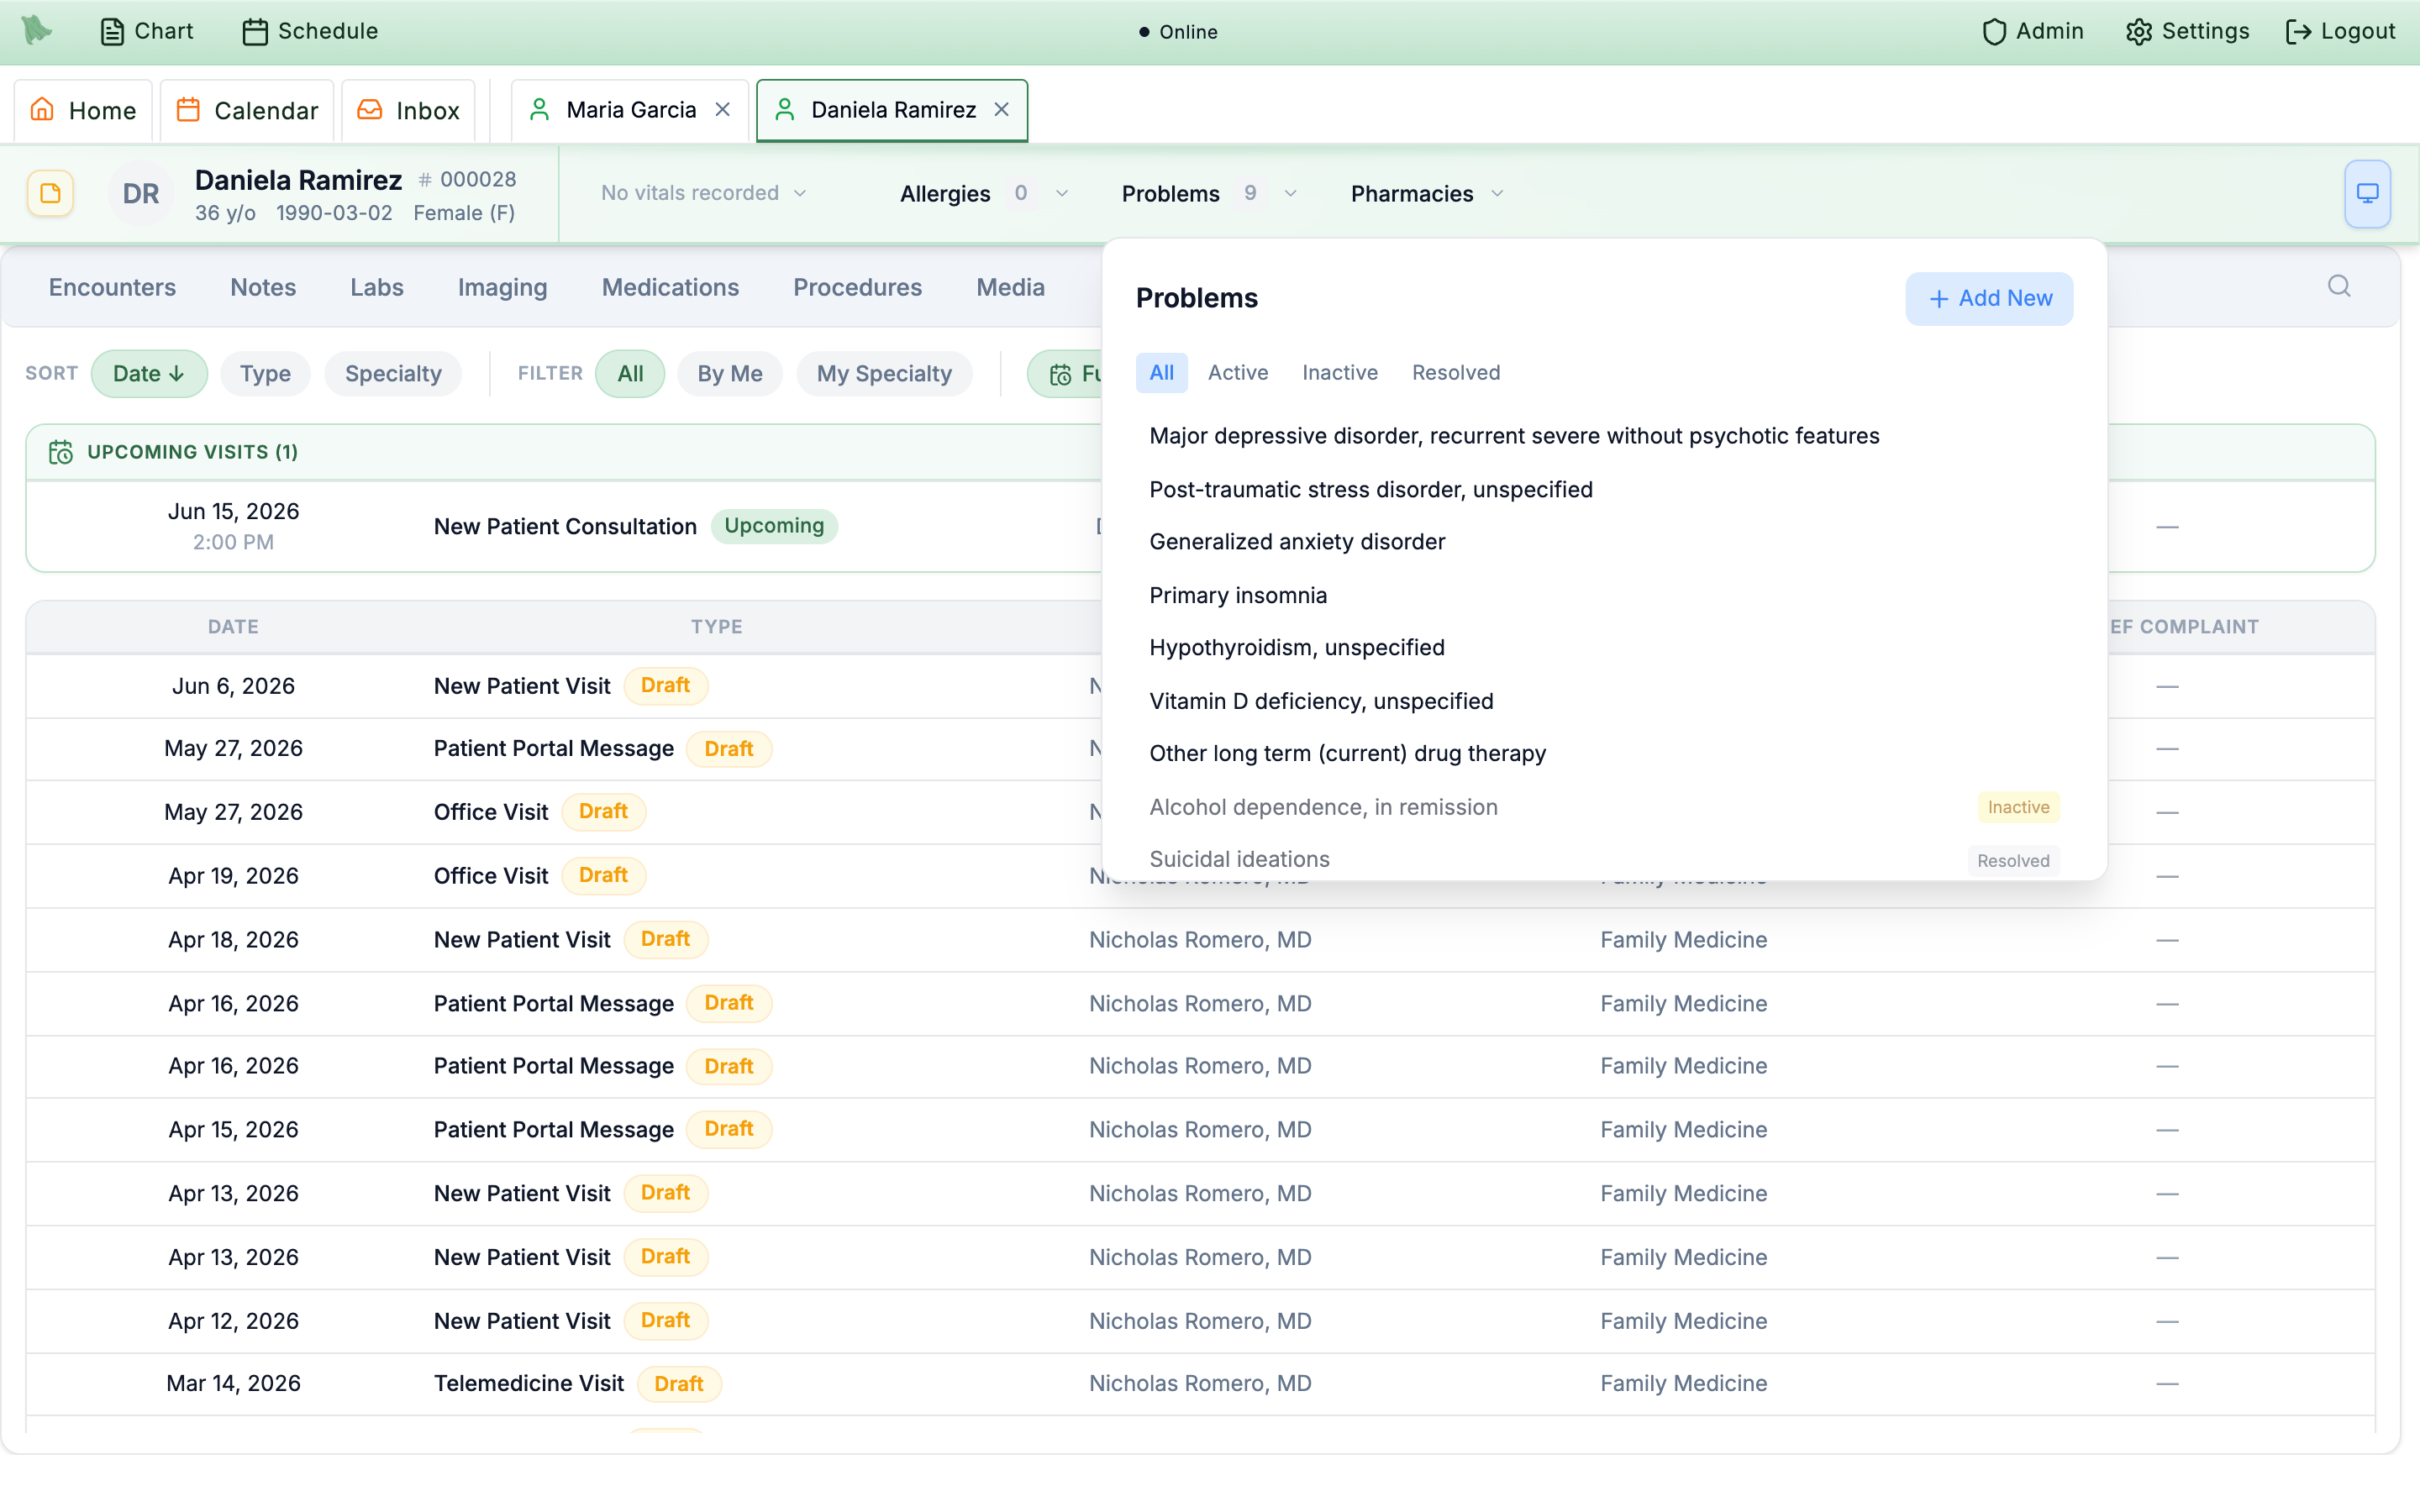
Problems dropdown: filter chips, color-coded status dots with Inactive / Resolved badges, and + Add New.No Known Allergies indicator instead, so you can tell “reviewed, none” apart from “never asked.”
View & edit demographics, insurance, and patient billing
Click the patient’s name or avatar in the header strip and Hero EMR opens Patient Information — one screen for everything administrative about this patient. For physicians and admins it is a full workspace page in its own tab titled Info: {patient}; staff without a patient-chart permission get the same content as an overlay dialog. Its header repeats the identity with chips for MRN, DOB, Age, and Sex, and it opens on Demographics.
Ten tabs sit in a grouped sidebar: Demographics under Patient; Appointments, Forms & Letters, Prescriptions, Prior Auth, and Questionnaires under Care workflow; Custom Billing Rules, Insurance, and Invoices & Charges under Financial; and Outbound Comms under Administration. The financial and administrative tabs are permission-gated, so a plain physician account works with seven of the ten.
The whole screen has its own chapter: the Patient Information overview for who sees which tab and the ?section= deep links, Demographics for the edit form and its validation, and Insurance & eligibility for policies, the free eligibility check and the paid COB check, and the cash-pay bypass.
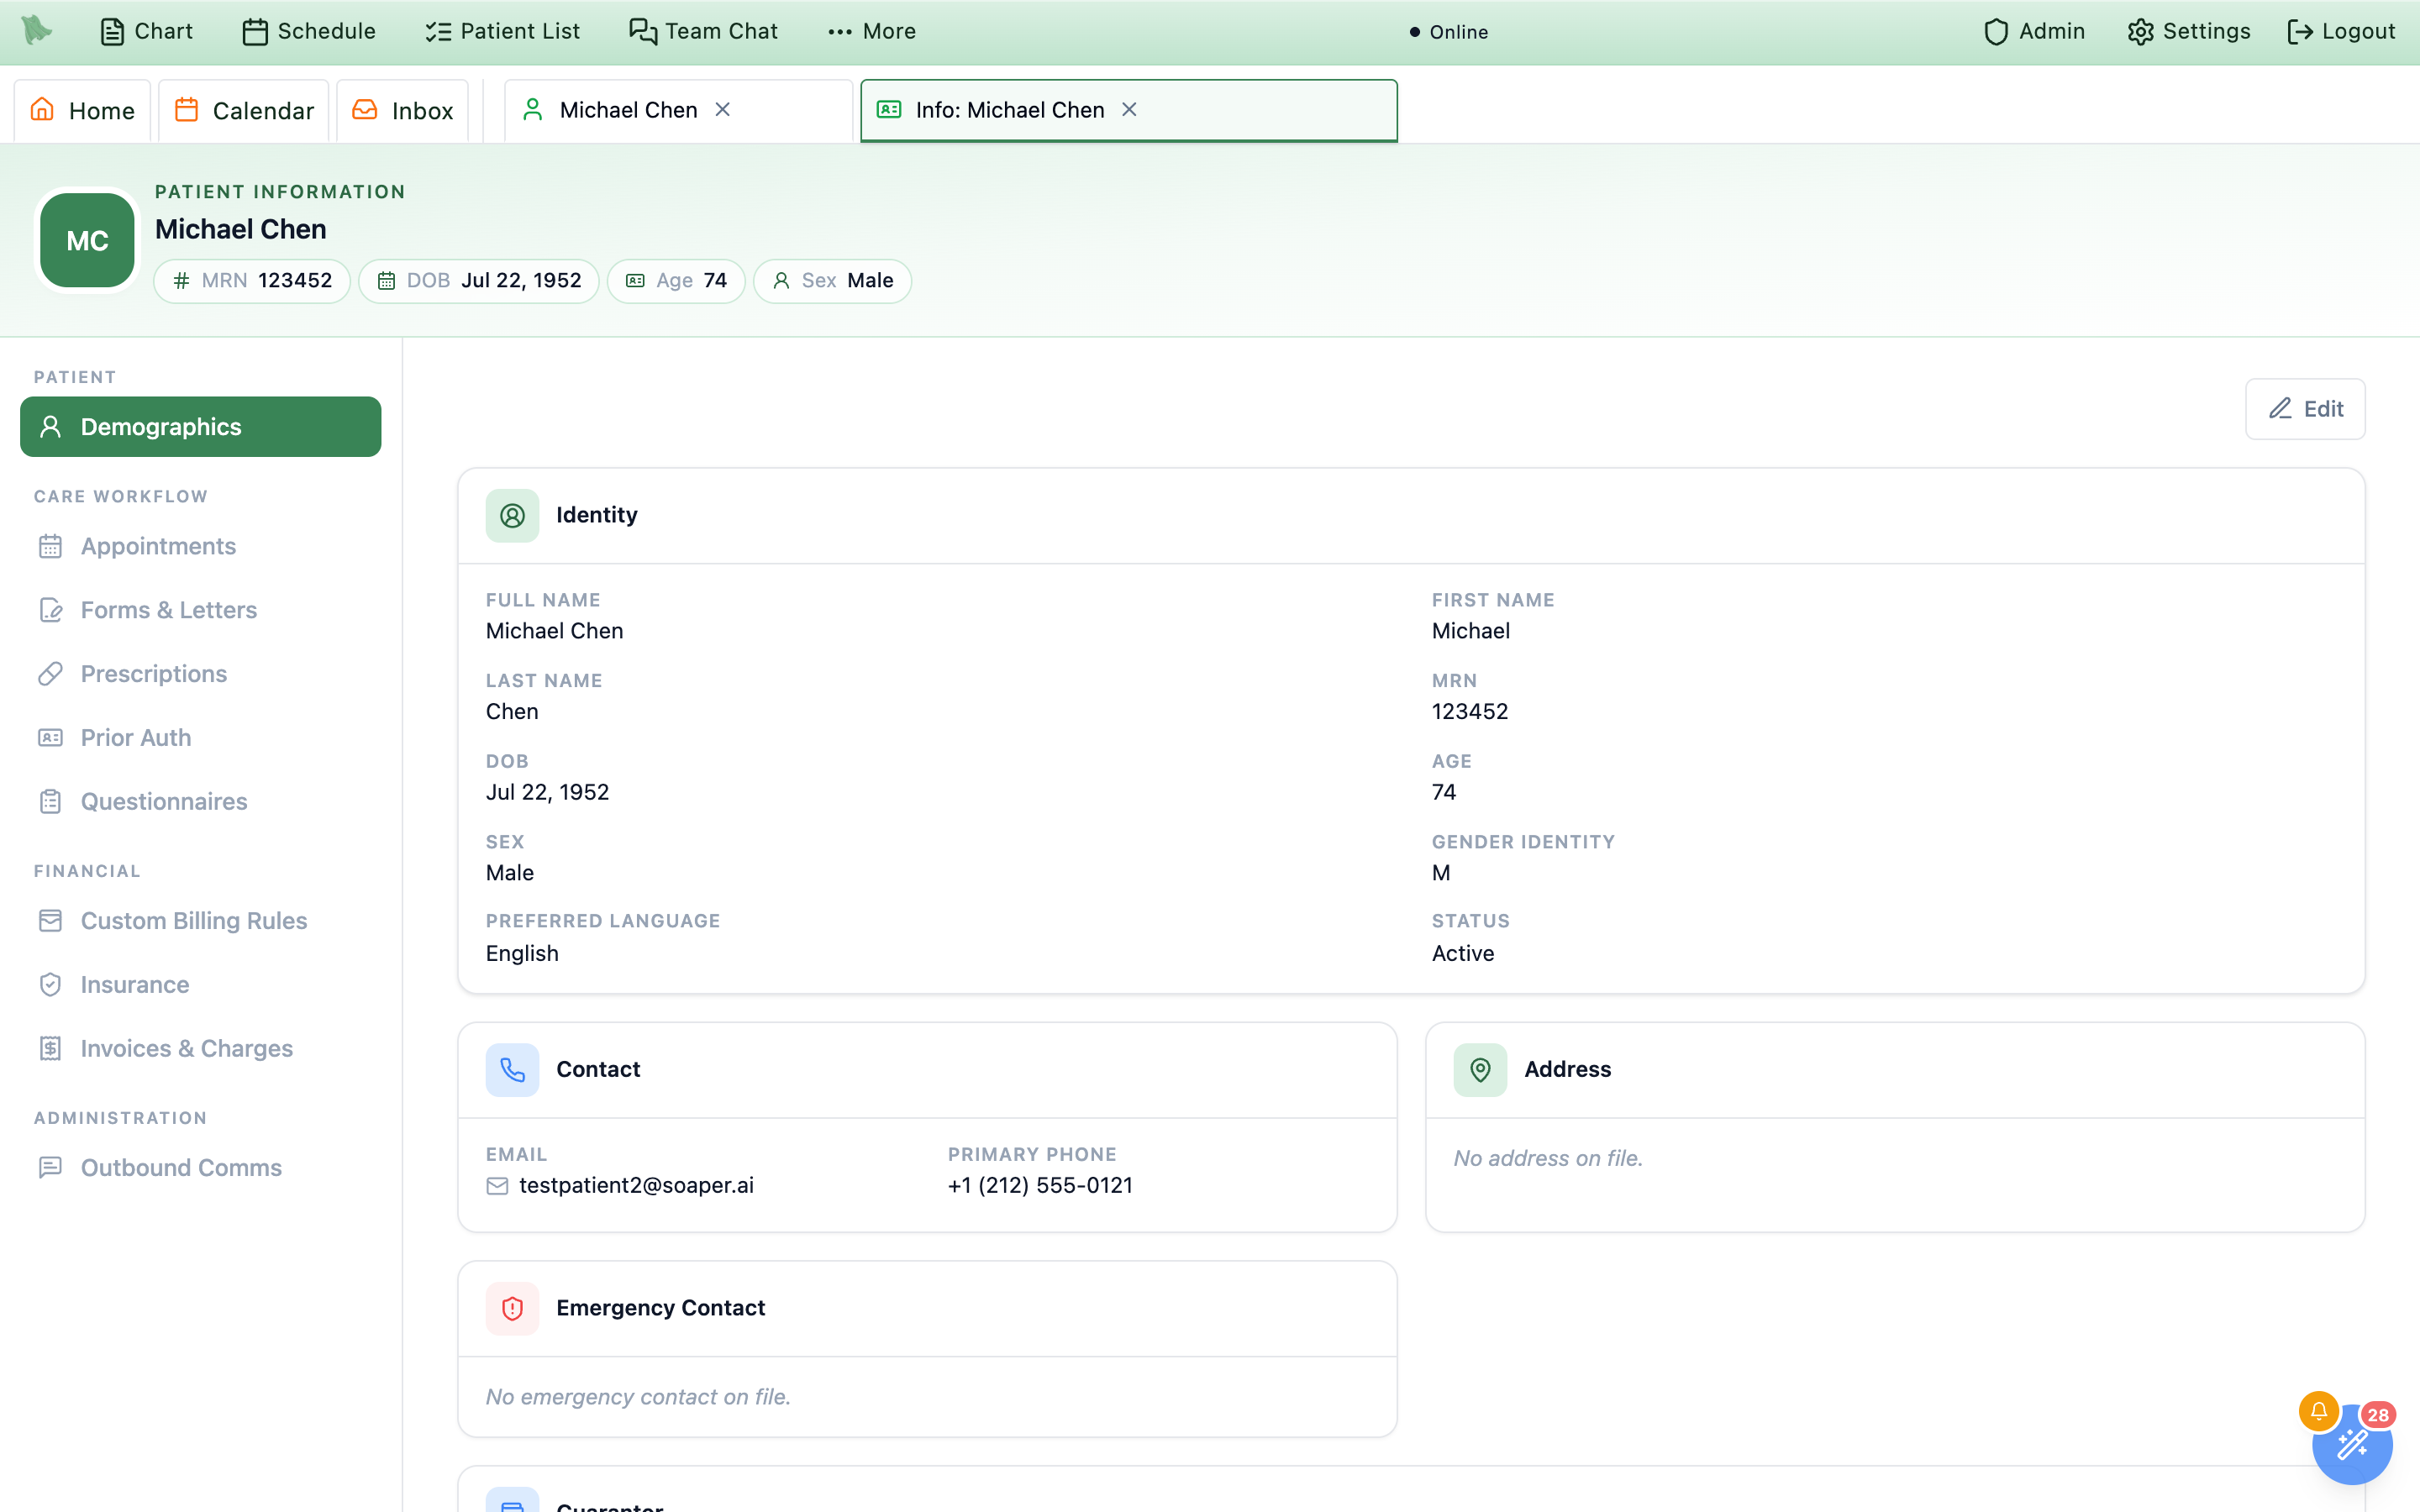
Demographics read cards.Review past encounters, notes & upcoming visits
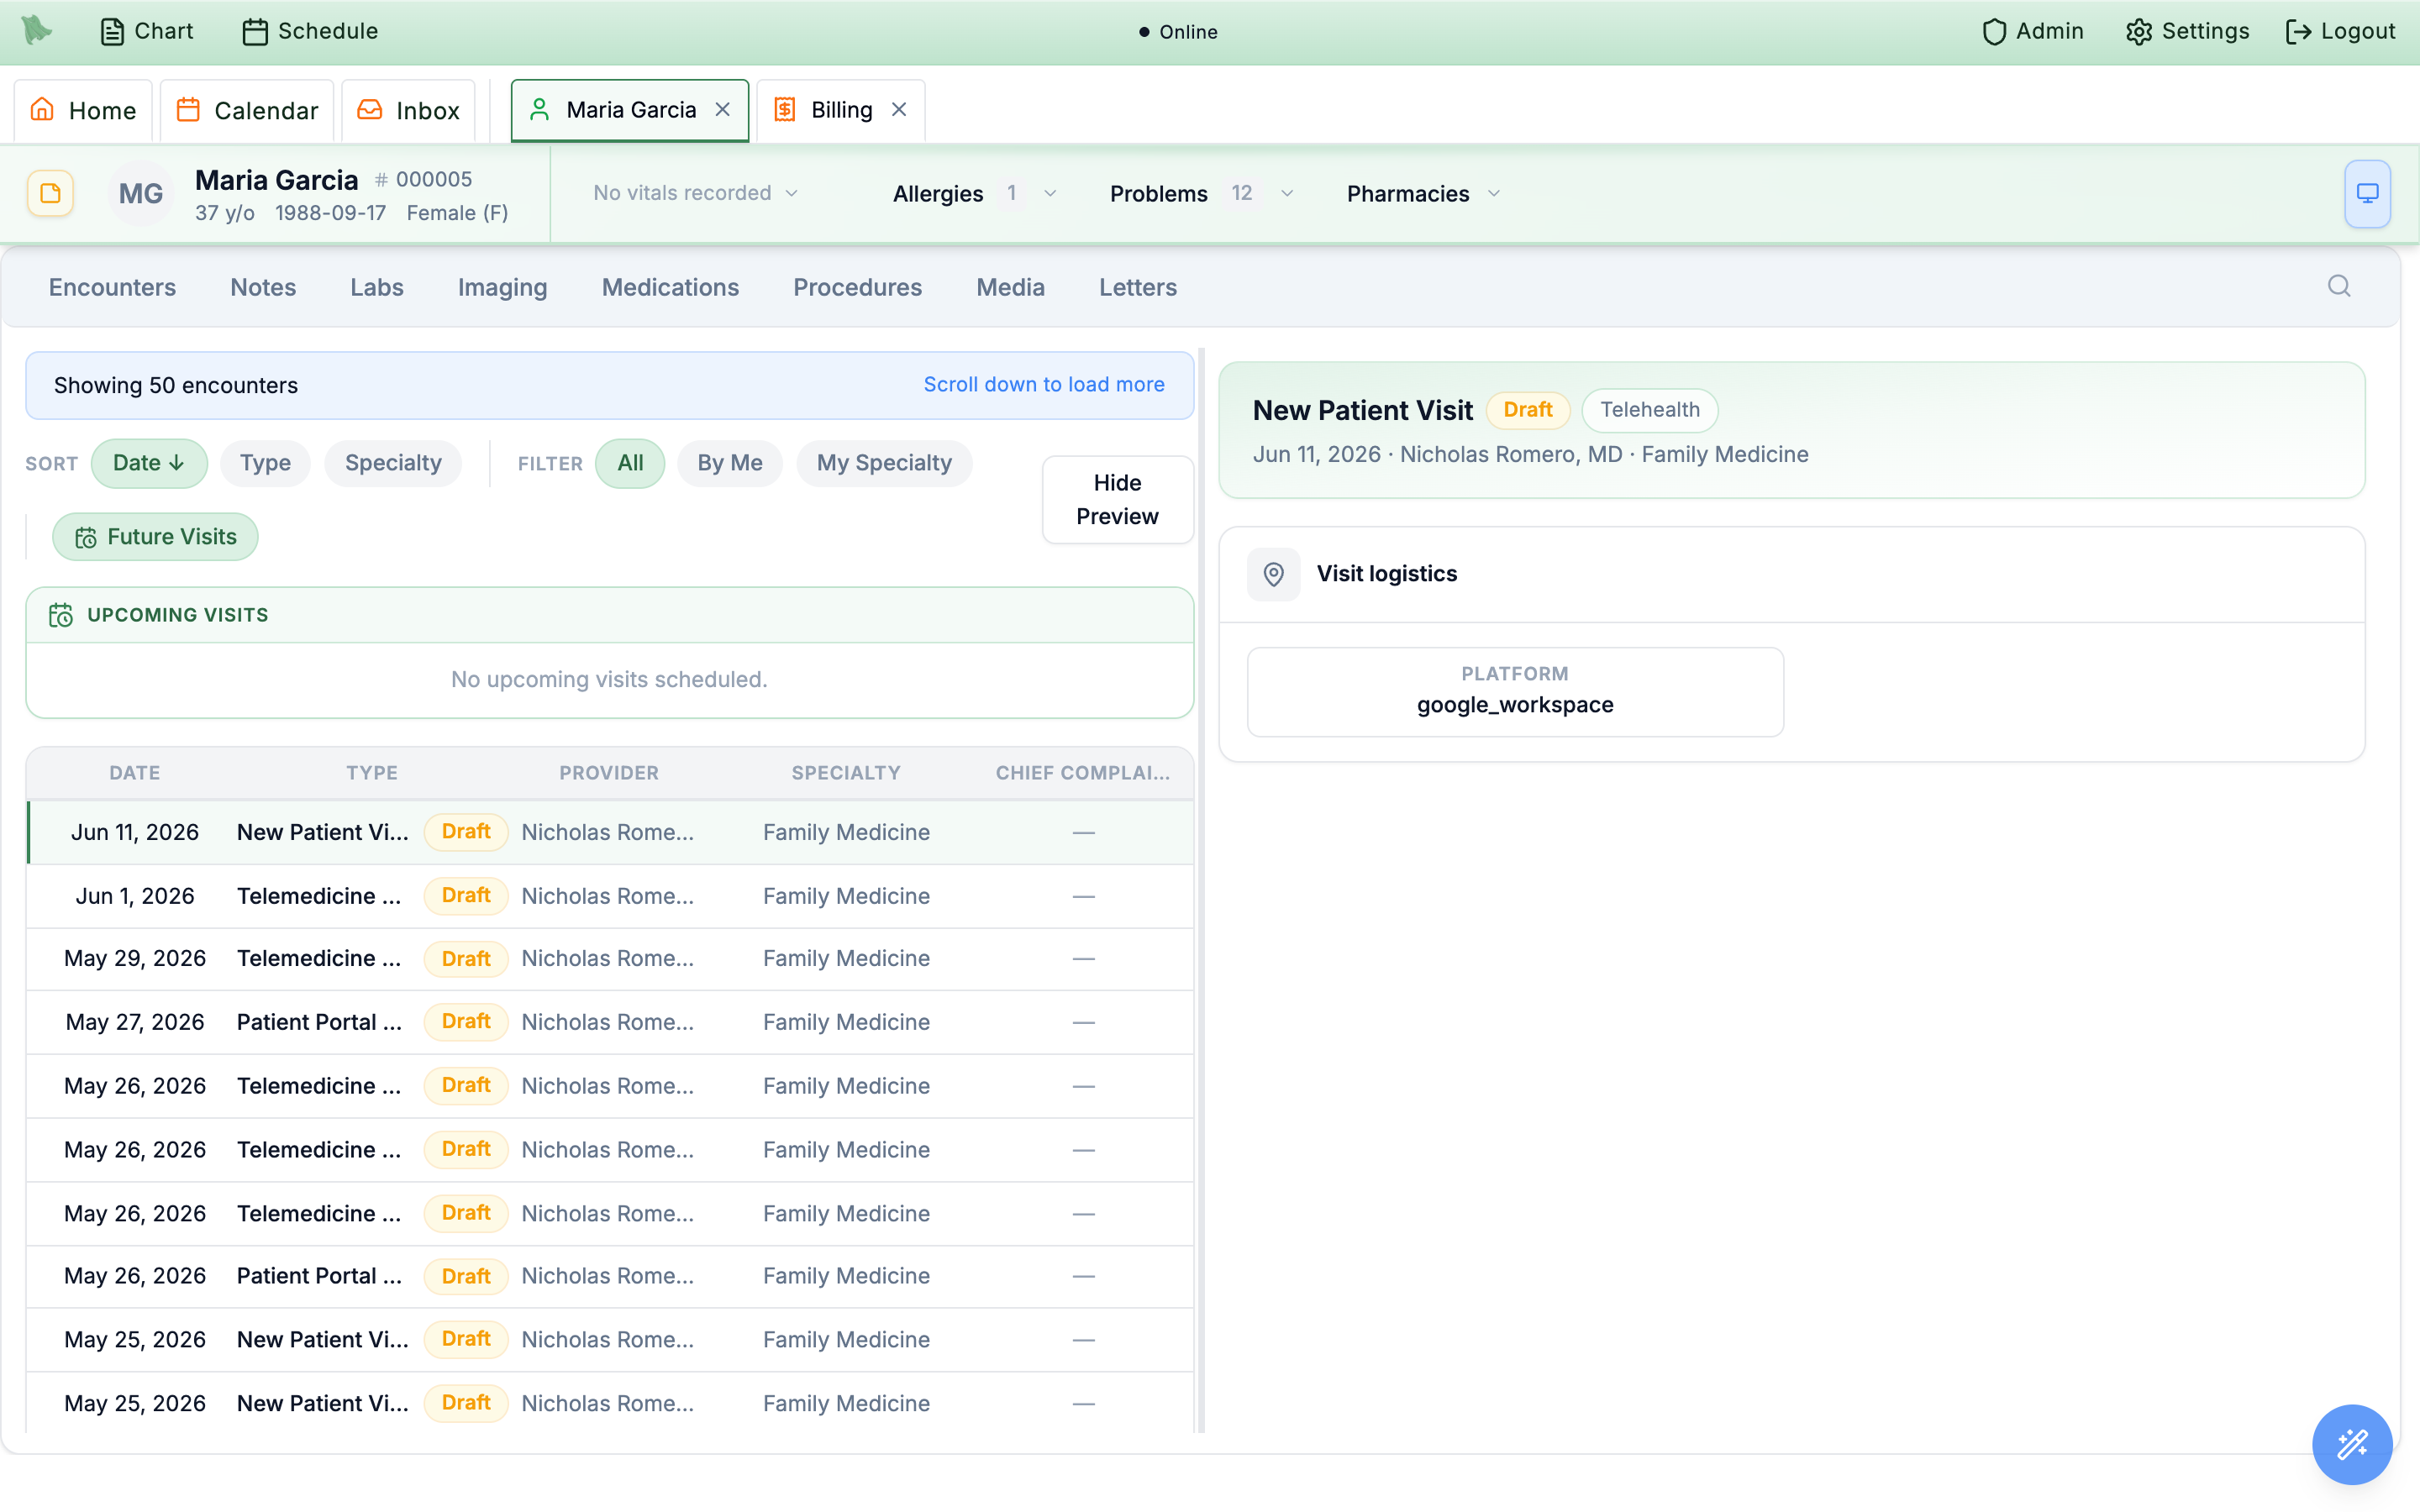
The Encounters tab — the chart’s default — is the visit history: every encounter in a sortable table, a side-by-side preview, and an optional panel of upcoming visits. The Notes tab is the note-centric view of the same record.
-
Scan the history.
Columns are Date, Type, Provider, Specialty, and Chief Complaint, and dates render in your organization’s time zone. Badges sit next to the type and tell you the state of each visit at a glance:
Unsigned notewhile a note is still a draft,Signedonce you’ve signed it, plusNo-show,Rescheduled, orCancelledwhere the appointment didn’t happen, andPortal restrictedon a visit whose note you’ve kept out of the patient portal. Switch on the optionalStatuscolumn and those badges move there rather than doubling up. Long histories load 50 encounters at a time as you scroll, with a Showing N encounters banner andAll encounters loadedmarking the end of the record. -
Sort and filter.
The
Sortchips (Date/Type/Provider/Specialty) toggle ascending and descending. The chips follow your columns: every sortable column you have switched on gets a chip, so adding or hiding columns changes what you can sort by. TheFilterchips narrow toAll,By Me, orMy Specialty. The last two are grayed out for staff accounts without a physician record — that’s expected. -
Choose your columns.
The
Customize columnsbutton — the small columns icon at the right-hand end of theSort/Filterrow — opens a column manager. Beyond the five that show by default you can addSummary,Status,Visit Reason,Last Updated, andSigned, plusBilling,Claim, andBalance— those last three are money columns and are simply absent for users who can’t see financial amounts. Your choice is saved to your own account, so the table looks the same on every chart you open. -
Preview a visit.
Single-click a row to open a split-pane preview — note content, orders, and charges — and collapse it with
Hide Preview/Show Preview. Double-click to open the same preview as a near-full-screen dialog instead. -
Open the visit itself.
A thin action strip sits above the split-pane preview:
Encounteron the left, and on the right anOpen encounterbutton that takes you into the note writer for that visit — to keep writing a draft, or to add an addendum to one you’ve already signed. On a row from theUpcoming visitspanel the same button readsBegin encounterand starts the visit instead. The strip belongs to the split-pane preview only, so if you double-clicked into the full-screen window you’ll need to close it and single-click the row instead. Staff accounts see the strip only with an encounter permission on their profile. -
Watch upcoming visits.
The
Future Visitstoggle (on by default) shows anUpcoming visitspanel above the history with a count: each booked appointment’s date and time, visit type with anUpcomingbadge, provider, location orVirtual Visit, and any visit notes. Cancelled, completed, no-show, held, and already-started visits are filtered out automatically; with nothing booked it readsNo upcoming visits scheduled. -
Read notes on the
Notestab. The sortable note list opens any note in a preview pane beside it. Columns areDate,Note Type,Document,Specialty, andAuthor; a note that has been signed shows aSigned:date beneath its date, andDocumentshows a dash where the note came from a visit rather than an imported or uploaded document.Sort by:offersDate,Note Type,Specialty, andAuthor; theFilter by:pills areAll Notes,My Specialty, andBy Me.Customize columnschooses the columns,Hide Preview/Show Previewcollapses the reading pane, andAll notes loadedmarks the end of the list. -
To change a signed note, open its visit.
Signed notes are never edited in place, and the
Notestab has no editing controls at all — it is a reading surface. Go back to theEncounterstab, single-click the visit, and clickOpen encounterin the preview’s action strip (or double-click the appointment on the calendar). Hero EMR asks whether you want to create an addendum, copies the signed note as your starting point, and you sign the amended version when you’re done. Full walkthrough in Change a visit after you’ve signed it. -
Read earlier versions with
History. Once a note has been amended, the list shows the current version only — the addendum takes the original’s place rather than sitting beside it as a second row. Nothing is lost: select the note and clickHistory, the clock button in the preview toolbar besidePrint(tooltip: View version history). AVersion Historycolumn opens listing every version by date and time with its author. Click an entry to read that version in full. The version you’re reading is badgedCurrent; theActivebadge that every entry carries means something else — that the version’s full text is still stored and instantly readable, rather than moved to long-term storage (Archived) once it passes your practice’s retention window.
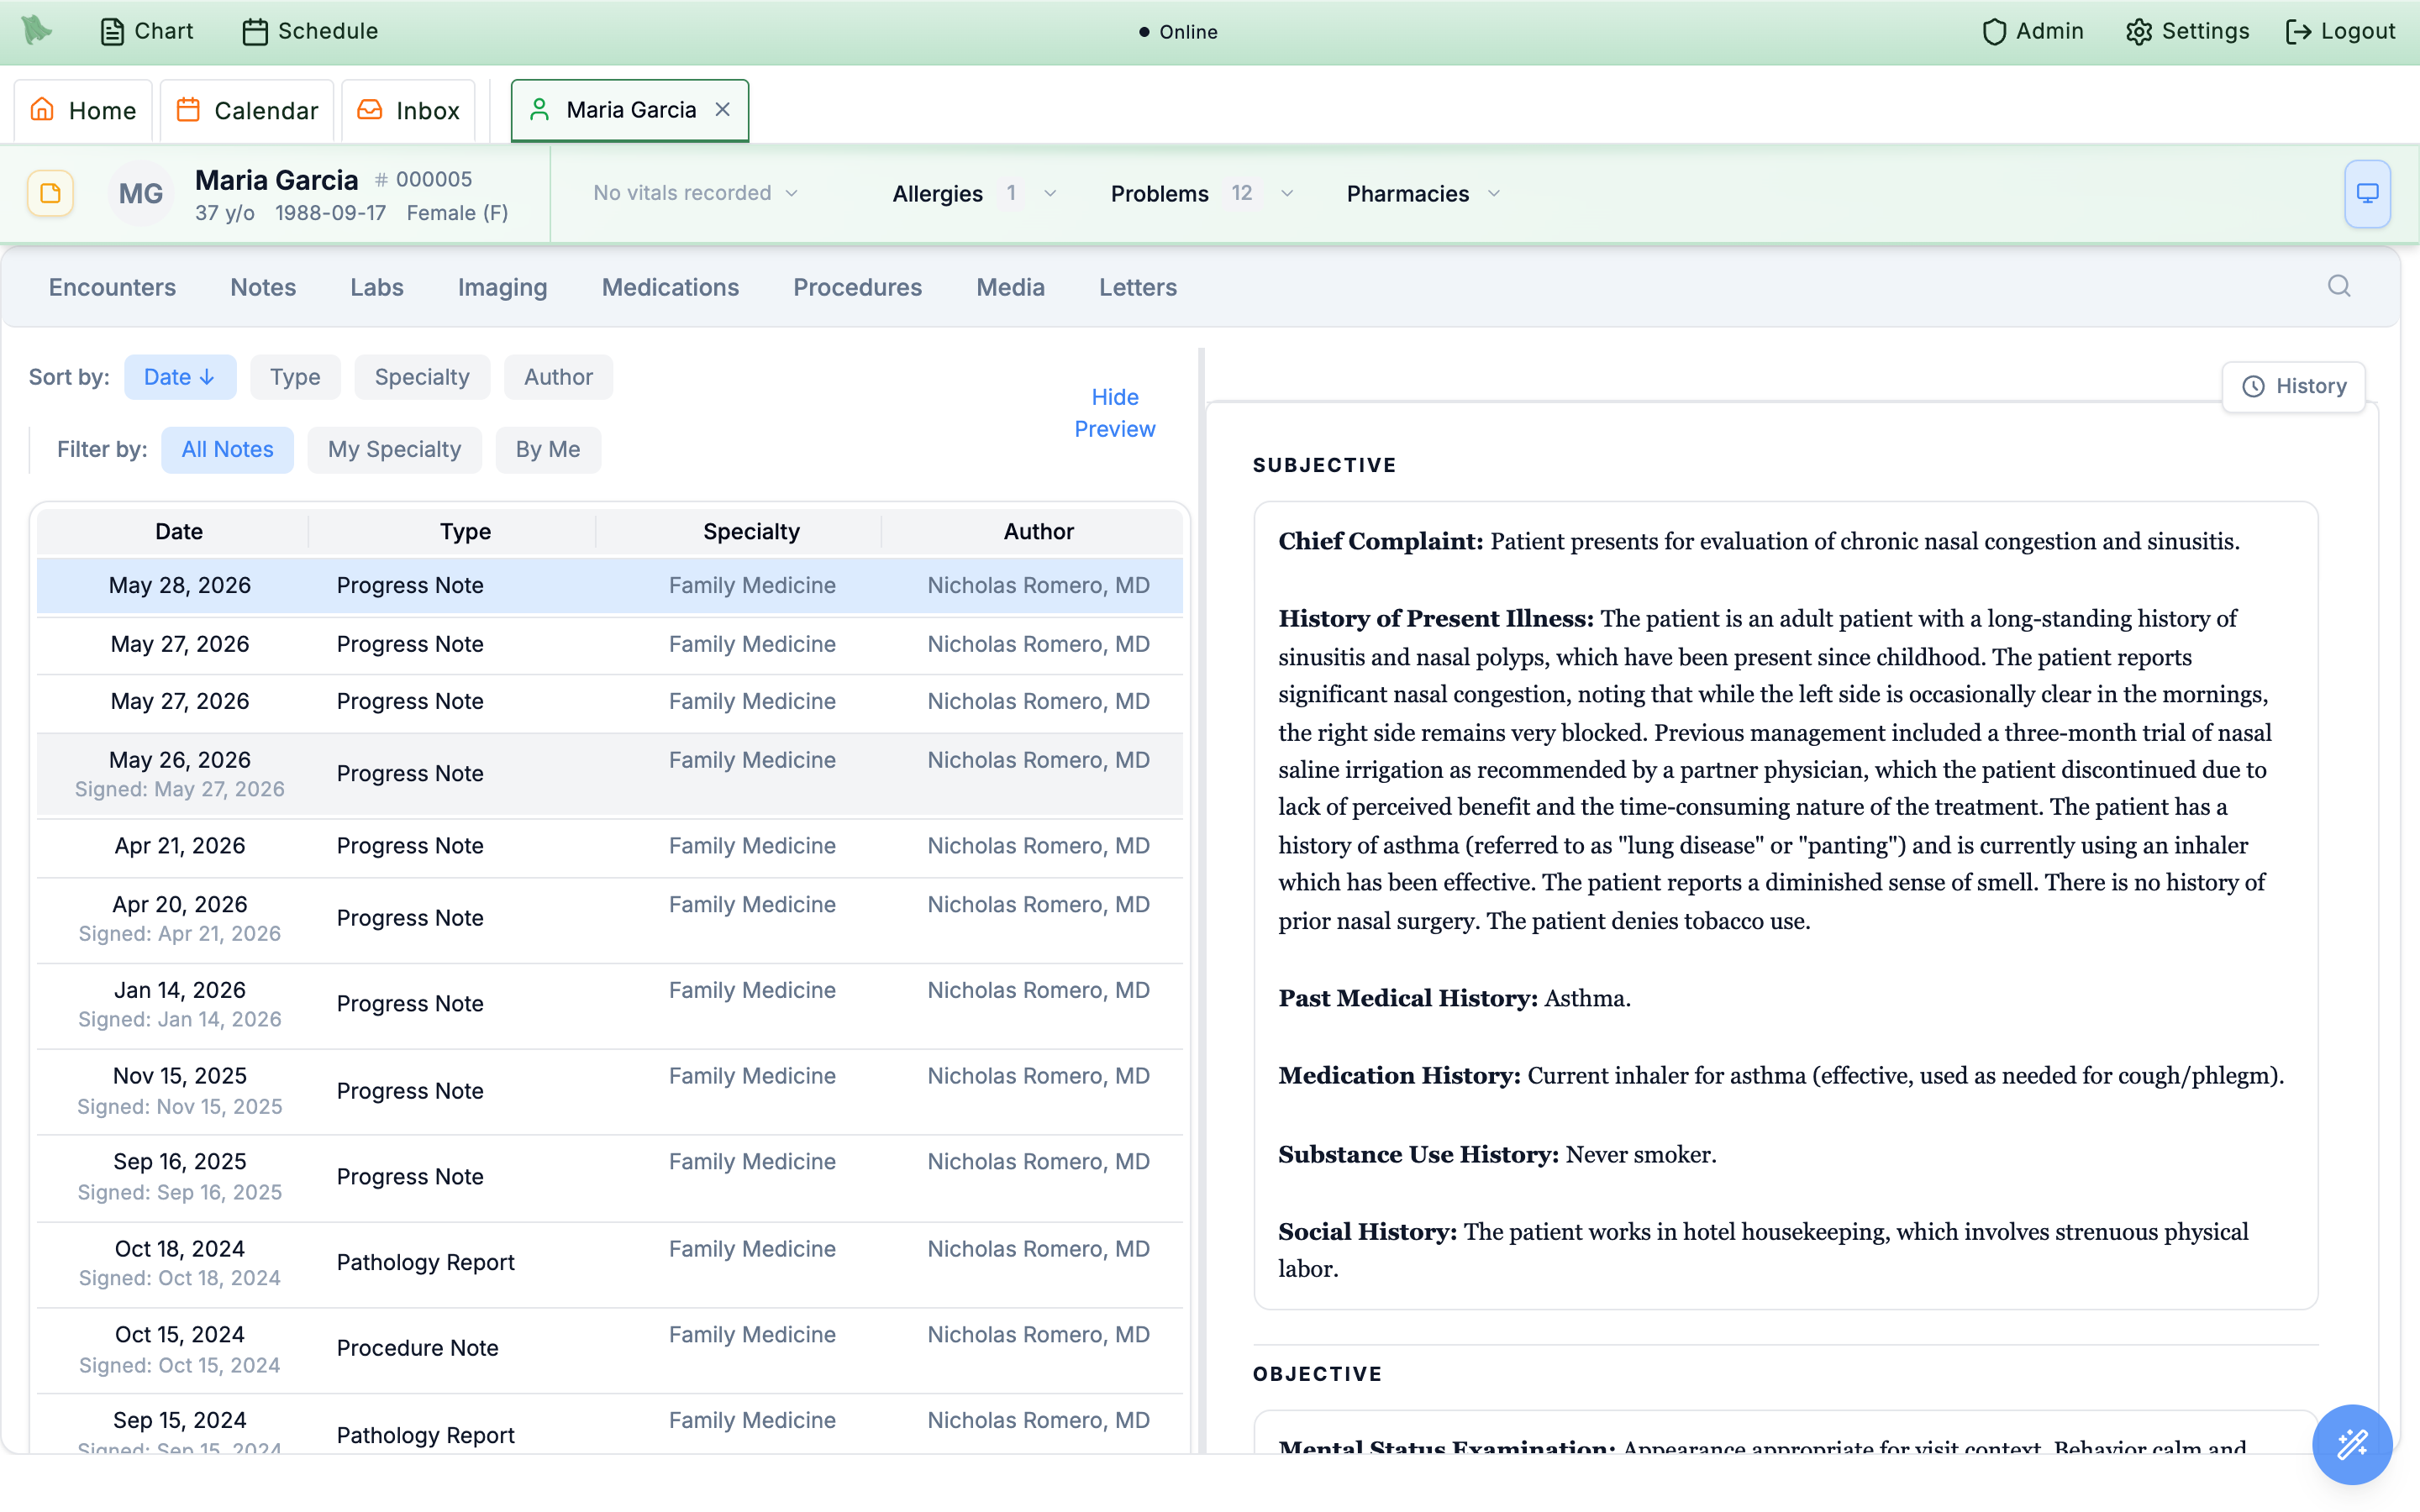
Notes tab: pick a note on the left, read it on the right.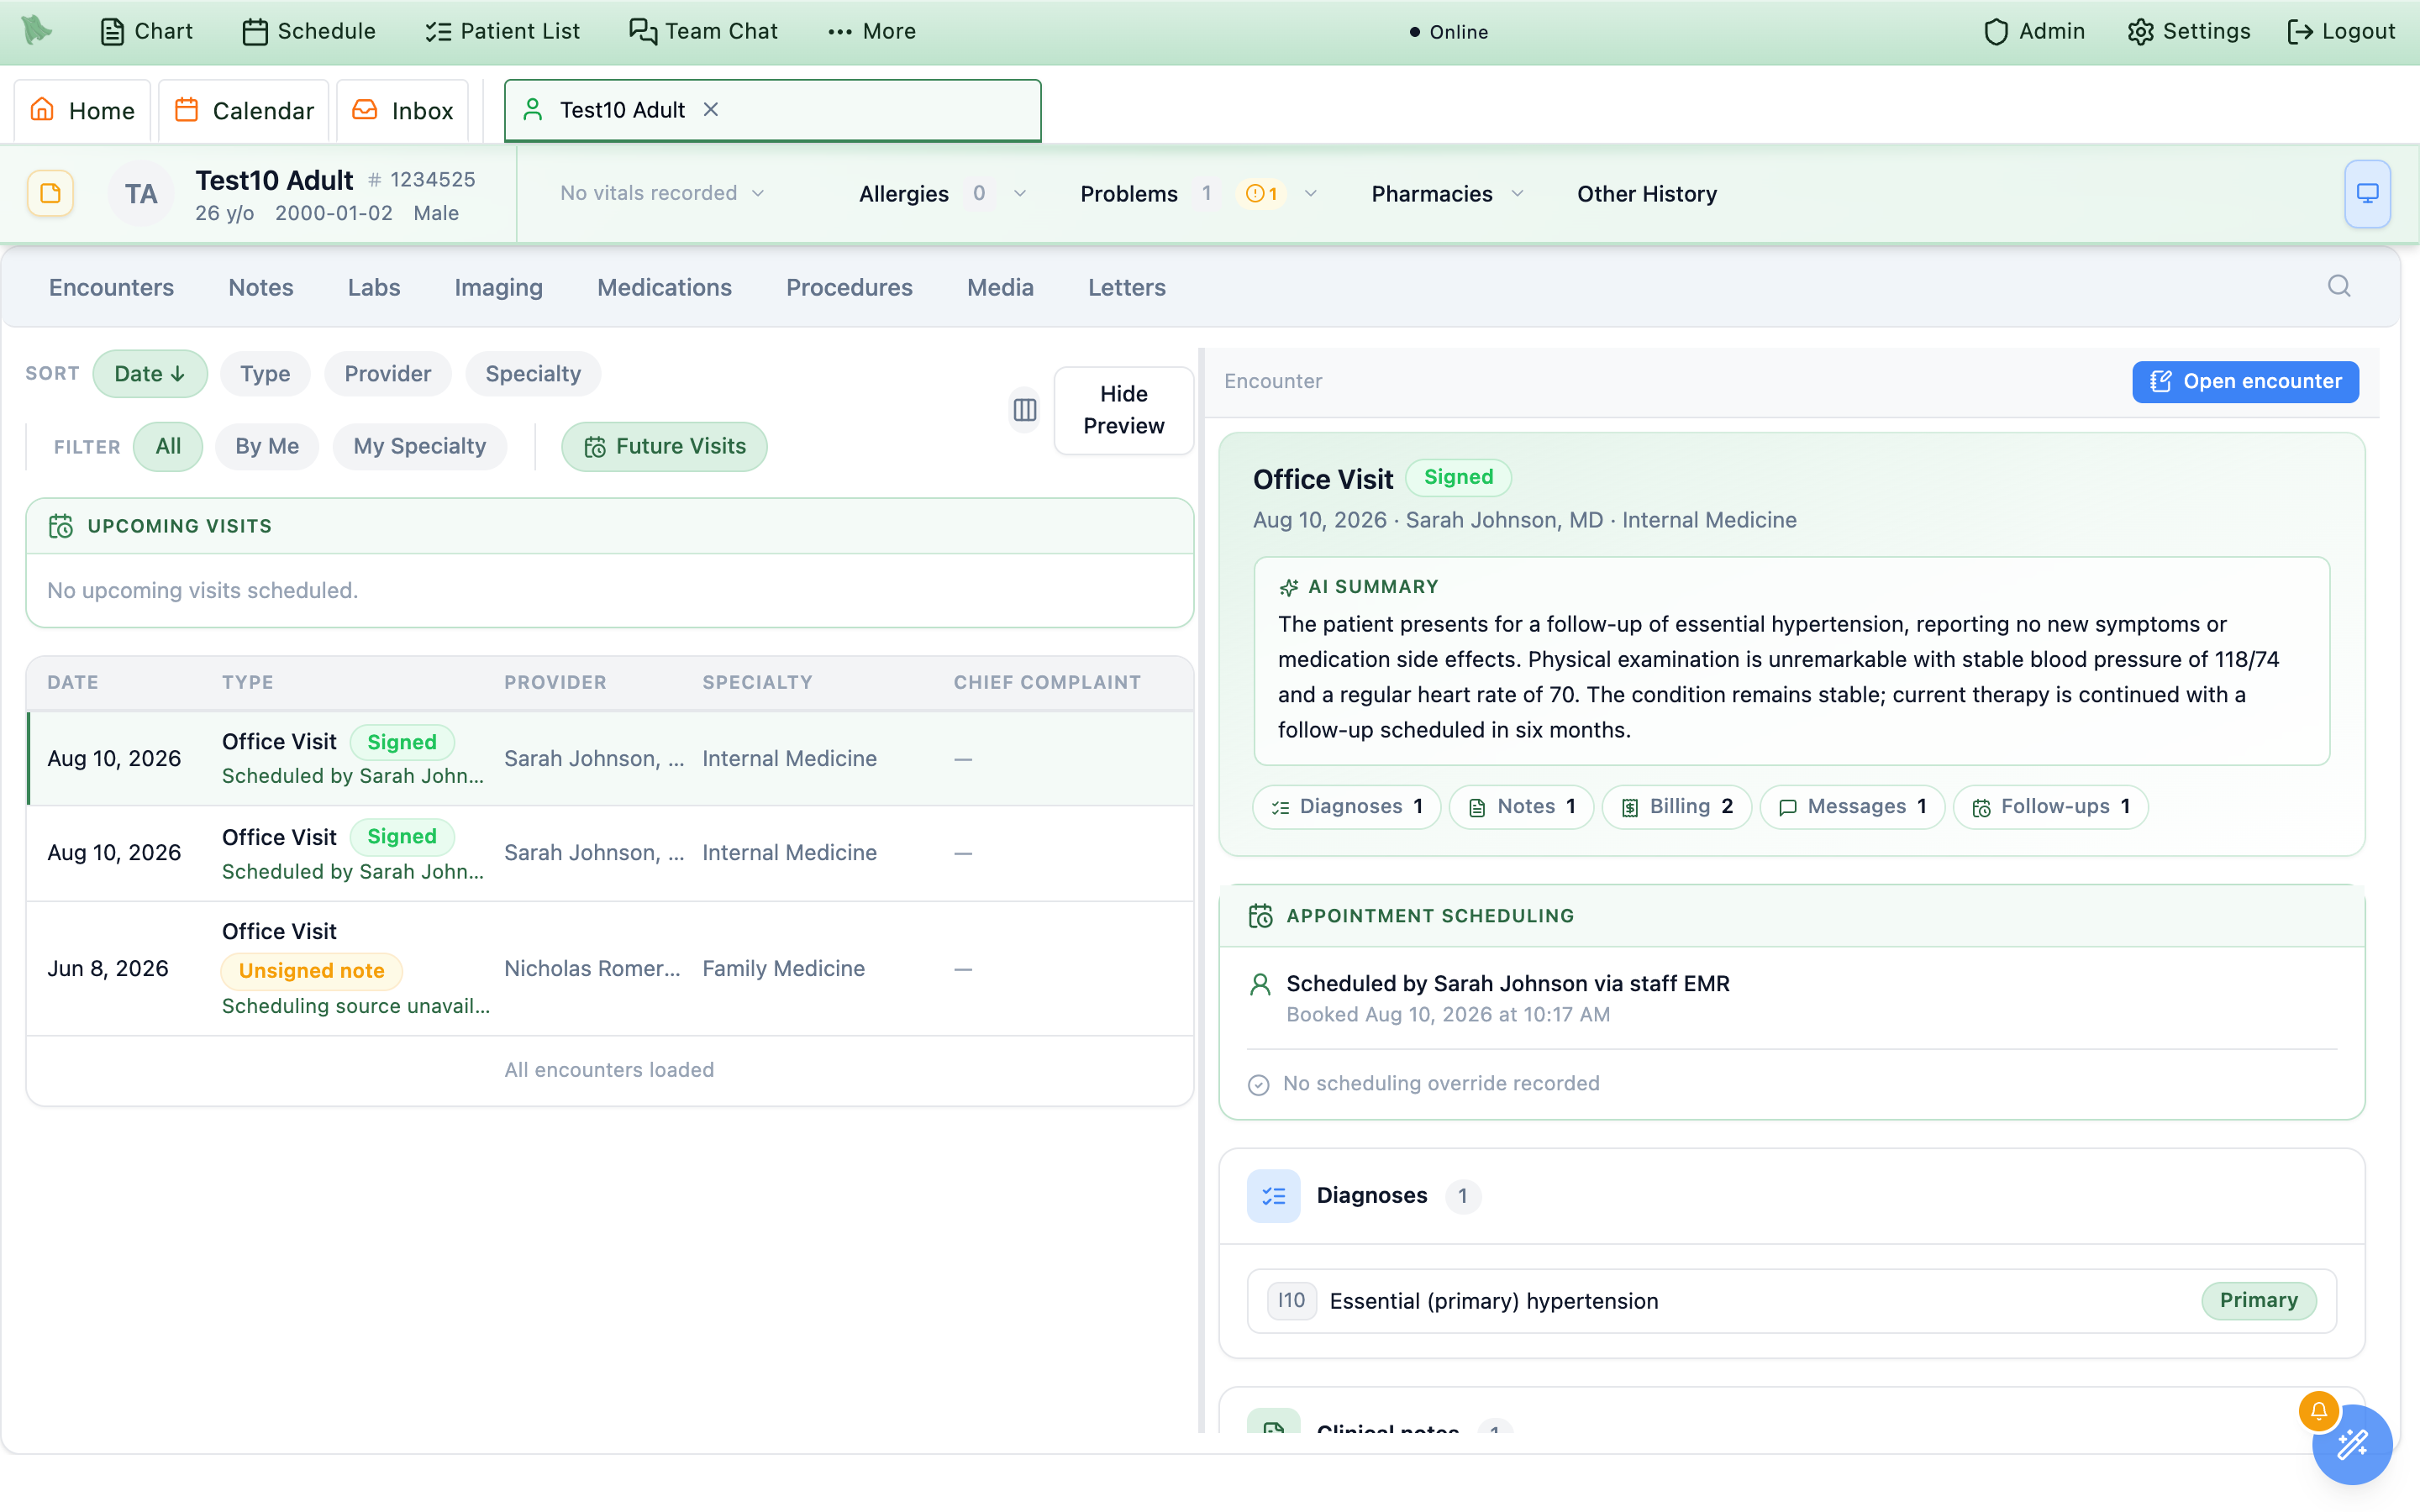
Open encounter takes you into the note writer for that visit.Virtual Visit run through telehealth.
Vitals: read the strip, record during a visit, review the trend
The header’s vitals readout shows the most recent Wt: and Ht: with a recency suffix — “(today)”, “(yesterday)”, “(3d ago)”, or a date — or No vitals recorded when there’s nothing yet. Clicking it opens a small action menu for everything vitals-related.
-
Open the action menu.
Click the
Wt:/Ht:readout. The three standing actions areOpen height and weight trends,Pull latest vitals into note, andAdd encounter vitals. Obstetric practices get a fourth,OB, during a visit — it opens prenatal observations for the encounter, or offersStart pregnancy episode…when there isn’t one yet. -
Review the trend.
Open height and weight trendsopens theGrowth & vitals trendsmodal. Three tiles across the top give youLatest weight,Latest height, andMost recentat a glance; below them,WeightandHeighttabs chart every recorded value point by point, each with aDate/Value/Sourcetable under the chart. Children get a third tab,Growth, plotting the measurements against CDC growth percentiles — it appears for patients under 20 and opens selected by default under 18. -
Record vitals during a visit.
Add encounter vitalsopens a dialog subtitled Save measurements for the patient on this encounter. It recordsMeasured at(required), Weight and Height with unit selectors,Head circumferencewith its own cm/in selector, Blood pressure (Systolic/Diastolic), Heart rate, Temperature with its unit, Oxygen saturation, Respiratory rate, Pain (0-10), and Notes. Finish withSave vitals. -
Stamp vitals into the note.
Pull latest vitals into noteinserts the most recent measurements into the encounter note you have open, so the documented vitals match the chart.
Pull latest vitals into note and Add encounter vitals stay disabled unless a draft encounter note for this patient is open — their tooltips read “Open an editable encounter note to pull vitals into the note.” and “Open an editable encounter to add encounter vitals.” Start the note first (see the encounter workspace); of the standing three actions, only the trends view is not tied to an open note, and the OB action needs an encounter too.
Need help? Email support@heroemr.com.